Use and Care
Page 6
... on for the entire time Sabbath Mode is in use . To change back. To Adjust Oven Temperature: 1. Press and hold TIMER SET/OFF for only part of the Sabbath. Press TIMER SET/OFF to toggle to Sabbath Mode and remain Sabbath compliant with the bake elements off for the entire time...
... on for the entire time Sabbath Mode is in use . To change back. To Adjust Oven Temperature: 1. Press and hold TIMER SET/OFF for only part of the Sabbath. Press TIMER SET/OFF to toggle to Sabbath Mode and remain Sabbath compliant with the bake elements off for the entire time...
Use and Care
Page 9
... soils should be displayed. To avoid damage, do not apply a cool damp cloth to avoid damaging. ■ affresh® Stainless Steel Cleaner Part Number W10355016 (not included): See cover for contact information. When replacing knobs, make sure all -purpose cleaner: Rinse with clean water and dry ...vinegar and tomato, should be displayed. To stop the self-cleaning cycle at www.amanacanada.ca. Press SELF CLEAN to set at www.amana.com. Do not clean in discoloring, loss of gloss, hairline cracks and popping sounds. The suggested first unless otherwise noted. When the...
... soils should be displayed. To avoid damage, do not apply a cool damp cloth to avoid damaging. ■ affresh® Stainless Steel Cleaner Part Number W10355016 (not included): See cover for contact information. When replacing knobs, make sure all -purpose cleaner: Rinse with clean water and dry ...vinegar and tomato, should be displayed. To stop the self-cleaning cycle at www.amanacanada.ca. Press SELF CLEAN to set at www.amana.com. Do not clean in discoloring, loss of gloss, hairline cracks and popping sounds. The suggested first unless otherwise noted. When the...
Use and Care
Page 11
... Grate and Drip Pan Cleaner Order Part Number 31617 2-Burner Cooktop Griddle Order Part Number 4396096RB Split Oven Rack Order Part Number 4396927 Porcelain Broiler Pan and Grid Order Part Number 4396923 Premium Broiler Pan and Roasting Rack Order Part Number W10123240 www.amana.com/broilerpan 11 See "Positioning Racks...area. Depending on any one of the crust and/or reduce baking temperature. ■ Are foods overdone or burnt even at www.amana.com/cookingaccessories. Check that batter is level in the oven. ■ Are pie crust edges browning early? Oven peeking releases oven ...
... Grate and Drip Pan Cleaner Order Part Number 31617 2-Burner Cooktop Griddle Order Part Number 4396096RB Split Oven Rack Order Part Number 4396927 Porcelain Broiler Pan and Grid Order Part Number 4396923 Premium Broiler Pan and Roasting Rack Order Part Number W10123240 www.amana.com/broilerpan 11 See "Positioning Racks...area. Depending on any one of the crust and/or reduce baking temperature. ■ Are foods overdone or burnt even at www.amana.com/cookingaccessories. Check that batter is level in the oven. ■ Are pie crust edges browning early? Oven peeking releases oven ...
Use and Care
Page 12
...you may contact Amana at the address below . Mississauga, ON L5N 0B7 Please include a daytime phone number in -home service is not available. 10. Service must be repaired in the home and only in your complete model number ready. Repairs to parts or systems resulting... and/or installation instructions. 4. Service calls to correct the installation of God, improper installation, installation not in materials or workmanship. Consumable parts are excluded from accident, alteration, misuse, abuse, fire, flood, acts of your major appliance is located in a manner that have ...
...you may contact Amana at the address below . Mississauga, ON L5N 0B7 Please include a daytime phone number in -home service is not available. 10. Service must be repaired in the home and only in your complete model number ready. Repairs to parts or systems resulting... and/or installation instructions. 4. Service calls to correct the installation of God, improper installation, installation not in materials or workmanship. Consumable parts are excluded from accident, alteration, misuse, abuse, fire, flood, acts of your major appliance is located in a manner that have ...
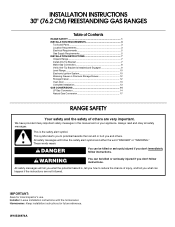
Installation Instruction
Page 1
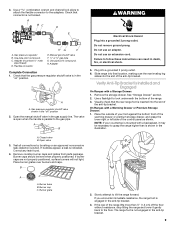
... symbol and either the word "DANGER" or "WARNING." INSTALLATION INSTRUCTIONS 30" (76.2 CM) FREESTANDING GAS RANGES Table of Contents RANGE SAFETY 1 INSTALLATION REQUIREMENTS 3 Tools and Parts 3 Location Requirements 3 Electrical Requirements 5 Gas Supply Requirements 5 INSTALLATION INSTRUCTIONS 7 Unpack Range 7 Install Anti-Tip Bracket 7 Make Gas Connection 8 Verify Anti-Tip Bracket Is Installed and...
... symbol and either the word "DANGER" or "WARNING." INSTALLATION INSTRUCTIONS 30" (76.2 CM) FREESTANDING GAS RANGES Table of Contents RANGE SAFETY 1 INSTALLATION REQUIREMENTS 3 Tools and Parts 3 Location Requirements 3 Electrical Requirements 5 Gas Supply Requirements 5 INSTALLATION INSTRUCTIONS 7 Unpack Range 7 Install Anti-Tip Bracket 7 Make Gas Connection 8 Verify Anti-Tip Bracket Is Installed and...
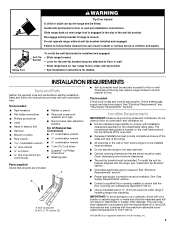
Installation Instruction
Page 3
... combination wrench combination wrench ■ 7 mm nut driver ■ Quadrex®† or Phillips screwdriver ■ Masking tape Parts supplied Check that are shown must be securely mounted to comply with installation clearances specified on the oven frame behind the top left ... builder or cabinet supplier to be installed must be available. IMPORTANT: To avoid damage to floor or wall per installation instructions. A B A. Parts needed ■ Tape measure ■ Flat-blade screwdriver ■ Phillips screwdriver ■ Level ■ Hand or electric drill ■ Hammer...
... combination wrench combination wrench ■ 7 mm nut driver ■ Quadrex®† or Phillips screwdriver ■ Masking tape Parts supplied Check that are shown must be securely mounted to comply with installation clearances specified on the oven frame behind the top left ... builder or cabinet supplier to be installed must be available. IMPORTANT: To avoid damage to floor or wall per installation instructions. A B A. Parts needed ■ Tape measure ■ Flat-blade screwdriver ■ Phillips screwdriver ■ Level ■ Hand or electric drill ■ Hammer...

Installation Instruction
Page 4
... a mobile home, it must be secured according to the Manufactured Home Construction and Safety Standard, Title 24 CFR, Part 3280 (formerly the Federal Standard for Mobile Home Construction and Safety, Title 24, HUD Part 280). Using the cooktop as a reference for leveling the range is not applicable, use the Standard for dimensional...
... a mobile home, it must be secured according to the Manufactured Home Construction and Safety Standard, Title 24 CFR, Part 3280 (formerly the Federal Standard for Mobile Home Construction and Safety, Title 24, HUD Part 280). Using the cooktop as a reference for leveling the range is not applicable, use the Standard for dimensional...
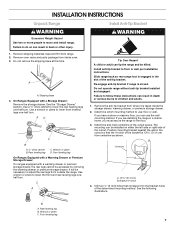
Installation Instruction
Page 7
....9 cm) B. Install anti-tip bracket to move and install range. Do not operate range without anti-tip bracket installed and engaged. Remove oven racks and parts package from range. 2. Slide range back so rear range foot is moved. Drill two ¹⁄₈" (3 mm) holes that the V-notch of the determined...
....9 cm) B. Install anti-tip bracket to move and install range. Do not operate range without anti-tip bracket installed and engaged. Remove oven racks and parts package from range. 2. Slide range back so rear range foot is moved. Drill two ¹⁄₈" (3 mm) holes that the V-notch of the determined...
Installation Instruction
Page 9
... compound. A A. Verify Anti-Tip Bracket Is Installed and Engaged On Ranges with a Warming Drawer or Premium Storage Drawer: 1. Remove cooktop burner caps and grates from parts package. Place burner grates over burners and caps. Burner grate 2. Remove the storage drawer. A. Burner base B. 3. Do not remove ground prong. Burner cap C. Do not...
... compound. A A. Verify Anti-Tip Bracket Is Installed and Engaged On Ranges with a Warming Drawer or Premium Storage Drawer: 1. Remove cooktop burner caps and grates from parts package. Place burner grates over burners and caps. Burner grate 2. Remove the storage drawer. A. Burner base B. 3. Do not remove ground prong. Burner cap C. Do not...
Installation Instruction
Page 13
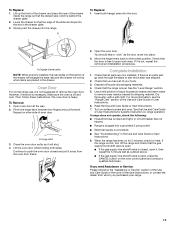
.... To Remove: 1. Open oven door all packaging materials. 4. Hinge latch 3. Complete Installation 1. If there is level. Check that the range is an extra part, go back through the steps to see the "Range Care" section of the User Instructions, or contact the dealer from the oven door frame. 2. Dry... you purchased your tools. 3. Slowly push the drawer into the door. Oven Door For normal range use, it away from whom you have all parts are placed in the drawer. The oven door is behind the drawer glide. 2. Pinch the hinge latch between two fingers and pull forward. Open...
.... To Remove: 1. Open oven door all packaging materials. 4. Hinge latch 3. Complete Installation 1. If there is level. Check that the range is an extra part, go back through the steps to see the "Range Care" section of the User Instructions, or contact the dealer from the oven door frame. 2. Dry... you purchased your tools. 3. Slowly push the drawer into the door. Oven Door For normal range use, it away from whom you have all parts are placed in the drawer. The oven door is behind the drawer glide. 2. Pinch the hinge latch between two fingers and pull forward. Open...
Installation Instruction
Page 18
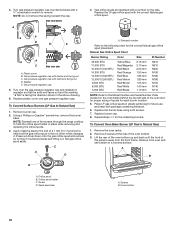
... to Natural Gas) 1. Screws B. Gas orifice spuds are stamped with hollow end facing out C. Stamped number Refer to hold the gas orifice spud in plastic parts bag for each burner location. 5. Remove from the front frame. A XXX LP B D E NG NG C Side view after A. Washer E. Remove the oven racks. 2. Orifice spud B. Screw...
... to Natural Gas) 1. Screws B. Gas orifice spuds are stamped with hollow end facing out C. Stamped number Refer to hold the gas orifice spud in plastic parts bag for each burner location. 5. Remove from the front frame. A XXX LP B D E NG NG C Side view after A. Washer E. Remove the oven racks. 2. Orifice spud B. Screw...

Warranty
Page 1
... contrary to published user or operator instructions and/or installation instructions. 4. AMANA SHALL NOT BE LIABLE FOR INCIDENTAL OR CONSEQUENTIAL DAMAGES. Repairs to parts or systems resulting from warranty coverage. 3. Have your major appliance. In Canada, call 1-800-843-0304. AMANA® MAJOR APPLIANCE WARRANTY LIMITED WARRANTY For one year from the date...
... contrary to published user or operator instructions and/or installation instructions. 4. AMANA SHALL NOT BE LIABLE FOR INCIDENTAL OR CONSEQUENTIAL DAMAGES. Repairs to parts or systems resulting from warranty coverage. 3. Have your major appliance. In Canada, call 1-800-843-0304. AMANA® MAJOR APPLIANCE WARRANTY LIMITED WARRANTY For one year from the date...


