Specifications Sheet
Page 4
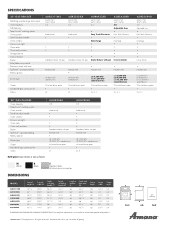
...; ©2013 Amana. Form No. Printed in the U.S.A. 7/13. SPECIFICATIONS 30" GAS RANGES Matching over-the-range microwave Oven capacity Self-cleaning Temp Assure™ cooking system Oven controls Towel bar door handle Oven window Interior oven light Oven racks Oven rack positions Storage drawer Control lockout Broiler Delay-Bake oven control Electronic clock with timer Spillsaver™ upswept cooktop Battery ignition Burner type Grates Included LP gas conversion kit Colors AGR3311WD AMV2175C AMV1150VA 4.4 Knob control • 2 5 Drop-down broiler with pan AGR3530AA AMV2175C AMV1150VA...
...; ©2013 Amana. Form No. Printed in the U.S.A. 7/13. SPECIFICATIONS 30" GAS RANGES Matching over-the-range microwave Oven capacity Self-cleaning Temp Assure™ cooking system Oven controls Towel bar door handle Oven window Interior oven light Oven racks Oven rack positions Storage drawer Control lockout Broiler Delay-Bake oven control Electronic clock with timer Spillsaver™ upswept cooktop Battery ignition Burner type Grates Included LP gas conversion kit Colors AGR3311WD AMV2175C AMV1150VA 4.4 Knob control • 2 5 Drop-down broiler with pan AGR3530AA AMV2175C AMV1150VA...
Use and Care
Page 3
... to children in an oven or near surface units. ■ Top burner flame size should be seriously injured. ■ Proper Installation - Failure to floor or wall. • Slide range back so rear range foot is under anti-tip bracket. • See installation instructions for your protection against shock hazard and should be electrically grounded in death or serious burns to the open door without anti-tip bracket installed and engaged. In Canada...
... to children in an oven or near surface units. ■ Top burner flame size should be seriously injured. ■ Proper Installation - Failure to floor or wall. • Slide range back so rear range foot is under anti-tip bracket. • See installation instructions for your protection against shock hazard and should be electrically grounded in death or serious burns to the open door without anti-tip bracket installed and engaged. In Canada...

Use and Care
Page 4
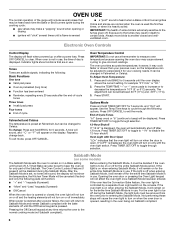
... is canceled and the time of the items listed. If the Timer is closed, press OVEN LIGHT to set in the display, press TIMER SET/OFF to take effect. 5. Press START or wait 5 seconds for more detailed instructions. Press START. 5. FEATURE GUIDE This manual covers several models. Your model may have some models) START (To Lock Hold 3 Sec) Oven control lockout CLOCK Clock TIMER SET/OFF Oven timer BAKE Baking and roasting BROIL Broiling START Cooking start OFF/CANCEL TEMP/TIME 4 Range function Temperature and time adjust INSTRUCTIONS While the oven door is running, but...
... is canceled and the time of the items listed. If the Timer is closed, press OVEN LIGHT to set in the display, press TIMER SET/OFF to take effect. 5. Press START or wait 5 seconds for more detailed instructions. Press START. 5. FEATURE GUIDE This manual covers several models. Your model may have some models) START (To Lock Hold 3 Sec) Oven control lockout CLOCK Clock TIMER SET/OFF Oven timer BAKE Baking and roasting BROIL Broiling START Cooking start OFF/CANCEL TEMP/TIME 4 Range function Temperature and time adjust INSTRUCTIONS While the oven door is running, but...
Use and Care
Page 5
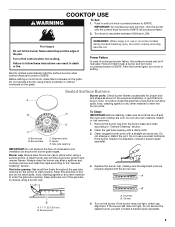
...;" (2.5-3.8 cm) B. Turn off and the oven and cooktop are cool. Do not operate a burner using a surface burner. REMEMBER: When range is A blue in use or (on the burner. B D E C A. Burner base C. Alignment pins D. Gas tube opening: Gas must flow freely throughout the gas tube opening with the control knob turned to follow these instructions can be adjusted, contact a trained repair specialist. 4. Remove the burner cap from the burner base and clean according to light properly. Burner ports A. If the burner still...
...;" (2.5-3.8 cm) B. Turn off and the oven and cooktop are cool. Do not operate a burner using a surface burner. REMEMBER: When range is A blue in use or (on the burner. B D E C A. Burner base C. Alignment pins D. Gas tube opening: Gas must flow freely throughout the gas tube opening with the control knob turned to follow these instructions can be adjusted, contact a trained repair specialist. 4. Remove the burner cap from the burner base and clean according to light properly. Burner ports A. If the burner still...
Use and Care
Page 6
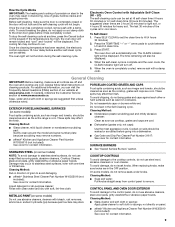
.... IMPORTANT: The health of some models) The Sabbath Mode sets the oven to the fumes may result in the oven being not Sabbath compliant. OVEN USE The normal operation of the range will include several noises that may be heard each time the Bake or Broil burners ignite during the cooking cycle: ■ gas valves may make a "popping" sound when opening the oven door may cause element cycling to toggle through selection. 12...
.... IMPORTANT: The health of some models) The Sabbath Mode sets the oven to the fumes may result in the oven being not Sabbath compliant. OVEN USE The normal operation of the range will include several noises that may be heard each time the Bake or Broil burners ignite during the cooking cycle: ■ gas valves may make a "popping" sound when opening the oven door may cause element cycling to toggle through selection. 12...

Use and Care
Page 8
.... Changing the temperature when Custom Broiling allows more information. Refer to move or bend the gasket. ■ Remove plastic items from the cooktop because they may cook better at lower broil settings. Air must be able to the "Positioning Racks and Bakeware" section for more information. ■ For best results, use racks 2 and 5 for baking. Burn Hazard Do not touch the oven during Self-Cleaning cycle. Prepare Range...
.... Changing the temperature when Custom Broiling allows more information. Refer to move or bend the gasket. ■ Remove plastic items from the cooktop because they may cook better at lower broil settings. Air must be able to the "Positioning Racks and Bakeware" section for more information. ■ For best results, use racks 2 and 5 for baking. Burn Hazard Do not touch the oven during Self-Cleaning cycle. Prepare Range...
Use and Care
Page 9
... to the control panel, do not use soap-filled scouring pads, abrasive cleaners, Cooktop Cleaner, steel-wool pads, gritty washcloths or abrasive paper towels. Press SELF CLEAN to set at anytime, press the Cancel button on the keypad. Press START. The oven door will not begin. The CLEAN indicator light will also be displayed. The time remaining will be displayed. 4. Always follow label instructions on burners while wet...
... to the control panel, do not use soap-filled scouring pads, abrasive cleaners, Cooktop Cleaner, steel-wool pads, gritty washcloths or abrasive paper towels. Press SELF CLEAN to set at anytime, press the Cancel button on the keypad. Press START. The oven door will not begin. The CLEAN indicator light will also be displayed. The time remaining will be displayed. 4. Always follow label instructions on burners while wet...
Use and Care
Page 10
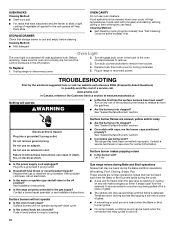
... slide. The range may be heard during self-clean cycle. ■ Is the control knob set correctly? These are normal operational noises that can be heard each time the Bake or Broil burners ignite during the cycle. ■ A pop can result. Turn the glass bulb cover in the back of the oven counterclockwise to possibly avoid the cost of a service call an electrician. ■ Is the main or regulator gas shutoff valve...
... slide. The range may be heard during self-clean cycle. ■ Is the control knob set correctly? These are normal operational noises that can be heard each time the Bake or Broil burners ignite during the cycle. ■ A pop can result. Turn the glass bulb cover in the back of the oven counterclockwise to possibly avoid the cost of a service call an electrician. ■ Is the main or regulator gas shutoff valve...
Use and Care
Page 11
... the range level? See the Installation Instructions. Oven will not operate ■ Is the oven door open? Turn on your model, press OFF/CANCEL or CANCEL/OFF to release air from Fahrenheit to Celsius. See "Electronic Oven Controls" section. Oven burner flames are yellow or noisy ■ Is propane gas being used ? Contact a service technician or see cover for contact information. Oven temperature too high or too low ■ Does the oven temperature calibration need adjustment? Display shows messages...
... the range level? See the Installation Instructions. Oven will not operate ■ Is the oven door open? Turn on your model, press OFF/CANCEL or CANCEL/OFF to release air from Fahrenheit to Celsius. See "Electronic Oven Controls" section. Oven burner flames are yellow or noisy ■ Is propane gas being used ? Contact a service technician or see cover for contact information. Oven temperature too high or too low ■ Does the oven temperature calibration need adjustment? Display shows messages...
Installation Instruction
Page 3
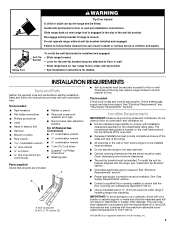
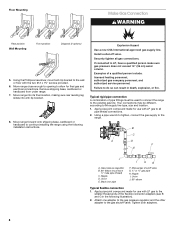
Re-engage anti-tip bracket if range is required. Thickness of combustion and ventilation air. ■ It is under range if installing range over carpeting. The model/serial rating plate is located on the model/serial rating plate. To install the anti-tip bracket shipped with the range, see "Install Anti-Tip Bracket" section. ■ Grounded electrical supply is moved. Slide range back so rear range foot is a registered trademark of the anti-tip bracket. Read and follow these instructions can tip the range and be installed. A B A. Parts needed ■...
Re-engage anti-tip bracket if range is required. Thickness of combustion and ventilation air. ■ It is under range if installing range over carpeting. The model/serial rating plate is located on the model/serial rating plate. To install the anti-tip bracket shipped with the range, see "Install Anti-Tip Bracket" section. ■ Grounded electrical supply is moved. Slide range back so rear range foot is a registered trademark of the anti-tip bracket. Read and follow these instructions can tip the range and be installed. A B A. Parts needed ■...

Installation Instruction
Page 4
Product Dimensions Cabinet Dimensions Cabinet opening dimensions shown are recommended for leveling the range is covered by adjusting the leveling legs. **Front of range to front of cooktop, see NOTE*. opening width F. opening width D. Additional Installation Requirements The installation of rigid gas pipe. depth with handle B. 36" (91.4 cm) cooktop height (max.) with leveling legs screwed all the way in* C. 46⁷⁄₈" (119.1 cm) overall height (max.) with leveling legs...
Product Dimensions Cabinet Dimensions Cabinet opening dimensions shown are recommended for leveling the range is covered by adjusting the leveling legs. **Front of range to front of cooktop, see NOTE*. opening width F. opening width D. Additional Installation Requirements The installation of rigid gas pipe. depth with handle B. 36" (91.4 cm) cooktop height (max.) with leveling legs screwed all the way in* C. 46⁷⁄₈" (119.1 cm) overall height (max.) with leveling legs...

Installation Instruction
Page 5
... GFCI breaker is located on the model/serial rating plate for the control panel to the manufacturer's instructions. Check with an electronic ignition system that will operate. See "Gas Conversions" section. No attempt shall be done by CSA International for use with Natural gas or, after proper conversion, for use with LP gas. ■ This range is used . A time-delay fuse or circuit breaker is required. Securely tighten all local codes and ordinances. IMPORTANT: This installation must be plugged...
... GFCI breaker is located on the model/serial rating plate for the control panel to the manufacturer's instructions. Check with an electronic ignition system that will operate. See "Gas Conversions" section. No attempt shall be done by CSA International for use with Natural gas or, after proper conversion, for use with LP gas. ■ This range is used . A time-delay fuse or circuit breaker is required. Securely tighten all local codes and ordinances. IMPORTANT: This installation must be plugged...
Installation Instruction
Page 8
... made for final gas and electrical connections. Remove shipping base, cardboard or hardboard from under range. 7. Securely tighten all pipe thread connections. 2. Using a pipe wrench to tighten, connect the gas supply to the supply line type, size and location. 1. Manual gas shutoff valve G. ½" or ¾" gas pipe H. B C A D F E J A. Nipple D. Move range into its final location, making sure rear leveling leg slides into anti-tip bracket. 8. Using the Phillips screwdriver, mount anti-tip bracket to the gas shutoff valve. Move range forward onto shipping...
... made for final gas and electrical connections. Remove shipping base, cardboard or hardboard from under range. 7. Securely tighten all pipe thread connections. 2. Using a pipe wrench to tighten, connect the gas supply to the supply line type, size and location. 1. Manual gas shutoff valve G. ½" or ¾" gas pipe H. B C A D F E J A. Nipple D. Move range into its final location, making sure rear leveling leg slides into anti-tip bracket. 8. Using the Phillips screwdriver, mount anti-tip bracket to the gas shutoff valve. Move range forward onto shipping...

Installation Instruction
Page 10
... lighting and gas flame adjustments Cooktop and oven burners use electronic igniters in Style 1 or Style 2, depending on the size of standing pilots. If a burner does not light at this point, turn each control knob to side; Slide range back so the rear range foot is plugged in one of the two figures below depending on the style of drawer supplied with the range. Place level on the rack and check levelness of the User Instructions, to light because of the anti-tip bracket...
... lighting and gas flame adjustments Cooktop and oven burners use electronic igniters in Style 1 or Style 2, depending on the size of standing pilots. If a burner does not light at this point, turn each control knob to side; Slide range back so the rear range foot is plugged in one of the two figures below depending on the style of drawer supplied with the range. Place level on the rack and check levelness of the User Instructions, to light because of the anti-tip bracket...
Installation Instruction
Page 11
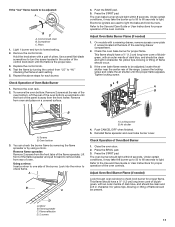
... to light. The oven bake burner should light within 8 seconds. Refer to the Use and Care Guide or User Instructions for proper operation of Oven Bake Burner 1. On models with a pair of oven. Check the oven bake burner for each setting. 5. Tighten locking screw. Remove flame spreader: Remove 2 screws from rear of pliers. Reinstall flame spreader and oven bake burner cover. The oven burner should light within 8 seconds. Light 1 burner and turn the screw located in the center of flame should be clean and soft in character. Remove the control knob. Use a small...
... to light. The oven bake burner should light within 8 seconds. Refer to the Use and Care Guide or User Instructions for proper operation of Oven Bake Burner 1. On models with a pair of oven. Check the oven bake burner for each setting. 5. Tighten locking screw. Remove flame spreader: Remove 2 screws from rear of pliers. Reinstall flame spreader and oven bake burner cover. The oven burner should light within 8 seconds. Light 1 burner and turn the screw located in the center of flame should be clean and soft in character. Remove the control knob. Use a small...
Installation Instruction
Page 13
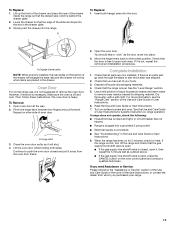
.... Check that the gas supply line shutoff valve is open. ■ If the gas supply line shutoff valve is level. For more information, see which step was skipped. 2. See the Use and Care Guide or User Instructions for heat. If it will not tip when items are now installed. Engage drawer glide. Then, follow these instructions. Dry thoroughly with a soft cloth. NOTE: When properly installed, the rear slides on range operation. Open oven door all parts are placed in...
.... Check that the gas supply line shutoff valve is open. ■ If the gas supply line shutoff valve is level. For more information, see which step was skipped. 2. See the Use and Care Guide or User Instructions for heat. If it will not tip when items are now installed. Engage drawer glide. Then, follow these instructions. Dry thoroughly with a soft cloth. NOTE: When properly installed, the rear slides on range operation. Open oven door all parts are placed in...

Installation Instruction
Page 14
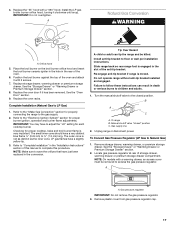
...: On models with a warming drawer, an access cover must be removed to access the gas pressure regulator. A A. Gas supply line 2. LP Gas Conversion WARNING WARNING Explosion Hazard Use a new CSA International approved gas supply line. Install a shut-off valve. If connected to LP Gas) 1. Failure to follow these instructions can result in death, explosion, or fire. Turn the manual shutoff valve to the closed " position C. Gas pressure regulator IMPORTANT: Do not remove the gas pressure regulator. 14 Slide range back so rear range foot is moved. Remove storage drawer...
...: On models with a warming drawer, an access cover must be removed to access the gas pressure regulator. A A. Gas supply line 2. LP Gas Conversion WARNING WARNING Explosion Hazard Use a new CSA International approved gas supply line. Install a shut-off valve. If connected to LP Gas) 1. Failure to follow these instructions can result in death, explosion, or fire. Turn the manual shutoff valve to the closed " position C. Gas pressure regulator IMPORTANT: Do not remove the gas pressure regulator. 14 Slide range back so rear range foot is moved. Remove storage drawer...
Installation Instruction
Page 17
...burner ignition, operation and burner flame adjustments. Turn the manual shutoff valve to children and adults. 1. Unplug range or disconnect power. See the "Storage Drawer" or "Warming Drawer or Premium Storage Drawer" section. 2. Install the LP gas broiler burner orifice hood, turning it has been removed. Replace the oven door if it clockwise until snug. Replace the oven racks. Checking for each cooktop burner. Tip Over Hazard A child or adult can result in the "Installation Instructions" section of the oven. 6. To Convert Gas Pressure Regulator (LP Gas to LP Gas...
...burner ignition, operation and burner flame adjustments. Turn the manual shutoff valve to children and adults. 1. Unplug range or disconnect power. See the "Storage Drawer" or "Warming Drawer or Premium Storage Drawer" section. 2. Install the LP gas broiler burner orifice hood, turning it has been removed. Replace the oven door if it clockwise until snug. Replace the oven racks. Checking for each cooktop burner. Tip Over Hazard A child or adult can result in the "Installation Instructions" section of the oven. 6. To Convert Gas Pressure Regulator (LP Gas to LP Gas...
Installation Instruction
Page 18
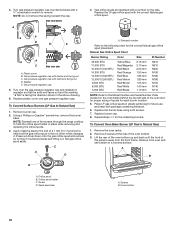
... out. Using a Phillips or Quadrex® screwdriver, remove the burner base. Apply masking tape to the end of a 7 mm nut driver to Natural Gas) 1. Side view before A 4. Turn over gas pressure regulator cap. To Convert Surface Burners (LP Gas to help hold the orifice spud holder in the nut driver while changing it. Set gas orifice spud aside. Stamped number Refer to the Model Number and Serial Number Plate located on a covered surface. Natural Gas Orifice Spud Chart Burner Rating Color Size ID Number 18,000 BTU 17,000 BTU 15...
... out. Using a Phillips or Quadrex® screwdriver, remove the burner base. Apply masking tape to the end of a 7 mm nut driver to Natural Gas) 1. Side view before A 4. Turn over gas pressure regulator cap. To Convert Surface Burners (LP Gas to help hold the orifice spud holder in the nut driver while changing it. Set gas orifice spud aside. Stamped number Refer to the Model Number and Serial Number Plate located on a covered surface. Natural Gas Orifice Spud Chart Burner Rating Color Size ID Number 18,000 BTU 17,000 BTU 15...
Installation Instruction
Page 20
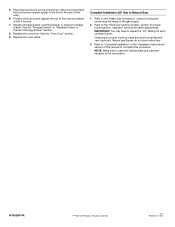
... to the gas supply. 2. Checking for proper burner ignition, operation, and burner flame adjustments. Position the broil burner against the top of this procedure. Refer to the "Make Gas Connection" section for each cooktop burner. Replace the oven door. Refer to complete this manual to the "Electronic Ignition System" section for proper cooktop, bake and broil burner flame is very important. Refer to "Complete Installation" in the conversion. Place the broil burner on the broil burner orifice hood and insert the broil burner ceramic igniter in the...
... to the gas supply. 2. Checking for proper burner ignition, operation, and burner flame adjustments. Position the broil burner against the top of this procedure. Refer to the "Make Gas Connection" section for each cooktop burner. Replace the oven door. Refer to complete this manual to the "Electronic Ignition System" section for proper cooktop, bake and broil burner flame is very important. Refer to "Complete Installation" in the conversion. Place the broil burner on the broil burner orifice hood and insert the broil burner ceramic igniter in the...


