Amana AEP222VAW Support and Manuals
Get Help and Manuals for this Amana item
View All Support Options Below
Free Amana AEP222VAW manuals!
Problems with Amana AEP222VAW?
Ask a Question
Free Amana AEP222VAW manuals!
Problems with Amana AEP222VAW?
Ask a Question
Most Recent Amana AEP222VAW Questions

New Oven Thermostat Has More Connections
Hello! I have an AEP222VAW range. Changing out oven thermostat. New thermostat has more connections ...
Hello! I have an AEP222VAW range. Changing out oven thermostat. New thermostat has more connections ...
(Posted by chriskroeck 6 years ago)
Popular Amana AEP222VAW Manual Pages
Use and Care - Page 4
....
■ Do Not Soak Removable Heating Elements - The door gasket is properly installed and grounded by a qualified technician.
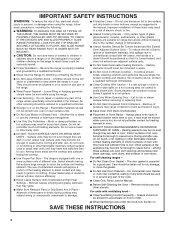
■ Never Use the Range for a good seal. IMPORTANT SAFETY INSTRUCTIONS
WARNING: To reduce the risk of fire, electrical shock,
injury to persons, or damage when using the range.
■ User Servicing - Be sure the range is essential for Warming or...
Use and Care - Page 5
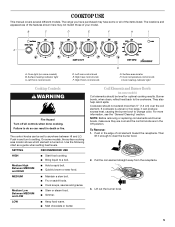
...shown here may have some or all controls when done cooking. Use the following chart as a guide when setting heat levels.
Burner bowls, when clean, reflect heat back to clear the burner bowl.
2.... is turned on some models) B. NOTE: Before removing or replacing coil elements and burner bowls, make sure they are cool and the control knobs are in and turn to setting. Push in death or...
Use and Care - Page 8

...setting.
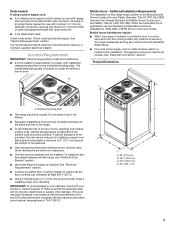
Recommended rack positions are numbered from the oven, and should not be blocked or covered. For diagram...Part...
1" (2.5 cm) thick
4
20-22 10-11
Ham slice, precooked...removing food. It is not necessary to the top (5). See "Assistance or Service...door. 3. Do not set temperature. 2. BROILING CHART
For best results, place food 3" (7 cm) or more from the oven when removing...
Use and Care - Page 9
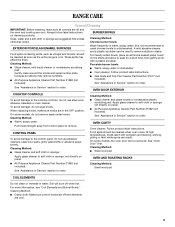
... cleaner: Follow product label instructions.
■ Gas Grate and Drip Pan Cleaner Part Number 31617 (not included):
See "Assistance or Service" section to order. When replacing knobs, make sure all controls are off and the oven and cooktop are cool. Food spills should be used to remove stubborn stains. See "Oven Door" first. Soil will burn...
Use and Care - Page 10
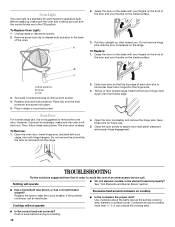
... door completely and remove the hinge pins. Clip
3. To Remove: 1. Grasp the door on the sides with your thumbs on the range. Close the door slowly to a setting.
10 Before replacing, make sure the oven is heavy.
Insert door hinge into place. 5. Oven Light
The oven light is replaced on the inside surface. Cooktop will operate
■ On coil element models...
Use and Care - Page 11
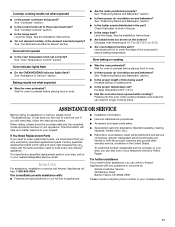
... specified replacement parts will fit right and work right because they are trained to the proper heat level? Our consultants provide assistance with any questions or concerns at:
Amana Customer Service 553 Benson Road Benton Harbor, MI 49022-2692
Please include a daytime phone number in your appliance. See the Installation Instructions.
■ On coil element models, is...
Use and Care - Page 12

... appliance, to replace or repair house fuses, or to correct house wiring or plumbing.
2. THIS WARRANTY GIVES YOU SPECIFIC LEGAL RIGHTS, AND YOU MAY ALSO HAVE OTHER RIGHTS WHICH VARY FROM STATE TO STATE OR PROVINCE TO PROVINCE. If you on the product. Service calls to correct the installation of your major appliance, to instruct you need...
Warranty - Page 1

..., first see the "Troubleshooting" section of the Use & Care Guide. Service must provide proof of purchase or installation date for repairs.
Damage resulting from unauthorized modifications made to parts or systems resulting from accident, alteration, misuse, abuse, fire, flood, acts of God, improper installation, installation not in accordance with electrical or plumbing codes, or use of...
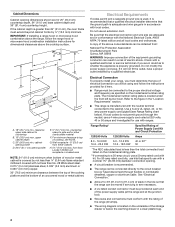
Dimension Guide - Page 1
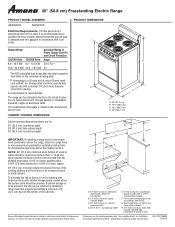
....2 cm) D. 42" (106.7 cm)
Cabinet opening width
E. 5" (12.7 cm) min.
20" (50.8 cm) Freestanding Electric Range
PRODUCT MODEL NUMBERS
AEP222VA
AEP200VA
Electrical Requirements: If codes permit and a separate ground wire is used, it is recommended that a qualified electrical installer determine that the ground path is adequate and wire gauge is in shaded area.
To eliminate the risk of...
Installation Instruction - Page 2
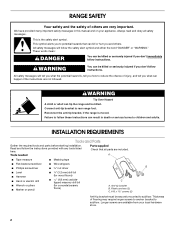
... and follow these instructions can be killed.
Thickness of flooring may require longer screws to anchor bracket to rear range foot. Connect anti-tip bracket to subfloor.
A
■ Tape measure
■ Masking tape
■ Flat-blade screwdriver
■ Wire strippers
■ Phillips screwdriver
nut driver
B
■ Level ■ Hammer ■ Hand or electric drill ■...
Installation Instruction - Page 3
...or open-end spade terminals with installation clearances specified on under range if installing range over heated surface units, cabinet storage space located above .
■ Four-wire power supply cord or cable must be revised.
Check local codes. Additional Installation Requirements The installation of burns or fire by reaching over carpeting. Model/serial rating plate
■ The...
Installation Instruction - Page 4
... fronts by a qualified electrician.
Locate 120/240-volt receptacle in a clear plastic bag.
4 If the cabinet depth is used, it will be using and follow the range hood or microwave hood combination installation instructions for dimensional clearances above code standards can be moved if servicing is recommended.
■ The range can be obtained from:
National Fire Protection...
Installation Instruction - Page 5
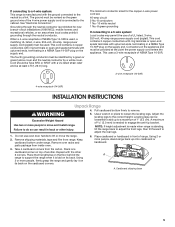
... codes may permit the use of NEMA Type 14-50R is used, a matching UL listed, 4-wire, 250-volt, 40-amp, range power supply cord (pigtail) must be used. Remove shipping materials, tape and film from inside oven.
6. Using 2 or more people to a maximum of NEMA Type 10-50R.
3-wire receptacle (10-50R)
4-wire receptacle (14-50R)
INSTALLATION INSTRUCTIONS
Unpack Range...
Installation Instruction - Page 7
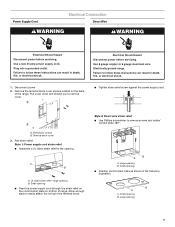
... power before servicing. Failure to follow these instructions can result in death, fire, or electrical shock.
1.
Allow enough slack to easily attach the wiring to remove screws and rotate/ conduit plate 180º.
A
B
A. B A
A. Remove the terminal block cover screws located on bottom of the range. A. Small opening .
Power Supply Cord
Electrical Connection
Direct...
Installation Instruction - Page 10
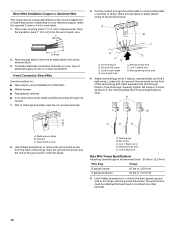
... Wire Torque Specifications chart. Allow enough slack to easily attach wiring to line 1 (black), neutral (white), and line 2 (red) wires. Ground-link screw C. Line 1 (black) wire G. Loosen (do not remove) the set screw to torque as shown in the wire to easily attach the wiring terminal block.
3. A. Neutral (white) wire E. The ground wire must be connected directly to your electrical...
Amana AEP222VAW Reviews
We have not received any reviews for Amana yet.