Use and Care
Page 4
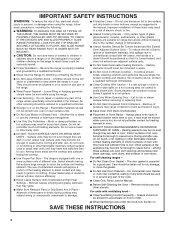
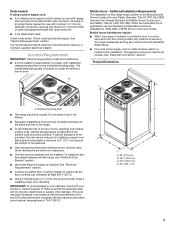
...color. Do not repair or replace any part of the appliance may result in or on the range to reach items could be allowed to a qualified technician. ■ Storage in a risk of electric shock, or fire. ■ Glazed Cooking Utensils - Areas near these liners may become hot ... or bowls during cooking may penetrate the broken cooktop and create a risk of electric shock. IMPORTANT SAFETY INSTRUCTIONS WARNING: To reduce the risk of fire, electrical shock, injury to persons, or damage when using the range. ■ User Servicing - They should be referred to sit or stand on...
...color. Do not repair or replace any part of the appliance may result in or on the range to reach items could be allowed to a qualified technician. ■ Storage in a risk of electric shock, or fire. ■ Glazed Cooking Utensils - Areas near these liners may become hot ... or bowls during cooking may penetrate the broken cooktop and create a risk of electric shock. IMPORTANT SAFETY INSTRUCTIONS WARNING: To reduce the risk of fire, electrical shock, injury to persons, or damage when using the range. ■ User Servicing - They should be referred to sit or stand on...
Dimension Guide
Page 1
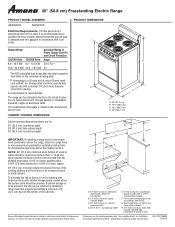
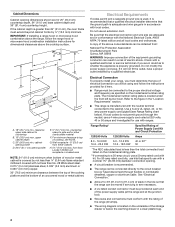
...circuit, use with local codes. NOTE: 24" (61.0 cm) minimum when bottom of wood or metal cabinet is covered by installing a range hood that projects horizontally a minimum of 5" (12.7 cm) beyond the bottom of the cabinets. Because Whirlpool Corporation policy includes a continuous... B. 13" (33.0 cm) max. 20" (50.8 cm) Freestanding Electric Range PRODUCT MODEL NUMBERS AEP222VA AEP200VA Electrical Requirements: If codes permit and a separate ground wire is used, it is recommended that a qualified electrical installer determine that the ground path is adequate and wire gauge is in shaded...
...circuit, use with local codes. NOTE: 24" (61.0 cm) minimum when bottom of wood or metal cabinet is covered by installing a range hood that projects horizontally a minimum of 5" (12.7 cm) beyond the bottom of the cabinets. Because Whirlpool Corporation policy includes a continuous... B. 13" (33.0 cm) max. 20" (50.8 cm) Freestanding Electric Range PRODUCT MODEL NUMBERS AEP222VA AEP200VA Electrical Requirements: If codes permit and a separate ground wire is used, it is recommended that a qualified electrical installer determine that the ground path is adequate and wire gauge is in shaded...
Installation Instruction
Page 2
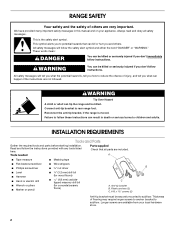
... or hurt you don't immediately follow the instructions provided with any tools listed here. WARNING You can be securely mounted to rear range foot. A ■ Tape measure ■ Masking tape ■ Flat-blade screwdriver ■ Wire strippers ■ Phillips screwdriver... nut driver B ■ Level ■ Hammer ■ Hand or electric drill ■ Wrench or pliers ■ Marker or pencil 3.2 mm) drill bit (for wood floors) 4.8 mm) carbidetipped masonry drill bit (for...
... or hurt you don't immediately follow the instructions provided with any tools listed here. WARNING You can be securely mounted to rear range foot. A ■ Tape measure ■ Masking tape ■ Flat-blade screwdriver ■ Wire strippers ■ Phillips screwdriver... nut driver B ■ Level ■ Hammer ■ Hand or electric drill ■ Wrench or pliers ■ Marker or pencil 3.2 mm) drill bit (for wood floors) 4.8 mm) carbidetipped masonry drill bit (for...
Installation Instruction
Page 3
... The model/serial rating plate is adequate as long as it must be located for convenient use with ranges. See "Electrical Requirements" section. ■ Contact a qualified floor covering installer to make sure that the floor covering can be reduced by ... responsibility to the standards listed above the surface units should be made by a licensed, qualified electrical installer. When such standard is installed in accordance with the requirements of this range is not applicable, use with nominal 1³⁄₈" (3.5 cm) diameter connection opening dimensions...
... The model/serial rating plate is adequate as long as it must be located for convenient use with ranges. See "Electrical Requirements" section. ■ Contact a qualified floor covering installer to make sure that the floor covering can be reduced by ... responsibility to the standards listed above the surface units should be made by a licensed, qualified electrical installer. When such standard is installed in accordance with the requirements of this range is not applicable, use with nominal 1³⁄₈" (3.5 cm) diameter connection opening dimensions...
Installation Instruction
Page 4
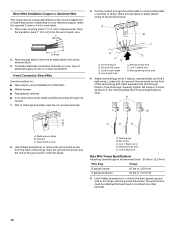
...Check with a qualified electrician or service technician if you are in accordance with ranges. Range Rating* 120/240 Volts 8.0 - 16.5 KW 16.6 - 22.5 KW 120/208 Volts 6.0 - 12.5 KW 12.6 - 18.5 KW Specified Rating of electric shock. Cabinet Dimensions Cabinet opening width E. 5" (12.7 cm) min. B... 18" (45.7 cm) min. from either cabinet, H. 5½" (14.0 cm) max. Do not modify the power supply cord plug. Electrical Connection To properly install your range, you will not fit the outlet, have a proper outlet installed by ½" (13.0 mm) minimum. Use a 3-wire UL listed, 40...
...Check with a qualified electrician or service technician if you are in accordance with ranges. Range Rating* 120/240 Volts 8.0 - 16.5 KW 16.6 - 22.5 KW 120/208 Volts 6.0 - 12.5 KW 12.6 - 18.5 KW Specified Rating of electric shock. Cabinet Dimensions Cabinet opening width E. 5" (12.7 cm) min. B... 18" (45.7 cm) min. from either cabinet, H. 5½" (14.0 cm) max. Do not modify the power supply cord plug. Electrical Connection To properly install your range, you will not fit the outlet, have a proper outlet installed by ½" (13.0 mm) minimum. Use a 3-wire UL listed, 40...
Installation Instruction
Page 5
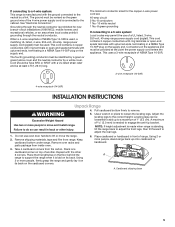
....-10 white neutral 1 No.-8 green grounding If connecting to a 3-wire system: Local codes may permit the use oven door handle to support the range when it on its back. Cord should be Type SRD or SRDT with upturned ends, terminating in back or other 2 corners. This uses a ...be loosened to the cabinet. NOTE: If height adjustment is made when range is standing, tilt the range back to adjust the front legs, then tilt forward to loosen the leveling legs. Cardboard shipping base 5 See "Electrical Connection." Connectors on the supply end. Adjust the leveling legs to remove....
....-10 white neutral 1 No.-8 green grounding If connecting to a 3-wire system: Local codes may permit the use oven door handle to support the range when it on its back. Cord should be Type SRD or SRDT with upturned ends, terminating in back or other 2 corners. This uses a ...be loosened to the cabinet. NOTE: If height adjustment is made when range is standing, tilt the range back to adjust the front legs, then tilt forward to loosen the leveling legs. Cardboard shipping base 5 See "Electrical Connection." Connectors on the supply end. Adjust the leveling legs to remove....
Installation Instruction
Page 6
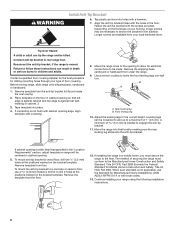
... of 1" (2.5 cm). To mount the anti-tip bracket to a concrete or ceramic floor, use the Standard for electrical connections to the floor. Remove the template from floor. Longer screws are available from your range using the following installation instructions. 6 Tape template into the anti-tip bracket. Rear leveling leg B. Adjust the leveling...
... of 1" (2.5 cm). To mount the anti-tip bracket to a concrete or ceramic floor, use the Standard for electrical connections to the floor. Remove the template from floor. Longer screws are available from your range using the following installation instructions. 6 Tape template into the anti-tip bracket. Rear leveling leg B. Adjust the leveling...
Installation Instruction
Page 7
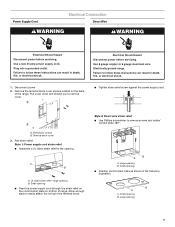
.... A B A. Large opening B. Small opening B. Failure to follow these instructions can result in death, fire, or electrical shock. 1. Electrical Shock Hazard Disconnect power before servicing. Electrically ground range. Failure to follow these instructions can result in death, fire, or electrical shock. Small opening ■ Feed the power supply cord through the strain relief on the cord...
.... A B A. Large opening B. Small opening B. Failure to follow these instructions can result in death, fire, or electrical shock. 1. Electrical Shock Hazard Disconnect power before servicing. Electrically ground range. Failure to follow these instructions can result in death, fire, or electrical shock. Small opening ■ Feed the power supply cord through the strain relief on the cord...
Installation Instruction
Page 8
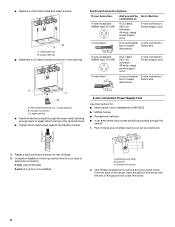
... 4-wire connection: box or fused Direct wire disconnect 3-wire receptacle (NEMA type 10-50R) A UL listed, 250-volt minimum, 40-amp, range power supply cord 3-wire connection: Power supply cord 3-wire direct 1" (2.5 cm) A circuit breaker 3-wire connection: box or fused Direct wire ... screw against the flexible conduit. Discard C. ■ Replace cord/conduit plate and insert screws. Electrical Connection Options If your type of range. 5. Replace back panel and screws on rear of electrical connection: 4-wire (recommended) 3-wire (if 4-wire is not available) A B C A. Metal...
... 4-wire connection: box or fused Direct wire disconnect 3-wire receptacle (NEMA type 10-50R) A UL listed, 250-volt minimum, 40-amp, range power supply cord 3-wire connection: Power supply cord 3-wire direct 1" (2.5 cm) A circuit breaker 3-wire connection: box or fused Direct wire ... screw against the flexible conduit. Discard C. ■ Replace cord/conduit plate and insert screws. Electrical Connection Options If your type of range. 5. Replace back panel and screws on rear of electrical connection: 4-wire (recommended) 3-wire (if 4-wire is not available) A B C A. Metal...
Installation Instruction
Page 10
... terminal lugs to the range with the ground-link screw. A B A B C C D E A. Metal ground strap B. Use Phillips screwdriver to connect the bare (green) ground wire to line 1 (black), neutral (white), and line 2 (red) wires. The ground wire must be connected directly to your electrical supply, make the required...Torque Specifications chart. Loosen (do not remove) the set screw to remove the ground-link screw from the end of the range. Strip outer covering back 3" (7.6 cm) to easily attach the wiring terminal block. 3. Cord/conduit plate D. Direct Wire Installation: Copper...
... terminal lugs to the range with the ground-link screw. A B A B C C D E A. Metal ground strap B. Use Phillips screwdriver to connect the bare (green) ground wire to line 1 (black), neutral (white), and line 2 (red) wires. The ground wire must be connected directly to your electrical supply, make the required...Torque Specifications chart. Loosen (do not remove) the set screw to remove the ground-link screw from the end of the range. Strip outer covering back 3" (7.6 cm) to easily attach the wiring terminal block. 3. Cord/conduit plate D. Direct Wire Installation: Copper...
Installation Instruction
Page 12
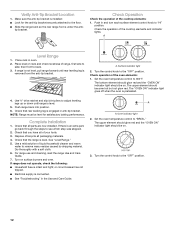
...level on . 3. then front to remove waxy residue caused by shipping material. If range is not level, pull range forward until range is level. Check that you have all packaging materials. 4. NOTE: Range must be on rack and check levelness of liquid household cleaner and warm water to.... See "Level Range." 5. Use a mild solution of range, first side to the floor. ■ Slide the range back so the rear range foot is preheated. For range use and cleaning, read the range Use and Care Guide. 7. or circuit breaker has not tripped. ■ Electrical supply is engaged ...
...level on . 3. then front to remove waxy residue caused by shipping material. If range is not level, pull range forward until range is level. Check that you have all packaging materials. 4. NOTE: Range must be on rack and check levelness of liquid household cleaner and warm water to.... See "Level Range." 5. Use a mild solution of range, first side to the floor. ■ Slide the range back so the rear range foot is preheated. For range use and cleaning, read the range Use and Care Guide. 7. or circuit breaker has not tripped. ■ Electrical supply is engaged ...


