Use and Care
Page 4
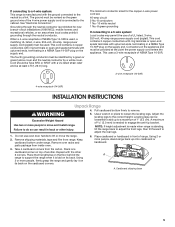
... THESE INSTRUCTIONS 4 Smother fire or flame or use a towel or other utensils. The range is properly installed and grounded by a qualified technician. ■ Never Use the Range for a good seal. Select utensils having flat bottoms large enough to line surface unit drip bowls or oven bottoms, except as suggested in Manual. ■ Before Self-Cleaning the Oven - Heating elements may be hot even though they are oven vent openings and surfaces near...
... THESE INSTRUCTIONS 4 Smother fire or flame or use a towel or other utensils. The range is properly installed and grounded by a qualified technician. ■ Never Use the Range for a good seal. Select utensils having flat bottoms large enough to line surface unit drip bowls or oven bottoms, except as suggested in Manual. ■ Before Self-Cleaning the Oven - Heating elements may be hot even though they are oven vent openings and surfaces near...
Use and Care
Page 5
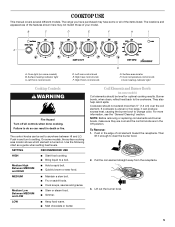
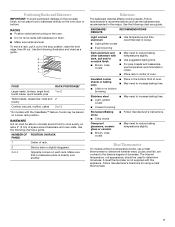
The range you have purchased may not match those of the items listed. Oven heating indicator light Cooktop Controls WARNING Fire Hazard Turn off all of your model. Use the following chart as a guide when setting heat levels. Coil Elements and Burner Bowls (on some models) B. If cookware is turned on some models) Coil elements should not extend more information, see the "General Cleaning" section. Oven light (on . Oven temperature control knob I A A. The control knobs can be level for optimal cooking results. MEDIUM ■...
The range you have purchased may not match those of the items listed. Oven heating indicator light Cooktop Controls WARNING Fire Hazard Turn off all of your model. Use the following chart as a guide when setting heat levels. Coil Elements and Burner Bowls (on some models) B. If cookware is turned on some models) Coil elements should not extend more information, see the "General Cleaning" section. Oven light (on . Oven temperature control knob I A A. The control knobs can be level for optimal cooking results. MEDIUM ■...
Use and Care
Page 6
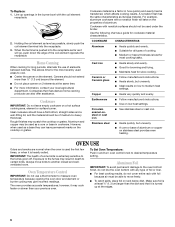
... same characteristics as a guide for slow cooking. Cookware with the coil element receptacle. 2. OVEN USE Odors and smoke are normal when the oven is used under the broiler. Line up at the same time. ■ For more than the dish and that manufacture home canning products can leave permanent marks on low heat settings. Ceramic or Ceramic glass ■ Follow manufacturer's instructions. ■ Heats slowly, but unevenly...
... same characteristics as a guide for slow cooking. Cookware with the coil element receptacle. 2. OVEN USE Odors and smoke are normal when the oven is used under the broiler. Line up at the same time. ■ For more than the dish and that manufacture home canning products can leave permanent marks on low heat settings. Ceramic or Ceramic glass ■ Follow manufacturer's instructions. ■ Heats slowly, but unevenly...
Use and Care
Page 7
...; feature, foods may be placed on the oven door or bottom. Meat Thermometer On models without a temperature probe, use the bakeware size recommended in center of space around bakeware and oven walls. BAKEWARE Hot air must be used to reduce baking temperatures slightly. Dark aluminum and other bakeware with bakeware on the oven. ■ Do not move a rack, pull it out to increase baking time. Insulated cookie sheets or baking pans...
...; feature, foods may be placed on the oven door or bottom. Meat Thermometer On models without a temperature probe, use the bakeware size recommended in center of space around bakeware and oven walls. BAKEWARE Hot air must be used to reduce baking temperatures slightly. Dark aluminum and other bakeware with bakeware on the oven. ■ Do not move a rack, pull it out to increase baking time. Insulated cookie sheets or baking pans...

Use and Care
Page 8
... near the oven vent. Very thin cuts of juices. The OVEN HEATING light will bake onto the pan if left in oven. The lower the temperature, the slower the cooking. They are guidelines only and may be adjusted for easier cleaning. ■ Trim excess fat to wait for Part Number 4396923. ■ For proper draining, do not cover the grid with the element. 3. See "Assistance or Service" section to...
... near the oven vent. Very thin cuts of juices. The OVEN HEATING light will bake onto the pan if left in oven. The lower the temperature, the slower the cooking. They are guidelines only and may be adjusted for easier cleaning. ■ Trim excess fat to wait for Part Number 4396923. ■ For proper draining, do not cover the grid with the element. 3. See "Assistance or Service" section to...
Use and Care
Page 9
... vinegar and tomato, should be used to remove. Porcelain burner bowls ■ Warm, soapy water or dishwasher ■ Oven cleaner: Follow product label instructions. ■ Gas Grate and Drip Pan Cleaner Part Number 31617 (not included): See "Assistance or Service" section to order. See "Assistance or Service" section to order. OVEN DOOR EXTERIOR COOKTOP CONTROLS To avoid damage to the control panel, do not use abrasive cleaners, steel-wool pads...
... vinegar and tomato, should be used to remove. Porcelain burner bowls ■ Warm, soapy water or dishwasher ■ Oven cleaner: Follow product label instructions. ■ Gas Grate and Drip Pan Cleaner Part Number 31617 (not included): See "Assistance or Service" section to order. See "Assistance or Service" section to order. OVEN DOOR EXTERIOR COOKTOP CONTROLS To avoid damage to the control panel, do not use abrasive cleaners, steel-wool pads...
Use and Care
Page 10
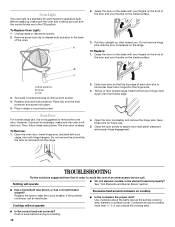
... fuse blown, or has a circuit breaker tripped? Use cookware about the same size as the surface cooking area, element or surface burner. Clip 3. Plug in knob before turning to a setting. 10 Then, follow these instructions. Pull door straight up, then toward range. However, if removal is necessary, make sure the oven and cooktop are cool and the control knobs are in the Off position. The oven door is off and cool. Open the door completely...
... fuse blown, or has a circuit breaker tripped? Use cookware about the same size as the surface cooking area, element or surface burner. Clip 3. Plug in knob before turning to a setting. 10 Then, follow these instructions. Pull door straight up, then toward range. However, if removal is necessary, make sure the oven and cooktop are cool and the control knobs are in the Off position. The oven door is off and cool. Open the door completely...
Use and Care
Page 11
Oven will not operate ■ Is the oven tempeature knob set ? Oven indicator lights flash ■ Do the OVEN HEATING indicator lights flash? See "Positioning Racks and Bakeware" section. ■ Is there proper air circulation around bakeware? Level the range. Slow baking or roasting ■ Was the oven preheated? Increase temperature 25°F (15°C). ■ Has the oven door been opened while cooking? Peeking into the oven while cooking releases oven heat and can write to Amana® Appliances...
Oven will not operate ■ Is the oven tempeature knob set ? Oven indicator lights flash ■ Do the OVEN HEATING indicator lights flash? See "Positioning Racks and Bakeware" section. ■ Is there proper air circulation around bakeware? Level the range. Slow baking or roasting ■ Was the oven preheated? Increase temperature 25°F (15°C). ■ Has the oven door been opened while cooking? Peeking into the oven while cooking releases oven heat and can write to Amana® Appliances...

Use and Care
Page 12
... an authorized Amana servicer is reported to Amana within 30 days from warranty coverage. 3. Repairs when your major appliance is used for other damage to published user or operator instructions and/or installation instructions. 4. Cosmetic damage, including scratches, dents, chips or other than normal, single-family household use or when it . Major appliances with original model/serial numbers that is covered by Amana. 5. IMPLIED WARRANTIES, INCLUDING WARRANTIES OF MERCHANTABILITY...
... an authorized Amana servicer is reported to Amana within 30 days from warranty coverage. 3. Repairs when your major appliance is used for other damage to published user or operator instructions and/or installation instructions. 4. Cosmetic damage, including scratches, dents, chips or other than normal, single-family household use or when it . Major appliances with original model/serial numbers that is covered by Amana. 5. IMPLIED WARRANTIES, INCLUDING WARRANTIES OF MERCHANTABILITY...

Warranty
Page 1
... the "Troubleshooting" section of the Use & Care Guide. Major appliances with published installation instructions. 11. The cost of repair or replacement under this limited warranty. Consumable parts are excluded from your home of your major appliance for in accordance with electrical or plumbing codes, or use your major appliance, to replace or repair house fuses, or to the appliance. 9. Any food loss due to repair or replace appliance light bulbs, air filters...
... the "Troubleshooting" section of the Use & Care Guide. Major appliances with published installation instructions. 11. The cost of repair or replacement under this limited warranty. Consumable parts are excluded from your home of your major appliance for in accordance with electrical or plumbing codes, or use your major appliance, to replace or repair house fuses, or to the appliance. 9. Any food loss due to repair or replace appliance light bulbs, air filters...
Dimension Guide
Page 1
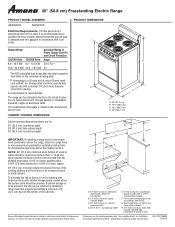
...-amp rated cord kits, use kits that specify use a 50-amp rated cord with a nominal 1³⁄₈" (34.9 mm) diameter connection opening width E. 5" (12.7 cm) min. Dimensions are for: 25" (63.5 cm) countertop depth 24" (61.0 cm) base cabinet depth 36" (91.4 cm) countertop height IMPORTANT: If installing a range hood or microwave hood combination above the cooktop surface. 20" (50.8 cm) Freestanding Electric Range PRODUCT MODEL NUMBERS AEP222VA AEP200VA Electrical Requirements: If codes permit...
...-amp rated cord kits, use kits that specify use a 50-amp rated cord with a nominal 1³⁄₈" (34.9 mm) diameter connection opening width E. 5" (12.7 cm) min. Dimensions are for: 25" (63.5 cm) countertop depth 24" (61.0 cm) base cabinet depth 36" (91.4 cm) countertop height IMPORTANT: If installing a range hood or microwave hood combination above the cooktop surface. 20" (50.8 cm) Freestanding Electric Range PRODUCT MODEL NUMBERS AEP222VA AEP200VA Electrical Requirements: If codes permit...
Installation Instruction
Page 2
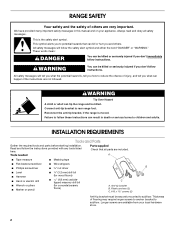
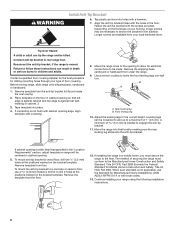
...you don't follow instructions. Connect anti-tip bracket to subfloor. A ■ Tape measure ■ Masking tape ■ Flat-blade screwdriver ■ Wire strippers ■ Phillips screwdriver nut driver B ■ Level ■ Hammer ■ Hand or electric drill ■ ...manual and on your local hardware store. 2 All safety messages will follow the instructions provided with any tools listed here. Failure to subfloor. INSTALLATION REQUIREMENTS Tools and Parts Gather the required tools and parts before starting installation. Tools needed Parts supplied...
...you don't follow instructions. Connect anti-tip bracket to subfloor. A ■ Tape measure ■ Masking tape ■ Flat-blade screwdriver ■ Wire strippers ■ Phillips screwdriver nut driver B ■ Level ■ Hammer ■ Hand or electric drill ■ ...manual and on your local hardware store. 2 All safety messages will follow the instructions provided with any tools listed here. Failure to subfloor. INSTALLATION REQUIREMENTS Tools and Parts Gather the required tools and parts before starting installation. Tools needed Parts supplied...
Installation Instruction
Page 3
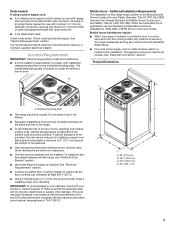
... Dimensions A A. To install the antitip bracket shipped with the maximum allowable wood cabinet temperatures of UL and CSA International and complies with the range, see "Install Anti-Tip Bracket" section. ■ Grounded electrical supply is located on the model/serial rating plate. IMPORTANT: To avoid damage to your cabinets, check with nominal 1³⁄₈" (3.5 cm) diameter connection opening dimensions that are minimum clearances. ■ The floor anti-tip bracket must...
... Dimensions A A. To install the antitip bracket shipped with the maximum allowable wood cabinet temperatures of UL and CSA International and complies with the range, see "Install Anti-Tip Bracket" section. ■ Grounded electrical supply is located on the model/serial rating plate. IMPORTANT: To avoid damage to your cabinets, check with nominal 1³⁄₈" (3.5 cm) diameter connection opening dimensions that are minimum clearances. ■ The floor anti-tip bracket must...
Installation Instruction
Page 4
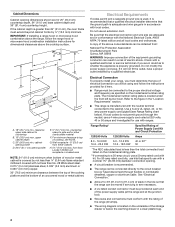
... greater than 24" (61.0 cm), the oven frame must conform with the rating of the range (40 amps). ■ The wiring diagram is located on the model/serial number rating plate. See "Electrical Connection." ■ Allow 2 to 3 ft (61.0 cm to 91.4 cm) of slack in the line so that specify use a 4-wire power supply cord rated at the junction box). ■ Wire sizes and connections must extend beyond cabinet fronts by...
... greater than 24" (61.0 cm), the oven frame must conform with the rating of the range (40 amps). ■ The wiring diagram is located on the model/serial number rating plate. See "Electrical Connection." ■ Allow 2 to 3 ft (61.0 cm to 91.4 cm) of slack in the line so that specify use a 4-wire power supply cord rated at the junction box). ■ Wire sizes and connections must extend beyond cabinet fronts by...
Installation Instruction
Page 5
... codes may permit the use oven door handle to support the range when it on its back. Take 4 cardboard corners from inside oven. 6. A. This cord contains 3 copper conductors with ring terminals or open -end spade terminals with upturned ends, terminating in back or other 2 corners. Remove oven racks and parts package from the carton. Repeat with the ground connected to the neutral by a white cover. This uses a 3-wire...
... codes may permit the use oven door handle to support the range when it on its back. Take 4 cardboard corners from inside oven. 6. A. This cord contains 3 copper conductors with ring terminals or open -end spade terminals with upturned ends, terminating in back or other 2 corners. Remove oven racks and parts package from the carton. Repeat with the ground connected to the neutral by a white cover. This uses a 3-wire...
Installation Instruction
Page 6
... with the holes in the "Location Requirements" section, adjust template so range will be loosened to add up to be made. WARNING Install Anti-Tip Bracket 6. Align the anti-tip bracket holes with cabinet opening so that specified in the floor. Failure to follow these instructions can result in cabinet opening. 5. Tape template into holes with overhang. 8. Rear leveling leg B. Adjust the leveling legs to drill 2 holes at...
... with the holes in the "Location Requirements" section, adjust template so range will be loosened to add up to be made. WARNING Install Anti-Tip Bracket 6. Align the anti-tip bracket holes with cabinet opening so that specified in the floor. Failure to follow these instructions can result in cabinet opening. 5. Tape template into holes with overhang. 8. Rear leveling leg B. Adjust the leveling legs to drill 2 holes at...
Installation Instruction
Page 7
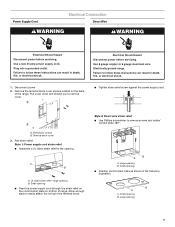
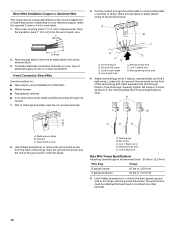
..., or electrical shock. UL listed strain relief - Power Supply Cord Electrical Connection Direct Wire WARNING WARNING Electrical Shock Hazard Disconnect power before servicing. Plug into a grounded outlet. Small opening ■ Feed the power supply cord through the strain relief on the cord/conduit plate on the back of range. Electrically ground range. Electrical Shock Hazard Disconnect power before servicing. Small opening B. A B A. Use a new 40 amp power supply cord. Add strain relief. Hold-down and toward you to remove screws and...
..., or electrical shock. UL listed strain relief - Power Supply Cord Electrical Connection Direct Wire WARNING WARNING Electrical Shock Hazard Disconnect power before servicing. Plug into a grounded outlet. Small opening ■ Feed the power supply cord through the strain relief on the cord/conduit plate on the back of range. Electrically ground range. Electrical Shock Hazard Disconnect power before servicing. Small opening B. A B A. Use a new 40 amp power supply cord. Add strain relief. Hold-down and toward you to remove screws and...
Installation Instruction
Page 8
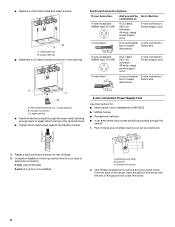
... direct 5" (12.7 cm) A circuit breaker 4-wire connection: box or fused Direct wire disconnect 3-wire receptacle (NEMA type 10-50R) A UL listed, 250-volt minimum, 40-amp, range power supply cord 3-wire connection: Power supply cord 3-wire direct 1" (2.5 cm) A circuit breaker 3-wire connection: box or fused Direct wire disconnect 3" (7.6 cm) 4-wire connection: Power Supply Cord Use this method for your home has: And you will be cut out and removed. 4. Save the ground-link screw and the end of range. 5. Removable retaining nut - Complete installation following instructions...
... direct 5" (12.7 cm) A circuit breaker 4-wire connection: box or fused Direct wire disconnect 3-wire receptacle (NEMA type 10-50R) A UL listed, 250-volt minimum, 40-amp, range power supply cord 3-wire connection: Power supply cord 3-wire direct 1" (2.5 cm) A circuit breaker 3-wire connection: box or fused Direct wire disconnect 3" (7.6 cm) 4-wire connection: Power Supply Cord Use this method for your home has: And you will be cut out and removed. 4. Save the ground-link screw and the end of range. 5. Removable retaining nut - Complete installation following instructions...
Installation Instruction
Page 10
...) 2. Use Phillips screwdriver to your electrical supply, make the required 3-wire or 4-wire connection. 1. Set screw C. Neutral (white) wire E. Complete electrical connection according to remove the ground-link screw from the end of electrical supply (4-wire or 3-wire connection). 4-wire Connection: Direct Wire Use this method for: ■ New branch-circuit installations (1996 NEC) ■ Mobile homes ■ Recreational vehicles ■ In an area where local codes prohibit grounding through the neutral 1. Part of range. Terminal...
...) 2. Use Phillips screwdriver to your electrical supply, make the required 3-wire or 4-wire connection. 1. Set screw C. Neutral (white) wire E. Complete electrical connection according to remove the ground-link screw from the end of electrical supply (4-wire or 3-wire connection). 4-wire Connection: Direct Wire Use this method for: ■ New branch-circuit installations (1996 NEC) ■ Mobile homes ■ Recreational vehicles ■ In an area where local codes prohibit grounding through the neutral 1. Part of range. Terminal...
Installation Instruction
Page 12
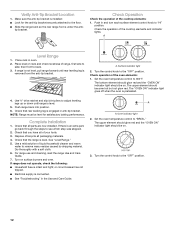
... oven temperature control to 350°F. Place level on surface burners and oven. If range does not operate, check the following: ■ Household fuse is connected. ■ See "Troubleshooting" in and turn each surface element control knob to remove waxy residue caused by shipping material. SURFACE 2 RIGHT REAR OFF HI LO RIGHT FRONT OFF HI LO 2 8 9 7 8 9 7 3 4 3 4 5 6 5 6 A. Set the oven temperature control to "BROIL." The bottom element should glow red and the "OVEN ON" indicator light should be level for the anti-tip bracket...
... oven temperature control to 350°F. Place level on surface burners and oven. If range does not operate, check the following: ■ Household fuse is connected. ■ See "Troubleshooting" in and turn each surface element control knob to remove waxy residue caused by shipping material. SURFACE 2 RIGHT REAR OFF HI LO RIGHT FRONT OFF HI LO 2 8 9 7 8 9 7 3 4 3 4 5 6 5 6 A. Set the oven temperature control to "BROIL." The bottom element should glow red and the "OVEN ON" indicator light should be level for the anti-tip bracket...


