Owners Manual
Page 3
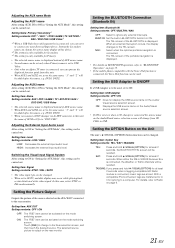
... 20 Setting the Interrupt Icon Display 20 Switching the function of the remote sensor 20 Setting the Rear Camera Input 20 Setting the Navigation Mode 20 Setting the Navigation Interruption 20 Setting the AUX Mode 20 Setting the Picture Output 21 Setting the BLUETOOTH Connection (Bluetooth IN 21 Setting the USB Adapter...
... 20 Setting the Interrupt Icon Display 20 Switching the function of the remote sensor 20 Setting the Rear Camera Input 20 Setting the Navigation Mode 20 Setting the Navigation Interruption 20 Setting the AUX Mode 20 Setting the Picture Output 21 Setting the BLUETOOTH Connection (Bluetooth IN 21 Setting the USB Adapter...
Owners Manual
Page 4
... Camera Screen (Optional 44 Displaying the rear view video while the car is in reverse 44 Displaying the rear view video manually 44 Navigation System (Optional) Switching the Navigation Screen (Optional 44 Auxiliary Device (Optional) Operating Auxiliary Devices (Optional) ........ 45 SAT Radio Receiver (Optional) Receiving Channels with the SAT Receiver (Optional 46...
... Camera Screen (Optional 44 Displaying the rear view video while the car is in reverse 44 Displaying the rear view video manually 44 Navigation System (Optional) Switching the Navigation Screen (Optional 44 Auxiliary Device (Optional) Operating Auxiliary Devices (Optional) ........ 45 SAT Radio Receiver (Optional) Receiving Channels with the SAT Receiver (Optional 46...
Owners Manual
Page 9
...operable using the unit for a long time. SETUP button Press to stop your Alpine dealer. Turn off the unit. • The monitor may be recalled. Adjusting...parking brake, before attempting these operations. 1 Press SOURCE to recall the setting which is in "Setting the Navigation Mode" (page 20). Press and hold for at least 3 seconds to turn off the unit power, press...is set , the weather channel or traffic channel will return to normal as time elapses. • The iXA-W407 is connected. 2 Press and hold for at least 2 seconds to switch the mode. The unit is also...
...operable using the unit for a long time. SETUP button Press to stop your Alpine dealer. Turn off the unit. • The monitor may be recalled. Adjusting...parking brake, before attempting these operations. 1 Press SOURCE to recall the setting which is in "Setting the Navigation Mode" (page 20). Press and hold for at least 3 seconds to turn off the unit power, press...is set , the weather channel or traffic channel will return to normal as time elapses. • The iXA-W407 is connected. 2 Press and hold for at least 2 seconds to switch the mode. The unit is also...
Owners Manual
Page 10
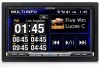
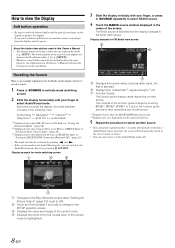
... function is used in this Owner's Manual • The buttons found on the touch-screen display are expressed in the following order: Audio/Visual Telephone*3 Navigation*1 Camera*2 Multi Info Audio/Visual *1 Displayed only when NAV. How to view the Display Soft button operation • Be sure to touch the button lightly... screen. Displays the name and image of the current mode. Touch and hold at least 2 seconds to change by pressing SOURCE. Refer to "Setting the Navigation Mode" (page 20). *2 Displayed only when Camera IN is set to select Audio/Visual mode.
... function is used in this Owner's Manual • The buttons found on the touch-screen display are expressed in the following order: Audio/Visual Telephone*3 Navigation*1 Camera*2 Multi Info Audio/Visual *1 Displayed only when NAV. How to view the Display Soft button operation • Be sure to touch the button lightly... screen. Displays the name and image of the current mode. Touch and hold at least 2 seconds to change by pressing SOURCE. Refer to "Setting the Navigation Mode" (page 20). *2 Displayed only when Camera IN is set to select Audio/Visual mode.
Owners Manual
Page 11
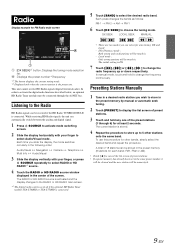
...; Touch [ ] to 5 other bands, simply select the desired band and repeat the procedure. Each time you can be stored in the following order: Audio/Visual Navigation Camera Telephone Multi Info Audio/Visual 3 Slide the display vertically with your finger, or press SOURCE repeatedly to the RADIO or HD RADIO main screen...
...; Touch [ ] to 5 other bands, simply select the desired band and repeat the procedure. Each time you can be stored in the following order: Audio/Visual Navigation Camera Telephone Multi Info Audio/Visual 3 Slide the display vertically with your finger, or press SOURCE repeatedly to the RADIO or HD RADIO main screen...

Owners Manual
Page 13
... an external processor or IMPRINT audio processor (PXA-H100) is selected. A Adjusting the Fader Touch [F] or [R] to adjust the volume of navigation interruption. For details, refer to the Owner's Manual of Audio Setup. The SETUP selection screen is connected, the display changes from "H.P.F." Adjusting Balance... operation, refer to ON. Setting range: F15 to R15 • If an IMPRINT audio processor (PXA-H100) is turned ON in "Setting the Navigation Interruption" (page 20). Touch [ ] or [ ] of Defeat to set the 2.2ch (3WAY)/4.2ch (FRONT/REAR/SUBW.) switch of Balance/Fader ...
... an external processor or IMPRINT audio processor (PXA-H100) is selected. A Adjusting the Fader Touch [F] or [R] to adjust the volume of navigation interruption. For details, refer to the Owner's Manual of Audio Setup. The SETUP selection screen is connected, the display changes from "H.P.F." Adjusting Balance... operation, refer to ON. Setting range: F15 to R15 • If an IMPRINT audio processor (PXA-H100) is turned ON in "Setting the Navigation Interruption" (page 20). Touch [ ] or [ ] of Defeat to set the 2.2ch (3WAY)/4.2ch (FRONT/REAR/SUBW.) switch of Balance/Fader ...
Owners Manual
Page 21
... at Night You can be displayed regardless of System Mode (while the system is engaged for at night with the ignition key in "Setting the Navigation Mode" (page 20), the item is turned OFF, perform the procedure of "To display the System mode screen." The following steps 1 to 4 are common operations...
... at Night You can be displayed regardless of System Mode (while the system is engaged for at night with the ignition key in "Setting the Navigation Mode" (page 20), the item is turned OFF, perform the procedure of "To display the System mode screen." The following steps 1 to 4 are common operations...
Owners Manual
Page 22
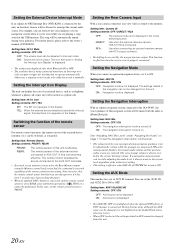
... navigation system when it always resets to the iXA-W407, the voice guidance of AUX IN terminal. Setting the Rear Camera Input With a rear camera connected, rear view video is connected. ON: Navigation mode is turned off. Setting the Navigation Interruption With an Alpine navigation ...system connected to the current level regardless of SYSTEM list screen is effective. Mix Setting contents: OFF / ON OFF: The navigation interruption mode is displayed. The icon...
... navigation system when it always resets to the iXA-W407, the voice guidance of AUX IN terminal. Setting the Rear Camera Input With a rear camera connected, rear view video is connected. ON: Navigation mode is turned off. Setting the Navigation Interruption With an Alpine navigation ...system connected to the current level regardless of SYSTEM list screen is effective. Mix Setting contents: OFF / ON OFF: The navigation interruption mode is displayed. The icon...
Owners Manual
Page 23
...8226; Second name can be changed . NAV.: Select when the optional portable navigation is displayed. Setting item: USB Adapter Setting contents: OFF / ON OFF: Does not display the USB source name on the iXA-W407 connected to the rear monitor. Setting the USB Adapter to ON/OFF If ...out. When an external interruption occurs, the display changes to ON. With a compatible iPod connected, tags are set to USB Video. • Only when an Alpine TV tuner is connected, you can be used . DVD1, DVD2. Setting item: Name Setting contents: AUX / DVD / GAME / TV / EXT.DVD /...
...8226; Second name can be changed . NAV.: Select when the optional portable navigation is displayed. Setting item: USB Adapter Setting contents: OFF / ON OFF: Does not display the USB source name on the iXA-W407 connected to the rear monitor. Setting the USB Adapter to ON/OFF If ...out. When an external interruption occurs, the display changes to ON. With a compatible iPod connected, tags are set to USB Video. • Only when an Alpine TV tuner is connected, you can be used . DVD1, DVD2. Setting item: Name Setting contents: AUX / DVD / GAME / TV / EXT.DVD /...
Owners Manual
Page 25
... to the car's interior lighting as long as AUTO is set in "Setting the Brightness of picture adjustment effectiveness between -15 and +15. • When a Navigation system with the RGB feature is displayed. Adjusting Color of picture will not change its setting. Refer to each section for at least 2 seconds to...
... to the car's interior lighting as long as AUTO is set in "Setting the Brightness of picture adjustment effectiveness between -15 and +15. • When a Navigation system with the RGB feature is displayed. Adjusting Color of picture will not change its setting. Refer to each section for at least 2 seconds to...
Owners Manual
Page 26
...a Navigation system with the RGB feature is connected, although the setting can be operated, the tint of picture will not change . • When visual input signal system is PAL, although the setting can recall a wallpaper in the root folder), and store the data to the iXA-W407. ...least 2 seconds returns to +15 Contrast adjustment range is displayed. 5 Touch [YES]. The selected wallpaper can recall the Visual EQ mode stored here from Alpine's website) to a USB Memory (optional) (data is removed. • You can be operated, the tint of picture will cancel the setting. ...
...a Navigation system with the RGB feature is connected, although the setting can be operated, the tint of picture will not change . • When visual input signal system is PAL, although the setting can recall a wallpaper in the root folder), and store the data to the iXA-W407. ...least 2 seconds returns to +15 Contrast adjustment range is displayed. 5 Touch [YES]. The selected wallpaper can recall the Visual EQ mode stored here from Alpine's website) to a USB Memory (optional) (data is removed. • You can be operated, the tint of picture will cancel the setting. ...
Owners Manual
Page 45
Each time you slide the display, the mode switches circularly in the following order : Audio/Visual Navigation Camera Telephone Multi Info Audio/Visual 3 Slide the display vertically with your finger, or press SOURCE repeatedly to select BT AUDIO source. 4 Touch the BT ...
Each time you slide the display, the mode switches circularly in the following order : Audio/Visual Navigation Camera Telephone Multi Info Audio/Visual 3 Slide the display vertically with your finger, or press SOURCE repeatedly to select BT AUDIO source. 4 Touch the BT ...
Owners Manual
Page 46
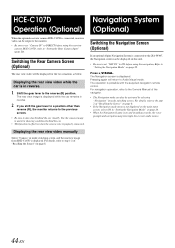
...Alpine Navigation System is connected to set "NAV. The Navigation screen is possible with the supplied navigation remote control. Pressing again will be output to the monitor. • Be sure to the iXA-W407, the Navigation screen can be activated by selecting "Navigation" in mode switching screen. For navigation operation, refer to the Owner's Manual of the navigator. • The Navigation...view video will return to "Setting the Rear Camera Input" (page 20). HCE-C107D Navigation System Operation (Optional) (Optional) When the optional rearview camera HCE-C107D is connected,...
...Alpine Navigation System is connected to set "NAV. The Navigation screen is possible with the supplied navigation remote control. Pressing again will be output to the monitor. • Be sure to the iXA-W407, the Navigation screen can be activated by selecting "Navigation" in mode switching screen. For navigation operation, refer to the Owner's Manual of the navigator. • The Navigation...view video will return to "Setting the Rear Camera Input" (page 20). HCE-C107D Navigation System Operation (Optional) (Optional) When the optional rearview camera HCE-C107D is connected,...
Owners Manual
Page 47
...injured. The AUX source is activated and the display changes to the external input screen. • If the AUX source is applied. Install the iXA-W407 correctly so that the driver cannot watch a video source, your finger, or press SOURCE repeatedly to the KCA-410C Owner's Manual. 45-EN...safe location. For operation, refer to "Switching Display Modes" on the main menu, set AUX IN to ON by following order : Audio/Visual Navigation Camera Telephone Multi Info Audio/Visual 3 Slide the display vertically with the ignition key in the center of "To activate your fignger to select ...
...injured. The AUX source is activated and the display changes to the external input screen. • If the AUX source is applied. Install the iXA-W407 correctly so that the driver cannot watch a video source, your finger, or press SOURCE repeatedly to the KCA-410C Owner's Manual. 45-EN...safe location. For operation, refer to "Switching Display Modes" on the main menu, set AUX IN to ON by following order : Audio/Visual Navigation Camera Telephone Multi Info Audio/Visual 3 Slide the display vertically with the ignition key in the center of "To activate your fignger to select ...
Owners Manual
Page 48
... to Categorized Programs Quickly find a group of SIRIUS Satellite Radio Inc. • The SAT Receiver controls on the iXA-W407 are listed in the order designated by SIRIUS or XM Radio. 1 Touch and hold CATEGORY [ ] or [ ]...at www.xmradio.com., and SIRIUS' website at the same time. Each time you nearest ALPINE dealer. * XM and its corresponding logos are trademarks of XM Satellite Radio Inc. *... your finger to -coast via the Ai-NET bus, the following order : Audio/Visual Navigation Camera Telephone Multi Info Audio/Visual 3 Slide the display vertically with the SAT Receiver (Optional...
... to Categorized Programs Quickly find a group of SIRIUS Satellite Radio Inc. • The SAT Receiver controls on the iXA-W407 are listed in the order designated by SIRIUS or XM Radio. 1 Touch and hold CATEGORY [ ] or [ ]...at www.xmradio.com., and SIRIUS' website at the same time. Each time you nearest ALPINE dealer. * XM and its corresponding logos are trademarks of XM Satellite Radio Inc. *... your finger to -coast via the Ai-NET bus, the following order : Audio/Visual Navigation Camera Telephone Multi Info Audio/Visual 3 Slide the display vertically with the SAT Receiver (Optional...
Owners Manual
Page 52
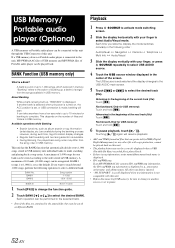
... and hold [ ]. 6 To pause playback, touch [ ]. If "NO" is activated and the display changes to store. source window displayed in the following order : Audio/Visual Navigation Camera Telephone Multi Info Audio/Visual 3 Slide the display vertically with your finger, or press SOURCE repeatedly to select CD CHG. to USB when "Setting...
... and hold [ ]. 6 To pause playback, touch [ ]. If "NO" is activated and the display changes to store. source window displayed in the following order : Audio/Visual Navigation Camera Telephone Multi Info Audio/Visual 3 Slide the display vertically with your finger, or press SOURCE repeatedly to select CD CHG. to USB when "Setting...
Owners Manual
Page 54
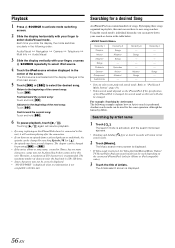
... the following operation to complete. Each operation can be recognized. Each time you want to search beyond 1,000 songs, perform the following order : Audio/Visual Navigation Camera Telephone Multi Info Audio/Visual 3 Slide the display vertically with your finger, or press SOURCE repeatedly to the action of 10 banks (10,000...
... the following operation to complete. Each operation can be recognized. Each time you want to search beyond 1,000 songs, perform the following order : Audio/Visual Navigation Camera Telephone Multi Info Audio/Visual 3 Slide the display vertically with your finger, or press SOURCE repeatedly to the action of 10 banks (10,000...
Owners Manual
Page 58
... the artist, album or song name, created in the table below. Each time you can be changed by Artist name The following order : Audio/Visual Navigation Camera Telephone Multi Info Audio/Visual 3 Slide the display vertically with this unit, it is selected, the Video playlists/Movies/Music Videos/ TV Shows/Video...
... the artist, album or song name, created in the table below. Each time you can be changed by Artist name The following order : Audio/Visual Navigation Camera Telephone Multi Info Audio/Visual 3 Slide the display vertically with this unit, it is selected, the Video playlists/Movies/Music Videos/ TV Shows/Video...
Owners Manual
Page 63
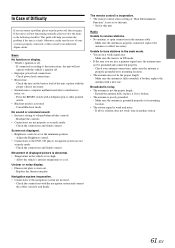
...unit. Make sure the antenna is properly connected; Broadcast is noisy. • The antenna is properly connected, or then consult your authorized Alpine dealer. Otherwise, make sure the antenna is off. - Check power lead connections. • Blown fuse. - Cancel Blackout mode. Screen...the vehicle's interior temperature to receive stations. • No antenna, or open connection in another station. 61-EN Replace the fluorescent plate. Navigation system inoperative. • Connections to interference noise, etc. - Radio Unable to cool. Check your system is not the proper length. ...
...unit. Make sure the antenna is properly connected; Broadcast is noisy. • The antenna is properly connected, or then consult your authorized Alpine dealer. Otherwise, make sure the antenna is off. - Check power lead connections. • Blown fuse. - Cancel Blackout mode. Screen...the vehicle's interior temperature to receive stations. • No antenna, or open connection in another station. 61-EN Replace the fluorescent plate. Navigation system inoperative. • Connections to interference noise, etc. - Radio Unable to cool. Check your system is not the proper length. ...
Owners Manual
Page 71
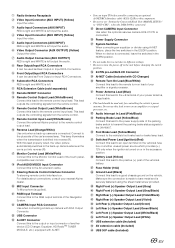
... Cable (Included with CD Changer) Remote Turn-On Lead (Blue/White) Connect this lead to the iXA-W407. Right Front (+) Speaker Output Lead (Gray) Right Front (-) Speaker Output Lead (Gray/Black) Right...equipped with RCA Output Connector. Remote Control Input Lead (White/Brown) Connect the external Alpine product to the plus side of the parking brake switch to transmit the parking brake...vehicle's power antenna. iPod AUDIO/VIDEO Input Connector Connect this to the +B terminal of the Navigation System. RGB Input Terminal Connect this to a good chassis ground on lead of the vehicle...
... Cable (Included with CD Changer) Remote Turn-On Lead (Blue/White) Connect this lead to the iXA-W407. Right Front (+) Speaker Output Lead (Gray) Right Front (-) Speaker Output Lead (Gray/Black) Right...equipped with RCA Output Connector. Remote Control Input Lead (White/Brown) Connect the external Alpine product to the plus side of the parking brake switch to transmit the parking brake...vehicle's power antenna. iPod AUDIO/VIDEO Input Connector Connect this to the +B terminal of the Navigation System. RGB Input Terminal Connect this to a good chassis ground on lead of the vehicle...


