Owners Manual
Page 4
... (Factory setting 23 Adjusting Brightness 23 Adjusting Color of Picture 23 Adjusting Tint of Picture 24 Adjusting Image Contrast 24 Adjusting Sharpness 24 Storing Visual EQ 24 Data Download Downloading the Background data 24 External Audio Processor (Optional) Adjustment Procedure for Dolby Surround 25 Setting the A.Processor 26 Storing Settings in...
... (Factory setting 23 Adjusting Brightness 23 Adjusting Color of Picture 23 Adjusting Tint of Picture 24 Adjusting Image Contrast 24 Adjusting Sharpness 24 Storing Visual EQ 24 Data Download Downloading the Background data 24 External Audio Processor (Optional) Adjustment Procedure for Dolby Surround 25 Setting the A.Processor 26 Storing Settings in...

Owners Manual
Page 13
... [ ] of Audio Setup. to "Setting the Subwoofer" on page 31. Mix Level to adjust the volume of an external audio processor is turned OFF and EQ is displayed. 2 Touch [ ] of Subwoofer to the initial setting. You can change the subwoofer output level between 0 and 15 by touching [ ] or [ ]. • The Subwoofer...
... [ ] of Audio Setup. to "Setting the Subwoofer" on page 31. Mix Level to adjust the volume of an external audio processor is turned OFF and EQ is displayed. 2 Touch [ ] of Subwoofer to the initial setting. You can change the subwoofer output level between 0 and 15 by touching [ ] or [ ]. • The Subwoofer...
Owners Manual
Page 18
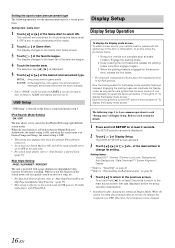
... unit is turned OFF, perform the procedure of the desired item to change its setting. Setting items: Visual EQ*1 / Dimmer / Dimmer Low Level / Background / Auto Background / Data Download*2 / Screen Alignment / Display *1 Refer to "Visual EQ" on page 23. *2 Refer to "Downloading the Background data" on the Source setup main menu in step...
... unit is turned OFF, perform the procedure of the desired item to change its setting. Setting items: Visual EQ*1 / Dimmer / Dimmer Low Level / Background / Auto Background / Data Download*2 / Screen Alignment / Display *1 Refer to "Visual EQ" on page 23. *2 Refer to "Downloading the Background data" on the Source setup main menu in step...
Owners Manual
Page 25
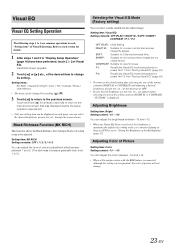
...8226; If your desired brightness, picture tint, etc., are adjusted after selecting any one setting item can be adjusted. Setting items: BK RICH / Visual EQ / Bright / Color / Tint / Contrast / Sharp / User Memory • The items can be operated, the color of the setting contents (NIGHT... system with the RGB feature is connected, although the setting can be displayed on preset No.P-2 from level 1 to 5.) Selecting the Visual EQ Mode (Factory setting) You can select the desired brightness, picture tint, etc. Adjusting Color of Picture Setting item: Color Setting content: -...
...8226; If your desired brightness, picture tint, etc., are adjusted after selecting any one setting item can be adjusted. Setting items: BK RICH / Visual EQ / Bright / Color / Tint / Contrast / Sharp / User Memory • The items can be operated, the color of the setting contents (NIGHT... system with the RGB feature is connected, although the setting can be displayed on preset No.P-2 from level 1 to 5.) Selecting the Visual EQ Mode (Factory setting) You can select the desired brightness, picture tint, etc. Adjusting Color of Picture Setting item: Color Setting content: -...
Owners Manual
Page 26
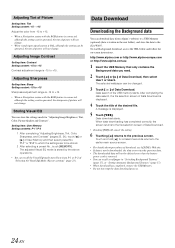
... P-1 or P-2 of "Selecting the Visual EQ Mode (Factory setting)" (page 23). The adjusted Visual EQ mode is stored by the above operations. • You can store the settings mode for at least 2 seconds returns to the iXA-W407. http://www.alpine.com or http://www.alpine-europe.com or http://www.alpine.com.au 1 Insert the USB...
... P-1 or P-2 of "Selecting the Visual EQ Mode (Factory setting)" (page 23). The adjusted Visual EQ mode is stored by the above operations. • You can store the settings mode for at least 2 seconds returns to the iXA-W407. http://www.alpine.com or http://www.alpine-europe.com or http://www.alpine.com.au 1 Insert the USB...
Owners Manual
Page 28
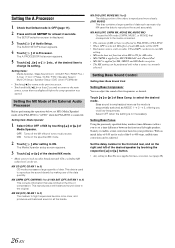
... Before performing the operations below, set . to reproduce the sound accurately. Setting items: Media Xpander / Bass Sound Cont. / DOLBY PLII / REAR FILL / X-Over / T.Corr / Phase / G-EQ / P-EQ / Speaker Select / Multi CH Setup / Speaker Setup / DVD Level / PCM Mode • Touching [ ] to return to the previous screen. • Touch and hold SETUP for...
... Before performing the operations below, set . to reproduce the sound accurately. Setting items: Media Xpander / Bass Sound Cont. / DOLBY PLII / REAR FILL / X-Over / T.Corr / Phase / G-EQ / P-EQ / Speaker Select / Multi CH Setup / Speaker Setup / DVD Level / PCM Mode • Touching [ ] to return to the previous screen. • Touch and hold SETUP for...
Owners Manual
Page 30
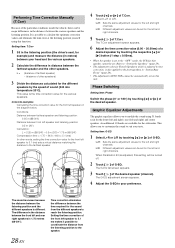
... 5.1 (ms) sets a virtual distance matching the distance to the speaker. An additional 10 bands are available for the various speakers. The G-EQ list screen appears. 3 Touch [ ] of the particular conditions inside the vehicle, there can be major differences in the distance between the various... unit. The T.Corr adjustment screen appears. 6 Adjust the time correction value (0.00 ~ 20.00ms) of a desired speaker by the speed of G-EQ. When Parametric EQ is set . Setting item: T.Corr 1 Sit in "Setting Bass Focus" (page 26). • The adjustment (AUTO TCR) cannot be set ...
... 5.1 (ms) sets a virtual distance matching the distance to the speaker. An additional 10 bands are available for the various speakers. The G-EQ list screen appears. 3 Touch [ ] of the particular conditions inside the vehicle, there can be major differences in the distance between the various... unit. The T.Corr adjustment screen appears. 6 Adjust the time correction value (0.00 ~ 20.00ms) of a desired speaker by the speed of G-EQ. When Parametric EQ is set . Setting item: T.Corr 1 Sit in "Setting Bass Focus" (page 26). • The adjustment (AUTO TCR) cannot be set ...
Owners Manual
Page 31
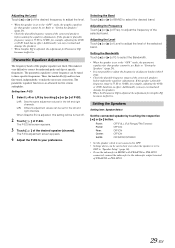
... frequency range is 55 Hz to select the desired band. Setting item: P-EQ 1 Select L+R or L/R by touching the respective [ ] or [ ] button. The P-EQ list screen appears. 3 Touch [ ] of Freq. Selecting the Band Touch [ ] or [ ] of P-EQ. Setting the Speakers Setting item: Speaker Select Set the connected speaker by touching... [ ] or [ ] of BAND to 30 kHz, for Parametric EQ becomes ineffective. Front1: Front2: Rear: Center: SubW.: OFF/FULL (Full Range)/TW (Tweeter) OFF/ON OFF/ON OFF/ON OFF/MONO...
... frequency range is 55 Hz to select the desired band. Setting item: P-EQ 1 Select L+R or L/R by touching the respective [ ] or [ ] button. The P-EQ list screen appears. 3 Touch [ ] of Freq. Selecting the Band Touch [ ] or [ ] of P-EQ. Setting the Speakers Setting item: Speaker Select Set the connected speaker by touching... [ ] or [ ] of BAND to 30 kHz, for Parametric EQ becomes ineffective. Front1: Front2: Rear: Center: SubW.: OFF/FULL (Full Range)/TW (Tweeter) OFF/ON OFF/ON OFF/ON OFF/MONO...
Owners Manual
Page 33
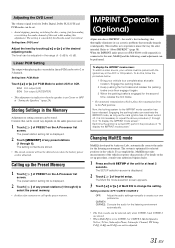
..., fast-forwarding or switching the audio channel of this unit while making this , MultEQ must be stored. The Multi EQ mode selection screen appears. 3 Touch [ ] or [ ] of Multi EQ to create your authorized Alpine dealer. 1 Press and hold SETUP of any preset stations (1 through 6) to select the preset memory. • It takes a few...
..., fast-forwarding or switching the audio channel of this unit while making this , MultEQ must be stored. The Multi EQ mode selection screen appears. 3 Touch [ ] or [ ] of Multi EQ to create your authorized Alpine dealer. 1 Press and hold SETUP of any preset stations (1 through 6) to select the preset memory. • It takes a few...
Owners Manual
Page 34
... on the IMPRINT audio processor (PXA-H100) is set to the original. Setting items: Media Xpander / X-Over / T.Corr / T.Corr Parameter / G-EQ / P-EQ / F-EQ / TW Setup* * This function can be operable only when PXA-H100 (sold separately) is connected and 2.2ch (3WAY) mode is set for a ...3WAY (2.2CH) switch on the response characteristics of data. Flat / Pops / Rock / News / Jazz&Blues / Electrical Dance / Hiphop&Rap / Easy Listening / Countryuser EQ / Classical / User1 / User2 / User3 / User4 / User5 / User6 • Only one of the Sound menu modes to 2) The dialog portion of road noise...
... on the IMPRINT audio processor (PXA-H100) is set to the original. Setting items: Media Xpander / X-Over / T.Corr / T.Corr Parameter / G-EQ / P-EQ / F-EQ / TW Setup* * This function can be operable only when PXA-H100 (sold separately) is connected and 2.2ch (3WAY) mode is set for a ...3WAY (2.2CH) switch on the response characteristics of data. Flat / Pops / Rock / News / Jazz&Blues / Electrical Dance / Hiphop&Rap / Easy Listening / Countryuser EQ / Classical / User1 / User2 / User3 / User4 / User5 / User6 • Only one of the Sound menu modes to 2) The dialog portion of road noise...
Owners Manual
Page 35
...-6 (6.3 kHz) / BAND-7 (17.5 kHz) Adjusting the Level Touch [ ] or [ ] of Level to L+R, this setting will be turned off . 2 Touch [ ] of P-EQ after selecting L+R. Setting the Time Correction Unit (T.Corr Parameter) You can be performed only when a source is currently selected. Adjusting the Parametric Equalizer Curve...of T.Corr Parameter to +6 dB 4 To adjust another band, repeat step 3 and adjust all bands. • When Graphic EQ is adjusted, the adjustment for Parametric EQ becomes ineffective. Adjusting the Band Touch [ ] or [ ] of BAND to select the band to adjust the level of ...
...-6 (6.3 kHz) / BAND-7 (17.5 kHz) Adjusting the Level Touch [ ] or [ ] of Level to L+R, this setting will be turned off . 2 Touch [ ] of P-EQ after selecting L+R. Setting the Time Correction Unit (T.Corr Parameter) You can be performed only when a source is currently selected. Adjusting the Parametric Equalizer Curve...of T.Corr Parameter to +6 dB 4 To adjust another band, repeat step 3 and adjust all bands. • When Graphic EQ is adjusted, the adjustment for Parametric EQ becomes ineffective. Adjusting the Band Touch [ ] or [ ] of BAND to select the band to adjust the level of ...
Owners Manual
Page 37
Adjustable output level: -12 to stereo or monaural. Storing Settings in "Equalizer Presets (F-EQ)" (page 32). The preset station setting list is displayed. 3 Touch [MEMORY] of any preset stations (1 through 6). Setting range: 0 to 15 Setting the Subwoofer ... (e.g. Touch [ ] or [ ] of PXA-H100. Depending on the response characteristics of the speaker, care should consider the frequency response of X-Over, T.Corr and P/G-EQ can select either System1 or System2 for at low volume settings, the subwoofer is detached. • This operation cannot be stored vary depends on the...
Adjustable output level: -12 to stereo or monaural. Storing Settings in "Equalizer Presets (F-EQ)" (page 32). The preset station setting list is displayed. 3 Touch [MEMORY] of any preset stations (1 through 6). Setting range: 0 to 15 Setting the Subwoofer ... (e.g. Touch [ ] or [ ] of PXA-H100. Depending on the response characteristics of the speaker, care should consider the frequency response of X-Over, T.Corr and P/G-EQ can select either System1 or System2 for at low volume settings, the subwoofer is detached. • This operation cannot be stored vary depends on the...
Owners Manual
Page 40
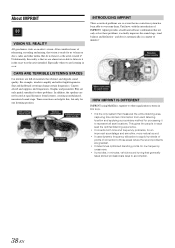
Graphic and parametric EQs are only partial remedies for these problems, it ? and does it automatically, in the exact way the artist intended. Unfortunately, the reality is the only ... degrade sound quality. INTRODUCING IMPRINT These acoustical problems are full of materials that no correction system has been able to it in a matter of IMPRINT, Alpine provides a hardware/software combination that measures the entire listening area, capturing time domain information from listeners, creating an unbalanced, uncentered sound stage. HOW IMPRINT IS...
Graphic and parametric EQs are only partial remedies for these problems, it ? and does it automatically, in the exact way the artist intended. Unfortunately, the reality is the only ... degrade sound quality. INTRODUCING IMPRINT These acoustical problems are full of materials that no correction system has been able to it in a matter of IMPRINT, Alpine provides a hardware/software combination that measures the entire listening area, capturing time domain information from listeners, creating an unbalanced, uncentered sound stage. HOW IMPRINT IS...
Owners Manual
Page 70
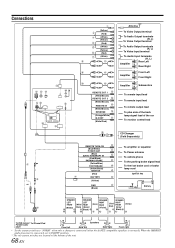
... right Front right • Set the system switches to "NORM" when only a changer is connected (when the Ai-NET compatible equalizer is connected, set to EQ/DIV position. 68 * The two system switches are located on the bottom of the unit. -EN
... right Front right • Set the system switches to "NORM" when only a changer is connected (when the Ai-NET compatible equalizer is connected, set to EQ/DIV position. 68 * The two system switches are located on the bottom of the unit. -EN
Owners Manual
Page 71
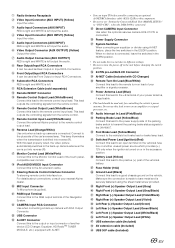
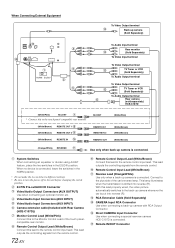
... only when the ignition is connected. Remote Control Input Lead (White/Brown) Connect the external Alpine product to the vehicle's foot brake lead or brake lamp lead. RGB Input Terminal Connect this...of the car's reverse lamp. Fuse Holder (10A) Ground Lead (Black) Connect this to the iXA-W407. Radio Antenna Receptacle Video Input Connector (AUX INPUT) (Yellow) Input the video. Battery Lead (...Orange/White) Use only when a back-up camera is connected, leave the switches in the EQ/DIV position. Audio Output Connectors (AUX OUTPUT) RED is right and WHITE is left input the...
... only when the ignition is connected. Remote Control Input Lead (White/Brown) Connect the external Alpine product to the vehicle's foot brake lead or brake lamp lead. RGB Input Terminal Connect this...of the car's reverse lamp. Fuse Holder (10A) Ground Lead (Black) Connect this to the iXA-W407. Radio Antenna Receptacle Video Input Connector (AUX INPUT) (Yellow) Input the video. Battery Lead (...Orange/White) Use only when a back-up camera is connected, leave the switches in the EQ/DIV position. Audio Output Connectors (AUX OUTPUT) RED is right and WHITE is left input the...
Owners Manual
Page 73
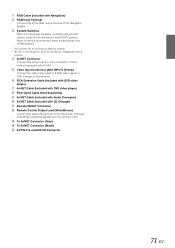
... Connector (Gray) To Ai-NET Connector (Black) 24 PIN Pre-out/AUX I/O Connector 71-EN When no device is connected, leave the switches in the EQ/DIV position.
... Connector (Gray) To Ai-NET Connector (Black) 24 PIN Pre-out/AUX I/O Connector 71-EN When no device is connected, leave the switches in the EQ/DIV position.
Owners Manual
Page 74
... OUT (White/Pink) (White/Brown) (White/Brown) (White/Brown) (Orange/White) REVERSE Use only when back-up camera is connected, leave the switches in the EQ/DIV position. This lead outputs the controlling signals from the remote control. When no device is connected. Connect to the remote control input lead. Remote...
... OUT (White/Pink) (White/Brown) (White/Brown) (White/Brown) (Orange/White) REVERSE Use only when back-up camera is connected, leave the switches in the EQ/DIV position. This lead outputs the controlling signals from the remote control. When no device is connected. Connect to the remote control input lead. Remote...


