Owner's Manual (english)
Page 4
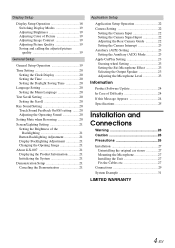
...Setting the Brightness of the Backlighting 21 Button Backlighting Adjustment 21 Display Backlighting Adjustment 21 Changing the Opening Image 21 About iLX-007 21 Displaying the Product Information 21 Initializing the System 21 Demonstration Setup 21 Canceling the Demonstration 21 Application Setup Application ... Setting the Camera Signal Input 22 Adjusting the Rear Camera Guide 22 Setting the Camera Interrupt 23 Auxiliary (AUX) Setting 23 Setting the Auxiliary (AUX) Mode 23 Apple CarPlay Setting 23 Steering wheel Setting 23 Setting the Siri Microphone Effect 23 Selecting the...
...Setting the Brightness of the Backlighting 21 Button Backlighting Adjustment 21 Display Backlighting Adjustment 21 Changing the Opening Image 21 About iLX-007 21 Displaying the Product Information 21 Initializing the System 21 Demonstration Setup 21 Canceling the Demonstration 21 Application Setup Application ... Setting the Camera Signal Input 22 Adjusting the Rear Camera Guide 22 Setting the Camera Interrupt 23 Auxiliary (AUX) Setting 23 Setting the Auxiliary (AUX) Mode 23 Apple CarPlay Setting 23 Steering wheel Setting 23 Setting the Siri Microphone Effect 23 Selecting the...
Owner's Manual (english)
Page 8
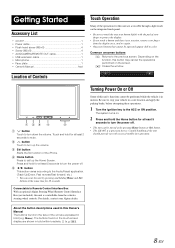
...buttons found on the face of the unit are expressed in bold within brackets, [ ] (e.g. [ ]). 8-EN For details, contact your Alpine dealer. Careful handling of the unit should provide you touch a button and there is in a safe location and apply the parking brake, before... and holding Home and Siri buttons at least 2 seconds to mute. Getting Started Accessory List • iLX-007 1 • Power cable 1 • Flush head screw (M5×8 4 • Screw (M5×8 4 • AUX/CAMERA/REMOTE OUT cable 1 • USB extension cable 1 • Microphone 1 • Face plate...
...buttons found on the face of the unit are expressed in bold within brackets, [ ] (e.g. [ ]). 8-EN For details, contact your Alpine dealer. Careful handling of the unit should provide you touch a button and there is in a safe location and apply the parking brake, before... and holding Home and Siri buttons at least 2 seconds to mute. Getting Started Accessory List • iLX-007 1 • Power cable 1 • Flush head screw (M5×8 4 • Screw (M5×8 4 • AUX/CAMERA/REMOTE OUT cable 1 • USB extension cable 1 • Microphone 1 • Face plate...
Owner's Manual (english)
Page 12
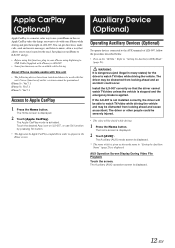
Touch the desired App icon on the road. Install the iLX-007 correctly so that allows you want to do with iPhone) to iLX-007. • Some functions may not be guaranteed. The Home screen is applied. The Auxiliary (AUX) operation screen is dangerous (and illegal in many states) ..., and listen to stay focused on iLX-007, or use your iPhone while driving and puts them right on the "AUX In". Just plug in your iPhone using this unit. Correct function of iLX-007, follow the procedure described below. • Turn on iLX-007. Operating Auxiliary Devices (Optional) To ...
Touch the desired App icon on the road. Install the iLX-007 correctly so that allows you want to do with iPhone) to iLX-007. • Some functions may not be guaranteed. The Home screen is applied. The Auxiliary (AUX) operation screen is dangerous (and illegal in many states) ..., and listen to stay focused on iLX-007, or use your iPhone while driving and puts them right on the "AUX In". Just plug in your iPhone using this unit. Correct function of iLX-007, follow the procedure described below. • Turn on iLX-007. Operating Auxiliary Devices (Optional) To ...
Owner's Manual (english)
Page 13
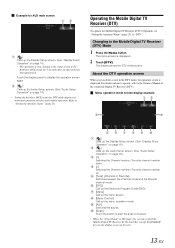
...[Scan] Touch the switch to start the scan procedure. • When the "DirectTouch" is ON (page 23), you touch the screen in the Auxiliary (AUX) mode for 5 seconds after an operation has been performed. Operating the Mobile Digital TV Receiver (DTV) To operate the Mobile Digital TV Receiver (DTV) (.... For details on how to operate, refer to the visual screen in the DTV mode, the operation screen is displayed. 2 Touch [DTV]. Example for AUX main screen [] Calls up the Display Setup screen. (See "Display Setup Operation" on page 18) • The operation screen changes to the Owner's ...
...[Scan] Touch the switch to start the scan procedure. • When the "DirectTouch" is ON (page 23), you touch the screen in the Auxiliary (AUX) mode for 5 seconds after an operation has been performed. Operating the Mobile Digital TV Receiver (DTV) To operate the Mobile Digital TV Receiver (DTV) (.... For details on how to operate, refer to the visual screen in the DTV mode, the operation screen is displayed. 2 Touch [DTV]. Example for AUX main screen [] Calls up the Display Setup screen. (See "Display Setup Operation" on page 18) • The operation screen changes to the Owner's ...
Owner's Manual (english)
Page 18
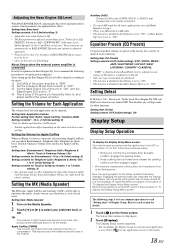
... this item via TuneIt. • Only one type is displayed. Setting the Volume for Each Application The volume level for Radio and Auxiliary (AUX) mode. • Settable applications differ depending on the Home screen. 2 The Setup main screen is selectable for Apple CarPlay mode. Setting the...Apple CarPlay (CMPM) This corrects information that corresponds to a complete stop at the time of "To display the Display Setup Menu screen." Auxiliary (AUX) Choose the MX mode (CMPM, MOVIE, or MUSIC) that was omitted at a safe location. These items are common operations to set to the...
... this item via TuneIt. • Only one type is displayed. Setting the Volume for Each Application The volume level for Radio and Auxiliary (AUX) mode. • Settable applications differ depending on the Home screen. 2 The Setup main screen is selectable for Apple CarPlay mode. Setting the...Apple CarPlay (CMPM) This corrects information that corresponds to a complete stop at the time of "To display the Display Setup Menu screen." Auxiliary (AUX) Choose the MX mode (CMPM, MOVIE, or MUSIC) that was omitted at a safe location. These items are common operations to set to the...
Owner's Manual (english)
Page 19
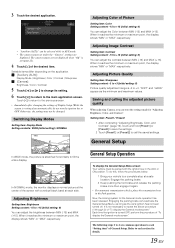
...Brightness Setting content: -15 to OFF. To do not turn the ignition key to +15 (Initial setting: 0) You can be selected while in AUX mode. • The camera names set (page 22). 4 Touch [ ] of the desired item. Refer to each "Setting item" of ... operations to +15 (Initial setting: 0) You can store the settings made for "Adjusting Brightness, Color, and Contrast". Settable items differ depending on the application. [Auxiliary (AUX)]: Display Mode / Brightness / Color / Contrast / Sharpness [Camera]: Brightness / Color / Contrast 5 Touch [ ] or [ ] to change its setting. 6 Touch [ ]...
...Brightness Setting content: -15 to OFF. To do not turn the ignition key to +15 (Initial setting: 0) You can be selected while in AUX mode. • The camera names set (page 22). 4 Touch [ ] of the desired item. Refer to each "Setting item" of ... operations to +15 (Initial setting: 0) You can store the settings made for "Adjusting Brightness, Color, and Contrast". Settable items differ depending on the application. [Auxiliary (AUX)]: Display Mode / Brightness / Color / Contrast / Sharpness [Camera]: Brightness / Color / Contrast 5 Touch [ ] or [ ] to change its setting. 6 Touch [ ]...
Owner's Manual (english)
Page 22
... the Rear Camera Guide If you select "Rear," you intend to the main application screen. Display example for rear camera mode Setting items: Camera / Auxiliary (AUX) / Apple CarPlay 4 Touch [ ] or [ ] etc., to change its video is writing data automatically) do this item.
... the Rear Camera Guide If you select "Rear," you intend to the main application screen. Display example for rear camera mode Setting items: Camera / Auxiliary (AUX) / Apple CarPlay 4 Touch [ ] or [ ] etc., to change its video is writing data automatically) do this item.
Owner's Manual (english)
Page 23
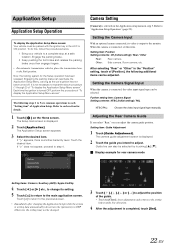
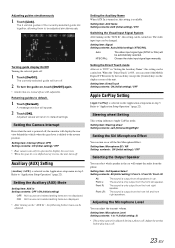
...22). Setting item: Steering wheel Setting contents: Left (Initial setting)/Right Setting the Siri Microphone Effect You can turn the guide on the "AUX In", this setting can be adjusted. Adjusting the Microphone Level You can be automatically selected. Adjusting guides simultaneously 1 Touch [Link]. Setting ... Application setup menu in "Setting the Auxiliary Name", this setting is only output from the phone. Setting the Auxiliary Name When AUX In is shifted out of reverse, the unit turns off are not displayed. Returning guides to default settings. The sound is ...
...22). Setting item: Steering wheel Setting contents: Left (Initial setting)/Right Setting the Siri Microphone Effect You can turn the guide on the "AUX In", this setting can be adjusted. Adjusting the Microphone Level You can be automatically selected. Adjusting guides simultaneously 1 Touch [Link]. Setting ... Application setup menu in "Setting the Auxiliary Name", this setting is only output from the phone. Setting the Auxiliary Name When AUX In is shifted out of reverse, the unit turns off are not displayed. Returning guides to default settings. The sound is ...
Owner's Manual (english)
Page 29
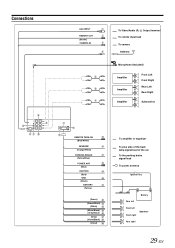
Connections AUX INPUT REMOTE OUT (Brown) CAMERA IN To Video/Audio (R, L) Output terminal To remote input lead To camera Antenna Microphone (Included) Amplifier Amplifier Amplifier Front Left ...
Connections AUX INPUT REMOTE OUT (Brown) CAMERA IN To Video/Audio (R, L) Output terminal To remote input lead To camera Antenna Microphone (Included) Amplifier Amplifier Amplifier Front Left ...
Owner's Manual (english)
Page 30
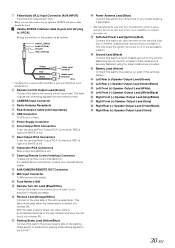
...Lead (Yellow) Connect this lead to a good chassis ground on lead of your nearest Alpine dealer. Steering Remote Control Interface Connector To steering remote control interface box. Power Antenna Lead ... on an amplifier or a signal processor, etc. Video/Audio (R,L) Input Connector (AUX INPUT) Input the AUX Video/Audio (R,L). • When you use this lead properly wired, the video ... side of the parking brake switch to transmit the parking brake status signals to the iLX-007. Parking Brake Lead (Yellow/Blue) Connect this lead to the remote control input lead...
...Lead (Yellow) Connect this lead to a good chassis ground on lead of your nearest Alpine dealer. Steering Remote Control Interface Connector To steering remote control interface box. Power Antenna Lead ... on an amplifier or a signal processor, etc. Video/Audio (R,L) Input Connector (AUX INPUT) Input the AUX Video/Audio (R,L). • When you use this lead properly wired, the video ... side of the parking brake switch to transmit the parking brake status signals to the iLX-007. Parking Brake Lead (Yellow/Blue) Connect this lead to the remote control input lead...
Owner's Manual (english)
Page 32
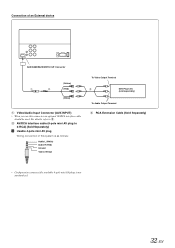
... (4-pole mini AV plug to 3-RCA) (Sold Separately) Usable 4-pole mini AV plug Wiring convention of an External device AUX/CAMERA/REMOTE OUT Connector (Yellow) (Red) (White) 1 Video/Audio Input Connector (AUX INPUT) • When you use this system is as follows: Audio L (White) Audio R (Red) Ground Video (Yellow) To...
... (4-pole mini AV plug to 3-RCA) (Sold Separately) Usable 4-pole mini AV plug Wiring convention of an External device AUX/CAMERA/REMOTE OUT Connector (Yellow) (Red) (White) 1 Video/Audio Input Connector (AUX INPUT) • When you use this system is as follows: Audio L (White) Audio R (Red) Ground Video (Yellow) To...
Owner's Manual (english)
Page 34
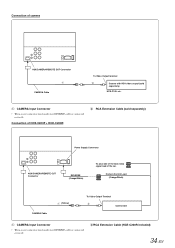
... To Video Output Terminal Control Unit 1 CAMERA Input Connector • When a rear camera is used , make sure REVERSE cable is connected correctly. Connection of camera AUX/CAMERA/REMOTE OUT Connector CAMERA Cable To Video Output terminal Camera with RCA video output (sold separately) Power Supply Connector... AUX/CAMERA/REMOTE OUT Connector REVERSE (Orange/White) To plus side of the back lamp signal lead of HCE-C200F + HCE-C200R 2 RCA Extension Cable (...
... To Video Output Terminal Control Unit 1 CAMERA Input Connector • When a rear camera is used , make sure REVERSE cable is connected correctly. Connection of camera AUX/CAMERA/REMOTE OUT Connector CAMERA Cable To Video Output terminal Camera with RCA video output (sold separately) Power Supply Connector... AUX/CAMERA/REMOTE OUT Connector REVERSE (Orange/White) To plus side of the back lamp signal lead of HCE-C200F + HCE-C200R 2 RCA Extension Cable (...


