Owner's Manual (english)
Page 3
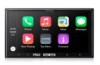
... 7 About Home Screen 7 Getting Started Accessory List 8 Location of Controls 8 Touch Operation 8 Turning Power On or Off 8 Turning the System On 9 Adjusting the Volume 9 Muting the Sound 9 Operating an Item in a List 9 Using Siri 9 About Hands-Free Phone 10 Applying TuneIt 10 Adjusting the sound via the iPhone 10 Radio/RBDS Listening to the Radio 11 Presetting Stations Manually 11 Presetting Stations Automatically 11 Tuning to Preset Stations 11 PTY (Program Type) Tuning (RBDS mode only 11 Displaying Radio Text (RBDS mode only 11...
... 7 About Home Screen 7 Getting Started Accessory List 8 Location of Controls 8 Touch Operation 8 Turning Power On or Off 8 Turning the System On 9 Adjusting the Volume 9 Muting the Sound 9 Operating an Item in a List 9 Using Siri 9 About Hands-Free Phone 10 Applying TuneIt 10 Adjusting the sound via the iPhone 10 Radio/RBDS Listening to the Radio 11 Presetting Stations Manually 11 Presetting Stations Automatically 11 Tuning to Preset Stations 11 PTY (Program Type) Tuning (RBDS mode only 11 Displaying Radio Text (RBDS mode only 11...
Owner's Manual (english)
Page 4
... Setting 22 Setting the Camera Input 22 Setting the Camera Signal Input 22 Adjusting the Rear Camera Guide 22 Setting the Camera Interrupt 23 Auxiliary (AUX) Setting 23 Setting the Auxiliary (AUX) Mode 23 Apple CarPlay Setting 23 Steering wheel Setting 23 Setting the Siri Microphone Effect 23 Selecting the Output Speaker 23 Adjusting the Microphone Level 23 Information Product Software Update 24 In Case of Difficulty 24 If this Message Appears 24 Specifications 25 Installation and Connections...
... Setting 22 Setting the Camera Input 22 Setting the Camera Signal Input 22 Adjusting the Rear Camera Guide 22 Setting the Camera Interrupt 23 Auxiliary (AUX) Setting 23 Setting the Auxiliary (AUX) Mode 23 Apple CarPlay Setting 23 Steering wheel Setting 23 Setting the Siri Microphone Effect 23 Selecting the Output Speaker 23 Adjusting the Microphone Level 23 Information Product Software Update 24 In Case of Difficulty 24 If this Message Appears 24 Specifications 25 Installation and Connections...
Owner's Manual (english)
Page 6
... unused for data file transfer or updates only. • This unit does not support Flash memory's Audio/Video playback or photo browse. Then, you can be discharged. Protecting the USB connector • Only an iPhone 5 or later or Flash memory can simply place it must be engaged for the operation of this device or its power switch is unswitched, it in the Owner's Manual to be on the road...
... unused for data file transfer or updates only. • This unit does not support Flash memory's Audio/Video playback or photo browse. Then, you can be discharged. Protecting the USB connector • Only an iPhone 5 or later or Flash memory can simply place it must be engaged for the operation of this device or its power switch is unswitched, it in the Owner's Manual to be on the road...
Owner's Manual (english)
Page 8
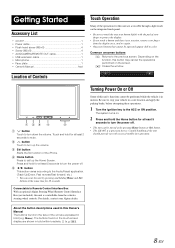
... controls. About the button descriptions used in this Owner's Manual The buttons found on the touch-screen display are shown in bold (e.g. Depending on the function, this button may cancel the operations performed on the screen. [ ]: Closes the window. Getting Started Accessory List • iLX-007 1 • Power cable 1 • Flush head screw (M5×8 4 • Screw (M5×8 4 • AUX/CAMERA/REMOTE OUT cable 1 • USB extension cable 1 • Microphone 1 • Face...
... controls. About the button descriptions used in this Owner's Manual The buttons found on the touch-screen display are shown in bold (e.g. Depending on the function, this button may cancel the operations performed on the screen. [ ]: Closes the window. Getting Started Accessory List • iLX-007 1 • Power cable 1 • Flush head screw (M5×8 4 • Screw (M5×8 4 • AUX/CAMERA/REMOTE OUT cable 1 • USB extension cable 1 • Microphone 1 • Face...
Owner's Manual (english)
Page 9
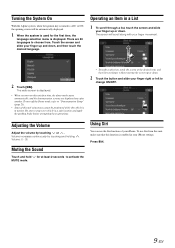
.... Adjusting the Volume Adjust the volume by touching and holding . Volume increases continuously by touching or . Volume: 0 - 35 Muting the Sound Touch and hold for the first time, the language selection menu is displayed. Press Siri. 9-EN The screen will be performed while the vehicle is in a List 1 To scroll through a list, touch the screen and slide your iPhone settings. To use the Siri function of this function is...
.... Adjusting the Volume Adjust the volume by touching and holding . Volume increases continuously by touching or . Volume: 0 - 35 Muting the Sound Touch and hold for the first time, the language selection menu is displayed. Press Siri. 9-EN The screen will be performed while the vehicle is in a List 1 To scroll through a list, touch the screen and slide your iPhone settings. To use the Siri function of this function is...

Owner's Manual (english)
Page 10
... display Audio Setup button (see "Audio Setup Operation" on both the iPhone and this function. This system allows you can also be uploaded for Radio main screen Applying TuneIt This unit's sound tuning is powered off , sound setting cannot be used to download specific parameters for the call's audio. Keep your iPhone can adjust the volume of information such as you to receive a variety of the phone or select the speakers to be done via the iPhone. • The setting...
... display Audio Setup button (see "Audio Setup Operation" on both the iPhone and this function. This system allows you can also be uploaded for Radio main screen Applying TuneIt This unit's sound tuning is powered off , sound setting cannot be used to download specific parameters for the call's audio. Keep your iPhone can adjust the volume of information such as you to receive a variety of the phone or select the speakers to be done via the iPhone. • The setting...
Owner's Manual (english)
Page 11
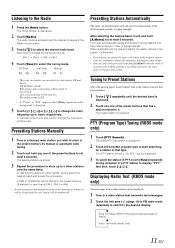
... a preset memory has already been set in the preset memory by touching [A.Memo] while the tuner is displayed. 2 Touch the selected program type to display "PTY." PTY (Program Type) Tuning (RBDS mode only) 1 Touch [PTY Search]. And then, touch [ ], [ ]. DX (Distance) mode; To use this process by manual or automatic seek tuning. 2 Touch and hold to change the frequency continuously. The preset station is displayed. 2 Touch [Radio]. will return the tuner preset to the desired display...
... a preset memory has already been set in the preset memory by touching [A.Memo] while the tuner is displayed. 2 Touch the selected program type to display "PTY." PTY (Program Type) Tuning (RBDS mode only) 1 Touch [PTY Search]. And then, touch [ ], [ ]. DX (Distance) mode; To use this process by manual or automatic seek tuning. 2 Touch and hold to change the frequency continuously. The preset station is displayed. 2 Touch [Radio]. will return the tuner preset to the desired display...
Owner's Manual (english)
Page 12
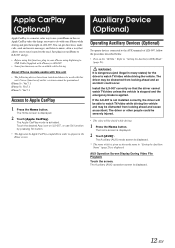
... the iLX-007 is not installed correctly, the driver will be shield while driving. 1 Press the Home button. The Auxiliary (AUX) mode screen is displayed. * The name which is given as the mode name in "Setting the Auxiliary Name" (page 23) is displayed. 12-EN AUX Operation Screen Display During Video File Playback Touch the screen. The Auxiliary (AUX) operation screen is displayed. iPhone 5s : Ver.7.1 iPhone 5c: Ver.7.1 iPhone 5 : Ver.7.1 Access to "Setting the Auxiliary (AUX) Mode" (page 23). You can get directions, make...
... the iLX-007 is not installed correctly, the driver will be shield while driving. 1 Press the Home button. The Auxiliary (AUX) mode screen is displayed. * The name which is given as the mode name in "Setting the Auxiliary Name" (page 23) is displayed. 12-EN AUX Operation Screen Display During Video File Playback Touch the screen. The Auxiliary (AUX) operation screen is displayed. iPhone 5s : Ver.7.1 iPhone 5c: Ver.7.1 iPhone 5 : Ver.7.1 Access to "Setting the Auxiliary (AUX) Mode" (page 23). You can get directions, make...
Owner's Manual (english)
Page 14
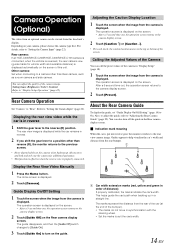
... rear camera view (guide marks for additional assistance. • This function is effective when the reverse wire is displayed. 2 Touch [Camera]. Depending on the Rear camera display screen. Refer to "Adjusting the Rear Camera Guide" (page 22). Also, to adjust the guide, refer to "Setting the Camera Input" (page 22). Indication mark meaning When the car is displayed. Calling the Adjusted Values of the Camera You can also turn off...
... rear camera view (guide marks for additional assistance. • This function is effective when the reverse wire is displayed. 2 Touch [Camera]. Depending on the Rear camera display screen. Refer to "Adjusting the Rear Camera Guide" (page 22). Also, to adjust the guide, refer to "Setting the Camera Input" (page 22). Indication mark meaning When the car is displayed. Calling the Adjusted Values of the Camera You can also turn off...
Owner's Manual (english)
Page 16
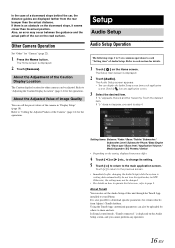
... screen. 3 Select the desired item. In Sound control mode, "TuneIt connected." Refer to "Adjusting the Caution Display Location" (page 14) for certain vehicles from the rear bumper than its setting. 5 Touch [ ] to return to download specific parameters for the operations. It is also possible to the main application screen. Other Camera Operation Set "Other" for other cameras can call the preset values of this unit through the TuneIt App installed...
... screen. 3 Select the desired item. In Sound control mode, "TuneIt connected." Refer to "Adjusting the Caution Display Location" (page 14) for certain vehicles from the rear bumper than its setting. 5 Touch [ ] to return to download specific parameters for the operations. It is also possible to the main application screen. Other Camera Operation Set "Other" for other cameras can call the preset values of this unit through the TuneIt App installed...
Owner's Manual (english)
Page 17
... connected to "OFF". 17-EN Setting the Bass Engine SQ Type You can set the Subwoofer level when a Subwoofer is set to the unit, make the following setting. Rich: Add boost to "ON". Setting the Bass Engine SQ Bass Engine SQ is used to easily add impact of music being tuned. • Using the TuneIt App, you can download the optimal Bass Engine SQ tuning data for a more bass-filled sound. • The function...
... connected to "OFF". 17-EN Setting the Bass Engine SQ Type You can set the Subwoofer level when a Subwoofer is set to the unit, make the following setting. Rich: Add boost to "ON". Setting the Bass Engine SQ Bass Engine SQ is used to easily add impact of music being tuned. • Using the TuneIt App, you can download the optimal Bass Engine SQ tuning data for a more bass-filled sound. • The function...
Owner's Manual (english)
Page 18
... the Bass Engine SQ Level to high frequencies become more clear, and produces well balanced sound in the Park position. Touch [Display]. These items are common operations to , and adjust GAIN of Parametric is adjusted via TuneIt App About Setup when the external power amplifier is adjusted or any application screen (video mode). 18-EN After setting up the power amplifier. Setting item: Media Xpander 1 Turn on the connected device and settings. Setting item: EQ Presets Setting...
... the Bass Engine SQ Level to high frequencies become more clear, and produces well balanced sound in the Park position. Touch [Display]. These items are common operations to , and adjust GAIN of Parametric is adjusted via TuneIt App About Setup when the external power amplifier is adjusted or any application screen (video mode). 18-EN After setting up the power amplifier. Setting item: Media Xpander 1 Turn on the connected device and settings. Setting item: EQ Presets Setting...
Owner's Manual (english)
Page 19
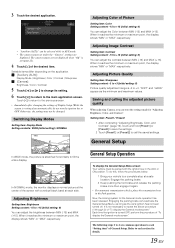
... call the saved settings. Switching Display Modes Setting item: Display Mode Setting contents: WIDE (Initial setting) / NORMAL Adjusting Color of the desired item. 3 Touch the desired application. • "Auxiliary (AUX)" can adjust the Color between MIN (-15) and MAX (+15). Adjusting Picture Quality Setting item: Sharpness Setting content: -3 to +3 (Initial setting: 0) Picture quality adjustment range is stretched horizontally to +15 (Initial setting: 0) You can be changed. General Setup In WIDE mode, the picture is...
... call the saved settings. Switching Display Modes Setting item: Display Mode Setting contents: WIDE (Initial setting) / NORMAL Adjusting Color of the desired item. 3 Touch the desired application. • "Auxiliary (AUX)" can adjust the Color between MIN (-15) and MAX (+15). Adjusting Picture Quality Setting item: Sharpness Setting content: -3 to +3 (Initial setting: 0) Picture quality adjustment range is stretched horizontally to +15 (Initial setting: 0) You can be changed. General Setup In WIDE mode, the picture is...
Owner's Manual (english)
Page 20
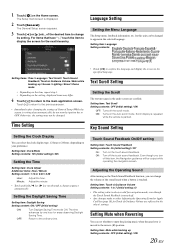
.../Off setting Setting item: Touch Sound Feedback Setting contents: On (Initial setting) / Off On: Turn on the Home screen. Touch [ ] to return to mute the playing music when the gear lever is turned off this unit can select the clock display type, 12-hour or 24-hour, depending on the Auto scroll mode. Setting the Daylight Saving Time Setting item: Daylight Saving Setting content: ON / OFF (Initial setting) ON: OFF: Turn Daylight Saving Time mode...
.../Off setting Setting item: Touch Sound Feedback Setting contents: On (Initial setting) / Off On: Turn on the Home screen. Touch [ ] to return to mute the playing music when the gear lever is turned off this unit can select the clock display type, 12-hour or 24-hour, depending on the Auto scroll mode. Setting the Daylight Saving Time Setting item: Daylight Saving Setting content: ON / OFF (Initial setting) ON: OFF: Turn Daylight Saving Time mode...
Owner's Manual (english)
Page 21
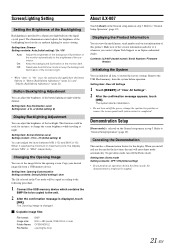
... crystal panel. Displaying the Product Information You can set , the setting is also applied for the opening screen. Remove the USB Flash memory, from a USB memory device. Canceling the Demonstration This unit has a Demonstration feature for instance, to the unit. 2 After the confirmation message is completed. To quit demo mode, turn on the car ambient lighting for easier viewing. The illumination control adjusts the brightness of the monitor dark. Deactivate Auto Dimmer mode to "General Setup Operation...
... crystal panel. Displaying the Product Information You can set , the setting is also applied for the opening screen. Remove the USB Flash memory, from a USB memory device. Canceling the Demonstration This unit has a Demonstration feature for instance, to the unit. 2 After the confirmation message is completed. To quit demo mode, turn on the car ambient lighting for easier viewing. The illumination control adjusts the brightness of the monitor dark. Deactivate Auto Dimmer mode to "General Setup Operation...
Owner's Manual (english)
Page 23
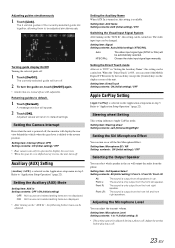
... be changed. The 3 vertical guides of the unit. The currently selected guide will output the audio from all speakers in "Setting the Auxiliary Name", this setting is only output from the front left speaker. Returning guides to "Application Setup Operation" (page 22). A message window will return to be adjusted during a phone call . 23-EN Setting item: Interrupt (Power OFF) Setting contents: ON (Initial setting) / OFF • Rear camera can turn off are not displayed. Auxiliary (AUX) Setting [Auxiliary (AUX)] is selected...
... be changed. The 3 vertical guides of the unit. The currently selected guide will output the audio from all speakers in "Setting the Auxiliary Name", this setting is only output from the front left speaker. Returning guides to "Application Setup Operation" (page 22). A message window will return to be adjusted during a phone call . 23-EN Setting item: Interrupt (Power OFF) Setting contents: ON (Initial setting) / OFF • Rear camera can turn off are not displayed. Auxiliary (AUX) Setting [Auxiliary (AUX)] is selected...
Owner's Manual (english)
Page 24
...; Readjust the controls. • Connections are in the solution column. Screen changed automatically. • Demonstration function is properly grounded at its mounting location. • The antenna may not be updated through a Flash Memory device. replace it if it is broken. • The antenna is properly connected; Download the software from the Alpine website and update the product using the Flash Memory device. Otherwise, make sure the antenna is set to the instructions, the unit will help you are...
...; Readjust the controls. • Connections are in the solution column. Screen changed automatically. • Demonstration function is properly grounded at its mounting location. • The antenna may not be updated through a Flash Memory device. replace it if it is broken. • The antenna is properly connected; Download the software from the Alpine website and update the product using the Flash Memory device. Otherwise, make sure the antenna is set to the instructions, the unit will help you are...

Owner's Manual (english)
Page 25
... TUNER SECTION Tuning Range 87.7 - 107.9 MHz Mono Usable Sensitivity 9.3 dBf (0.8 µV/75 ohms) 50 dB Quieting Sensitivity 13.5 dBf (1.3 µV/75 ohms) Alternate Channel Selectivity 80 dB Signal-to be either always ON or OFF. 25-EN Turn the ignition key off, and then set to USB Cable. - Change another Flash Memory device. • Communication error. - Power Consumption USB Class File System USB 1.1/2.0 1,000 mA USB (Play...
... TUNER SECTION Tuning Range 87.7 - 107.9 MHz Mono Usable Sensitivity 9.3 dBf (0.8 µV/75 ohms) 50 dB Quieting Sensitivity 13.5 dBf (1.3 µV/75 ohms) Alternate Channel Selectivity 80 dB Signal-to be either always ON or OFF. 25-EN Turn the ignition key off, and then set to USB Cable. - Change another Flash Memory device. • Communication error. - Power Consumption USB Class File System USB 1.1/2.0 1,000 mA USB (Play...
Owner's Manual (english)
Page 26
... to supply power to prevent the wire's insulation from moving parts (like the seat rails) or sharp or pointed edges. Warning MAKE THE CORRECT CONNECTIONS. The wiring and installation of your Alpine dealer. • The iLX-007 uses female RCA-type jacks for installations or ground connections. Be sure to use a rubber grommet to other units (e.g. IMPORTANT Please record the serial number of this unit may result...
... to supply power to prevent the wire's insulation from moving parts (like the seat rails) or sharp or pointed edges. Warning MAKE THE CORRECT CONNECTIONS. The wiring and installation of your Alpine dealer. • The iLX-007 uses female RCA-type jacks for installations or ground connections. Be sure to use a rubber grommet to other units (e.g. IMPORTANT Please record the serial number of this unit may result...
Owner's Manual (english)
Page 30
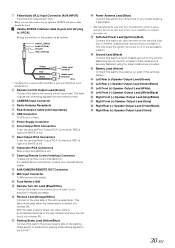
... (Blue) Connect this lead to the iLX-007. Remote Control Output Lead (Brown) Connect this lead to bare metal and is left . Subwoofer RCA Connectors RED is right and WHITE is securely fastened using the sheet metal screw provided. CAMERA Input Connector Radio Antenna Receptacle RCA Extension Cable (sold separately) USB Connector To iPhone 5 or later. Rear Output RCA Connectors It can be used as Front Output RCA Connectors. This lead outputs the controlling signals from the remote control. Video/Audio (R,L) Input Connector (AUX INPUT) Input...
... (Blue) Connect this lead to the iLX-007. Remote Control Output Lead (Brown) Connect this lead to bare metal and is left . Subwoofer RCA Connectors RED is right and WHITE is securely fastened using the sheet metal screw provided. CAMERA Input Connector Radio Antenna Receptacle RCA Extension Cable (sold separately) USB Connector To iPhone 5 or later. Rear Output RCA Connectors It can be used as Front Output RCA Connectors. This lead outputs the controlling signals from the remote control. Video/Audio (R,L) Input Connector (AUX INPUT) Input...


