Alpine iLX-F309TND Support and Manuals
Get Help and Manuals for this Alpine item
View All Support Options Below
Free Alpine iLX-F309TND manuals!
Problems with Alpine iLX-F309TND?
Ask a Question
Free Alpine iLX-F309TND manuals!
Problems with Alpine iLX-F309TND?
Ask a Question
Popular Alpine iLX-F309TND Manual Pages
Installation Manual - Page 1
... Manual ˜ Model: Tundra ˜ Model Year: 2014-Up
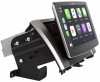
iLX-F309TND
Toyota Tundra ˜ 1/19
Toyota
Model Tundra
Year 2014 - Warning: Before you begin reading the main text. Note
˜ Design and specifications are subject to carefully read this installation manual and the separate user's manual so that are listed below. Alpine Electronics bears no responsibility for problems...
Installation Manual - Page 2
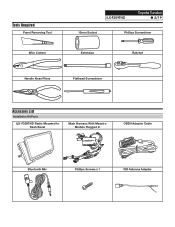
Tools Required
Panel Removing Tool
Wire Cutters
iLX-F309TND
Toyota Tundra ˜ 2/19
10mm Socket
Phillips Screwdriver
Extension
Ratchet
Needle Nose Pliers
Flathead Screwdriver
Accessory List
Installation Kit Parts
iLX-F309TND Radio Mounted In Dash Bezel
Main Harness With Maestro Module Plugged In
OBDII Adapter Cable
Bluetooth Mic
Phillips Screws x 1
FM Antenna Adapter
Installation Manual - Page 4
...installed" appears.
A confirmation email will be programmed specifically for your PC.
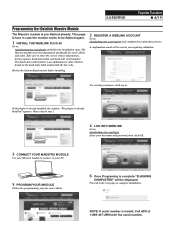
5 PROGRAM YOUR MODULE
Follow the programming steps for each vehicle and radio. Enter your username and password.../login. iLX-F309TND
Toyota Tundra ˜ 4/19
Programming the iDatalink Maestro Module
The Maestro module is complete "FLASHING
COMPLETED!" Review the System Requirements before installing.
2 ...
Installation Manual - Page 5
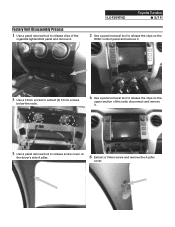
Factory Unit Disassembly Process
1 Use a panel removal tool to release screw cover on
the driver's side A pillar.
6 Extract a 10mm screw and remove the A pillar
cover. iLX-F309TND
Toyota Tundra ˜ 5/19
2 Use a panel removal tool to release the clips on the
HVAC control panel and remove it.
3 Use a 10mm socket to extract (4) 10mm screws
...
Installation Manual - Page 6
iLX-F309TND
Toyota Tundra ˜ 6/19
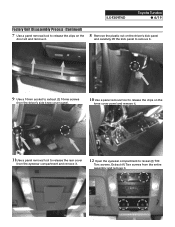
Factory Unit Disassembly Process (Continued)
7 Use a panel removal tool to release the clips on the
door sill and remove it.
8 Remove the plastic nut on the driver's kick panel
and carefully lift the kick panel to remove it.
9 Use a 10mm socket to extract (2) 10mm screws
from the driver's side knee...
Installation Manual - Page 7
iLX-F309TND
Toyota Tundra ˜ 7/19
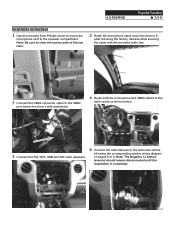
Installation Instructions
1 Use the included 3mm Phillips screw to mount the
microphone next to the radio and vehicle
following the factory harness while securing
the cable with the provided cable ties.
3 Connect the OBD2 connector cable to the OBD2
port below the driver's side dashboard.
4 Route both the microphone and OBD2...
Installation Manual - Page 8
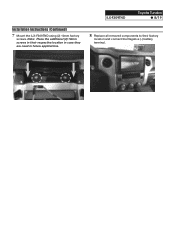
Note: Place the additional (2) 10mm screws in their respective location in case they are need in future applications.
8 Replace all removed components to their factory
location and connect the Negative (-) battery
terminal. iLX-F309TND
Toyota Tundra ˜ 8/19
Installation Instructions (Continued)
7 Mount the iLX-F309TND using (2) 10mm factory
screws.
Installation Manual - Page 11
iLX-F309TND
Toyota Tundra ˜ 11/19
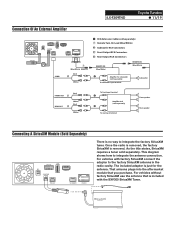
Connection Of An External Amplifier
ANTENNA
CAN I /F GPS
SXM/DAB
USB
HDMI IN
PRE OUT
W. REMOTE
POWER
There is just for subwoofer (...
Installation Manual - Page 12
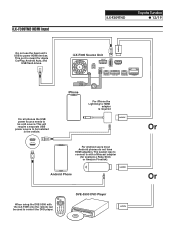
... Source Unit
CAN I/F GPS
SXM/DAB
USB HDMI IN
ANTENNA
PRE OUT EXT.
iLX-F309TND HDMI Input
iLX-F309TND
Toyota Tundra ˜ 12/19
Do not use the head unit's USB to control the DVD player.
The easiest way to be installed
in the vehicle.
For all phones the USB power source needs to connect is...
Installation Manual - Page 13

iLX-F309TND Wiring Diagram
Interface cable
SPEED SENSOR (Green/White) CAMERA
IDATALINK I/F
AUX INPUT
REMO (Blue/White) REVERSE (Orange...(White) (White/Black) (Gray/Black) (Gray) (Violet/Black) (Violet)
STEERING REMOTE MIC IN SUBW FRONT OUT REAR OUT
iLX-F309TND
Toyota Tundra ˜ 13/19
To SiriusXM Tuner Vehicle Antenna GPS Antenna (Included)
To the vehicle speed pulse line
To Front, Rear or ...
Installation Manual - Page 15
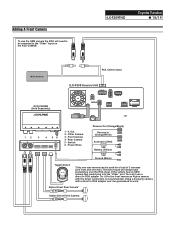
...If the vehicle has an OEM camera that would plug into the "Other" port. Alpine Direct Rear Camera*
Alpine Direct Front Camera Adding A Front Camera
To use a direct to RCA adapter for a... RCA will always take precedence over the RCA input.
iLX-F309TND
Toyota Tundra ˜ 15/19
Main Harness
KCX-C2600B (Sold Separately)
RCA Camera Input
iLX-F309 Source Unit
CAN I/F GPS
USB HDMI IN
SXM...
Installation Manual - Page 16
iLX-F309TND
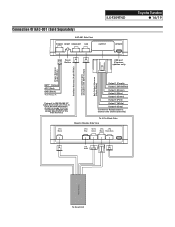
Connection Of KAC-001 (Sold Separately)
KAC-001 Side View
POWER RESET HEADUNIT CAN
OUTPUT
UPDATE
Toyota Tundra ˜ 16/19
Reset Button
USB port (Firmware updates only)
Power Harness...Used
Main Harness
To Head Unit This is
the 4 pin data connector shown on page 12 in the installation diagram that comes directly off of the
main harness
Output 1 (Purple) Output 2 (White/Red) ...
Installation Manual - Page 17
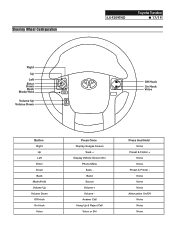
Steering Wheel Configuration
iLX-F309TND
Toyota Tundra ˜ 17/19
Right
Up
Left
Enter
Down
Back
Mode/Hold
MODE HOLD
Volume Up Volume Down
Off Hook
On Hook Voice
Button Right Up ...
Installation Manual - Page 18
... Accessory Control Module) is present be sure to turn it ON in the SETUP MENU.
(MENU/SYSTEM/EXTERNAL ACCESSORIES/EXTERNAL ACCESSORY CTLR).
8 Vehicle information- A third party USB adapter will need to be the one purchased from Apple.
Set Up Guide
iLX-F309TND
Toyota Tundra ˜ 18/19
1 Turn the vehicle's Ignition switch to ACC. 2 Turn ON...
Installation Manual - Page 19
... has not been activated.
iLX-F309TND
Toyota Tundra ˜ 19/19
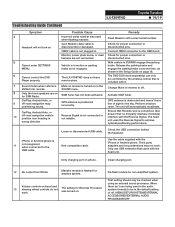
Troubleshooting Guide Continued
Symptom
Possible Cause
Remedy
4
Incorrect serial number was turned on .
4 pin Maestro data cable is disconnected or damaged. Release the parking brake and engage the parking brake a second time, as shown in the Setup Guide on phone. That setting should only be controlled by...
Alpine iLX-F309TND Reviews
We have not received any reviews for Alpine yet.