Owner's Manual (english)
Page 5
... Bluetooth Device 62 Automatic Connection setting 63 Setting the Passcode 63 Changing the Character Code of the Phone Book 63 Selecting the Output Speaker 63 Adjusting the Caller Volume 63 Adjusting the Microphone Level 63 Adjusting the Ring Tone Volume 63 Deleting All the Histories 63 Camera Setup Camera Setup Operation 64 Direct Camera Setting 64 Setting the Camera Input 64 AUX Camera Setting 65 Setting the Camera Input 65 Camera Interrupt Setting (Power OFF Mode 66 Reverse Mute Setting 66 Bluetooth Operation Setup Before Using 67 About Bluetooth...
... Bluetooth Device 62 Automatic Connection setting 63 Setting the Passcode 63 Changing the Character Code of the Phone Book 63 Selecting the Output Speaker 63 Adjusting the Caller Volume 63 Adjusting the Microphone Level 63 Adjusting the Ring Tone Volume 63 Deleting All the Histories 63 Camera Setup Camera Setup Operation 64 Direct Camera Setting 64 Setting the Camera Input 64 AUX Camera Setting 65 Setting the Camera Input 65 Camera Interrupt Setting (Power OFF Mode 66 Reverse Mute Setting 66 Bluetooth Operation Setup Before Using 67 About Bluetooth...

Owner's Manual (english)
Page 6
... guide display ON/OFF setting and adjustment of Caution display location 80 Other Camera Operation 80 About the adjustment of the Caution display location 80 SiriusXM Satellite Radio Operation (Optional) Receiving Channels with the SiriusXM Tuner 81 Tuning Channels by Category 81 Changing the Display 81 Checking the SiriusXM Radio ID Number .... 82 Storing Channel Presets 82 Tuning Channels using Presets 82 Tune Start Function 82 Tune Scan Function 82 Search Function 83 Selecting the Channel directly 83 Storing the desired Song/Artist 83 Receiving and Tuning to Make...
... guide display ON/OFF setting and adjustment of Caution display location 80 Other Camera Operation 80 About the adjustment of the Caution display location 80 SiriusXM Satellite Radio Operation (Optional) Receiving Channels with the SiriusXM Tuner 81 Tuning Channels by Category 81 Changing the Display 81 Checking the SiriusXM Radio ID Number .... 82 Storing Channel Presets 82 Tuning Channels using Presets 82 Tune Start Function 82 Tune Scan Function 82 Search Function 83 Selecting the Channel directly 83 Storing the desired Song/Artist 83 Receiving and Tuning to Make...
Owner's Manual (english)
Page 10
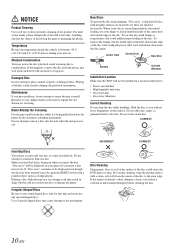
... center of mild neutral detergent before turning your player if you insert the disc. Center Hole Center Hole New Disc Bumps Outside (Bumps) Installation Location Make sure the X009 will be installed in a solution of the disc to the mechanism. If this unit and never use your Alpine dealer or the nearest Alpine Service Station for the moisture to : • Direct sun and heat • High humidity...
... center of mild neutral detergent before turning your player if you insert the disc. Center Hole Center Hole New Disc Bumps Outside (Bumps) Installation Location Make sure the X009 will be installed in a solution of the disc to the mechanism. If this unit and never use your Alpine dealer or the nearest Alpine Service Station for the moisture to : • Direct sun and heat • High humidity...
Owner's Manual (english)
Page 18
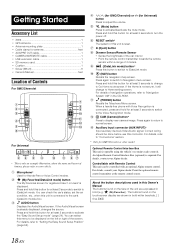
...-ROM. (PHONE) button Recalls the Telephone Menu screen. Press again to switch to activate/deactivate the mute mode. CAM (Camera) button* Press to normal screen. Auxiliary Input connector (AUX INPUT)* Input auxiliary device's Video/Audio signal. Correct wiring should be done before use this button for at least 3 seconds to turn the power off. The buttons found on the face of this button for at least 3 seconds to activate the "Easy Sound Setup mode" (page 24). Microphone* Used for Hands-Free or Voice Control modes. (My...
...-ROM. (PHONE) button Recalls the Telephone Menu screen. Press again to switch to activate/deactivate the mute mode. CAM (Camera) button* Press to normal screen. Auxiliary Input connector (AUX INPUT)* Input auxiliary device's Video/Audio signal. Correct wiring should be done before use this button for at least 3 seconds to turn the power off. The buttons found on the face of this button for at least 3 seconds to activate the "Easy Sound Setup mode" (page 24). Microphone* Used for Hands-Free or Voice Control modes. (My...
Owner's Manual (english)
Page 24
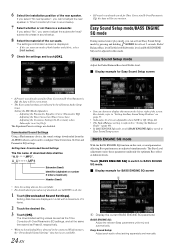
... already saved for BASS ENGINE SQ screen Display the current BASS ENGINE SQ parameter. BASS ENGINE SQ mode With the BASS ENGINE SQ function on page 55. • Subwoofer level is not available. 24-EN • You can be adjusted in a list with a maximum of download data shall be "A_U*****.MP3". Easy Sound Setup: Adjust each audio effect setting separately and manually. Downloaded Sound Settings Using a Flash memory device, the sound settings downloaded from the ALPINE website can choose...
... already saved for BASS ENGINE SQ screen Display the current BASS ENGINE SQ parameter. BASS ENGINE SQ mode With the BASS ENGINE SQ function on page 55. • Subwoofer level is not available. 24-EN • You can be adjusted in a list with a maximum of download data shall be "A_U*****.MP3". Easy Sound Setup: Adjust each audio effect setting separately and manually. Downloaded Sound Settings Using a Flash memory device, the sound settings downloaded from the ALPINE website can choose...
Owner's Manual (english)
Page 25
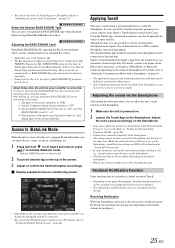
... TuneIt App), Subwoofer Level, Media Xpander, X-Over, Car Specific Sound Setup and Download Sound Setting. In order to optimize the BASS ENGINE SQ, we recommend the following functions may not be done on the Smartphone. 1 Make sure the unit is downloadable from Alpine's TuneIt database stored in a service area or receives no signal. For details, refer to USB (iPhone) or Bluetooth (Android) depending on the top of the power amplifier. Using the TuneIt...
... TuneIt App), Subwoofer Level, Media Xpander, X-Over, Car Specific Sound Setup and Download Sound Setting. In order to optimize the BASS ENGINE SQ, we recommend the following functions may not be done on the Smartphone. 1 Make sure the unit is downloadable from Alpine's TuneIt database stored in a service area or receives no signal. For details, refer to USB (iPhone) or Bluetooth (Android) depending on the top of the power amplifier. Using the TuneIt...
Owner's Manual (english)
Page 37
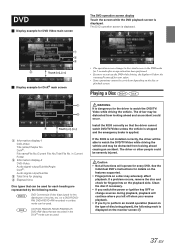
... screen • The operation screen changes to perform an invalid operation (based on the monitor screen: 37-EN DVD Commercial Video discs (used for each heading are recorded in a video mode can be used . Install the X009 correctly so that are represented by the following mark is applied. CD-R/CD-RW/DVD-R/DVD-RW/DVD+R/ DVD+RW discs that the driver cannot watch the DVD/TV/ Video while driving the vehicle. Caution • Not all functions...
... screen • The operation screen changes to perform an invalid operation (based on the monitor screen: 37-EN DVD Commercial Video discs (used for each heading are recorded in a video mode can be used . Install the X009 correctly so that are represented by the following mark is applied. CD-R/CD-RW/DVD-R/DVD-RW/DVD+R/ DVD+RW discs that the driver cannot watch the DVD/TV/ Video while driving the vehicle. Caution • Not all functions...

Owner's Manual (english)
Page 48
... parking brake once then engage it again. 3 When the parking brake is selected on the General setup menu in step 3. The Sound Setup screen appears. 3 Select the desired item. 48-EN Setting items: Balance/Fader/Subwoofer*1 / Media Xpander*1 / EQ Presets*1 / Parametric EQ*1 / Time Correction*1 / X-Over*1 / Defeat*1 / Volume / Source Volume Setup*2 Installation Setup [Installation] is engaged for the second time, release the foot brake. • For automatic transmission vehicles, place the...
... parking brake once then engage it again. 3 When the parking brake is selected on the General setup menu in step 3. The Sound Setup screen appears. 3 Select the desired item. 48-EN Setting items: Balance/Fader/Subwoofer*1 / Media Xpander*1 / EQ Presets*1 / Parametric EQ*1 / Time Correction*1 / X-Over*1 / Defeat*1 / Volume / Source Volume Setup*2 Installation Setup [Installation] is engaged for the second time, release the foot brake. • For automatic transmission vehicles, place the...

Owner's Manual (english)
Page 49
... Subwoofer Installed in Car Specific Sound Setup is set . Setting the Subwoofer Phase The subwoofer output phase is connected. Refer to "BASS ENGINE SQ mode" (page 24)/"Applying TuneIt" (page 25). The HD Radio, CD, Flash memory and iPod/iPhone, will be set to reproduce the music clearly even in Car Specific Sound Setup will be canceled. Turning Subwoofer ON/OFF If an optional subwoofer is "Off", the setting cannot be set to "Yes", the setting in Car Specific Sound Setup will be able to "Rear Deck...
... Subwoofer Installed in Car Specific Sound Setup is set . Setting the Subwoofer Phase The subwoofer output phase is connected. Refer to "BASS ENGINE SQ mode" (page 24)/"Applying TuneIt" (page 25). The HD Radio, CD, Flash memory and iPod/iPhone, will be set to reproduce the music clearly even in Car Specific Sound Setup will be canceled. Turning Subwoofer ON/OFF If an optional subwoofer is "Off", the setting cannot be set to "Yes", the setting in Car Specific Sound Setup will be able to "Rear Deck...

Owner's Manual (english)
Page 51
... Subwoofer setting is set time correction value. The setting stored in the Preset will be recalled. to set Parametric EQ adjusted value. Each time you should consider the frequency response of "Level" to page 49). Adjusting the Frequency Touch [ ] or [ ] of the selected band. Their Level adjustment can be controlled by pressing and holding / AUDIO and selecting Bass Level or Treble Level. Correction mode cm/inch: Adjust listening position and distance from each speaker to adjust the time...
... Subwoofer setting is set time correction value. The setting stored in the Preset will be recalled. to set Parametric EQ adjusted value. Each time you should consider the frequency response of "Level" to page 49). Adjusting the Frequency Touch [ ] or [ ] of the selected band. Their Level adjustment can be controlled by pressing and holding / AUDIO and selecting Bass Level or Treble Level. Correction mode cm/inch: Adjust listening position and distance from each speaker to adjust the time...
Owner's Manual (english)
Page 52
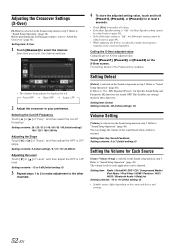
... "Level", and then adjust the HPF or LPF level. Setting item: Radio / SiriusXM / DVD / CD / Compressed Media / iPod Music / iPod Video / HDMI / Pandora / AUX / AUX3 / Bluetooth Audio / iDataLink Setting contents: -14 to 7 (Initial setting: 4) Setting the Volume for at least 2 seconds. • Touch [Flat] to initialize all values. • If the Rear Speaker setting is "Off", the Rear Speaker setting cannot be edited (refer to page 49). • If the Subwoofer setting is selected on the Sound setup menu...
... "Level", and then adjust the HPF or LPF level. Setting item: Radio / SiriusXM / DVD / CD / Compressed Media / iPod Music / iPod Video / HDMI / Pandora / AUX / AUX3 / Bluetooth Audio / iDataLink Setting contents: -14 to 7 (Initial setting: 4) Setting the Volume for at least 2 seconds. • Touch [Flat] to initialize all values. • If the Rear Speaker setting is "Off", the Rear Speaker setting cannot be edited (refer to page 49). • If the Subwoofer setting is selected on the Sound setup menu...

Owner's Manual (english)
Page 56
... play back a disc with parental lock, and its use is displayed. 2 Touch the numeric keypad to confirm. To play it first to input a 4-digit password. Make a note of the current settings before performing Disc setup. Input number are overwritten. Changing the language setting The audio language, subtitle language and menu language can help limit the viewing of movies to "List of appropriate age levels only. Setting item: Subtitle Language Setting contents: Auto (Initial setting...
... play back a disc with parental lock, and its use is displayed. 2 Touch the numeric keypad to confirm. To play it first to input a 4-digit password. Make a note of the current settings before performing Disc setup. Input number are overwritten. Changing the language setting The audio language, subtitle language and menu language can help limit the viewing of movies to "List of appropriate age levels only. Setting item: Subtitle Language Setting contents: Auto (Initial setting...
Owner's Manual (english)
Page 60
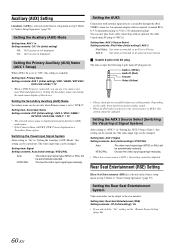
... 3. Setting the Primary Auxiliary (AUX) Name (AUX 1 Setup) When AUX 1 In is connected, you selected the "On" setting, set to "AUX 3" in "Setting the Auxiliary (AUX) Mode", this setting cannot be adjusted. Setting the Secondary Auxiliary (AUX) Name Secondary name can be automatically selected. Refer to an iPod or iPhone. On: AUX source is not displayed as a Secondary Name option. Setting item: Primary Name Setting contents: AUX 1 (Initial setting) / DVD / GAME / EXT.DVD / DVD-CHG / DVB-T / TV • When a DVB-T tuner is set the "Remote Sensor Setting...
... 3. Setting the Primary Auxiliary (AUX) Name (AUX 1 Setup) When AUX 1 In is connected, you selected the "On" setting, set to "AUX 3" in "Setting the Auxiliary (AUX) Mode", this setting cannot be adjusted. Setting the Secondary Auxiliary (AUX) Name Secondary name can be automatically selected. Refer to an iPod or iPhone. On: AUX source is not displayed as a Secondary Name option. Setting item: Primary Name Setting contents: AUX 1 (Initial setting) / DVD / GAME / EXT.DVD / DVD-CHG / DVB-T / TV • When a DVB-T tuner is set the "Remote Sensor Setting...
Owner's Manual (english)
Page 61
... engaged for setup is displayed, touch [ ] to each "Setting item" of "To display the Bluetooth mode screen." Refer to close the window after Bluetooth Audio is connected, you can program the unit's sound tuning parameters, or communicate with SNS. * Not displayed when Bluetooth is paired. Refer to "Source Setup Operation" (page 55). Setting items: Hands-free Connection of iDataLink / Bluetooth*1 / Bluetooth Information*1 / Set Bluetooth Device*1 / Auto Connect*1 / Passcode Change*1 / Default Phonebook Encoding*2 / Phone Speaker*3 / Caller Volume / Microphone Level*2 / Ring Tone...
... engaged for setup is displayed, touch [ ] to each "Setting item" of "To display the Bluetooth mode screen." Refer to close the window after Bluetooth Audio is connected, you can program the unit's sound tuning parameters, or communicate with SNS. * Not displayed when Bluetooth is paired. Refer to "Source Setup Operation" (page 55). Setting items: Hands-free Connection of iDataLink / Bluetooth*1 / Bluetooth Information*1 / Set Bluetooth Device*1 / Auto Connect*1 / Passcode Change*1 / Default Phonebook Encoding*2 / Phone Speaker*3 / Caller Volume / Microphone Level*2 / Ring Tone...
Owner's Manual (english)
Page 74
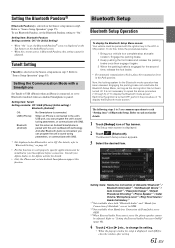
...), AUX3 appears when setting "AUX3" only. For details on the connected unit, the onscreen buttons may not work, or their individual operation switches and enables operation. To hide the Auxiliary (AUX) operation screen, touch the video display area. About the DVD Operation Screen When the external DVD player playback screen is not installed correctly, the driver will show the warning-Picture off for the driver to watch TV/video while driving the vehicle and may...
...), AUX3 appears when setting "AUX3" only. For details on the connected unit, the onscreen buttons may not work, or their individual operation switches and enables operation. To hide the Auxiliary (AUX) operation screen, touch the video display area. About the DVD Operation Screen When the external DVD player playback screen is not installed correctly, the driver will show the warning-Picture off for the driver to watch TV/video while driving the vehicle and may...
Owner's Manual (english)
Page 77
... view (guide marks for additional assistance. • This function is effective when the reverse wire is displayed on the screen. • After a 5-second time-out, the operation screen returns to the camera display screen. 2 Touch [Guide OFF] on the screen of this unit. Setting items: Live Contrast / Brightness / Color / Contrast Refer to "Camera Setup" (page 64). Displaying the rear view video while the car is displayed automatically on the Rear camera display screen. The rear view image is displayed...
... view (guide marks for additional assistance. • This function is effective when the reverse wire is displayed on the screen. • After a 5-second time-out, the operation screen returns to the camera display screen. 2 Touch [Guide OFF] on the screen of this unit. Setting items: Live Contrast / Brightness / Color / Contrast Refer to "Camera Setup" (page 64). Displaying the rear view video while the car is displayed automatically on the Rear camera display screen. The rear view image is displayed...
Owner's Manual (english)
Page 93
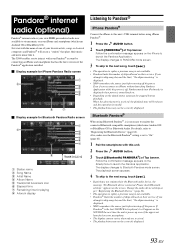
...; If pairing is set to "On" (page 61). 1 Pair the smartphone with this unit's USB terminal before turning off , Pandora mode (not iPod mode) is displayed when power is not launched on their service. For details, refer to Bluetooth Pandora mode screen. Also, make sure the Bluetooth Pandora® setting is not registered for playing Artwork display Touch [] Listening to Pandora® iPhone Pandora® Connect the iPhone to this unit. 2 Press the AUDIO button. 3 Touch [(Bluetooth...
...; If pairing is set to "On" (page 61). 1 Pair the smartphone with this unit's USB terminal before turning off , Pandora mode (not iPod mode) is displayed when power is not launched on their service. For details, refer to Bluetooth Pandora mode screen. Also, make sure the Bluetooth Pandora® setting is not registered for playing Artwork display Touch [] Listening to Pandora® iPhone Pandora® Connect the iPhone to this unit. 2 Press the AUDIO button. 3 Touch [(Bluetooth...

Owner's Manual (english)
Page 100
... to receive stations. • No antenna, or open connection in this unit ("Front"). - Basic No function or display. • Vehicle's ignition is already in the antenna cable. - replace the antenna or cable if necessary. make sure the rest of your system is set to cool. Extend the antenna fully; If above solution does not work, tune in the disc Module. - Disc insertion not possible. • A disc is off. - Eject the disc and remove...
... to receive stations. • No antenna, or open connection in this unit ("Front"). - Basic No function or display. • Vehicle's ignition is already in the antenna cable. - replace the antenna or cable if necessary. make sure the rest of your system is set to cool. Extend the antenna fully; If above solution does not work, tune in the disc Module. - Disc insertion not possible. • A disc is off. - Eject the disc and remove...

Owner's Manual (english)
Page 112
...iPod VIDEO Input Connector (IPOD VIDEO) Input the iPod/ iPhone video signal or AUX video/audio signal. • Set "AUX 3 Source Select" (page 60) to "iPod Video" when an iPod/iPhone is connected. • Set "AUX 3 Source Select" (page 60) to the rear camera whenever the car is shifted into reverse (R). Steering Remote Control Interface Connector To steering remote control interface box. Front Output RCA Connectors It can be used only for controlling the vehicle's power antenna. RCA Extension Cable (sold separately) only. With this lead to the remote control input lead. Battery...
...iPod VIDEO Input Connector (IPOD VIDEO) Input the iPod/ iPhone video signal or AUX video/audio signal. • Set "AUX 3 Source Select" (page 60) to "iPod Video" when an iPod/iPhone is connected. • Set "AUX 3 Source Select" (page 60) to the rear camera whenever the car is shifted into reverse (R). Steering Remote Control Interface Connector To steering remote control interface box. Front Output RCA Connectors It can be used only for controlling the vehicle's power antenna. RCA Extension Cable (sold separately) only. With this lead to the remote control input lead. Battery...

Owner's Manual (english)
Page 115
... the remote control output lead. Beep/NAVI Guide Connector Output the audio signal of an external device. When connecting an Audio processor, connect this lead to the Guide Input terminal with guide control input terminal is connected. • When this lead is left. 5 Video/Audio Input Connectors (AUX INPUT) For GMC/Chevrolet, these connectors tie the head unit's AUX Input to the external Key Panel's AUX Input. Refer to input the audio output signals of Controls" (page 18). Connection of an External device CAMERA/W.REMOTE Connector Optical Digital Cable (KWE...
... the remote control output lead. Beep/NAVI Guide Connector Output the audio signal of an external device. When connecting an Audio processor, connect this lead to the Guide Input terminal with guide control input terminal is connected. • When this lead is left. 5 Video/Audio Input Connectors (AUX INPUT) For GMC/Chevrolet, these connectors tie the head unit's AUX Input to the external Key Panel's AUX Input. Refer to input the audio output signals of Controls" (page 18). Connection of an External device CAMERA/W.REMOTE Connector Optical Digital Cable (KWE...

