Owners Manual
Page 3
... Contents Operating Instructions WARNING WARNING 5 CAUTION 5 PRECAUTIONS 6 Discs Playable on This Unit 7 Getting Started Accessory List 10 Location of Controls 10 Turning Power On or Off 10 Inserting/Ejecting a Disc 11 Adjusting the Monitor Viewing Angle 11 Adjusting the Volume 11 How to view the Display 11 Soft button operation 11 Recalling the Source 11 Displaying the Numeric Keypad Input Screen 12 Radio Listening to the Radio 13 Presetting Stations Manually 13 Presetting Stations Automatically 13 Tuning to Preset Stations 14 Changing the Display (HD Radio mode...
... Contents Operating Instructions WARNING WARNING 5 CAUTION 5 PRECAUTIONS 6 Discs Playable on This Unit 7 Getting Started Accessory List 10 Location of Controls 10 Turning Power On or Off 10 Inserting/Ejecting a Disc 11 Adjusting the Monitor Viewing Angle 11 Adjusting the Volume 11 How to view the Display 11 Soft button operation 11 Recalling the Source 11 Displaying the Numeric Keypad Input Screen 12 Radio Listening to the Radio 13 Presetting Stations Manually 13 Presetting Stations Automatically 13 Tuning to Preset Stations 14 Changing the Display (HD Radio mode...
Owners Manual
Page 4
... Rear Camera Input 36 Setting the Navigation Mode 36 Setting the Navigation Interruption 36 Setting the AUX Mode 36 Adjusting the External Input Audio Level 36 Setting the Picture Output 36 Setting the Bluetooth Connection (BLUETOOTH IN 36 2-EN Setting the USB Adapter to ON/OFF .......... 36 Setting the VISUAL Soft Button 37 Setting the VISUAL Button on the Unit ..... 37 Setting the Digital Output 37 Subwoofer On and Off 37 DISPLAY Setup Display Setup Operation 37 Setting the Brightness of the Backlighting 38 Adjusting the Minimum Level of Backlight 38 Switching Background...
... Rear Camera Input 36 Setting the Navigation Mode 36 Setting the Navigation Interruption 36 Setting the AUX Mode 36 Adjusting the External Input Audio Level 36 Setting the Picture Output 36 Setting the Bluetooth Connection (BLUETOOTH IN 36 2-EN Setting the USB Adapter to ON/OFF .......... 36 Setting the VISUAL Soft Button 37 Setting the VISUAL Button on the Unit ..... 37 Setting the Digital Output 37 Subwoofer On and Off 37 DISPLAY Setup Display Setup Operation 37 Setting the Brightness of the Backlighting 38 Adjusting the Minimum Level of Backlight 38 Switching Background...

Owners Manual
Page 5
... image (BI-PHANTOM 47 Mixing bass sound to the rear channel (REAR MIX 47 Achieving powerful high volume sound (LISTENING MODE 47 Adjusting the speaker levels (OUTPUT LEVEL 47 Adjusting the DVD Level 47 Storing Settings in the Memory 48 Calling up the Preset Memory 48 Using the Pro Logic II Mode 48 Linear PCM Setting 48 Navigation System (Optional) Switching the Navigation Screen (Optional 49 Portable Navigation System Operation (Optional 49 Auxiliary Device (Optional) Operating Auxiliary Devices (Optional) ........ 50 Changer (Optional) Controlling...
... image (BI-PHANTOM 47 Mixing bass sound to the rear channel (REAR MIX 47 Achieving powerful high volume sound (LISTENING MODE 47 Adjusting the speaker levels (OUTPUT LEVEL 47 Adjusting the DVD Level 47 Storing Settings in the Memory 48 Calling up the Preset Memory 48 Using the Pro Logic II Mode 48 Linear PCM Setting 48 Navigation System (Optional) Switching the Navigation Screen (Optional 49 Portable Navigation System Operation (Optional 49 Auxiliary Device (Optional) Operating Auxiliary Devices (Optional) ........ 50 Changer (Optional) Controlling...

Owners Manual
Page 9
...; The IVA-W205 draws minimal current even when its power switch is moving. Disc Accessories There are made if the car is turned off , a slight ghost of time. Using such accessories can be made to perform these accessories on discs played in Alpine DVD players. Because of the IVA-W205 is connected directly to times when the vehicle is very complex. If the switched power (ignition) lead of this unit is parked.
...; The IVA-W205 draws minimal current even when its power switch is moving. Disc Accessories There are made if the car is turned off , a slight ghost of time. Using such accessories can be made to perform these accessories on discs played in Alpine DVD players. Because of the IVA-W205 is connected directly to times when the vehicle is very complex. If the switched power (ignition) lead of this unit is parked.
Owners Manual
Page 12
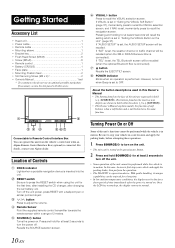
... operation. • The IVA-W205 is connected). RESET switch Be sure to press the RESET switch when using the unit for at least 2 seconds to turn on the unit. • The unit can operate this unit's functions cannot be recalled (when the XM or SIRIUS Receiver Box is set in a safe location and apply the parking brake, before attempting these operations. 1 Press SOURCE/ to turn the power off when Beep is set, momentarily press to recall the navigation screen...
... operation. • The IVA-W205 is connected). RESET switch Be sure to press the RESET switch when using the unit for at least 2 seconds to turn on the unit. • The unit can operate this unit's functions cannot be recalled (when the XM or SIRIUS Receiver Box is set in a safe location and apply the parking brake, before attempting these operations. 1 Press SOURCE/ to turn the power off when Beep is set, momentarily press to recall the navigation screen...

Owners Manual
Page 13
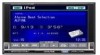
... button descriptions used in this Owner's Manual • Soft buttons, ones found in the display. • Be sure to adjust the desired monitor angle. The display changes to the movable monitor when it is normal and not a malfunction. • Touching and holding or . Inserting a disc will stop immediately. • The screen color will vary when viewed at the set to ON. The SOURCE selection screen is ejected. 3 Touch [CLOSE] on the display...
... button descriptions used in this Owner's Manual • Soft buttons, ones found in the display. • Be sure to adjust the desired monitor angle. The display changes to the movable monitor when it is normal and not a malfunction. • Touching and holding or . Inserting a disc will stop immediately. • The screen color will vary when viewed at the set to ON. The SOURCE selection screen is ejected. 3 Touch [CLOSE] on the display...

Owners Manual
Page 15
... FM-1 4 Touch [TUNE] to the Radio 1 Touch [SOURCE] on page 33. [SOURCE] button: Refer to page 11 [VISUAL] button: Displays the VISUAL selection screen [SETUP] button: Displays the SETUP selection screen Displays the preset number/frequency This unit cannot receive HD Radio™ signals (digital terrestrial radio). To use this procedure for other stations onto the same band. After selecting the desired band, touch [A.MEMO]. Receiving Analog Radio: 2 Touch [RADIO]. Each touch changes the tuning mode display. The initial setting is connected): 2 Touch [HD RADIO]. Listening to...
... FM-1 4 Touch [TUNE] to the Radio 1 Touch [SOURCE] on page 33. [SOURCE] button: Refer to page 11 [VISUAL] button: Displays the VISUAL selection screen [SETUP] button: Displays the SETUP selection screen Displays the preset number/frequency This unit cannot receive HD Radio™ signals (digital terrestrial radio). To use this procedure for other stations onto the same band. After selecting the desired band, touch [A.MEMO]. Receiving Analog Radio: 2 Touch [RADIO]. Each touch changes the tuning mode display. The initial setting is connected): 2 Touch [HD RADIO]. Listening to...
Owners Manual
Page 20
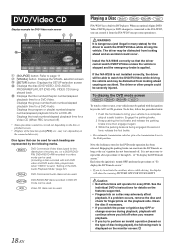
..., remove the disc and check for a DVD Video. Displays the title number/chapter number/elapsed playback time for fingerprints on the monitor screen: 18-EN Video CD discs can be used for the driver to the IVA-W205, you try to activate the auxiliary device while driving, the display will be parked with both DVD video and DVD audio data, played back when "VIDEO" is displayed on the playback side. When an optional Alpine DVD/ Video CD/CD player (or DVD changer) is connected to watch a video source...
..., remove the disc and check for a DVD Video. Displays the title number/chapter number/elapsed playback time for fingerprints on the monitor screen: 18-EN Video CD discs can be used for the driver to the IVA-W205, you try to activate the auxiliary device while driving, the display will be parked with both DVD video and DVD audio data, played back when "VIDEO" is displayed on the playback side. When an optional Alpine DVD/ Video CD/CD player (or DVD changer) is connected to watch a video source...
Owners Manual
Page 21
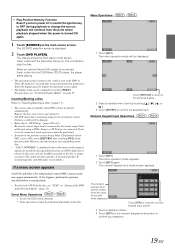
..., touch operation cannot be displayed. Numeric Keypad Input Operations 1 Touch [KEY]. The menu operation mode appears. 2 Touch [KEY] again. For operation, see "Switching Display Modes" on the disc. • "CAN'T DOWNMIX" is connected. Insert a disc with playback control (PBC), menu screens may vary depending on page 27. If this unit when a DVD changer or DVD player is displayed when a Downmix (multi-channel signals are mixed into the DVD/Video CD/CD player, the player starts playing. • The operation screen changes to play back a DVD-Audio disc, set to the remote output...
..., touch operation cannot be displayed. Numeric Keypad Input Operations 1 Touch [KEY]. The menu operation mode appears. 2 Touch [KEY] again. For operation, see "Switching Display Modes" on the disc. • "CAN'T DOWNMIX" is connected. Insert a disc with playback control (PBC), menu screens may vary depending on page 27. If this unit when a DVD changer or DVD player is displayed when a Downmix (multi-channel signals are mixed into the DVD/Video CD/CD player, the player starts playing. • The operation screen changes to play back a DVD-Audio disc, set to the remote output...
Owners Manual
Page 28
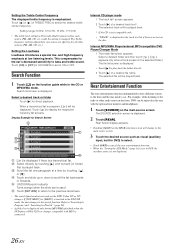
... player mode 1 The track list* screen appears. 2 Touch [ ] of a desired file name. When a hierarchical list is changed. The selected file will be displayed. Rear Select display appears. • Touching [MAIN] on the DVD, Video CD or CD changer. Touch [ON] or [OFF] of TREBLE FREQ to the search function. Touch [ ] or [ ] of LOUDNESS to set to the previous list screen. • The search function does not work on the REAR selection screen will be played...
... player mode 1 The track list* screen appears. 2 Touch [ ] of a desired file name. When a hierarchical list is changed. The selected file will be displayed. Rear Select display appears. • Touching [MAIN] on the DVD, Video CD or CD changer. Touch [ON] or [OFF] of TREBLE FREQ to the search function. Touch [ ] or [ ] of LOUDNESS to set to the previous list screen. • The search function does not work on the REAR selection screen will be played...
Owners Manual
Page 30
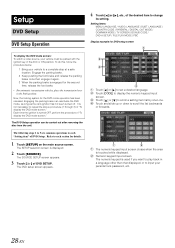
... ignition is engaged for DVD setup screen To display the DVD mode screen: To watch a video source, your vehicle must be carried out after removing the disc from the unit. The SETUP selection screen is touched while displayed. Touch [ ] or [ ] to set a desired language. LANGUAGE / COUNTRY CODE / PARENTAL / DIGITAL OUT MODE / DOWNMIX MODE / TV SCREEN / BONUS CODE / DVD-A SETUP / FILE PLAY MODE / PBC Display example for the second time, release the foot brake. • For automatic transmission vehicles, place the transmission lever...
... ignition is engaged for DVD setup screen To display the DVD mode screen: To watch a video source, your vehicle must be carried out after removing the disc from the unit. The SETUP selection screen is touched while displayed. Touch [ ] or [ ] to set a desired language. LANGUAGE / COUNTRY CODE / PARENTAL / DIGITAL OUT MODE / DOWNMIX MODE / TV SCREEN / BONUS CODE / DVD-A SETUP / FILE PLAY MODE / PBC Display example for the second time, release the foot brake. • For automatic transmission vehicles, place the transmission lever...
Owners Manual
Page 31
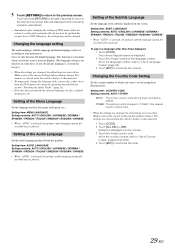
... main source screen that was displayed before the setup operation was started. • Immediately after changing the settings of the Audio Language Set the audio language produced from the factory.) • When the settings are changed . Changing the Country Code Setting Set the country number of the current settings before making changes. Setting item: COUNTRY CODE Setting contents: AUTO / OTHER AUTO: The primary country code among the recorded ones is displayed. 2 Touch the 4-digit numeral of the current settings before making changes. Make...
... main source screen that was displayed before the setup operation was started. • Immediately after changing the settings of the Audio Language Set the audio language produced from the factory.) • When the settings are changed . Changing the Country Code Setting Set the country number of the current settings before making changes. Setting item: COUNTRY CODE Setting contents: AUTO / OTHER AUTO: The primary country code among the recorded ones is displayed. 2 Touch the 4-digit numeral of the current settings before making changes. Make...

Owners Manual
Page 32
... of discs of the current settings before making changes. If this screen appears, change the rating level set a rating level. "AUTO" is displayed. 2 Touch the numeric keypad to input a 4-digit password. Setting the Rating Level (Parental Lock) This function can help restrict the viewing of movies to children of PASSWORD CHANGE. Setting item: DIGITAL OUT MODE Setting contents: AUTO / LPCM AUTO: LPCM: The digital output is 1111. Changing the password 4 Touch [INPUT] of appropriate age levels only. The initial number is switched...
... of discs of the current settings before making changes. If this screen appears, change the rating level set a rating level. "AUTO" is displayed. 2 Touch the numeric keypad to input a 4-digit password. Setting the Rating Level (Parental Lock) This function can help restrict the viewing of movies to children of PASSWORD CHANGE. Setting item: DIGITAL OUT MODE Setting contents: AUTO / LPCM AUTO: LPCM: The digital output is 1111. Changing the password 4 Touch [INPUT] of appropriate age levels only. The initial number is switched...
Owners Manual
Page 34
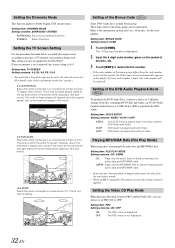
... discs containing both audio data and MP3/WMA data. Setting the Downmix Mode This function applies to set PBC ON or OFF. If a new code number is the factory setting. Setting item: FILE PLAY MODE Setting contents: CD / CMPM CD: Plays only the audio data on the jacket of TV monitor (rear monitor) being used , this code number will fill the entire TV screen. The PBC menu is 16:9. There may not be memorized. Setting the Video CD Play Mode When playing a Playback Control...
... discs containing both audio data and MP3/WMA data. Setting the Downmix Mode This function applies to set PBC ON or OFF. If a new code number is the factory setting. Setting item: FILE PLAY MODE Setting contents: CD / CMPM CD: Plays only the audio data on the jacket of TV monitor (rear monitor) being used , this code number will fill the entire TV screen. The PBC menu is 16:9. There may not be memorized. Setting the Video CD Play Mode When playing a Playback Control...

Owners Manual
Page 37
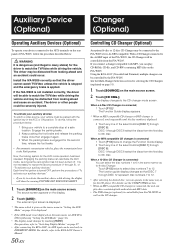
... an Alpine Ai-NET Auxiliary Input Adapter (KCA-801B) is displayed. 4 Touch [RETURN] to return to the AUX OUT terminals. • The touch panel rear monitor sensor has priority over the remote control sensor. Touch and hold [RETURN] for details. 1 Touch [SETUP] on the display. In this case, set in "Setting the Navigation Mode" (page 36), the item is connected to the IVA-W205, an Auxiliary Source will not be changed. MUTE Setting contents: OFF / ON OFF: The volume...
... an Alpine Ai-NET Auxiliary Input Adapter (KCA-801B) is displayed. 4 Touch [RETURN] to return to the AUX OUT terminals. • The touch panel rear monitor sensor has priority over the remote control sensor. Touch and hold [RETURN] for details. 1 Touch [SETUP] on the display. In this case, set in "Setting the Navigation Mode" (page 36), the item is connected to the IVA-W205, an Auxiliary Source will not be changed. MUTE Setting contents: OFF / ON OFF: The volume...

Owners Manual
Page 38
... Soft Button" (page 37). The voice prompt volume is connected. Select SOURCE to switch to the guide function of the Bluetooth Box. HIGH: Increases the external input audio level. ADAPTER: Select when the optional Bluetooth box is always at or below the current listening volume. ON: Displays the USB source name on the SOURCE selection screen will be carried out. Setting the Rear Camera Input With a rear camera connected, rear view video is turned off. This function is effective when the reverse wire...
... Soft Button" (page 37). The voice prompt volume is connected. Select SOURCE to switch to the guide function of the Bluetooth Box. HIGH: Increases the external input audio level. ADAPTER: Select when the optional Bluetooth box is always at or below the current listening volume. ON: Displays the USB source name on the SOURCE selection screen will be carried out. Setting the Rear Camera Input With a rear camera connected, rear view video is turned off. This function is effective when the reverse wire...
Owners Manual
Page 52
... MP3 compatible CD changer is connected; 1 Touch [P1/3] twice to change the Function Guide display. 2 Touch any one of the select buttons [DISC 1] through DISC 12 represent disc numbers 7 to 12. • After selecting the desired disc, you can play discs containing both audio data and MP3 data. • The DVD changer (optional) is not installed correctly, the driver will be controllable from looking ahead and an accident could be used only in "Setting the AUX Mode...
... MP3 compatible CD changer is connected; 1 Touch [P1/3] twice to change the Function Guide display. 2 Touch any one of the select buttons [DISC 1] through DISC 12 represent disc numbers 7 to 12. • After selecting the desired disc, you can play discs containing both audio data and MP3 data. • The DVD changer (optional) is not installed correctly, the driver will be controllable from looking ahead and an accident could be used only in "Setting the AUX Mode...
Owners Manual
Page 67
... grounded at fault. Press the RESET switch with the navigation system and connect the cables correctly and firmly. No sound or unnatural sound. • Incorrect setting of displayed picture is abnormal. • Temperature in the vehicle is too high. - Adjust the Brightness control. • Temperature in the disc Module. - Movement of volume/balance/fader controls. - Unclear or noisy display. • Fluorescent plate is fully extended; Replace the fluorescent plate. Set...
... grounded at fault. Press the RESET switch with the navigation system and connect the cables correctly and firmly. No sound or unnatural sound. • Incorrect setting of displayed picture is abnormal. • Temperature in the vehicle is too high. - Adjust the Brightness control. • Temperature in the disc Module. - Movement of volume/balance/fader controls. - Unclear or noisy display. • Fluorescent plate is fully extended; Replace the fluorescent plate. Set...
Owners Manual
Page 68
... fast-forwarded or fast-reversed. - Leave the power OFF until the temperature decreases and then turn off after ejecting, touch [ ] of DISC on the EJECT/TILT screen. After the error indication disappears, insert the disc again. Turn on . - Connect the monitor's parking brake wire and set . - Check the battery power and wiring. (The unit may be played back. • Parental lock is inserted. - Indication for a few times, consult your nearest Alpine dealer. Make sure the CD...
... fast-forwarded or fast-reversed. - Leave the power OFF until the temperature decreases and then turn off after ejecting, touch [ ] of DISC on the EJECT/TILT screen. After the error indication disappears, insert the disc again. Turn on . - Connect the monitor's parking brake wire and set . - Check the battery power and wiring. (The unit may be played back. • Parental lock is inserted. - Indication for a few times, consult your nearest Alpine dealer. Make sure the CD...

Owners Manual
Page 77
... input compatible products. iPod Direct Connector iPod control signals. Remote Control Output Lead (White/Brown) Connect this to the remote control input lead. Switches the video picture to the unit before changing the switch position. To use this component. Monitor Control Lead (White/Pink) Connect this switch in the NORM position. • Be sure to the Owner's Manual of your nearest Alpine dealer. System Switch When connecting an equalizer or divider using the FULL SPEED™ Connection Cable (KCE-422i) (sold separately). Foot Brake Lead (Yellow/Black) Connect...
... input compatible products. iPod Direct Connector iPod control signals. Remote Control Output Lead (White/Brown) Connect this to the remote control input lead. Switches the video picture to the unit before changing the switch position. To use this component. Monitor Control Lead (White/Pink) Connect this switch in the NORM position. • Be sure to the Owner's Manual of your nearest Alpine dealer. System Switch When connecting an equalizer or divider using the FULL SPEED™ Connection Cable (KCE-422i) (sold separately). Foot Brake Lead (Yellow/Black) Connect...


