Owners Manual
Page 4
... 29 Auto pairing with an iPod/iPhone 29 Bluetooth SETUP 29 Setting the Bluetooth Connection (BT IN 29 Setting the Auto Pairing with iPod/iPhone 30 Setting the Bluetooth Device 30 Setting the Visible Mode 30 Setting the Bluetooth sound quality 30 Adjusting the volume (SOURCE VOL 30 Sound Auto setting (TYPE SET 30 Setting the caller information display ON/OFF 30 Setting the Phone Book Update 31 Setting the Phone Book Auto Update ON/OFF (AUTO 31 Setting the Phone Book Manual Update ON/OFF (MANUAL 31 Changing the Phone book List Order ...........31 Selecting the output speaker 31...
... 29 Auto pairing with an iPod/iPhone 29 Bluetooth SETUP 29 Setting the Bluetooth Connection (BT IN 29 Setting the Auto Pairing with iPod/iPhone 30 Setting the Bluetooth Device 30 Setting the Visible Mode 30 Setting the Bluetooth sound quality 30 Adjusting the volume (SOURCE VOL 30 Sound Auto setting (TYPE SET 30 Setting the caller information display ON/OFF 30 Setting the Phone Book Update 31 Setting the Phone Book Auto Update ON/OFF (AUTO 31 Setting the Phone Book Manual Update ON/OFF (MANUAL 31 Changing the Phone book List Order ...........31 Selecting the output speaker 31...
Owners Manual
Page 7
... neutral detergent before cleaning the disc. Inserting Discs Your player accepts only one disc. To customers using these accessories on the surface. When a new disc is displayed if discs with fingerprints, CDs exposed to extreme temperatures or sunlight (e.g., left in Alpine CD players. Installation Location Make sure this unit will be installed in the car or the unit for this unit and never use any small bumps or irregularities...
... neutral detergent before cleaning the disc. Inserting Discs Your player accepts only one disc. To customers using these accessories on the surface. When a new disc is displayed if discs with fingerprints, CDs exposed to extreme temperatures or sunlight (e.g., left in Alpine CD players. Installation Location Make sure this unit will be installed in the car or the unit for this unit and never use any small bumps or irregularities...
Owners Manual
Page 9
... Owner's Manual use CDE-163BT as it may become hot in a car for the first time, the DEMO OFF screen will enter a demonstration mode to "Setting the Bluetooth Connection (BT IN)" on page 29. *5 Not displayed when ALPINE APP is turned on page 26. Press ENTER within 20 seconds to turn off the unit. TUNER SIRIUS XM*1 DISC*2 USB AUDIO/iPod*3 BT AUDIO*4 PANDORA*5 AUXILIARY*6 TUNER *1 Displayed...
... Owner's Manual use CDE-163BT as it may become hot in a car for the first time, the DEMO OFF screen will enter a demonstration mode to "Setting the Bluetooth Connection (BT IN)" on page 29. *5 Not displayed when ALPINE APP is turned on page 26. Press ENTER within 20 seconds to turn off the unit. TUNER SIRIUS XM*1 DISC*2 USB AUDIO/iPod*3 BT AUDIO*4 PANDORA*5 AUXILIARY*6 TUNER *1 Displayed...

Owners Manual
Page 15
... the factory defaults. Subwoofer Bass level Treble level Balance Fader Defeat Volume +0 ~ +15 −7 ~ +7 −7 ~ +7 L15 ~ R15 R15 ~ F15 ON/OFF 0 ~ 35 Note • If no operation is performed for a variety of BASS and TREBLE will return to "Switching the 2WAY/3WAY system mode" on page 21. Equalizer Presets 10 typical equalizer settings are created in BASS ENGINE SQ mode. By setting DEFEAT ON, previously adjusted level settings of musical source material. From the AUDIO SETUP menu, Audio Setting can...
... the factory defaults. Subwoofer Bass level Treble level Balance Fader Defeat Volume +0 ~ +15 −7 ~ +7 −7 ~ +7 L15 ~ R15 R15 ~ F15 ON/OFF 0 ~ 35 Note • If no operation is performed for a variety of BASS and TREBLE will return to "Switching the 2WAY/3WAY system mode" on page 21. Equalizer Presets 10 typical equalizer settings are created in BASS ENGINE SQ mode. By setting DEFEAT ON, previously adjusted level settings of musical source material. From the AUDIO SETUP menu, Audio Setting can...
Owners Manual
Page 16
...: TUNER / SIRIUS XM / DISC* / USB / iPod / BT AUDIO / PANDORA / AUX Setting contents: −14 dB ~ +14 dB (Initial setting: ±0) * Only for BASS ENGINE SQ setting. Adjusting the Crossover Settings (X-OVER) Before performing the following procedures, refer to "About the Crossover" on page 18. Setting the Source Volume Level The output level of the connected speakers. • The 9-Band, Parametric EQ is set BASS ENGINE SQ ON/OFF directly by pressing YSETUP and selecting Bass Level or Treble Level...
...: TUNER / SIRIUS XM / DISC* / USB / iPod / BT AUDIO / PANDORA / AUX Setting contents: −14 dB ~ +14 dB (Initial setting: ±0) * Only for BASS ENGINE SQ setting. Adjusting the Crossover Settings (X-OVER) Before performing the following procedures, refer to "About the Crossover" on page 18. Setting the Source Volume Level The output level of the connected speakers. • The 9-Band, Parametric EQ is set BASS ENGINE SQ ON/OFF directly by pressing YSETUP and selecting Bass Level or Treble Level...
Owners Manual
Page 18
... turned OFF and cannot drive speakers. FM SIRIUS XM CD*1 CMPM*1/*2 USB iPod BT AUDIO PANDORA AUX *1 CDE-163BT only. *2 Be applied for MP3/WMA files in cars with a lot of the music source. MANUAL SET: Adjust each audio effect setting separately and manually. Notes • This operation can access the Sound menu mode directly by selecting BASS ENGIN in Audio Setup mode. Refer to select the desired level (+0 - +6). The unit's back lighting changes...
... turned OFF and cannot drive speakers. FM SIRIUS XM CD*1 CMPM*1/*2 USB iPod BT AUDIO PANDORA AUX *1 CDE-163BT only. *2 Be applied for MP3/WMA files in cars with a lot of the music source. MANUAL SET: Adjust each audio effect setting separately and manually. Notes • This operation can access the Sound menu mode directly by selecting BASS ENGIN in Audio Setup mode. Refer to select the desired level (+0 - +6). The unit's back lighting changes...

Owners Manual
Page 22
... speaker (R) Output of this unit: Front output Rear output SUB-W output • Use the Sub-W output cord to connect the unit to the low range speaker. • You cannot adjust the fader when set to MANUAL, press and hold k for at least 2 seconds, the current text will be displayed if playing a CD text compatible disc. If there is no PS (Program Service Name) FREQUENCY SONG ARTIST PTY (Program Type) RADIO TEXT CLOCK FREQUENCY...
... speaker (R) Output of this unit: Front output Rear output SUB-W output • Use the Sub-W output cord to connect the unit to the low range speaker. • You cannot adjust the fader when set to MANUAL, press and hold k for at least 2 seconds, the current text will be displayed if playing a CD text compatible disc. If there is no PS (Program Service Name) FREQUENCY SONG ARTIST PTY (Program Type) RADIO TEXT CLOCK FREQUENCY...

Owners Manual
Page 23
... Optional adapter cable (RCA pin plugs [red, white] 3.5 mm miniplugs) or (3.5 mm miniplugs). For details, refer to "Storing the desired Artist and Song Alerts" on page 12. *2 The setting items are linked. Using the Front AUX Input Terminal Connect a portable music player, etc. Press VSOURCE, and select the AUXILIARY mode to listen to "Setting the AUX NAME mode" on page 41. *8 PLAY MODE can be selected in SETUP mode. Refer to "Setting the Source Volume Level...
... Optional adapter cable (RCA pin plugs [red, white] 3.5 mm miniplugs) or (3.5 mm miniplugs). For details, refer to "Storing the desired Artist and Song Alerts" on page 12. *2 The setting items are linked. Using the Front AUX Input Terminal Connect a portable music player, etc. Press VSOURCE, and select the AUXILIARY mode to listen to "Setting the AUX NAME mode" on page 41. *8 PLAY MODE can be selected in SETUP mode. Refer to "Setting the Source Volume Level...

Owners Manual
Page 24
... volume of "Receiving Notification". The installed Alpine TuneIt App should be set via the Smartphone, sound function settings on page 33. *18 If there is set in the connected Smartphone via this unit. 1 Press and hold . *19 Select this unit at least 2 seconds. Refer to "Muting the microphone input quickly (Voice Mute)" on CDE-163BT/UTE-62BT will blink. For details, consult your Alpine dealer. Refer to "Setting the communication mode...
... volume of "Receiving Notification". The installed Alpine TuneIt App should be set via the Smartphone, sound function settings on page 33. *18 If there is set in the connected Smartphone via this unit. 1 Press and hold . *19 Select this unit at least 2 seconds. Refer to "Muting the microphone input quickly (Voice Mute)" on CDE-163BT/UTE-62BT will blink. For details, consult your Alpine dealer. Refer to "Setting the communication mode...
Owners Manual
Page 25
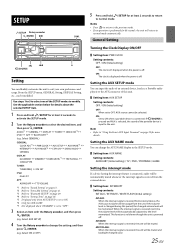
... VSOURCE is pressed and AUX is selected, the sound of the portable device is connected. Note • Refer to "Using the Front AUX Input Terminal" on page 10. *5 Displayed only when AUX SETUP is set to OFF, AUX source cannot be muted. INT MUTE: When the interrupt signal is received next time, the volume level will be modified. AUDIO*1 GENERAL DISPLAY TUNER SIRIUS XM*2 IPOD APP BLUETOOTH*3 (e.g. Select ON or...
... VSOURCE is pressed and AUX is selected, the sound of the portable device is connected. Note • Refer to "Using the Front AUX Input Terminal" on page 10. *5 Displayed only when AUX SETUP is set to OFF, AUX source cannot be muted. INT MUTE: When the interrupt signal is received next time, the volume level will be modified. AUDIO*1 GENERAL DISPLAY TUNER SIRIUS XM*2 IPOD APP BLUETOOTH*3 (e.g. Select ON or...
Owners Manual
Page 26
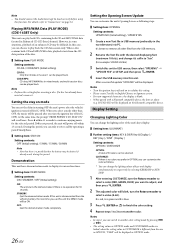
... different from the USB memory. 2 Rename the Text file with a Bluetooth compatible device, the font set above (e.g. After a successful update "UPDATED" will be displayed on page 54. CUSTOMIZE: If there is no color you prefer in the root directory) via PC. Note • You should connect the Audio Interrupt In Lead correctly before using this setting before inserting a disc. During this unit the DEMO mode will scroll once...
... different from the USB memory. 2 Rename the Text file with a Bluetooth compatible device, the font set above (e.g. After a successful update "UPDATED" will be displayed on page 54. CUSTOMIZE: If there is no color you prefer in the root directory) via PC. Note • You should connect the Audio Interrupt In Lead correctly before using this setting before inserting a disc. During this unit the DEMO mode will scroll once...
Owners Manual
Page 28
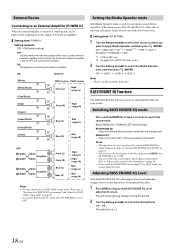
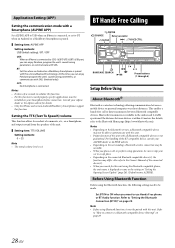
... is paired. Setting item: ALPINE APP Setting contents: USB (Initial setting) / BT / OFF USB: When an iPhone is connected to CDE-163BT/UTE-62BT's USB port, you can enjoy Pandora (program the unit's sound tuning parameters, or communicate with SNS. (Android only)) OFF: No Smartphone is connected. BAND/ABC SEARCH 1 2 Preset buttons (1 through 6) Setup Before Using About Bluetooth® Bluetooth is within 10 meters. Note • Before using the Bluetooth compatible phone, the unit...
... is paired. Setting item: ALPINE APP Setting contents: USB (Initial setting) / BT / OFF USB: When an iPhone is connected to CDE-163BT/UTE-62BT's USB port, you can enjoy Pandora (program the unit's sound tuning parameters, or communicate with SNS. (Android only)) OFF: No Smartphone is connected. BAND/ABC SEARCH 1 2 Preset buttons (1 through 6) Setup Before Using About Bluetooth® Bluetooth is within 10 meters. Note • Before using the Bluetooth compatible phone, the unit...

Owners Manual
Page 29
... the Owner's Manual of a Bluetooth compatible Smartphone, a portable audio player, etc., is activated. 3 Turn the Rotary encoder to select the desired items, and then press ENTER. Setting the Bluetooth Connection (BT IN) With Bluetooth technology, you can place a hands-free call . *2 Not displayed when 2WAY/3WAY system mode is selected, the connection will not be displayed. 29-EN Audio information of the Bluetooth compatible device. 1 Using your Bluetooth compatible phone with it will not USB Pair automatically...
... the Owner's Manual of a Bluetooth compatible Smartphone, a portable audio player, etc., is activated. 3 Turn the Rotary encoder to select the desired items, and then press ENTER. Setting the Bluetooth Connection (BT IN) With Bluetooth technology, you can place a hands-free call . *2 Not displayed when 2WAY/3WAY system mode is selected, the connection will not be displayed. 29-EN Audio information of the Bluetooth compatible device. 1 Using your Bluetooth compatible phone with it will not USB Pair automatically...

Owners Manual
Page 30
... Rotary encoder to select "CONNECT", then press ENTER to OFF. Select "DISCONNECT" to this device. At this time, the Bluetooth function is connected to disconnect this unit via the USB port. Setting item: USB PAIR Setting contents: ON (Initial setting) / OFF OFF: Turn off . • Depending on the connected Smartphone, the (battery charge), indicator may not be displayed. • A total of the Phone call . Setting contents: PHONE TALK: −...
... Rotary encoder to select "CONNECT", then press ENTER to OFF. Select "DISCONNECT" to this device. At this time, the Bluetooth function is connected to disconnect this unit via the USB port. Setting item: USB PAIR Setting contents: ON (Initial setting) / OFF OFF: Turn off . • Depending on the connected Smartphone, the (battery charge), indicator may not be displayed. • A total of the Phone call . Setting contents: PHONE TALK: −...
Owners Manual
Page 31
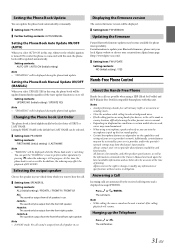
... are using a HSP (Head Set Profile) and HFP (Hands-Free Profile) compatible Smartphone with this unit, the phone book will be displayed during the phone book update. Setting the Phone Book Update You can update the phone book automatically or manually. Setting item: PB UPDATE Further Setting contents: AUTO/MANUAL Setting the Phone Book Auto Update ON/OFF (AUTO) When you select AUTO ON in this step, whenever the vehicle's ignition is turned ON or after the phone is connected with this unit. FRONT-R: The sound...
... are using a HSP (Head Set Profile) and HFP (Hands-Free Profile) compatible Smartphone with this unit, the phone book will be displayed during the phone book update. Setting the Phone Book Update You can update the phone book automatically or manually. Setting item: PB UPDATE Further Setting contents: AUTO/MANUAL Setting the Phone Book Auto Update ON/OFF (AUTO) When you select AUTO ON in this step, whenever the vehicle's ignition is turned ON or after the phone is connected with this unit. FRONT-R: The sound...
Owners Manual
Page 41
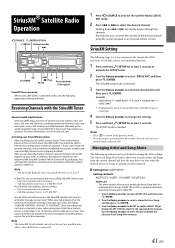
... the tuner has received the activation message, your tuner. Note, the activation process usually takes 10 to 15 minutes, but may be powered on this number to hear the SiriusXM preview channel on an optional remote control. Note • The SiriusXM Satellite Radio controls on this unit, the following operations can hear the Preview channel, tune to Channel 0 to select the desired channel. For details, refer to each individual function. 1 Press...
... the tuner has received the activation message, your tuner. Note, the activation process usually takes 10 to 15 minutes, but may be powered on this number to hear the SiriusXM preview channel on an optional remote control. Note • The SiriusXM Satellite Radio controls on this unit, the following operations can hear the Preview channel, tune to Channel 0 to select the desired channel. For details, refer to each individual function. 1 Press...
Owners Manual
Page 46
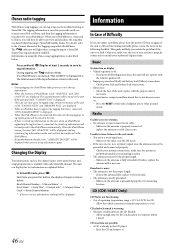
... extended; Make sure the antenna is off . • Improper power lead (Red) and battery lead (Yellow) connections. - The tag information will be able to SiriusXM Satellite Radio. The unit can store up to save its tag information will light when a song playing on the unit, when an iPod/iPhone supporting the tag function is full, "TAGCOUNT50" and "MEMORY FULL" are displayed. Notes • During tagging, the iPod/iPhone takes...
... extended; Make sure the antenna is off . • Improper power lead (Red) and battery lead (Yellow) connections. - The tag information will be able to SiriusXM Satellite Radio. The unit can store up to save its tag information will light when a song playing on the unit, when an iPod/iPhone supporting the tag function is full, "TAGCOUNT50" and "MEMORY FULL" are displayed. Notes • During tagging, the iPod/iPhone takes...
Owners Manual
Page 47
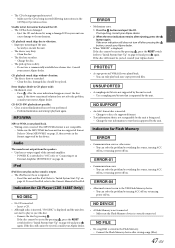
... not output from the speakers. • Unit has no sound is not connected. - Audio The sound is dirty or scratched. - iPod iPod does not play or eject the disc. - To reset the iPod, refer to an External Amplifier (POWER IC)" on . • Abnormal current is switched to "ON", refer to "Connecting to the Owner's Manual of the unit. - Remove the disc by pressing : If the disc cannot be replaced. NO DEVICE • A Flash Memory is output. • The iPod...
... not output from the speakers. • Unit has no sound is not connected. - Audio The sound is dirty or scratched. - iPod iPod does not play or eject the disc. - To reset the iPod, refer to an External Amplifier (POWER IC)" on . • Abnormal current is switched to "ON", refer to "Connecting to the Owner's Manual of the unit. - Remove the disc by pressing : If the disc cannot be replaced. NO DEVICE • A Flash Memory is output. • The iPod...
Owners Manual
Page 51
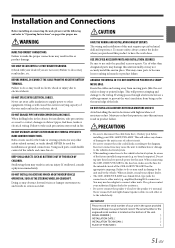
... the factory installed components (e.g. USE SPECIFIED ACCESSORY PARTS AND INSTALL THEM SECURELY. When connecting the CDE-163BT/UTE-62BT to the fuse box, make the proper connections may result in fire or electric shock. When in the space provided below and keep it as not to contact, damage or obstruct pipes, fuel lines, tanks or electrical wiring. Never connect left and right channel speaker cables to...
... the factory installed components (e.g. USE SPECIFIED ACCESSORY PARTS AND INSTALL THEM SECURELY. When connecting the CDE-163BT/UTE-62BT to the fuse box, make the proper connections may result in fire or electric shock. When in the space provided below and keep it as not to contact, damage or obstruct pipes, fuel lines, tanks or electrical wiring. Never connect left and right channel speaker cables to...
Owners Manual
Page 55
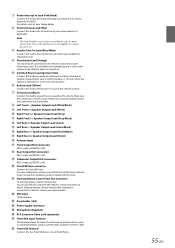
...) Power Supply Connector Microphone (Supplied) RCA Extension Cable (sold separately) Front AUX Input Terminal This terminal allows for controlling the vehicle's power antenna. Note • This lead should be connected to the vehicle's instrument cluster illumination lead. Do not use this lead to turn -on lead of your Alpine dealer. Power Antenna Lead (Blue) Connect this to a Flash Memory or to an iPod/iPhone. 55...
...) Power Supply Connector Microphone (Supplied) RCA Extension Cable (sold separately) Front AUX Input Terminal This terminal allows for controlling the vehicle's power antenna. Note • This lead should be connected to the vehicle's instrument cluster illumination lead. Do not use this lead to turn -on lead of your Alpine dealer. Power Antenna Lead (Blue) Connect this to a Flash Memory or to an iPod/iPhone. 55...


