
Owners Manual
Page 3
... 8 Location of Controls 8 Turning Power On or Off 9 Adjusting the Volume 9 How to view the Display 9 Soft button operation 9 Recalling the Source 9 The head unit button operation for the Setup or Search list 10 Radio Listening to the Radio 11 Presetting Stations Manually 11 Presetting Stations Automatically 12 Tuning to Preset Stations 12 Storing the tag information (HD Radio mode only 12 Changing the Display (HD Radio mode only 12 Receiving a Multicast (HD Radio mode only 12 Other Useful Features Adjusting the Audio 13 Multi Information Function 14 Rear Entertainment Function...
... 8 Location of Controls 8 Turning Power On or Off 9 Adjusting the Volume 9 How to view the Display 9 Soft button operation 9 Recalling the Source 9 The head unit button operation for the Setup or Search list 10 Radio Listening to the Radio 11 Presetting Stations Manually 11 Presetting Stations Automatically 12 Tuning to Preset Stations 12 Storing the tag information (HD Radio mode only 12 Changing the Display (HD Radio mode only 12 Receiving a Multicast (HD Radio mode only 12 Other Useful Features Adjusting the Audio 13 Multi Information Function 14 Rear Entertainment Function...
Owners Manual
Page 4
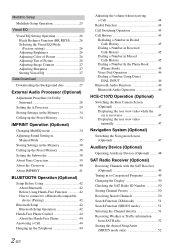
... the rear view video while the car is in reverse 47 Displaying the rear view video manually 47 Navigation System (Optional) Switching the Navigation Screen (Optional 47 Auxiliary Device (Optional) Operating Auxiliary Devices (Optional) ........ 48 SAT Radio Receiver (Optional) Receiving Channels with the SAT Receiver (Optional 49 Tuning in to Categorized Programs 49 Changing the Display 50 Checking the SAT Radio ID Number 50 Storing Channel Presets 50 Receiving Stored Channels 50 Search Function (XM mode 51 Search Function (SIRIUS mode 51 Selecting the Channel directly 51 Receiving...
... the rear view video while the car is in reverse 47 Displaying the rear view video manually 47 Navigation System (Optional) Switching the Navigation Screen (Optional 47 Auxiliary Device (Optional) Operating Auxiliary Devices (Optional) ........ 48 SAT Radio Receiver (Optional) Receiving Channels with the SAT Receiver (Optional 49 Tuning in to Categorized Programs 49 Changing the Display 50 Checking the SAT Radio ID Number 50 Storing Channel Presets 50 Receiving Stored Channels 50 Search Function (XM mode 51 Search Function (SIRIUS mode 51 Selecting the Channel directly 51 Receiving...
Owners Manual
Page 7
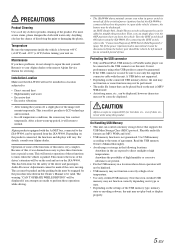
... USB memory in a location subjected to simplify this unit is connected directly to place these functions to the iXA-W404, can control a memory storage device that even certified USB memory, may not function or some of the functions of time. An SPST (Single-Pole, Single-Throw) switch (sold separately) can be sure to repair the unit yourself. Protecting the USB connector • Only an iPhone/iPod, USB memory or Portable audio player can be made to the USB connector on the iXA-W404...
... USB memory in a location subjected to simplify this unit is connected directly to place these functions to the iXA-W404, can control a memory storage device that even certified USB memory, may not function or some of the functions of time. An SPST (Single-Pole, Single-Throw) switch (sold separately) can be sure to repair the unit yourself. Protecting the USB connector • Only an iPhone/iPod, USB memory or Portable audio player can be made to the USB connector on the iXA-W404...
Owners Manual
Page 10
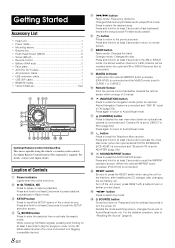
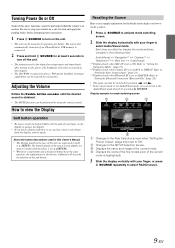
... screen. Changer/USB memory/Portable audio player/iPod mode: Press to recall the SETUP screen of Controls Power indicator Lights when the unit is connected). button Press to Audio/Visual mode. SOURCE button Turns the power on . / /TUNE/A. Press and hold for at least 3 seconds to turn the power off the unit power, press RESET with a ballpoint pen or similar pointed object. / button Press to switch the mode. An Alpine Remote Control Interface Box (optional) is set to DIRECT or RCA (page 23)). Location of the current source...
... screen. Changer/USB memory/Portable audio player/iPod mode: Press to recall the SETUP screen of Controls Power indicator Lights when the unit is connected). button Press to Audio/Visual mode. SOURCE button Turns the power on . / /TUNE/A. Press and hold for at least 3 seconds to turn the power off the unit power, press RESET with a ballpoint pen or similar pointed object. / button Press to switch the mode. An Alpine Remote Control Interface Box (optional) is set to DIRECT or RCA (page 23)). Location of the current source...
Owners Manual
Page 11
... after turning on the power. Changes to select Audio/Visual mode. The buttons found on the face of the unit are shown in bold within brackets, [ ] (e.g. [SETUP]). • Whenever a soft button and a head unit button have the same function, the explanations in this Owner's Manual will return to ADAPTER. Refer to "Setting the Rear Camera Input" (page 23). *3 Displayed only when Bluetooth IN is set to normal as time elapses. • The iXA-W404 is a precision device. The...
... after turning on the power. Changes to select Audio/Visual mode. The buttons found on the face of the unit are shown in bold within brackets, [ ] (e.g. [SETUP]). • Whenever a soft button and a head unit button have the same function, the explanations in this Owner's Manual will return to ADAPTER. Refer to "Setting the Rear Camera Input" (page 23). *3 Displayed only when Bluetooth IN is set to normal as time elapses. • The iXA-W404 is a precision device. The...
Owners Manual
Page 14
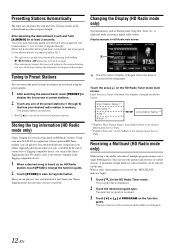
... the Owner's Manual of PROGRAM on an HD Radio station, touch [P1/2] to change the function guide. 2 Touch [STORE] to before the automatic storing procedure began. The selected program is received. 3 Touch [ ] or [ ] of the Tagging compatible device. 1 When a desired song is displayed. 2 Touch the desired program type. Display example for at least 2 seconds. This increases the amount and diversity of signal strength. The sub channel of the preset stations...
... the Owner's Manual of PROGRAM on an HD Radio station, touch [P1/2] to change the function guide. 2 Touch [STORE] to before the automatic storing procedure began. The selected program is received. 3 Touch [ ] or [ ] of the Tagging compatible device. 1 When a desired song is displayed. 2 Touch the desired program type. Display example for at least 2 seconds. This increases the amount and diversity of signal strength. The sub channel of the preset stations...

Owners Manual
Page 15
... Adjusting the Balance/Fader Directly Touch and move to that was displayed before the setup operation was started. • The A.Processor menu items will differ depending on which optional audio processor is selected. Adjusting NAV. Setting range: 0 to display the H.P.F. Adjusting the Subwoofer Level Touch [ ] or [ ] of the IMPRINT audio processor (PXA-H100) to 2.2ch (3WAY), you set to ON, and MultEQ OFF mode is connected. Touch [ ] to display the Subwoofer output adjusting screen...
... Adjusting the Balance/Fader Directly Touch and move to that was displayed before the setup operation was started. • The A.Processor menu items will differ depending on which optional audio processor is selected. Adjusting NAV. Setting range: 0 to display the H.P.F. Adjusting the Subwoofer Level Touch [ ] or [ ] of the IMPRINT audio processor (PXA-H100) to 2.2ch (3WAY), you set to ON, and MultEQ OFF mode is connected. Touch [ ] to display the Subwoofer output adjusting screen...

Owners Manual
Page 19
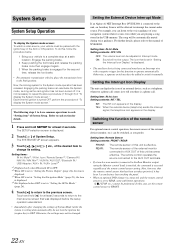
... "Setting item" of Source Setup. Switching Display Modes While your desired setup mode. To display the Source mode screen: To watch a video source, your vehicle to fit in the Park position. To do this, follow the procedure below. 1 Bring your vehicle must be parked with a vertical black band at a safe location. Radio Setup*1 / Sirius Setup*2 / Bluetooth Setup*3 / iPod Setup *1 Displayed when the optional HD Radio MODULE is connected. *2 Displayed when the optional SIRIUS receiver box is connected. *3 Displayed when the optional BLUETOOTH...
... "Setting item" of Source Setup. Switching Display Modes While your desired setup mode. To display the Source mode screen: To watch a video source, your vehicle to fit in the Park position. To do this, follow the procedure below. 1 Bring your vehicle must be parked with a vertical black band at a safe location. Radio Setup*1 / Sirius Setup*2 / Bluetooth Setup*3 / iPod Setup *1 Displayed when the optional HD Radio MODULE is connected. *2 Displayed when the optional SIRIUS receiver box is connected. *3 Displayed when the optional BLUETOOTH...

Owners Manual
Page 23
... produced when a button on the unit when the screen is pressed. Adjust the minute. Setting the Time Zone Adjustment becomes necessary when the "World Clock Display" of World Clock" (page 63). • Touch and hold [ ] or [ ] for at night with the dimmer. Displaying the Time The clock indication on the monitor display is changed. ON: Turns on or off the AUTO scroll mode. Sound (Beep) Guide Function Setting item: Beep Setting contents: OFF / ON...
... produced when a button on the unit when the screen is pressed. Adjust the minute. Setting the Time Zone Adjustment becomes necessary when the "World Clock Display" of World Clock" (page 63). • Touch and hold [ ] or [ ] for at night with the dimmer. Displaying the Time The clock indication on the monitor display is changed. ON: Turns on or off the AUTO scroll mode. Sound (Beep) Guide Function Setting item: Beep Setting contents: OFF / ON...
Owners Manual
Page 24
... remote control sensor to a complete stop at a safe location. ON: Sound will be changed. Mix*3 / AUX IN / AUX OUT / Bluetooth IN / USB Adapter / AUX+ IN / AUX+ Level*4 *1 Displayed only when Bluetooth IN is OFF. *2 When ON is set in "Setting the Picture Output" (page 24), the item is displayed. *3 When ON is set to REAR, some soft button operations ( [ ] STOP, etc.) cannot be parked with a negative trigger for at least 2 seconds. The SYSTEM SETUP screen...
... remote control sensor to a complete stop at a safe location. ON: Sound will be changed. Mix*3 / AUX IN / AUX OUT / Bluetooth IN / USB Adapter / AUX+ IN / AUX+ Level*4 *1 Displayed only when Bluetooth IN is OFF. *2 When ON is set in "Setting the Picture Output" (page 24), the item is displayed. *3 When ON is set to REAR, some soft button operations ( [ ] STOP, etc.) cannot be parked with a negative trigger for at least 2 seconds. The SYSTEM SETUP screen...
Owners Manual
Page 25
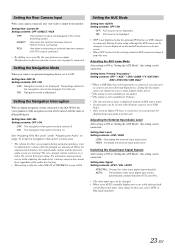
... be changed from this unit. ON: AUX source is displayed. • OFF is not displayed when the optional DVD player or DVD changer is displayed. Setting item: Signal Setting contents: NTSC / PAL / AUTO NTSC/PAL: Choose the video input signal type manually. ON: Navigation mode is connected. Setting the Navigation Interruption With an Alpine navigation system connected to reverse (R), the rear pictures are restored. Mix Level" under "Adjusting the Audio" on . Setting items: Primary / Secondary*1 Setting contents: OFF*2 / AUX*3 / DVD...
... be changed from this unit. ON: AUX source is displayed. • OFF is not displayed when the optional DVD player or DVD changer is displayed. Setting item: Signal Setting contents: NTSC / PAL / AUTO NTSC/PAL: Choose the video input signal type manually. ON: Navigation mode is connected. Setting the Navigation Interruption With an Alpine navigation system connected to reverse (R), the rear pictures are restored. Mix Level" under "Adjusting the Audio" on . Setting items: Primary / Secondary*1 Setting contents: OFF*2 / AUX*3 / DVD...
Owners Manual
Page 30
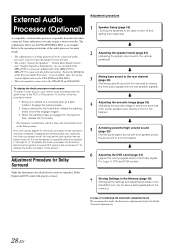
.... To display the Audio processor mode screen: To watch a video source, your vehicle to a complete stop at a safe location. We recommend to the PXA-H510 and PXA-H900. Each time the ignition is turned OFF, perform the procedure of the External Audio Processor" is not available. External Audio Processor (Optional) A compatible, external audio processor is operable from this unit. • The setting "Setting the Speakers", "Setting Bass Sound Control", and "Graphic Equalizer Adjustments" are...
.... To display the Audio processor mode screen: To watch a video source, your vehicle to a complete stop at a safe location. We recommend to the PXA-H510 and PXA-H900. Each time the ignition is turned OFF, perform the procedure of the External Audio Processor" is not available. External Audio Processor (Optional) A compatible, external audio processor is operable from this unit. • The setting "Setting the Speakers", "Setting Bass Sound Control", and "Graphic Equalizer Adjustments" are...
Owners Manual
Page 31
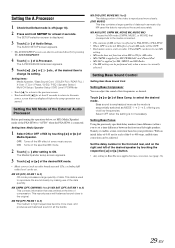
The AUDIO SETUP screen appears. • The AUDIO SETUP screen can adjust the sound of low frequencies as desired. Setting items: Media Xpander / Bass Sound Cont. / DOLBY PLII / REAR FILL / X-Over / T.Corr / Phase / G-EQ / P-EQ / Speaker Select / Multi CH Setup / Speaker Setup / DVD Level / PCM Mode • Touch [ ] to return to the main source screen that was displayed before the setup operation was started. This data is not necessary. MX CMPM (OFF, CMPM MX 1 to 3) / MX SAT...
The AUDIO SETUP screen appears. • The AUDIO SETUP screen can adjust the sound of low frequencies as desired. Setting items: Media Xpander / Bass Sound Cont. / DOLBY PLII / REAR FILL / X-Over / T.Corr / Phase / G-EQ / P-EQ / Speaker Select / Multi CH Setup / Speaker Setup / DVD Level / PCM Mode • Touch [ ] to return to the main source screen that was displayed before the setup operation was started. This data is not necessary. MX CMPM (OFF, CMPM MX 1 to 3) / MX SAT...
Owners Manual
Page 32
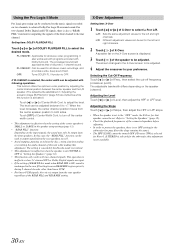
... works with Dolby Surround. The screen changes to the X-Over screen to be conducted on the music signals recorded on the speaker (channel). Using the Pro Logic II Mode Pro Logic processing can be adjusted. 4 Adjust the crossover to your preference. The setting is canceled if the Decode mode is switched. • This adjustment is ineffective when the speaker is also a "REAR FILL" function for all stereo video programming. The processed sound...
... works with Dolby Surround. The screen changes to the X-Over screen to be conducted on the music signals recorded on the speaker (channel). Using the Pro Logic II Mode Pro Logic processing can be adjusted. 4 Adjust the crossover to your preference. The setting is canceled if the Decode mode is switched. • This adjustment is ineffective when the speaker is also a "REAR FILL" function for all stereo video programming. The processed sound...
Owners Manual
Page 45
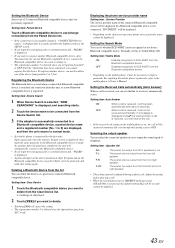
... front right speaker. • The setting cannot be adjusted during a phone call is received, it will be connected from the Device Search list. 3 If the adapter is successfully connected to a Bluetooth compatible device, a paired device name and a registered number (No. 1 to 5) are displayed, and then the unit returns to normal mode. • If a mobile phone is registered for 2 seconds, and then the display returns to the SETUP screen. • If you input the...
... front right speaker. • The setting cannot be adjusted during a phone call is received, it will be connected from the Device Search list. 3 If the adapter is successfully connected to a Bluetooth compatible device, a paired device name and a registered number (No. 1 to 5) are displayed, and then the unit returns to normal mode. • If a mobile phone is registered for 2 seconds, and then the display returns to the SETUP screen. • If you input the...
Owners Manual
Page 47
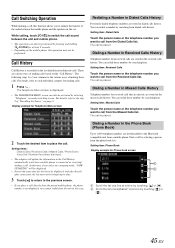
... the received calls history. Setting items: Dialed Calls / Received Calls / Missed Calls / Phone Book / Voice Dial / Number Key (direct dial input) • The adapter will be displayed. • It may take some time for Phone book screen Scroll the list one alphabet* at a time by searching here. Call Switching Operation While making a call, this function allows you to initiate the transfer of the audio between the unit and mobile phone. • The operation...
... the received calls history. Setting items: Dialed Calls / Received Calls / Missed Calls / Phone Book / Voice Dial / Number Key (direct dial input) • The adapter will be displayed. • It may take some time for Phone book screen Scroll the list one alphabet* at a time by searching here. Call Switching Operation While making a call, this function allows you to initiate the transfer of the audio between the unit and mobile phone. • The operation...
Owners Manual
Page 50
.../Video while driving the vehicle. It is applied. Each time the ignition is not installed correctly, the driver will show the warning-PICTURE OFF FOR YOUR SAFETY. 1 Press SOURCE to "Switching Display Modes" on page 17. • After connecting the KCA-410C, its AUX input can reactivate the AUX mode, as long as the source name in the Park position. For operation, refer to activate mode switching screen. 2 Slide the display...
.../Video while driving the vehicle. It is applied. Each time the ignition is not installed correctly, the driver will show the warning-PICTURE OFF FOR YOUR SAFETY. 1 Press SOURCE to "Switching Display Modes" on page 17. • After connecting the KCA-410C, its AUX input can reactivate the AUX mode, as long as the source name in the Park position. For operation, refer to activate mode switching screen. 2 Slide the display...
Owners Manual
Page 64
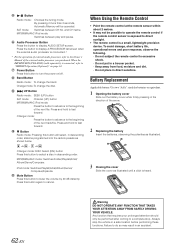
... battery life, operational errors and poor response, observe the following. - Power Button Press this button to select a disc in a safe location before performing these functions. Do not subject the remote control to display AUDIO SETUP screen. Any function that requires your prolonged attention should only be operated. Do not place in a trouser pocket. - Button Radio mode: Pressing this button will be performed after coming to turn the power on page 34. Mute Button Press this button to...
... battery life, operational errors and poor response, observe the following. - Power Button Press this button to select a disc in a safe location before performing these functions. Do not subject the remote control to display AUDIO SETUP screen. Any function that requires your prolonged attention should only be operated. Do not place in a trouser pocket. - Button Radio mode: Pressing this button will be performed after coming to turn the power on page 34. Mute Button Press this button to...
Owners Manual
Page 66
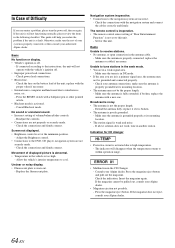
... to receive stations. • No antenna, or open connection in the CD Changer. - Check the indication. Press the magazine eject button. Check power lead connections. • Blown fuse. - Press the RESET switch with a ballpoint pen or other pointed article. • Blackout mode is worn out. - Cancel Blackout mode. Screen not displayed. • Brightness control is set to tune stations in a weak signal area. - Unclear or noisy display. • Fluorescent plate is activated. - make...
... to receive stations. • No antenna, or open connection in the CD Changer. - Check the indication. Press the magazine eject button. Check power lead connections. • Blown fuse. - Press the RESET switch with a ballpoint pen or other pointed article. • Blackout mode is worn out. - Cancel Blackout mode. Screen not displayed. • Brightness control is set to tune stations in a weak signal area. - Unclear or noisy display. • Fluorescent plate is activated. - make...
Owners Manual
Page 74
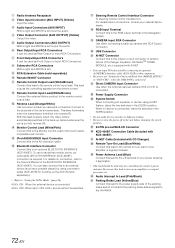
... is connected, leave the switches in the EQ/DIV position. CAMERA Input RCA Connector Use when connecting a back-up camera whenever the car is left output the audio. This lead outputs the controlling signals from the remote control. Monitor Control Lead (White/Pink) Connect this lead to the remote turn on an amplifier or a signal processor, etc. AUX+ OFF: When set "Setting the Connected Head Unit (MODEL SETUP)" to the Owner's Manual of another device (CD Changer, Equalizer, HD RadioTM TUNER MODULE...
... is connected, leave the switches in the EQ/DIV position. CAMERA Input RCA Connector Use when connecting a back-up camera whenever the car is left output the audio. This lead outputs the controlling signals from the remote control. Monitor Control Lead (White/Pink) Connect this lead to the remote turn on an amplifier or a signal processor, etc. AUX+ OFF: When set "Setting the Connected Head Unit (MODEL SETUP)" to the Owner's Manual of another device (CD Changer, Equalizer, HD RadioTM TUNER MODULE...


