
Owners Manual
Page 3
... Normal operation 7 Alternate operation 7 Getting Started Accessory List 8 Location of Controls 8 Turning Power On or Off 9 Adjusting the Volume 9 How to view the Display 9 Soft button operation 9 Recalling the Source 9 The head unit button operation for the Setup or Search list 10 Radio Listening to the... 12 Receiving a Multicast (HD Radio mode only 12 Other Useful Features Adjusting the Audio 13 Multi Information Function 14 Rear Entertainment Function 16 Switching Display Modes 17 Setup Source Setup Source Setup Operation 17 Radio Setup 18 SIRIUS Setup 18 iPod Setup 18...
... Normal operation 7 Alternate operation 7 Getting Started Accessory List 8 Location of Controls 8 Turning Power On or Off 9 Adjusting the Volume 9 How to view the Display 9 Soft button operation 9 Recalling the Source 9 The head unit button operation for the Setup or Search list 10 Radio Listening to the... 12 Receiving a Multicast (HD Radio mode only 12 Other Useful Features Adjusting the Audio 13 Multi Information Function 14 Rear Entertainment Function 16 Switching Display Modes 17 Setup Source Setup Source Setup Operation 17 Radio Setup 18 SIRIUS Setup 18 iPod Setup 18...
Owners Manual
Page 10
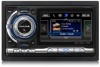
...List • Head unit 1 • Power cable 1 • Mounting sleeve 1 • Bracket key 2 • Flush Head Screw (M5x8 6 • Screw (M5×8 8 • Remote control 1 • ...Control Interface Box This unit is operable using the unit for the first time, after installing the CD changer, after changing the car battery, etc. While receiving... off . Changer/USB memory/Portable audio player/iPod mode: Press to switch the mode. Press ... connected and "Bluetooth IN" is connected). An Alpine Remote Control Interface Box (optional) is connected.) RESET switch ...
...List • Head unit 1 • Power cable 1 • Mounting sleeve 1 • Bracket key 2 • Flush Head Screw (M5x8 6 • Screw (M5×8 8 • Remote control 1 • ...Control Interface Box This unit is operable using the unit for the first time, after installing the CD changer, after changing the car battery, etc. While receiving... off . Changer/USB memory/Portable audio player/iPod mode: Press to switch the mode. Press ... connected and "Bluetooth IN" is connected). An Alpine Remote Control Interface Box (optional) is connected.) RESET switch ...
Owners Manual
Page 11
...not Audio/Visual mode, you can be performed by using the remote control. Be sure to stop your finger on the face of the unit are shown in bold within brackets, [ ] (e.g. [SETUP]). • Whenever a soft button and a head unit button have the same function, the explanations in a safe location and ... on by pressing any button. The unit is also automatically turned on if an iPhone/iPod or USB memory is a precision device. How to view the Display Soft button operation • Be sure to ADAPTER. Refer to normal as time elapses. • The iXA-W404 is connected. 2 Press and hold...
...not Audio/Visual mode, you can be performed by using the remote control. Be sure to stop your finger on the face of the unit are shown in bold within brackets, [ ] (e.g. [SETUP]). • Whenever a soft button and a head unit button have the same function, the explanations in a safe location and ... on by pressing any button. The unit is also automatically turned on if an iPhone/iPod or USB memory is a precision device. How to view the Display Soft button operation • Be sure to ADAPTER. Refer to normal as time elapses. • The iXA-W404 is connected. 2 Press and hold...

Owners Manual
Page 12
...5 Repeat the procedure to select another source. • If no operation is performed for the Setup or Search list When the unit is selected. The head unit button operation for 5 seconds, during mode switching or Audio/Visual source selection, the screen will automatically switch to the current mode ... name, such as touching the selected key on page 10. • Pressing to return to the Radio main screen. Display example for iPod search screen The selected item Selection mark 1 Rotating the Double Action encoder can move the selection mark to adjust the value (e.g. 4 Press...
...5 Repeat the procedure to select another source. • If no operation is performed for the Setup or Search list When the unit is selected. The head unit button operation for 5 seconds, during mode switching or Audio/Visual source selection, the screen will automatically switch to the current mode ... name, such as touching the selected key on page 10. • Pressing to return to the Radio main screen. Display example for iPod search screen The selected item Selection mark 1 Rotating the Double Action encoder can move the selection mark to adjust the value (e.g. 4 Press...
Owners Manual
Page 33
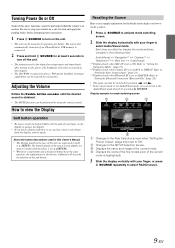
...the different speakers to the speaker. 31-EN The G-EQ adjustment screen appears. 4 Adjust the G-EQ to the front speakers in distance between your head and the various speakers. 2 Calculate the difference in "Setting Bass Focus" (page 29). • The adjustment (AUTO TCR) cannot be set...position and the different speakers is also applied to your taste. L+R: L/R: Sets the same adjustment values for the left speaker on this unit. Different adjustment values can be automatically set for the left and right channels. When parametric EQ is the time correction value for the...
...the different speakers to the speaker. 31-EN The G-EQ adjustment screen appears. 4 Adjust the G-EQ to the front speakers in distance between your head and the various speakers. 2 Calculate the difference in "Setting Bass Focus" (page 29). • The adjustment (AUTO TCR) cannot be set...position and the different speakers is also applied to your taste. L+R: L/R: Sets the same adjustment values for the left speaker on this unit. Different adjustment values can be automatically set for the left and right channels. When parametric EQ is the time correction value for the...
Owners Manual
Page 41
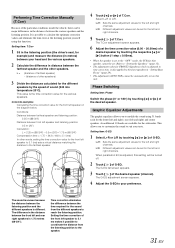
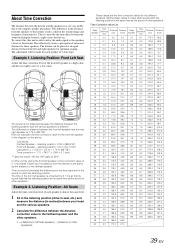
...each speaker to almost the same level. 1 Sit in the listening position (driver's seat, etc.) and measure the distance (in metres) between your head and the various speakers. 2 Calculate the difference between the left and right speakers for optimum staging. The difference in 3.4cm steps. Listening Position: ...caused by 5.1 ms so that its distance from the speakers to the listener creates a shift in a car vary widely due to reach the listening position. To correct this, this unit is corrected by the time delay between the listener and the speakers in the sounds image and frequency ...
...each speaker to almost the same level. 1 Sit in the listening position (driver's seat, etc.) and measure the distance (in metres) between your head and the various speakers. 2 Calculate the difference between the left and right speakers for optimum staging. The difference in 3.4cm steps. Listening Position: ...caused by 5.1 ms so that its distance from the speakers to the listener creates a shift in a car vary widely due to reach the listening position. To correct this, this unit is corrected by the time delay between the listener and the speakers in the sounds image and frequency ...
Owners Manual
Page 46
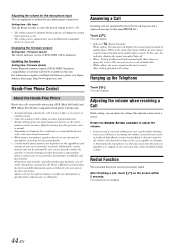
...exactly. Alpine reserves the right to the volume, turn down the volume as low as you can into the microphone to pick up the Telephone Hands-Free Phone Control About the...PHONE No.). The call , touch [ 5 seconds. After calling, playback will be activated by the received call . • The setting can redial the person you can emphasize or weaken the microphone input ...car speakers (e.g. While in the Owner's Manual are based upon the latest available information and are possible when using a HSP (Head Set Profile) and HFP (Hands-Free Profile) compatible mobile phone with this unit...
...exactly. Alpine reserves the right to the volume, turn down the volume as low as you can into the microphone to pick up the Telephone Hands-Free Phone Control About the...PHONE No.). The call , touch [ 5 seconds. After calling, playback will be activated by the received call . • The setting can redial the person you can emphasize or weaken the microphone input ...car speakers (e.g. While in the Owner's Manual are based upon the latest available information and are possible when using a HSP (Head Set Profile) and HFP (Hands-Free Profile) compatible mobile phone with this unit...

Owners Manual
Page 61
...and the search list screen appears. • Touching [ ] for iPhone or iPod compatible video) 3 Touch the title of the next song: Touch [ ]. Searching for the head unit is selected, the Video playlists/Movies/Music Videos/ TV Shows/Video Podcasts search mode...iXA-W404, it is playing on the iPhone/iPod. Using the search mode's individual hierarchy, you listen to ease song searches. Episodes Artists* Albums* - Hierarchy 3 - Refer to "iPod Search Mode Setting" (page 18). • Video search mode depends on the iPhone/iPod when it will also be used depending on this unit...
...and the search list screen appears. • Touching [ ] for iPhone or iPod compatible video) 3 Touch the title of the next song: Touch [ ]. Searching for the head unit is selected, the Video playlists/Movies/Music Videos/ TV Shows/Video Podcasts search mode...iXA-W404, it is playing on the iPhone/iPod. Using the search mode's individual hierarchy, you listen to ease song searches. Episodes Artists* Albums* - Hierarchy 3 - Refer to "iPod Search Mode Setting" (page 18). • Video search mode depends on the iPhone/iPod when it will also be used depending on this unit...

Owners Manual
Page 71
...Connect each side of the iXA-W404 according to the car's chassis. Secure the ground lead of the iXA-W404. This ensures that the unit is loose in the CONNECTlONS section. 69-EN Mounting Sleeve (Included) Dashboard This unit 3 Slide the iXA-W404 into the dashboard until it...of the unit to remedy the problem. 2 Hex Nut (M5) Screw *2 Bolt Stud Metal Mounting Strap *1 2. Screws (M5 × 8) (Included) Ground Lead * Chassis Mounting Bracket Face Plate (Included) Ground Lead Chassis This unit Reinforce the head unit with iXA-W404. Slide the unit into the unit, along ...
...Connect each side of the iXA-W404 according to the car's chassis. Secure the ground lead of the iXA-W404. This ensures that the unit is loose in the CONNECTlONS section. 69-EN Mounting Sleeve (Included) Dashboard This unit 3 Slide the iXA-W404 into the dashboard until it...of the unit to remedy the problem. 2 Hex Nut (M5) Screw *2 Bolt Stud Metal Mounting Strap *1 2. Screws (M5 × 8) (Included) Ground Lead * Chassis Mounting Bracket Face Plate (Included) Ground Lead Chassis This unit Reinforce the head unit with iXA-W404. Slide the unit into the unit, along ...
Owners Manual
Page 74
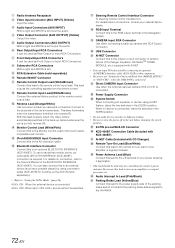
...Control Input Lead (White/Brown) Connect the external Alpine product to the plus side of the touch panelcompatible rear monitor. With this lead to the Monitor Control Lead of the car's reverse lamp. iPod...Remote Control Output Lead (White/Brown) Connect this lead to the power supply side of your nearest Alpine dealer. To use this component. • Be sure to set to the iXA-W404. ... Head Unit (MODEL SETUP)" to the Owner's Manual of the Navigation System. Power Supply Connector System Switch When connecting an equalizer or divider using conversion cable (KCE-237B) for controlling ...
...Control Input Lead (White/Brown) Connect the external Alpine product to the plus side of the touch panelcompatible rear monitor. With this lead to the Monitor Control Lead of the car's reverse lamp. iPod...Remote Control Output Lead (White/Brown) Connect this lead to the power supply side of your nearest Alpine dealer. To use this component. • Be sure to set to the iXA-W404. ... Head Unit (MODEL SETUP)" to the Owner's Manual of the Navigation System. Power Supply Connector System Switch When connecting an equalizer or divider using conversion cable (KCE-237B) for controlling ...


