User Manual
Page 3
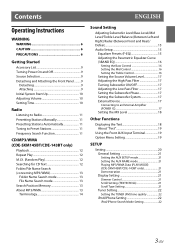
... AUX Input Terminal 19 Option Menu Setting 19 SETUP Setting 20 General Setting 21 Setting the AUX SETUP mode 21 Setting the AUX NAME mode 21 Playing MP3/WMA Data (PLAY MODE) (CDE-SXM145BT/CDE-143BT only 21 Demonstration 21 Display Setting 21 Dimmer Control 21 Scroll Setting (TEXTSCROLL 21 Scroll Type Setting 21 Tuner Setting 22 Setting the TUNER (FM) tone quality...
... AUX Input Terminal 19 Option Menu Setting 19 SETUP Setting 20 General Setting 21 Setting the AUX SETUP mode 21 Setting the AUX NAME mode 21 Playing MP3/WMA Data (PLAY MODE) (CDE-SXM145BT/CDE-143BT only 21 Demonstration 21 Display Setting 21 Dimmer Control 21 Scroll Setting (TEXTSCROLL 21 Scroll Type Setting 21 Tuner Setting 22 Setting the TUNER (FM) tone quality...

User Manual
Page 4
...Repeat Play 32 SiriusXM Satellite Radio Operation (CDE-SXM145BT only) Receiving Channels with the SiriusXM Tuner 32 SiriusXM Setting (CDE-SXM145BT Only) ..........32 Managing Artist and Song Alerts 33 Setting the Favorite Sports Team Alerts.......33 Setting the Parental Control 33 Confirming the strength ...of the SiriusXM signal 34 Setting Tune Start 34 Checking the ...
...Repeat Play 32 SiriusXM Satellite Radio Operation (CDE-SXM145BT only) Receiving Channels with the SiriusXM Tuner 32 SiriusXM Setting (CDE-SXM145BT Only) ..........32 Managing Artist and Song Alerts 33 Setting the Favorite Sports Team Alerts.......33 Setting the Parental Control 33 Confirming the strength ...of the SiriusXM signal 34 Setting Tune Start 34 Checking the ...
User Manual
Page 8
... • iPhone, iPod, iPod classic, iPod nano, and iPod touch are trademarks of Sirius XM Radio Inc. Do not touch the terminals by Alpine Electronics, Inc. If there is a particular file other than audio data. The resulting playback may contain noise that an electronic accessory has been designed ... file extensions. • Do not add the above extensions to a file other USB products cannot be connected to back up important data on the settings of such marks by hand or metal. Do not subject Flash Memory to its type or state. • Flash Memory function is copy-protected (...
... • iPhone, iPod, iPod classic, iPod nano, and iPod touch are trademarks of Sirius XM Radio Inc. Do not touch the terminals by Alpine Electronics, Inc. If there is a particular file other than audio data. The resulting playback may contain noise that an electronic accessory has been designed ... file extensions. • Do not add the above extensions to a file other USB products cannot be connected to back up important data on the settings of such marks by hand or metal. Do not subject Flash Memory to its type or state. • Flash Memory function is copy-protected (...
User Manual
Page 9
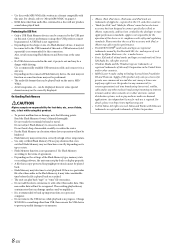
... 1 • Carrying Case 1 • Bracket Key 2 • Screw (M5 × 8 4 • Owner's Manual 1 set * It is for CDE-SXM145BT/CDE-143BT. Note • The first time power is set to ON. Refer to "Setting the BLUETOOTH Connection (BT IN)" on the connector terminals and no dirt or dust on page 23. *5 Only..., make sure that there is not a malfunction. • To protect the front panel, place it in the supplied carrying case (CDE-SXM145BT/CDE-143BT only). • When detaching the front panel, do not apply excessive force as it locks firmly into the main unit. This is...
... 1 • Carrying Case 1 • Bracket Key 2 • Screw (M5 × 8 4 • Owner's Manual 1 set * It is for CDE-SXM145BT/CDE-143BT. Note • The first time power is set to ON. Refer to "Setting the BLUETOOTH Connection (BT IN)" on the connector terminals and no dirt or dust on page 23. *5 Only..., make sure that there is not a malfunction. • To protect the front panel, place it in the supplied carrying case (CDE-SXM145BT/CDE-143BT only). • When detaching the front panel, do not apply excessive force as it locks firmly into the main unit. This is...
User Manual
Page 10
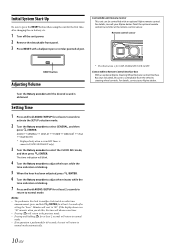
...and then press ENTER. For details, consult your Alpine dealer. 10-EN Initial System Start-Up Be sure to press the RESET button when using the unit for the first time, after setting the "hour". Setting Time 1 Press and hold AUDIOSETUP for at least ... details, contact your Alpine dealer. Point the optional remote control transmitter at least 2 seconds will return to normal mode. • If no operation is performed for 60 seconds, the unit will reset to the previous mode. • Pressing and holding r for CDE-SXM145BT/CDE-143BT. If the display ...
...and then press ENTER. For details, consult your Alpine dealer. 10-EN Initial System Start-Up Be sure to press the RESET button when using the unit for the first time, after setting the "hour". Setting Time 1 Press and hold AUDIOSETUP for at least ... details, contact your Alpine dealer. Point the optional remote control transmitter at least 2 seconds will return to normal mode. • If no operation is performed for 60 seconds, the unit will reset to the previous mode. • Pressing and holding r for CDE-SXM145BT/CDE-143BT. If the display ...
User Manual
Page 12
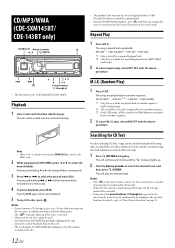
...ENTER. play , the M.I .X. (Random Play) 1 Press 5 x. The songs are made during its eject cycle. Pressing again will set the search mode, and the "" indicator lights up . Searching for CD Text On discs utilizing CD Text, songs can be canceled. •... file protected by DRM (Digital Rights Management) copy protection, cannot be searched and played by skipping to select the desired folder. CD/MP3/WMA (CDE-SXM145BT/ CDE-143BT only) SOURCE/ Rotary encoder / II /ENTER 5 4 Preset buttons (1 through 6) is ...
...ENTER. play , the M.I .X. (Random Play) 1 Press 5 x. The songs are made during its eject cycle. Pressing again will set the search mode, and the "" indicator lights up . Searching for CD Text On discs utilizing CD Text, songs can be canceled. •... file protected by DRM (Digital Rights Management) copy protection, cannot be searched and played by skipping to select the desired folder. CD/MP3/WMA (CDE-SXM145BT/ CDE-143BT only) SOURCE/ Rotary encoder / II /ENTER 5 4 Preset buttons (1 through 6) is ...
User Manual
Page 15
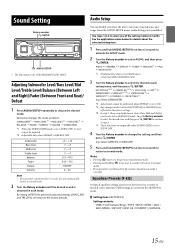
...~ +7 L15 ~ R15 R15 ~ F15 ON/OFF 0 ~ 35 Note • If no operation is performed for 60 seconds, Sound menu mode is connected.(CDE-SXM145BT only). 3 Turn the Rotary encoder to select the desired sound setting menu, and then press ENTER. Use steps 1 to 5 to select one of the... applicable section below for details about the selected setting item. 1 Press and hold AUDIOSETUP for CDE-SXM145BT/CDE-143BT. By setting DEFEAT ON, previously adjusted settings of musical source material. From the AUDIO SETUP menu, Audio Setting can be selected in each mode. Select SUBW...
...~ +7 L15 ~ R15 R15 ~ F15 ON/OFF 0 ~ 35 Note • If no operation is performed for 60 seconds, Sound menu mode is connected.(CDE-SXM145BT only). 3 Turn the Rotary encoder to select the desired sound setting menu, and then press ENTER. Use steps 1 to 5 to select one of the... applicable section below for details about the selected setting item. 1 Press and hold AUDIOSETUP for CDE-SXM145BT/CDE-143BT. By setting DEFEAT ON, previously adjusted settings of musical source material. From the AUDIO SETUP menu, Audio Setting can be selected in each mode. Select SUBW...

User Manual
Page 16
...Left and Right)/Fader (Between Front and Rear)/Defeat" on page 15. WIDE 0.75 MEDIUM 1.00 MEDIUM 1.25 NARROW 1.50 Setting the Mid Center Frequency (CENTER FRQ) Turn the Rotary encoder to select the desired Mid center frequency. 500 (Hz) 1.0K (Hz) 1.5K (... to select the desired treble center frequency. 7.5K (Hz) 10.0K (Hz) 12.5K (Hz) 15.0K (Hz) Setting the Treble Level Turn the Rotary encoder to your personal taste. You can emphasise or weaken the treble level. * The adjustment can modify the Equalizer...
...Left and Right)/Fader (Between Front and Rear)/Defeat" on page 15. WIDE 0.75 MEDIUM 1.00 MEDIUM 1.25 NARROW 1.50 Setting the Mid Center Frequency (CENTER FRQ) Turn the Rotary encoder to select the desired Mid center frequency. 500 (Hz) 1.0K (Hz) 1.5K (... to select the desired treble center frequency. 7.5K (Hz) 10.0K (Hz) 12.5K (Hz) 15.0K (Hz) Setting the Treble Level Turn the Rotary encoder to your personal taste. You can emphasise or weaken the treble level. * The adjustment can modify the Equalizer...
User Manual
Page 17
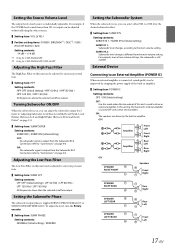
..., turn the Rotary encoder. Setting item: SUBW PHASE Setting contents: NORMAL (Initial setting) / REVERSE Setting the Subwoofer System When the subwoofer is output from the Subwoofer RCA Connectors (refer to "Connections" on this unit can select either SYS 1 or SYS 2 for CDE-SXM145BT/CDE-143BT. For example, even at low volume settings, the subwoofer is toggled SUBWOOFER...
..., turn the Rotary encoder. Setting item: SUBW PHASE Setting contents: NORMAL (Initial setting) / REVERSE Setting the Subwoofer System When the subwoofer is output from the Subwoofer RCA Connectors (refer to "Connections" on this unit can select either SYS 1 or SYS 2 for CDE-SXM145BT/CDE-143BT. For example, even at low volume settings, the subwoofer is toggled SUBWOOFER...
User Manual
Page 18
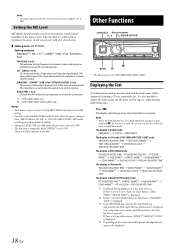
...is displayed. *4 Depending on page 21, press and hold k for CDE-SXM145BT/CDE-143BT. This reproduces a well-balanced sound close to 3): This corrects information that corresponds to reproduce a clearer, cleaner output. It is set to SCR MANUAL on the connected mobile phone, the elapsed time may...the ID3 tag/WMA tag information is for at the time of this large data quantity to the media connected. *1 CDE-SXM145BT only. *2 CDE-SXM145BT/CDE-143BT only. Setting the MX Level MX (Media Xpander) makes vocals or instruments sound distinct regardless of data during playback of a disc with...
...is displayed. *4 Depending on page 21, press and hold k for CDE-SXM145BT/CDE-143BT. This reproduces a well-balanced sound close to 3): This corrects information that corresponds to reproduce a clearer, cleaner output. It is set to SCR MANUAL on the connected mobile phone, the elapsed time may...the ID3 tag/WMA tag information is for at the time of this large data quantity to the media connected. *1 CDE-SXM145BT only. *2 CDE-SXM145BT/CDE-143BT only. Setting the MX Level MX (Media Xpander) makes vocals or instruments sound distinct regardless of data during playback of a disc with...
User Manual
Page 19
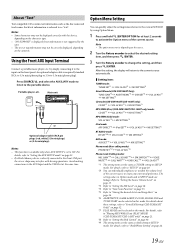
... source automatically. Setting item: TUNER mode: TUNER SET*1 VOL LV ADJ*2 MX SETTING*3 SiriusXM mode (CDE-SXM145BT Only): TUNE SCAN*4 ALERT MEMO*5 SXM SET*6 VOL LV ADJ*2 MX SETTING*3 CD mode (CDE-SXM145BT/CDE-143BT only): CD SET*7 VOL LV ADJ*2 MX SETTING*3 MP3/WMA (Disc) (CDE-SXM145BT/CDE-143BT only) mode: CD SET*7 VOL...
... source automatically. Setting item: TUNER mode: TUNER SET*1 VOL LV ADJ*2 MX SETTING*3 SiriusXM mode (CDE-SXM145BT Only): TUNE SCAN*4 ALERT MEMO*5 SXM SET*6 VOL LV ADJ*2 MX SETTING*3 CD mode (CDE-SXM145BT/CDE-143BT only): CD SET*7 VOL LV ADJ*2 MX SETTING*3 MP3/WMA (Disc) (CDE-SXM145BT/CDE-143BT only) mode: CD SET*7 VOL...
User Manual
Page 20
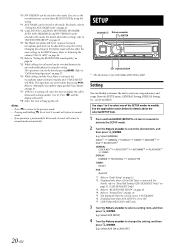
...Press r to return to the previous mode. • Pressing and holding r for CDE-SXM145BT/CDE-143BT. SETUP SOURCE/ Rotary encoder /ENTER AUDIO/SETUP * The illustration is performed for at least 2 seconds will also affect the same settings in this item to "Call Switching Operation" on page 15. *2 Displayed only ... *15 While calling, the call . Refer to "Muting the microphone input quickly (Voice Mute)" on page 27. *17 If there is set to ON. *7 CDE-SXM145BT/CDE-143BT only. 3 Turn the Rotary encoder to "Setting the BLUETOOTH sound quality" on page 24. *14 Refer to select...
...Press r to return to the previous mode. • Pressing and holding r for CDE-SXM145BT/CDE-143BT. SETUP SOURCE/ Rotary encoder /ENTER AUDIO/SETUP * The illustration is performed for at least 2 seconds will also affect the same settings in this item to "Call Switching Operation" on page 15. *2 Displayed only ... *15 While calling, the call . Refer to "Muting the microphone input quickly (Voice Mute)" on page 27. *17 If there is set to ON. *7 CDE-SXM145BT/CDE-143BT only. 3 Turn the Rotary encoder to "Setting the BLUETOOTH sound quality" on page 24. *14 Refer to select...
User Manual
Page 21
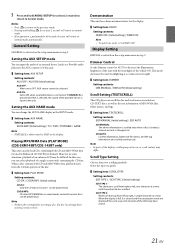
Dimmer Control Set the Dimmer control to AUTO to decrease the illumination brightness of the unit with the head lights of a single session only, containing the CD data. Playing MP3/WMA Data (PLAY MODE) (CDE-SXM145BT/CDE-143BT only) This unit can be played back.... Select the type you can select playback of the vehicle ON. AUX ON: Set to ON when a portable device is performed for at night. Setting item: DIMMER Setting contents: DIM MANUAL / DIM AUTO (Initial setting) Scroll Setting (TEXTSCROLL...
Dimmer Control Set the Dimmer control to AUTO to decrease the illumination brightness of the unit with the head lights of a single session only, containing the CD data. Playing MP3/WMA Data (PLAY MODE) (CDE-SXM145BT/CDE-143BT only) This unit can be played back.... Select the type you can select playback of the vehicle ON. AUX ON: Set to ON when a portable device is performed for at night. Setting item: DIMMER Setting contents: DIM MANUAL / DIM AUTO (Initial setting) Scroll Setting (TEXTSCROLL...
User Manual
Page 22
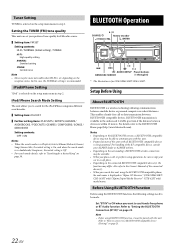
... buttons BAND/ABC SEARCH (1 through 6) * The illustration is displayed as "Alpine CD Receiver" (CDE-SXM145BT/ CDE-143BT only)/"Alpine Digital Media Receiver" (UTE-42BT only) model name. In this unit using BLUETOOTH function, it must be more noticeable when HI-FI is not guaranteed. Tuner Setting TUNER is recommended. Setup Before Using About BLUETOOTH BLUETOOTH is...
... buttons BAND/ABC SEARCH (1 through 6) * The illustration is displayed as "Alpine CD Receiver" (CDE-SXM145BT/ CDE-143BT only)/"Alpine Digital Media Receiver" (UTE-42BT only) model name. In this unit using BLUETOOTH function, it must be more noticeable when HI-FI is not guaranteed. Tuner Setting TUNER is recommended. Setup Before Using About BLUETOOTH BLUETOOTH is...
User Manual
Page 23
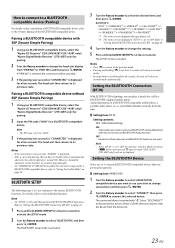
... Owner's Manual of 5 connected BLUETOOTH compatible devices that you previously registered. Setting item: PAIRED DEV 1 Turn the Rotary encoder to select a BLUETOOTH compatible device you want to pair your BLUETOOTH compatible device, select the "Alpine CD Receiver" (CDE-SXM145BT/CDE-143BT only)/ "Alpine Digital Media Receiver" (UTE-42BT only) for pairing. 2 Input the PIN code...
... Owner's Manual of 5 connected BLUETOOTH compatible devices that you previously registered. Setting item: PAIRED DEV 1 Turn the Rotary encoder to select a BLUETOOTH compatible device you want to pair your BLUETOOTH compatible device, select the "Alpine CD Receiver" (CDE-SXM145BT/CDE-143BT only)/ "Alpine Digital Media Receiver" (UTE-42BT only) for pairing. 2 Input the PIN code...
User Manual
Page 24
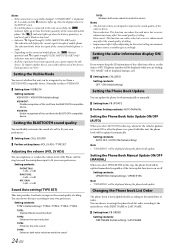
... Phone call . Setting item: CALLER ID Setting contents: OFF / ON (Initial setting) Setting the Phone Book Update You can reduce the road noise, but excessive enhancement may affect the sound quality of calling. • Improvement effect differs depending on the connected mobile phone, the c (battery quantity) and i (signal strength) (CDE-143BT/UTE-42BT only) indicators...
... Phone call . Setting item: CALLER ID Setting contents: OFF / ON (Initial setting) Setting the Phone Book Update You can reduce the road noise, but excessive enhancement may affect the sound quality of calling. • Improvement effect differs depending on the connected mobile phone, the c (battery quantity) and i (signal strength) (CDE-143BT/UTE-42BT only) indicators...
User Manual
Page 25
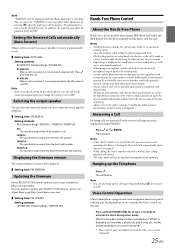
...noise. • If both calling parties are announced by your BLUETOOTH firmware, please visit Alpine home page (http://www.alpine-usa.com). Setting item: FW UPDATE Setting contents: UPDATE NO (Initial setting) / UPDATE YES Hands-Free Phone Control About the Hands-Free Phone Hands-free calls are... of BT AUDIO. The call is still in car. In addition, the ordering may affect the playback of telephone. Setting item: SPEAKER SL Setting contents: ALL (Initial setting) / FRONT-L / FRONT-R / FRONT-LR ALL: The sound be controlled by pressing r when the ordering is made in ...
...noise. • If both calling parties are announced by your BLUETOOTH firmware, please visit Alpine home page (http://www.alpine-usa.com). Setting item: FW UPDATE Setting contents: UPDATE NO (Initial setting) / UPDATE YES Hands-Free Phone Control About the Hands-Free Phone Hands-free calls are... of BT AUDIO. The call is still in car. In addition, the ordering may affect the playback of telephone. Setting item: SPEAKER SL Setting contents: ALL (Initial setting) / FRONT-L / FRONT-R / FRONT-LR ALL: The sound be controlled by pressing r when the ordering is made in ...
User Manual
Page 26
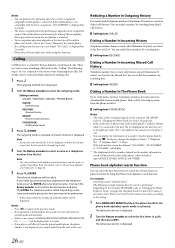
...You can use Phone book alphabet search function to date. You can redial these numbers by searching from dialed calls history. Setting item: DIALED Dialing a Number In Incoming History Telephone numbers from received calls (Maximum 20 items) are stored in the Received List... ENTER after connection, the list may not be performed. * If the name cannot be recognised, default number will be displayed. Setting contents: DIALED / RECEIVED / MISSED / PHONE BOOK DIALED: Dialed history RECEIVED: Received history MISSED: Missed incoming history PHONE BOOK: Mobile phone ...
...You can use Phone book alphabet search function to date. You can redial these numbers by searching from dialed calls history. Setting item: DIALED Dialing a Number In Incoming History Telephone numbers from received calls (Maximum 20 items) are stored in the Received List... ENTER after connection, the list may not be performed. * If the name cannot be recognised, default number will be displayed. Setting contents: DIALED / RECEIVED / MISSED / PHONE BOOK DIALED: Dialed history RECEIVED: Received history MISSED: Missed incoming history PHONE BOOK: Mobile phone ...
User Manual
Page 27
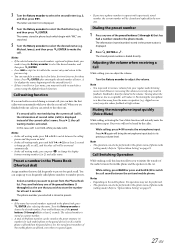
...number in the phone book, press ENTER after entering the desired number of the preset buttons (1 through 6) that you to "Option Menu Setting" on sun visor) may not be performed. • The operation can assign up call1 or call2, and the other one call (call1), the ... call waiting mode is displayed. 2 Press ENTER or f. While calling, press BAND or press and hold to "Option Menu Setting" on hold. • In the call sound between the mobile phone and the speakers in a direction away from your regular audio listening source level. ...
...number in the phone book, press ENTER after entering the desired number of the preset buttons (1 through 6) that you to "Option Menu Setting" on sun visor) may not be performed. • The operation can assign up call1 or call2, and the other one call (call1), the ... call waiting mode is displayed. 2 Press ENTER or f. While calling, press BAND or press and hold to "Option Menu Setting" on hold. • In the call sound between the mobile phone and the speakers in a direction away from your regular audio listening source level. ...
User Manual
Page 28
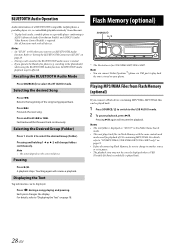
...file is required. Fast backward/fast forward track continuously. Pressing and holding 1 or 2 will change to another source or set to A2DP (Advanced Audio Distribution Profile) and AVRCP (Audio/ Video Remote Control Profile) is played back. 28-EN Playing MP3/WMA Files from... (Folder). A playback stops. Displaying the Text Tag information can connect Nokia (Symbian™) phone via USB port to "CD/MP3/WMA (CDE-SXM145BT/CDE-143BT only)" on page 18. For details, refer to play back audio, a mobile phone or a portable player conforming to pause. • ...
...file is required. Fast backward/fast forward track continuously. Pressing and holding 1 or 2 will change to another source or set to A2DP (Advanced Audio Distribution Profile) and AVRCP (Audio/ Video Remote Control Profile) is played back. 28-EN Playing MP3/WMA Files from... (Folder). A playback stops. Displaying the Text Tag information can connect Nokia (Symbian™) phone via USB port to "CD/MP3/WMA (CDE-SXM145BT/CDE-143BT only)" on page 18. For details, refer to play back audio, a mobile phone or a portable player conforming to pause. • ...


