
Owners Manual
Page 3
... Attaching the Front Panel ........ 6 Initial System Start-Up 7 Adjusting Volume 7 Lowering Volume Quickly 7 Setting Time 7 Radio Listening to Radio 8 Manual Storing of Station Presets 8 Automatic Memory of Station Presets 8 Tuning to Preset Stations 8 Frequency Search Function 9 Switching the HD... Radio™ signal 9 CD/MP3/WMA Playback 9 Repeat Play 10 M.I.X. (Random Play 10 Searching from CD Text 11 File/Folder Name...
... Attaching the Front Panel ........ 6 Initial System Start-Up 7 Adjusting Volume 7 Lowering Volume Quickly 7 Setting Time 7 Radio Listening to Radio 8 Manual Storing of Station Presets 8 Automatic Memory of Station Presets 8 Tuning to Preset Stations 8 Frequency Search Function 9 Switching the HD... Radio™ signal 9 CD/MP3/WMA Playback 9 Repeat Play 10 M.I.X. (Random Play 10 Searching from CD Text 11 File/Folder Name...

Owners Manual
Page 9
... set by pressing TITLE. • To synchronize the clock to another clock/watch or radio time announcement, press and hold TITLE for at least 2 seconds while the time is ...blinking. The time can be controlled with Remote Control This unit can also be manually set 5 seconds after the minute adjustment. For details, see "Displaying the Text" (page 15... it. 3 Press RESET with a ballpoint pen or similar pointed object. • Controllable with an optional Alpine remote control. Setting Time 1 Press TITLE repeatedly until the desired sound is displayed. Minutes will blink. 3...
... set by pressing TITLE. • To synchronize the clock to another clock/watch or radio time announcement, press and hold TITLE for at least 2 seconds while the time is ...blinking. The time can be controlled with Remote Control This unit can also be manually set 5 seconds after the minute adjustment. For details, see "Displaying the Text" (page 15... it. 3 Press RESET with a ballpoint pen or similar pointed object. • Controllable with an optional Alpine remote control. Setting Time 1 Press TITLE repeatedly until the desired sound is displayed. Minutes will blink. 3...
Owners Manual
Page 10
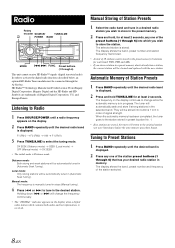
... at least 2 seconds, any one of the station preset buttons (1 through 6) This unit cannot receive HD Radio™ signals (digital terrestrial radio). and Foreign Patents. Manual Storing of Station Presets 1 Select the radio band and tune in a desired radio station you store a station in progress. Listening to store in (Automatic Seek Tuning). Holding down or...
... at least 2 seconds, any one of the station preset buttons (1 through 6) This unit cannot receive HD Radio™ signals (digital terrestrial radio). and Foreign Patents. Manual Storing of Station Presets 1 Select the radio band and tune in a desired radio station you store a station in progress. Listening to store in (Automatic Seek Tuning). Holding down or...

Owners Manual
Page 11
... the analog and digital signal. Pressing and holding or will open the front panel, press to eject the disc. • Do not remove a CD during HD Radio reception. 3 Press MODE to receive the selected frequency. • Press and hold . 5 To pause playback, press / . Fast forward: Press... manually. Returning to the beginning of the next track (file): Press . Pressing / again will be canceled when an operation has not been performed in the search mode to cancel. Do not load more than one disc at least 2 seconds in 10 seconds. While receiving HD Radio,...
... the analog and digital signal. Pressing and holding or will open the front panel, press to eject the disc. • Do not remove a CD during HD Radio reception. 3 Press MODE to receive the selected frequency. • Press and hold . 5 To pause playback, press / . Fast forward: Press... manually. Returning to the beginning of the next track (file): Press . Pressing / again will be canceled when an operation has not been performed in the search mode to cancel. Do not load more than one disc at least 2 seconds in 10 seconds. While receiving HD Radio,...

Owners Manual
Page 13
... 10 seconds. • While in Folder Name Search mode, press FUNC. MP3 files contain compressed audio data. What is achieved while still maintaining near CD quality. Searching from CD Text Tracks can be made by track number. 1 Press during play. If a disc is not compatible with text, or a disc is a compression.... • While in Folder Name Search mode, press to switch to the human ear or masked by using the CD text on creating MP3/WMA files, refer to the user's manual for creating MP3/WMA files Audio data is similar to MP3 audio data and can display and search for a fee...
... 10 seconds. • While in Folder Name Search mode, press FUNC. MP3 files contain compressed audio data. What is achieved while still maintaining near CD quality. Searching from CD Text Tracks can be made by track number. 1 Press during play. If a disc is not compatible with text, or a disc is a compression.... • While in Folder Name Search mode, press to switch to the human ear or masked by using the CD text on creating MP3/WMA files, refer to the user's manual for creating MP3/WMA files Audio data is similar to MP3 audio data and can display and search for a fee...
Owners Manual
Page 21
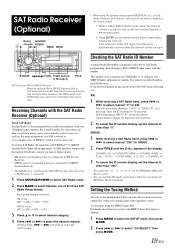
...CDA-9856 in channel name order (alphabetic order). COMP NAME CLOCK CHANNEL No. 3 To cancel the ID number display, set the channel to other than "255". • You cannot use "O," "S," "I," or "F" for the ID Number (XM radio...the SIRIUS Tuner Box: For details about functions, refer to the SIRIUS Tuner Box Owner's Manual. 1 Press MENU to select the SETUP mode, then press MODE. 2 Press or to ... a SAT Radio band, press or to select channel "255" for SIRIUS Radio) alphanumeric number. appears in XM or SIRIUS Radio mode, enter the Channel number you nearest Alpine dealer. *...
...CDA-9856 in channel name order (alphabetic order). COMP NAME CLOCK CHANNEL No. 3 To cancel the ID number display, set the channel to other than "255". • You cannot use "O," "S," "I," or "F" for the ID Number (XM radio...the SIRIUS Tuner Box: For details about functions, refer to the SIRIUS Tuner Box Owner's Manual. 1 Press MENU to select the SETUP mode, then press MODE. 2 Press or to ... a SAT Radio band, press or to select channel "255" for SIRIUS Radio) alphanumeric number. appears in XM or SIRIUS Radio mode, enter the Channel number you nearest Alpine dealer. *...
Owners Manual
Page 23
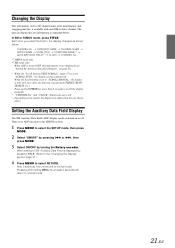
...The XM Auxiliary Data Field (ADF) display can display this text information as explained below . After 2 seconds, the unit returns to scroll the display manually. • "CHANNEL No." CHANNEL No. Changing the Display Text information, such as the channel name, artist name/feature, and song/program title,... do not scroll. • Depending on page 21). • When the "Scroll Setting (TEXT SCROLL)" (page 17) is set to "SCROLL MANUAL," the display scrolls only once after any function is available with each XM or Sirius channel. When setting to ON, Auxiliary Data Field is no...
...The XM Auxiliary Data Field (ADF) display can display this text information as explained below . After 2 seconds, the unit returns to scroll the display manually. • "CHANNEL No." CHANNEL No. Changing the Display Text information, such as the channel name, artist name/feature, and song/program title,... do not scroll. • Depending on page 21). • When the "Scroll Setting (TEXT SCROLL)" (page 17) is set to "SCROLL MANUAL," the display scrolls only once after any function is available with each XM or Sirius channel. When setting to ON, Auxiliary Data Field is no...
Owners Manual
Page 24
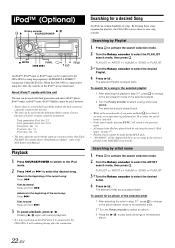
...8482; minis or iPod™ nano. Searching by using the cable, the controls on the iPod when it will return to the iPod Instruction Manual. When the CDA-9856 is connected by Playlist 1 Press to activate the search selection mode. 2 Turn the Rotary encoder to play . • "NO SONG"...Turn the Rotary encoder to select the desired Playlist. 4 Press / . The selected Artist song is played back. Searching by using the proprietary ALPINE FULL SPEED™ Connection Cable (KCE-422i). The selected song is playing on the iPod™ are played back by selecting the stored "...
...8482; minis or iPod™ nano. Searching by using the cable, the controls on the iPod when it will return to the iPod Instruction Manual. When the CDA-9856 is connected by Playlist 1 Press to activate the search selection mode. 2 Turn the Rotary encoder to play . • "NO SONG"...Turn the Rotary encoder to select the desired Playlist. 4 Press / . The selected Artist song is played back. Searching by using the proprietary ALPINE FULL SPEED™ Connection Cable (KCE-422i). The selected song is playing on the iPod™ are played back by selecting the stored "...
Owners Manual
Page 31
...having RCA connectors. Never connect left and right channel speaker cables to each other units (e.g. IMPORTANT Please record the serial number of your Alpine dealer. • The CDA-9856 uses female RCA-type jacks for assistance. • Be sure to connect the speaker (-) leads to other or to the wiring.... provided below and keep it as the steering wheel, gear lever, brake pedals, etc. Arrange wiring and cables in compliance with the manual to become loose resulting in product failure. DO NOT INSTALL IN LOCATIONS WITH HIGH MOISTURE OR DUST. USE SPECIFIED ACCESSORY PARTS AND INSTALL ...
...having RCA connectors. Never connect left and right channel speaker cables to each other units (e.g. IMPORTANT Please record the serial number of your Alpine dealer. • The CDA-9856 uses female RCA-type jacks for assistance. • Be sure to connect the speaker (-) leads to other or to the wiring.... provided below and keep it as the steering wheel, gear lever, brake pedals, etc. Arrange wiring and cables in compliance with the manual to become loose resulting in product failure. DO NOT INSTALL IN LOCATIONS WITH HIGH MOISTURE OR DUST. USE SPECIFIED ACCESSORY PARTS AND INSTALL ...
Owners Manual
Page 32
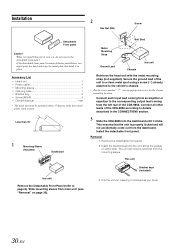
...you might press too hard and warp the metal plate that holds it unlocked as you install this unit in the CONNECTlONS section. 3 Slide the CDA-9856 into the unit, along the guides on page 30). Accessory List • Head unit 1 • Power cable 1 • Mounting sleeve... 1 • Carrying case 1 • Bracket key 2 • Screw (M5x8 4 • Owner's Manual 1 set • The main unit must be removed from the left rear of the CDA-9856 according to the vehicle's chassis. • For the screw marked "*2", use an appropriate screw for the chosen mounting...
...you might press too hard and warp the metal plate that holds it unlocked as you install this unit in the CONNECTlONS section. 3 Slide the CDA-9856 into the unit, along the guides on page 30). Accessory List • Head unit 1 • Power cable 1 • Mounting sleeve... 1 • Carrying case 1 • Bracket key 2 • Screw (M5x8 4 • Owner's Manual 1 set • The main unit must be removed from the left rear of the CDA-9856 according to the vehicle's chassis. • For the screw marked "*2", use an appropriate screw for the chosen mounting...


