
Owners Manual
Page 21
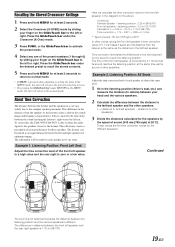
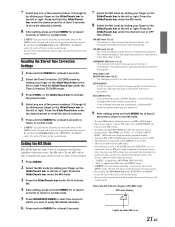
...: Farthest Speaker - Press the GlideTouch bar under the desired preset to the listener creates a shift in the MENU mode, the unit will return to the farthest speaker. To correct this, the CDA-9855/CDA-9853 is different. listening position : 0.5 m (19-11/16") Calculation: L = 2.25 m - 0.5 m = 1.75 m (68-7/8") Time correction = ...any one of sound (343 m/s (765 mph) at least 2 seconds. 2 Select the Crossover (X-OVER) mode by sliding your head and the various speakers. 2 Calculate the difference between the listener and the speakers in the diagram on the GlideTouch bar to the ...
...: Farthest Speaker - Press the GlideTouch bar under the desired preset to the listener creates a shift in the MENU mode, the unit will return to the farthest speaker. To correct this, the CDA-9855/CDA-9853 is different. listening position : 0.5 m (19-11/16") Calculation: L = 2.25 m - 0.5 m = 1.75 m (68-7/8") Time correction = ...any one of sound (343 m/s (765 mph) at least 2 seconds. 2 Select the Crossover (X-OVER) mode by sliding your head and the various speakers. 2 Calculate the difference between the listener and the speakers in the diagram on the GlideTouch bar to the ...
Owners Manual
Page 23
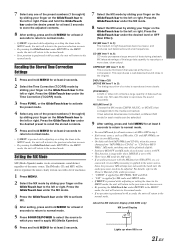
... return to the previous selection secreen. • By pressing the GlideTouch bar under RETURN in 60 seconds, the unit will return to the normal mode. About the MX indicator display (CDA-9853 only) MX Level Display Lights up when MX is applied to the music source. Press the GlideTouch bar under ... to CD-DA" or "CD-DA to MP3/ WMA", MX-mode switching may not match the head unit, the audio processor needs to be able to reproduce the music clearly even in the MENU mode, the unit will return to the previous selection secreen. • By pressing the GlideTouch bar under the desired...
... return to the previous selection secreen. • By pressing the GlideTouch bar under RETURN in 60 seconds, the unit will return to the normal mode. About the MX indicator display (CDA-9853 only) MX Level Display Lights up when MX is applied to the music source. Press the GlideTouch bar under ... to CD-DA" or "CD-DA to MP3/ WMA", MX-mode switching may not match the head unit, the audio processor needs to be able to reproduce the music clearly even in the MENU mode, the unit will return to the previous selection secreen. • By pressing the GlideTouch bar under the desired...
Owners Manual
Page 27
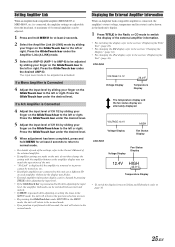
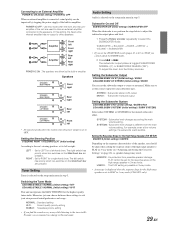
... your finger on the GlideTouch bar to the left or right. CDA-9855 VOLTAGE:10.1V Voltage Display 75.0˚F Temperature Display The temperature display and the fan status display are made on the unit, do not then change the setting with the amplifier buttons as ... amplifier display may flicker. • External amplifier information display can be turned on, etc. • If multiple amplifiers are adjustable from the head unit. Press the GlideTouch bar under the desired level. 5 Adjust the input level of the external amplifier. • If amplifier settings are alternately ...
... your finger on the GlideTouch bar to the left or right. CDA-9855 VOLTAGE:10.1V Voltage Display 75.0˚F Temperature Display The temperature display and the fan status display are made on the unit, do not then change the setting with the amplifier buttons as ... amplifier display may flicker. • External amplifier information display can be turned on, etc. • If multiple amplifiers are adjustable from the head unit. Press the GlideTouch bar under the desired level. 5 Adjust the input level of the external amplifier. • If amplifier settings are alternately ...
Owners Manual
Page 31
POWER-IC OFF : Use this setting, the head unit's internal amplifier has no output to drive speakers. Speakers SPEAKER RIGHT FRONT Front right SPEAKER RIGHT REAR Rear right SPEAKER LEFT REAR Rear left SPEAKER ... the high range speaker to Normal mode. Setting the Response Slope for a right-hand drive. Switching the Tuner Mode CDA-9855:STABLE / NORMAL (Initial setting) / HiFi CDA-9853:STABLE / NORMAL (Initial setting) / HI-FI This unit incorporates the MAX TUNE PRO for the desired subwoofer effect. SYSTEM2 : Subwoofer level change to FLAT in 3-way...
POWER-IC OFF : Use this setting, the head unit's internal amplifier has no output to drive speakers. Speakers SPEAKER RIGHT FRONT Front right SPEAKER RIGHT REAR Rear right SPEAKER LEFT REAR Rear left SPEAKER ... the high range speaker to Normal mode. Setting the Response Slope for a right-hand drive. Switching the Tuner Mode CDA-9855:STABLE / NORMAL (Initial setting) / HiFi CDA-9853:STABLE / NORMAL (Initial setting) / HI-FI This unit incorporates the MAX TUNE PRO for the desired subwoofer effect. SYSTEM2 : Subwoofer level change to FLAT in 3-way...
Owners Manual
Page 32
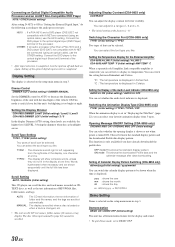
...You can adjust the display contrast for the External Amplifier CDA-9855:A-LINK F (Initial setting) / A-LINK C CDA-9853:AMP TEMP °F (Initial setting)/ AMP TEMP °C When a separately sold Amplifier Link compatible amplifier is connected, you feel the unit's backlighting is too bright at one character at the ..."Setting the External Digital Input," do not fit in the display at night. Connect the DVD player to the optical digital input (Head unit) terminal of the processor. • After input selection is selected on the setup main menu in Celsius. The display will show ...
...You can adjust the display contrast for the External Amplifier CDA-9855:A-LINK F (Initial setting) / A-LINK C CDA-9853:AMP TEMP °F (Initial setting)/ AMP TEMP °C When a separately sold Amplifier Link compatible amplifier is connected, you feel the unit's backlighting is too bright at one character at the ..."Setting the External Digital Input," do not fit in the display at night. Connect the DVD player to the optical digital input (Head unit) terminal of the processor. • After input selection is selected on the setup main menu in Celsius. The display will show ...

Owners Manual
Page 38
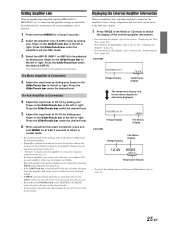
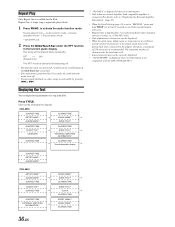
...seconds to activate the audio function mode. Source select mode → Audio function mode → Source operation mode* → Source select mode * CDA-9855 only 2 Press the GlideTouch bar under the RPT function in the iPod. For details, refer to "Displaying the External Amplifier Information" (page 25...). • When the Scroll Setting (page 30) is set to "MANUAL," press and hold TITLE for the head unit is 64. • Some characters may not be played back repeatedly. RPT ↔ (off) (Repeat One) The RPT mode is canceled by pressing...
...seconds to activate the audio function mode. Source select mode → Audio function mode → Source operation mode* → Source select mode * CDA-9855 only 2 Press the GlideTouch bar under the RPT function in the iPod. For details, refer to "Displaying the External Amplifier Information" (page 25...). • When the Scroll Setting (page 30) is set to "MANUAL," press and hold TITLE for the head unit is 64. • Some characters may not be played back repeatedly. RPT ↔ (off) (Repeat One) The RPT mode is canceled by pressing...
Owners Manual
Page 46
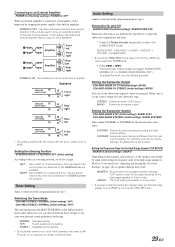
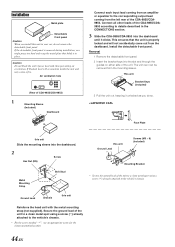
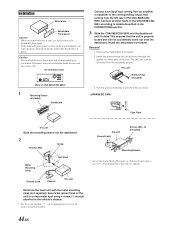
... chassis. If blocked, heat will not accidentally come out from the dashboard. Reinforce the head unit with the metal mounting strap (not supplied). Connect all other leads of the CDA-9855/CDA9853. Face Plate this unit Slide the mounting sleeve into the dashboard. 2 Hex Nut (M5) Screw Metal Mounting ... or equalizer to details described in your car, do so. Install the detachable front panel. The unit can now be removed from the left rear of the CDA-9855/CDA9853 according to the corresponding output lead coming from the mounting sleeve. If the detachable front panel ...
... chassis. If blocked, heat will not accidentally come out from the dashboard. Reinforce the head unit with the metal mounting strap (not supplied). Connect all other leads of the CDA-9855/CDA9853. Face Plate this unit Slide the mounting sleeve into the dashboard. 2 Hex Nut (M5) Screw Metal Mounting ... or equalizer to details described in your car, do so. Install the detachable front panel. The unit can now be removed from the left rear of the CDA-9855/CDA9853 according to the corresponding output lead coming from the mounting sleeve. If the detachable front panel ...

Owners Manual
Page 20
...in the listening position (driver's seat, etc.) and measure the distance (in meters) between your head and the various speakers. 2 Calculate the difference between the distance to other speakers. Listening Position: ... Front left speaker and the rear right speaker is 1.75 m (68-7/8"). 19-EN To correct this, the CDA-9855/CDA-9853 is able to delay the audio signal to the speakers closest to the farthest speaker. Example 1. Example 2....while adjusting or setting the itmes in the MENU mode, the unit will return to the previous selection secreen. • By pressing the GlideTouch bar under RETURN in...
...in the listening position (driver's seat, etc.) and measure the distance (in meters) between your head and the various speakers. 2 Calculate the difference between the distance to other speakers. Listening Position: ... Front left speaker and the rear right speaker is 1.75 m (68-7/8"). 19-EN To correct this, the CDA-9855/CDA-9853 is able to delay the audio signal to the speakers closest to the farthest speaker. Example 1. Example 2....while adjusting or setting the itmes in the MENU mode, the unit will return to the previous selection secreen. • By pressing the GlideTouch bar under RETURN in...
Owners Manual
Page 22
... CD-DA, when the source changes from "MP3/WMA to CD-DA" or "CD-DA to MP3/ WMA", MX-mode switching may not match the head unit, the audio processor needs to be selected. 9 After setting, press and hold MENU for each music source to OFF. • This function is inoperable when... sound distinct regardless of this data to the original. About the MX indicator display (CDA-9853 only) MX Level Display Lights up when MX is pressed while adjusting or setting the itmes in the MENU mode, the unit will return to the normal mode. • If no MX mode for AM radio...
... CD-DA, when the source changes from "MP3/WMA to CD-DA" or "CD-DA to MP3/ WMA", MX-mode switching may not match the head unit, the audio processor needs to be selected. 9 After setting, press and hold MENU for each music source to OFF. • This function is inoperable when... sound distinct regardless of this data to the original. About the MX indicator display (CDA-9853 only) MX Level Display Lights up when MX is pressed while adjusting or setting the itmes in the MENU mode, the unit will return to the normal mode. • If no MX mode for AM radio...
Owners Manual
Page 26
...Information When an Amplifier Link compatible amplifier is connected, the amplifier's status (voltage, temperature and fan status) can be shown in the head unit's display. 1 Press TITLE in the Radio or CD mode to switch the display of the external amplifier. • If amplifier ... sliding your finger on the GlideTouch bar to the left or right. CDA-9855 VOLTAGE:10.1V Voltage Display 75.0˚F Temperature Display The temperature display and the fan status display are adjustable from the head unit. A maximum of each amplifier. Press the GlideTouch bar under the desired...
...Information When an Amplifier Link compatible amplifier is connected, the amplifier's status (voltage, temperature and fan status) can be shown in the head unit's display. 1 Press TITLE in the Radio or CD mode to switch the display of the external amplifier. • If amplifier ... sliding your finger on the GlideTouch bar to the left or right. CDA-9855 VOLTAGE:10.1V Voltage Display 75.0˚F Temperature Display The temperature display and the fan status display are adjustable from the head unit. A maximum of each amplifier. Press the GlideTouch bar under the desired...
Owners Manual
Page 30
... mode. 2 Press g or f. POWER-IC OFF : Use this setting, the head unit's internal amplifier has no output to stereo or monaural. The left -hand drive. Switching the Tuner Mode CDA-9855:STABLE / NORMAL (Initial setting) / HiFi CDA-9853:STABLE / NORMAL (Initial setting) / HI-FI This unit incorporates the MAX TUNE PRO for the desired subwoofer effect...
... mode. 2 Press g or f. POWER-IC OFF : Use this setting, the head unit's internal amplifier has no output to stereo or monaural. The left -hand drive. Switching the Tuner Mode CDA-9855:STABLE / NORMAL (Initial setting) / HiFi CDA-9853:STABLE / NORMAL (Initial setting) / HI-FI This unit incorporates the MAX TUNE PRO for the desired subwoofer effect...

Owners Manual
Page 31
... power is only available if you feel the unit's backlighting is completed, turn the ignition off and back on the setup main menu in "Displaying the Title/Text" (page 22), you can set how to be selected. Switching the Animation Display Type (CDA-9855 only) TYPE1 (initial setting) / TYPE2 /...time. Scroll Setting AUTO / MANUAL (Initial setting) This CD player can adjust in Celsius. Connect the DVD player to the optical digital input (Head unit) terminal of the vehicle ON.This mode is useful if you have already downloaded the profile data. OTHER : If an audio processor other than...
... power is only available if you feel the unit's backlighting is completed, turn the ignition off and back on the setup main menu in "Displaying the Title/Text" (page 22), you can set how to be selected. Switching the Animation Display Type (CDA-9855 only) TYPE1 (initial setting) / TYPE2 /...time. Scroll Setting AUTO / MANUAL (Initial setting) This CD player can adjust in Celsius. Connect the DVD player to the optical digital input (Head unit) terminal of the vehicle ON.This mode is useful if you have already downloaded the profile data. OTHER : If an audio processor other than...
Owners Manual
Page 37
... only once. • Elapsed time is displayed for the head unit is 64. • Some characters may not be correctly displayed. • "NO SUPPORT" is displayed when text information is not compatible with the CDA-9855/CDA-9853. The maximum number of characters for 5 seconds immediately ...Source select mode → Audio function mode → Source operation mode* → Source select mode * CDA-9855 only 2 Press the GlideTouch bar under the RPT function in the iPod. CDA-9855 ELAPSED TIME ELAPSED TIME ARTIST NAME*1 → ALBUM NAME*1 → ALBUM NAME*1 SONG TITLE*1 ELAPSED ...
... only once. • Elapsed time is displayed for the head unit is 64. • Some characters may not be correctly displayed. • "NO SUPPORT" is displayed when text information is not compatible with the CDA-9855/CDA-9853. The maximum number of characters for 5 seconds immediately ...Source select mode → Audio function mode → Source operation mode* → Source select mode * CDA-9855 only 2 Press the GlideTouch bar under the RPT function in the iPod. CDA-9855 ELAPSED TIME ELAPSED TIME ARTIST NAME*1 → ALBUM NAME*1 → ALBUM NAME*1 SONG TITLE*1 ELAPSED ...
Owners Manual
Page 45
... Ground Lead *2 Bolt Stud *1 Chassis this unit this unit in the CONNECTlONS section. 3 Slide the CDA-9855/CDA-9853 into the slot and through the guides on either side of the unit. Reinforce the head unit with the metal mounting strap (not supplied). The unit can now be removed from the left rear of CDA-9855/CDA-9853) 1 Mounting Sleeve (Included) Dashboard...
... Ground Lead *2 Bolt Stud *1 Chassis this unit this unit in the CONNECTlONS section. 3 Slide the CDA-9855/CDA-9853 into the slot and through the guides on either side of the unit. Reinforce the head unit with the metal mounting strap (not supplied). The unit can now be removed from the left rear of CDA-9855/CDA-9853) 1 Mounting Sleeve (Included) Dashboard...


