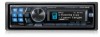

Owner's Manual (english)
Page 3
... Mode)........21 Sound (Beep) Guide Function 21 Turning Mute Mode On/Off (INT Mute 22 Setting the AUX+ Setup Mode 22 Setting the AUX+ Level (AUX IN GAIN 22 Setting the External Digital Input 22 Setting the AUX Mode (V-Link 22 Changer Name Setting 22 Connecting to automatically Adjust ....... 10 Receiving Traffic Information 11...
... Mode)........21 Sound (Beep) Guide Function 21 Turning Mute Mode On/Off (INT Mute 22 Setting the AUX+ Setup Mode 22 Setting the AUX+ Level (AUX IN GAIN 22 Setting the External Digital Input 22 Setting the AUX Mode (V-Link 22 Changer Name Setting 22 Connecting to automatically Adjust ....... 10 Receiving Traffic Information 11...
Owner's Manual (english)
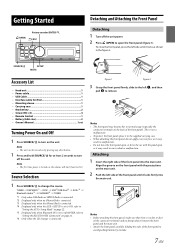
Page 9
... terminals and no iPhone/iPod is connected. *3 Displayed only when the iPhone/iPod is connected. *4 Displayed only when the AUX+ SETUP is set to ON, refer to "Setting the AUX+ Setup Mode" on page 22. *5 Displayed only when Bluetooth IN is not a malfunction. • To protect the front... CD changer is turned on, the volume will start from level 12. TUNER XM/SIRIUS*1 DISC USB*2/USB iPod*3 AUX+*4 Bluetooth Audio*5 CHANGER*6 TUNER *1 Only when XM Radio or SIRIUS Radio is connected. *2 Displayed only when no foreign object ...
... terminals and no iPhone/iPod is connected. *3 Displayed only when the iPhone/iPod is connected. *4 Displayed only when the AUX+ SETUP is set to ON, refer to "Setting the AUX+ Setup Mode" on page 22. *5 Displayed only when Bluetooth IN is not a malfunction. • To protect the front... CD changer is turned on, the volume will start from level 12. TUNER XM/SIRIUS*1 DISC USB*2/USB iPod*3 AUX+*4 Bluetooth Audio*5 CHANGER*6 TUNER *1 Only when XM Radio or SIRIUS Radio is connected. *2 Displayed only when no foreign object ...
Owner's Manual (english)
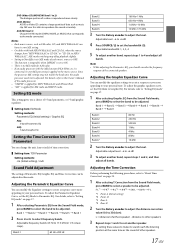
Page 19
...; R-R*4 SW-L SW-R F-L *1 Front-L (Initial setting) *2 Front -R *3 Rear-L *4 Rear-R 2 Turn the Rotary encoder to adjust the distance correction value (0.0 to adjust the level. AUX (MX level 1): Choose the MX mode (CMPM, MOVIE, or MUSIC) that corresponds to 4 and adjust all bands. Setting EQ mode This setting gives you should...
...; R-R*4 SW-L SW-R F-L *1 Front-L (Initial setting) *2 Front -R *3 Rear-L *4 Rear-R 2 Turn the Rotary encoder to adjust the distance correction value (0.0 to adjust the level. AUX (MX level 1): Choose the MX mode (CMPM, MOVIE, or MUSIC) that corresponds to 4 and adjust all bands. Setting EQ mode This setting gives you should...
Owner's Manual (english)
Page 22
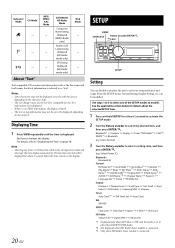
... Set Clock Mode Clock Adjust*6 Calendar Play Mode Beep INT Mute*7 AUX+ Setup AUX+ Name*8 AUX IN GAIN*8 Digital AUX D.AUX Name*9 AUX IN AUX Name*10 Changer Name Power IC Language Set Demo Birthday Set Display: Dimmer ...
... Set Clock Mode Clock Adjust*6 Calendar Play Mode Beep INT Mute*7 AUX+ Setup AUX+ Name*8 AUX IN GAIN*8 Digital AUX D.AUX Name*9 AUX IN AUX Name*10 Changer Name Power IC Language Set Demo Birthday Set Display: Dimmer ...

Owner's Manual (english)
Page 23
..., refer to "SAT Radio Receiver (optional)" on page 8. *7 Displayed only when Bluetooth IN is OFF. *8 Displayed only when AUX+ Setup is ON. *9 Displayed only when Digital AUX is ON. *10 Displayed only when AUX IN is connected, you have to change the setting, and then press ENTER. (e.g. Turn the Rotary encoder...
..., refer to "SAT Radio Receiver (optional)" on page 8. *7 Displayed only when Bluetooth IN is OFF. *8 Displayed only when AUX+ Setup is ON. *9 Displayed only when Digital AUX is ON. *10 Displayed only when AUX IN is connected, you have to change the setting, and then press ENTER. (e.g. Turn the Rotary encoder...
Owner's Manual (english)
Page 24
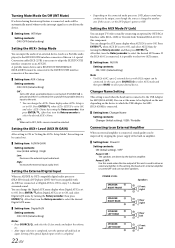
...input to the unit. * You can change the AUX+ Name display when AUX+ Setup is set Digital AUX to ON to ON, and select Digital AUX name by turning the Rotary encoder, then press ENTER. Setting the External Digital Input When an ALPINE Ai-NET compatible digital audio processor (PXA-H701)... and a DVD player (DVE-5207) not compatible with RCA output can set to enjoy 5.1-channel surround sound. You can change the AUX name display when AUX IN is set to ON, and select AUX+ Name by stopping the...
...input to the unit. * You can change the AUX+ Name display when AUX+ Setup is set Digital AUX to ON to ON, and select Digital AUX name by turning the Rotary encoder, then press ENTER. Setting the External Digital Input When an ALPINE Ai-NET compatible digital audio processor (PXA-H701)... and a DVD player (DVE-5207) not compatible with RCA output can set to enjoy 5.1-channel surround sound. You can change the AUX name display when AUX IN is set to ON, and select AUX+ Name by stopping the...
Owner's Manual (english)
Page 39
.../iPod. • "SAT" is connected, its own MX setting. • On disks with the MX function (PXA-H701, etc.) is applied for a variety of compression. AUX (MX level 1): Choose the MX mode (CMPM, MOVIE, or MUSIC) that was lost at the time of musical source material. For details, refer to the...
.../iPod. • "SAT" is connected, its own MX setting. • On disks with the MX function (PXA-H701, etc.) is applied for a variety of compression. AUX (MX level 1): Choose the MX mode (CMPM, MOVIE, or MUSIC) that was lost at the time of musical source material. For details, refer to the...
Owner's Manual (english)
Page 45
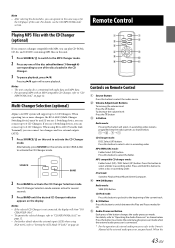
... you connect a changer compatible with an MP3 compatible CD Changer, refer to select a folder in ascending order. When using KCA-410C, refer to "Setting the AUX Mode (V-Link)" on page 22. Controls on... pause playback, press . MP3 compatible CD changer mode: Folder Select (UP) / DISC Select (UP) button. Multi-Changer Selection (optional) Alpine's Ai-NET system will select, in the same way as for the CD player of this unit. 1 Press SOURCE to switch to...
... you connect a changer compatible with an MP3 compatible CD Changer, refer to select a folder in ascending order. When using KCA-410C, refer to "Setting the AUX Mode (V-Link)" on page 22. Controls on... pause playback, press . MP3 compatible CD changer mode: Folder Select (UP) / DISC Select (UP) button. Multi-Changer Selection (optional) Alpine's Ai-NET system will select, in the same way as for the CD player of this unit. 1 Press SOURCE to switch to...
Owner's Manual (english)
Page 55
... battery. Ground Lead (Black) Connect this lead to a good chassis ground on the vehicle. This will allow the backlighting of the CDA-117 to dim whenever the vehicle's lights are turned on. Switched Power Lead (Ignition) (Red) Connect this lead to an open terminal ... noise suppressors, contact them for further information. • Your Alpine dealer knows best about noise prevention measures so consult your power antenna, if applicable. To use an iPhone/iPod, Interface cable for further information. 53-EN AUX+ ON : When the external device is required. To use ...
... battery. Ground Lead (Black) Connect this lead to a good chassis ground on the vehicle. This will allow the backlighting of the CDA-117 to dim whenever the vehicle's lights are turned on. Switched Power Lead (Ignition) (Red) Connect this lead to an open terminal ... noise suppressors, contact them for further information. • Your Alpine dealer knows best about noise prevention measures so consult your power antenna, if applicable. To use an iPhone/iPod, Interface cable for further information. 53-EN AUX+ ON : When the external device is required. To use ...


