Owners Manual
Page 3
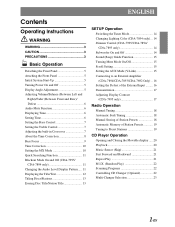
... SETUP Operation Switching the Tuner Mode 14 Changing Lighting Color (CDA-7894 only) ... 14 Dimmer Control (CDA-7995/CDA-7894/ CDA-7893 only 14 Subwoofer On and Off 14 Sound (Beep) Guide Function 15 Turning Mute Mode On/Off 15 Scroll Setting 15 Setting the AUX Mode (V-Link 15 Connecting to an External Amplifier (CDA-7894/CDA-7893/CDA-7892 Only) .. 16 Setting the Defeat of the External Input ......... 16 Demonstration 17 Adjusting Display Contrast (CDA-7995 only 17 Radio Operation Manual Tuning 18 Automatic Seek Tuning 18 Manual Storing of Station Presets 18 Automatic Memory...
... SETUP Operation Switching the Tuner Mode 14 Changing Lighting Color (CDA-7894 only) ... 14 Dimmer Control (CDA-7995/CDA-7894/ CDA-7893 only 14 Subwoofer On and Off 14 Sound (Beep) Guide Function 15 Turning Mute Mode On/Off 15 Scroll Setting 15 Setting the AUX Mode (V-Link 15 Connecting to an External Amplifier (CDA-7894/CDA-7893/CDA-7892 Only) .. 16 Setting the Defeat of the External Input ......... 16 Demonstration 17 Adjusting Display Contrast (CDA-7995 only 17 Radio Operation Manual Tuning 18 Automatic Seek Tuning 18 Manual Storing of Station Presets 18 Automatic Memory...

Owners Manual
Page 6
... the disc while handling. Transparent Sheet Disc Stabilizer Installation Location Make sure the CDA-7995/CDA-7894/CDA-7893/CDA-7892 will automatically eject any small bumps or irregularities, this could cause the CD player to insert a disc into the unit when the unit power is being pulled back into the player and ejected after initial loading, using these accessories on discs played in skips, but this unit and never use round shape discs only...
... the disc while handling. Transparent Sheet Disc Stabilizer Installation Location Make sure the CDA-7995/CDA-7894/CDA-7893/CDA-7892 will automatically eject any small bumps or irregularities, this could cause the CD player to insert a disc into the unit when the unit power is being pulled back into the player and ejected after initial loading, using these accessories on discs played in skips, but this unit and never use round shape discs only...
Owners Manual
Page 8
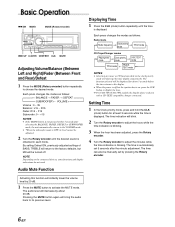
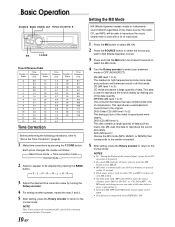
... connected devices, some functions and display indications do not work. NOTE Depending on , press the CLK button to activate the MUTE mode. The time is OFF, its previous level. 6-EN The function selected will be displayed for at least 3 seconds while the time is shown with a CD-TEXT compatible changer connected. The time can also be turned off. Each press changes the modes as follows: Radio mode → Radio frequency → Clock priority → mode TITLE mode CD Player/Changer modes → Playing time mode → Clock priority mode...
... connected devices, some functions and display indications do not work. NOTE Depending on , press the CLK button to activate the MUTE mode. The time is OFF, its previous level. 6-EN The function selected will be displayed for at least 3 seconds while the time is shown with a CD-TEXT compatible changer connected. The time can also be turned off. Each press changes the modes as follows: Radio mode → Radio frequency → Clock priority → mode TITLE mode CD Player/Changer modes → Playing time mode → Clock priority mode...
Owners Manual
Page 10
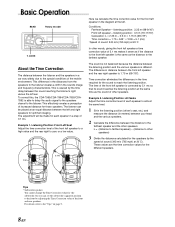
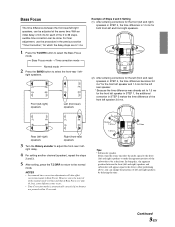
... set the subwoofer's apparent position to the front by 5.1 ms so that its sound reaches the listening position at 20˚C In other speakers. The sound is not balanced because the distance between the front left speaker is the same as the distance to the special conditions of the front and rear speakers. Basic Operation BAND Rotary encoder T. The time of sound...
... set the subwoofer's apparent position to the front by 5.1 ms so that its sound reaches the listening position at 20˚C In other speakers. The sound is not balanced because the distance between the front left speaker is the same as the distance to the special conditions of the front and rear speakers. Basic Operation BAND Rotary encoder T. The time of sound...
Owners Manual
Page 11
... -right) speakers Right (front-rear) speakers 3 Turn the Rotary encoder to be done. For finer adjustment, use the procedure in STEP 5, the time difference is automatically canceled if no buttons are 0.1 ms. 1 Press the T.CORR button to select the Bass Focus mode. → Bass Focus mode → Time correction mode Normal mode ← 2 Press the BAND button to the normal mode. NOTES • Any manual time correction adjustments will appear equal to 39...
... -right) speakers Right (front-rear) speakers 3 Turn the Rotary encoder to be done. For finer adjustment, use the procedure in STEP 5, the time difference is automatically canceled if no buttons are 0.1 ms. 1 Press the T.CORR button to select the Bass Focus mode. → Bass Focus mode → Time correction mode Normal mode ← 2 Press the BAND button to the normal mode. NOTES • Any manual time correction adjustments will appear equal to 39...
Owners Manual
Page 12
... more clear, and produces well balanced sound in cars with both MP3 and CD-DA, when the source changes from "MP3 to CD-DA" or "CD-DA to MP3", the MX-mode switching process may take a little time before a piece is ON. DVD (Video CD) (MX level 1 to the normal mode. R 3 Adjust the desired time correction value by making use of the external input" (page 16) to turn MX off. • MX...
... more clear, and produces well balanced sound in cars with both MP3 and CD-DA, when the source changes from "MP3 to CD-DA" or "CD-DA to MP3", the MX-mode switching process may take a little time before a piece is ON. DVD (Video CD) (MX level 1 to the normal mode. R 3 Adjust the desired time correction value by making use of the external input" (page 16) to turn MX off. • MX...

Owners Manual
Page 14
... MANUAL", press and hold the TITLE button for the CDA-7893/CDA7892 models when a compatible changer with CD text is connected.) ↓ ELAPSED TIME DISPLAY ↓ CLOCK DISPLAY ↓ TEXT DISPLAY (DISC NAME)∗1 ↓ TEXT DISPLAY (TRACK NAME)∗1 ↓ TITLE DISPLAY MP3 mode: (MP3 files can be displayed when the CD contains no ID3 tag information. ∗3 The recording sampling rate and bit rate of a disc with the CDA-7893/CDA-7892 models...
... MANUAL", press and hold the TITLE button for the CDA-7893/CDA7892 models when a compatible changer with CD text is connected.) ↓ ELAPSED TIME DISPLAY ↓ CLOCK DISPLAY ↓ TEXT DISPLAY (DISC NAME)∗1 ↓ TEXT DISPLAY (TRACK NAME)∗1 ↓ TITLE DISPLAY MP3 mode: (MP3 files can be displayed when the CD contains no ID3 tag information. ∗3 The recording sampling rate and bit rate of a disc with the CDA-7893/CDA-7892 models...
Owners Manual
Page 16
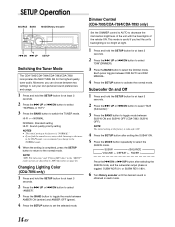
... sound is subwoofer ON. 4 Press the SETUP button after setting the SUB-W ON. 5 Press the MODE button repeatedly to toggle mode between two settings to suit your own personal sound preferences and usage. 1 Press and hold the SETUP button for at least 3 seconds. 2 Press the f UP or g DN button to select "DIM"(DIMMER). 3 Press the BAND button to set the selected mode. Dimmer Control (CDA-7995/CDA-7894/CDA-7893 only) Set the DIMMER control to AUTO to activate the normal mode...
... sound is subwoofer ON. 4 Press the SETUP button after setting the SUB-W ON. 5 Press the MODE button repeatedly to toggle mode between two settings to suit your own personal sound preferences and usage. 1 Press and hold the SETUP button for at least 3 seconds. 2 Press the f UP or g DN button to select "DIM"(DIMMER). 3 Press the BAND button to set the selected mode. Dimmer Control (CDA-7995/CDA-7894/CDA-7893 only) Set the DIMMER control to AUTO to activate the normal mode...

Owners Manual
Page 17
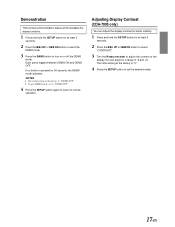
... "MUTE ON." 4 Press the SETUP button again to return to normal operation. NOTE The initial setting at the factory is BEEP ON. 4 Press the SETUP button to set two AUX mode displays. 4 Press the SETUP button to return to normal mode. 5 To adjust the volume, etc., first press the SOURCE button and select the AUX mode, then make the necessary adjustment. NOTE When using the Versatile Link Terminal (KCA-410C), you can connect two external inputs. The disc...
... "MUTE ON." 4 Press the SETUP button again to return to normal operation. NOTE The initial setting at the factory is BEEP ON. 4 Press the SETUP button to set two AUX mode displays. 4 Press the SETUP button to return to normal mode. 5 To adjust the volume, etc., first press the SOURCE button and select the AUX mode, then make the necessary adjustment. NOTE When using the Versatile Link Terminal (KCA-410C), you can connect two external inputs. The disc...
Owners Manual
Page 19
... button to select "CONTRAST." 3 Turn the Rotary encoder to adjust the contrast of -6 and +6. Adjusting Display Contrast (CDA-7995 only) You can adjust in a range of the display. Demonstration This unit has a Demonstration feature which simulates the display functions. 1 Press and hold the SETUP button for at the factory is "0." 4 Press the SETUP button to set to "DEMO OFF." 4 Press the SETUP button again to return to turn on or off the DEMO mode...
... button to select "CONTRAST." 3 Turn the Rotary encoder to adjust the contrast of -6 and +6. Adjusting Display Contrast (CDA-7995 only) You can adjust in a range of the display. Demonstration This unit has a Demonstration feature which simulates the display functions. 1 Press and hold the SETUP button for at the factory is "0." 4 Press the SETUP button to set to "DEMO OFF." 4 Press the SETUP button again to return to turn on or off the DEMO mode...
Owners Manual
Page 22
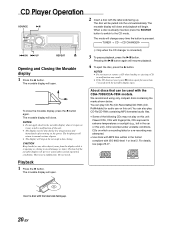
... disc, press the c button. We recommend using only compact discs containing the marks shown below. Insert a disc with the CDA-7995/CDA-7894 models. CD Player Operation SOURCE -/J 2 Insert a disc with the movable display open. The disc will return to normal as it may result in malfunction of the unit. • The display may be dim during low temperatures and immediately after turning on the power. The movable display will change every time...
... disc, press the c button. We recommend using only compact discs containing the marks shown below. Insert a disc with the CDA-7995/CDA-7894 models. CD Player Operation SOURCE -/J 2 Insert a disc with the movable display open. The disc will return to normal as it may result in malfunction of the unit. • The display may be dim during low temperatures and immediately after turning on the power. The movable display will change every time...
Owners Manual
Page 24
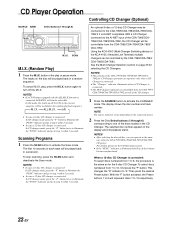
... 6-disc or 12-disc CD Changer may be selectable. See the Multi-Changer Selection section on the CDA-7995/CDA-7894/CDA-7893/CDA- 7892 for CD Changer operation are operative only when a CD Changer is connected. • The "Changer" indicator illuminates when a CD Changer is connected. • The DVD changer (optional) is Ai-NET compatible. NOTES • The controls on page 23 for selecting the CD Changers. This changes the "D" indicator to activate the Scan mode. With the "F" button activated, the Preset buttons 1 to 6 will be played...
... 6-disc or 12-disc CD Changer may be selectable. See the Multi-Changer Selection section on the CDA-7995/CDA-7894/CDA-7893/CDA- 7892 for CD Changer operation are operative only when a CD Changer is connected. • The "Changer" indicator illuminates when a CD Changer is connected. • The DVD changer (optional) is Ai-NET compatible. NOTES • The controls on page 23 for selecting the CD Changers. This changes the "D" indicator to activate the Scan mode. With the "F" button activated, the Preset buttons 1 to 6 will be played...

Owners Manual
Page 25
..., see "CD Player Operation" section. Alternatively, press the SOURCE button on the Remote Control (RUE-4187) to activate the CD Changer mode. 3 The CD Changer Selection mode remains active for 8 seconds after step 2 is not connected, the display will support up to 4 CD Changers. When operating two or more changers, the KCA-400C (Multi-Changer Switching device) must be used. NOTE For further details about the external input (AUX) when using KCA410C (Versatile Link Terminal), you can connect up to 6 CD Changers. SOURCE BAND...
..., see "CD Player Operation" section. Alternatively, press the SOURCE button on the Remote Control (RUE-4187) to activate the CD Changer mode. 3 The CD Changer Selection mode remains active for 8 seconds after step 2 is not connected, the display will support up to 4 CD Changers. When operating two or more changers, the KCA-400C (Multi-Changer Switching device) must be used. NOTE For further details about the external input (AUX) when using KCA410C (Versatile Link Terminal), you can connect up to 6 CD Changers. SOURCE BAND...

Owners Manual
Page 26
... the CD mode. The mode will change every time the button is pressed. → TUNER → CD → CD CHANGER∗ (∗ Only when the CD changer is pressed. NOTES • The music sensor feature is already inserted, press the SOURCE button to switch to pages 26 - 27 before using the unit. 1 Press the c button. The movable display will close and playback will begin. FOLDER UP REPEAT Playing MP3 Files (CDA-7995/CDA...
... the CD mode. The mode will change every time the button is pressed. → TUNER → CD → CD CHANGER∗ (∗ Only when the CD changer is pressed. NOTES • The music sensor feature is already inserted, press the SOURCE button to switch to pages 26 - 27 before using the unit. 1 Press the c button. The movable display will close and playback will begin. FOLDER UP REPEAT Playing MP3 Files (CDA-7995/CDA...
Owners Manual
Page 30
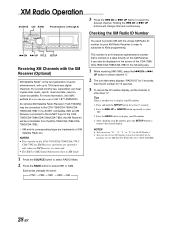
... ID number, press the SETUP button to return to display your XM Radio Receiver in XM mode. 1 Press the SOURCE button to select RADIO Mode. 2 Press the BAND button to XM's programming. With an XM Receiver connected to the Ai-NET input of the CDA7995/CDA-7894/CDA-7893/CDA-7892, the XM Receiver will change channels continuously. Holding the g DN or f UP buttons will be displayed on the XM Receiver. It can hear crystal-clear music, sports...
... ID number, press the SETUP button to return to display your XM Radio Receiver in XM mode. 1 Press the SOURCE button to select RADIO Mode. 2 Press the BAND button to XM's programming. With an XM Receiver connected to the Ai-NET input of the CDA7995/CDA-7894/CDA-7893/CDA-7892, the XM Receiver will change channels continuously. Holding the g DN or f UP buttons will be displayed on the XM Receiver. It can hear crystal-clear music, sports...
Owners Manual
Page 32
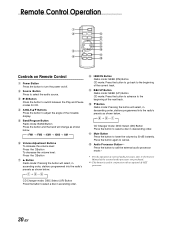
...Owner's Manual of the next track. ! 9 Button Radio mode: Pressing the button will select, in descending order, stations programmed into the radio's presets as shown below. → 6 → 5 ... 1 CD Changer mode: DISC Select (DN) Button Press the button to select a disc in conjunction with an optional Ai-NET processor. 30-EN Remote Control Operation 1 2 5 6 7 8 9 3 ! 4 " # Controls on Remote Control 1 Power Button Press the button to turn the power on/off. 2 Source Button Press to select the audio source. 3 -/J Button Press the button to switch between the Play and Pause modes...
...Owner's Manual of the next track. ! 9 Button Radio mode: Pressing the button will select, in descending order, stations programmed into the radio's presets as shown below. → 6 → 5 ... 1 CD Changer mode: DISC Select (DN) Button Press the button to select a disc in conjunction with an optional Ai-NET processor. 30-EN Remote Control Operation 1 2 5 6 7 8 9 3 ! 4 " # Controls on Remote Control 1 Power Button Press the button to turn the power on/off. 2 Source Button Press to select the audio source. 3 -/J Button Press the button to switch between the Play and Pause modes...
Owners Manual
Page 34
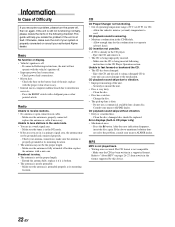
... CD Module. - Radio Unable to tune stations in the seek mode. • You are in the following instructions, the unit will help you encounter a problem, please turn the power off . • Improper power lead connections. - Extend the antenna fully; Eject the CD and remove it. • The CD is not played back. • Writing error occurred. Make sure the CD is poorly grounded. - Clean the disc. • Disc has scratches. - replace it if it ; CD playback sound...
... CD Module. - Radio Unable to tune stations in the seek mode. • You are in the following instructions, the unit will help you encounter a problem, please turn the power off . • Improper power lead connections. - Extend the antenna fully; Eject the CD and remove it. • The CD is not played back. • Writing error occurred. Make sure the CD is poorly grounded. - Clean the disc. • Disc has scratches. - replace it if it ; CD playback sound...
Owners Manual
Page 38
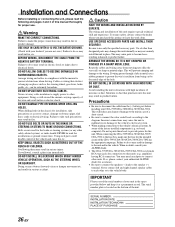
... the fuse for assistance. • Be sure to connect the speaker (-) leads to other units. USE SPECIFIED ACCESSORY PARTS AND INSTALL THEM SECURELY. Incorrect connections may obstruct forward vision or hamper movement etc. Warning MAKE THE CORRECT CONNECTIONS. BEFORE WIRING, DISCONNECT THE CABLE FROM THE NEGATIVE BATTERY TERMINAL. DO NOT DAMAGE PIPE OR WIRING WHEN DRILLING HOLES. DO NOT INSTALL IN LOCATIONS WHICH MIGHT HINDER VEHICLE OPERATION...
... the fuse for assistance. • Be sure to connect the speaker (-) leads to other units. USE SPECIFIED ACCESSORY PARTS AND INSTALL THEM SECURELY. Incorrect connections may obstruct forward vision or hamper movement etc. Warning MAKE THE CORRECT CONNECTIONS. BEFORE WIRING, DISCONNECT THE CABLE FROM THE NEGATIVE BATTERY TERMINAL. DO NOT DAMAGE PIPE OR WIRING WHEN DRILLING HOLES. DO NOT INSTALL IN LOCATIONS WHICH MIGHT HINDER VEHICLE OPERATION...
Owners Manual
Page 41
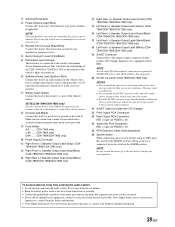
... Extension Cable (Sold Separately) < System Switch When connecting a processor or divider using the sheet metal screw provided. 9 Fuse Holder (5A ........ When no device is turned on or in the accessory position. 7 Battery Lead (Yellow) Connect this to the output or input connector of the CDA-7995/CDA-7894/CDA-7893 to dim whenever the vehicle's lights are turned on. 6 Switched Power Lead (Ignition) (Red) Connect this component. , DC/DC Converter (CDA-7995/CDA...
... Extension Cable (Sold Separately) < System Switch When connecting a processor or divider using the sheet metal screw provided. 9 Fuse Holder (5A ........ When no device is turned on or in the accessory position. 7 Battery Lead (Yellow) Connect this to the output or input connector of the CDA-7995/CDA-7894/CDA-7893 to dim whenever the vehicle's lights are turned on. 6 Switched Power Lead (Ignition) (Red) Connect this component. , DC/DC Converter (CDA-7995/CDA...
Owners Manual
Page 45
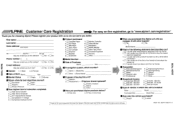
... which this number? PART NO. 68P01434K37-0 Customer Care Registration - . First name: Last name: _ Home address: "'$u"'e""e1c;;a"'dd"'re""ss City State/Provo "'Zlmpr,COclVl;e May we contact you for choosing Alpine! We value your cooperation! Make: Model: _ Purchased Vear: _ Model Vear: _ • How was this vehicle purchased? 1.0 Bought 2.0 Leased Thank you at this unit is installed. This information...
... which this number? PART NO. 68P01434K37-0 Customer Care Registration - . First name: Last name: _ Home address: "'$u"'e""e1c;;a"'dd"'re""ss City State/Provo "'Zlmpr,COclVl;e May we contact you for choosing Alpine! We value your cooperation! Make: Model: _ Purchased Vear: _ Model Vear: _ • How was this vehicle purchased? 1.0 Bought 2.0 Leased Thank you at this unit is installed. This information...


