
User Manual
Page 1
Wireless 300N Gigabit Router Model # AR690W User's Manual Ver. 1A
Wireless 300N Gigabit Router Model # AR690W User's Manual Ver. 1A
User Manual
Page 2
... ...10 5. Web Configuration Utility ...13 6.1 Setup ...13 6.1.1 Internet Setup ...13 6.1.2 Network Setup ...14 6.1.3 DDNS...15 6.1.4 Time Settings ...16 6.2. Connecting the Router ...5 3. Verifying Connection to the Router Wirelessly 11 6. Connecting to the Router 6 4. Wireless...17 6.2.1 Basic Wireless Settings 17 6.2.2 Wireless Security ...18 WEP ...18 WPA...19 WPA with RADIUS...20 Wi-Fi Protected Setup...
... ...10 5. Web Configuration Utility ...13 6.1 Setup ...13 6.1.1 Internet Setup ...13 6.1.2 Network Setup ...14 6.1.3 DDNS...15 6.1.4 Time Settings ...16 6.2. Connecting the Router ...5 3. Verifying Connection to the Router Wirelessly 11 6. Connecting to the Router 6 4. Wireless...17 6.2.1 Basic Wireless Settings 17 6.2.2 Wireless Security ...18 WEP ...18 WPA...19 WPA with RADIUS...20 Wi-Fi Protected Setup...

User Manual
Page 3
Troubleshooting ...43 Appendix A - Information ...45 Technical Support ...47 3 6.6.5 Firmware Upgrade 40 6.6.6 Restart ...40 6.7 Status...41 6.7.1 Router...41 6.7.2 Local Network ...42 6.7.3 Wireless Network...42 7. Specifications ...44 Appendix B -
Troubleshooting ...43 Appendix A - Information ...45 Technical Support ...47 3 6.6.5 Firmware Upgrade 40 6.6.6 Restart ...40 6.7 Status...41 6.7.1 Router...41 6.7.2 Local Network ...42 6.7.3 Wireless Network...42 7. Specifications ...44 Appendix B -
User Manual
Page 4
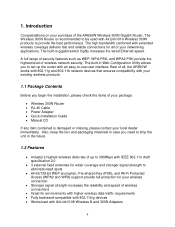
... Adapters 4 A full range of security features such as WEP, WPA-PSK, and WPA2-PSK provide the highest level of the AR690W Wireless 300N Gigabit Router. Also, keep the box and packaging materials in case you need to ship the unit in Web Configuration Utility allows you to ...1. Introduction Congratulations on your networking applications. The built-in the future. 1.2 Features • Industry's highest wireless data rate of up the router with AirLink101® Wireless 300N products to -use user interface. The built-in gigabit switch highly increases the wired Ethernet speed. Best of all...
... Adapters 4 A full range of security features such as WEP, WPA-PSK, and WPA2-PSK provide the highest level of the AR690W Wireless 300N Gigabit Router. Also, keep the box and packaging materials in case you need to ship the unit in Web Configuration Utility allows you to ...1. Introduction Congratulations on your networking applications. The built-in the future. 1.2 Features • Industry's highest wireless data rate of up the router with AirLink101® Wireless 300N products to -use user interface. The built-in gigabit switch highly increases the wired Ethernet speed. Best of all...

User Manual
Page 5
... (Ethernet) ports of the router. Step 5 Power on Status Blinking: Functioning properly WAN On: Link established Blinking: Data transmission Wireless On: Wireless is connected to the DSL/Cable modem. Step 1 Connect one end of a network cable to the WAN port of the cable to are lit. AR690W Icon Illustrations: Power On: Power... on your computer, DSL/Cable modem, and the router. 2.
... (Ethernet) ports of the router. Step 5 Power on Status Blinking: Functioning properly WAN On: Link established Blinking: Data transmission Wireless On: Wireless is connected to the DSL/Cable modem. Step 1 Connect one end of a network cable to the WAN port of the cable to are lit. AR690W Icon Illustrations: Power On: Power... on your computer, DSL/Cable modem, and the router. 2.

User Manual
Page 6
... 1 Go to Step 6) 6 Step 3 If you still encounter problem, go to Section 3, Configuring the Router. Step 4 For Windows 2000/XP, type ipconfig/release and press Enter. (Windows 98se/ME users skip ahead to Start, Run, type command (for Windows 95/... Blinking Red: Error found 3. You should get Request timed out, or Destination host unreachable, double-check the network cable connection between the computer and the router and try Step 2 again. Step 2 Type ping 192.168.1.1 and press Enter. otherwise proceed to the next step;
... 1 Go to Step 6) 6 Step 3 If you still encounter problem, go to Section 3, Configuring the Router. Step 4 For Windows 2000/XP, type ipconfig/release and press Enter. (Windows 98se/ME users skip ahead to Start, Run, type command (for Windows 95/... Blinking Red: Error found 3. You should get Request timed out, or Destination host unreachable, double-check the network cable connection between the computer and the router and try Step 2 again. Step 2 Type ping 192.168.1.1 and press Enter. otherwise proceed to the next step;
User Manual
Page 7
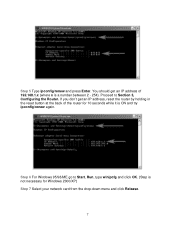
You should get an IP address, reset the router by holding in the reset button at the back of 192.168.1.x (where x is ON and try ipconfig/renew again. Step 6 For Windows 95/98/ME go to Section 3, Configuring the Router. If you don't get an IP address of the router for Windows 2000/XP) Step 7 Select your network card from the drop-down menu and click Release. 7 Step 5 Type ipconfig/renew and press Enter. Proceed to Start, Run, type winipcfg and click OK. (Step is not necessary for 10 seconds while it is a number between 2 - 254).
You should get an IP address, reset the router by holding in the reset button at the back of 192.168.1.x (where x is ON and try ipconfig/renew again. Step 6 For Windows 95/98/ME go to Section 3, Configuring the Router. If you don't get an IP address of the router for Windows 2000/XP) Step 7 Select your network card from the drop-down menu and click Release. 7 Step 5 Type ipconfig/renew and press Enter. Proceed to Start, Run, type winipcfg and click OK. (Step is not necessary for 10 seconds while it is a number between 2 - 254).

User Manual
Page 8
You should get an IP address, reset the router by holding in the reset button at the back of 192.168.1.x (where x is released, click Renew. If you don't get an IP address of the router for 10 seconds while it is ON and try Renew again. 8 Step 8 After your IP address is a number between 2 - 254).
You should get an IP address, reset the router by holding in the reset button at the back of 192.168.1.x (where x is released, click Renew. If you don't get an IP address of the router for 10 seconds while it is ON and try Renew again. 8 Step 8 After your IP address is a number between 2 - 254).

User Manual
Page 9
... click Apply. Incorrectly selecting the current region of operation may cause harmful interference to other systems. The user is obligated to ensure the 9 Configuring the Router Step 1 Open the web browser and type 192.168.1.1 in illegal operation and may result in the URL Address field and press Enter.
... click Apply. Incorrectly selecting the current region of operation may cause harmful interference to other systems. The user is obligated to ensure the 9 Configuring the Router Step 1 Open the web browser and type 192.168.1.1 in illegal operation and may result in the URL Address field and press Enter.

User Manual
Page 10
... this guide. If you have trouble connecting to the Internet, please refer to the Internet without any configuration. Click Apply and OK to configure the router. Click on the Clone MAC Address button. Step 1 Select PPPoE from the drop-down menu. 10 DSL For DSL users, follow the steps below to...
... this guide. If you have trouble connecting to the Internet, please refer to the Internet without any configuration. Click Apply and OK to configure the router. Click on the Clone MAC Address button. Step 1 Select PPPoE from the drop-down menu. 10 DSL For DSL users, follow the steps below to...
User Manual
Page 11
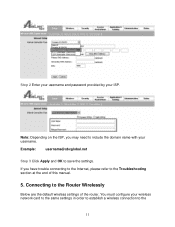
If you may need to include the domain name with your username. Connecting to the Troubleshooting section at the end of the router. Example: [email protected] Step 3 Click Apply and OK to the 11 You must configure your ISP. Note: Depending on the ISP, you have trouble connecting to the Internet, please refer to the Router Wirelessly Below are the default wireless settings of this manual. 5. Step 2 Enter your username and password provided by your wireless network card to the same settings in order to establish a wireless connection to save the settings.
If you may need to include the domain name with your username. Connecting to the Troubleshooting section at the end of the router. Example: [email protected] Step 3 Click Apply and OK to the 11 You must configure your ISP. Note: Depending on the ISP, you have trouble connecting to the Internet, please refer to the Router Wirelessly Below are the default wireless settings of this manual. 5. Step 2 Enter your username and password provided by your wireless network card to the same settings in order to establish a wireless connection to save the settings.
User Manual
Page 12
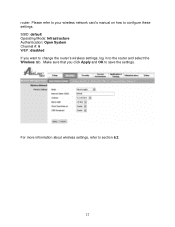
Please refer to your wireless network card's manual on how to section 6.2. 12 For more information about wireless settings, refer to configure these settings. Make sure that you want to change the router's wireless settings, log in to save the settings. SSID: default Operating Mode: Infrastructure Authentication: Open System Channel #: 6 WEP: disabled If you click Apply and OK to the router and select the Wireless tab. router.
Please refer to your wireless network card's manual on how to section 6.2. 12 For more information about wireless settings, refer to configure these settings. Make sure that you want to change the router's wireless settings, log in to save the settings. SSID: default Operating Mode: Infrastructure Authentication: Open System Channel #: 6 WEP: disabled If you click Apply and OK to the router and select the Wireless tab. router.

User Manual
Page 13
Web Configuration Utility This router has a built-in to the router's web configuration utility. You can use to the router using your computer's web browser. 6.1 Setup 6.1.1 Internet Setup This is the default screen when you log in web configuration utility that you can setup your Internet connection here. 13 Simply log in to configure the router's settings. 6.
Web Configuration Utility This router has a built-in to the router's web configuration utility. You can use to the router using your computer's web browser. 6.1 Setup 6.1.1 Internet Setup This is the default screen when you log in web configuration utility that you can setup your Internet connection here. 13 Simply log in to configure the router's settings. 6.

User Manual
Page 16
Using this feature requires that your computer's system clock Manual provides you to synchronize the router's clock with your router have a working internet connection. 6.1.4 Time Settings Time Settings allow you with the option of setting your own date and time. Automatic connects to save the settings. 16 Click Apply and OK to the internet and synchronizes the router's clock with time provided by accurate timeservers on the internet. Your computer's clock allows you to configure the router clock.
Using this feature requires that your computer's system clock Manual provides you to synchronize the router's clock with your router have a working internet connection. 6.1.4 Time Settings Time Settings allow you with the option of setting your own date and time. Automatic connects to save the settings. 16 Click Apply and OK to the internet and synchronizes the router's clock with time provided by accurate timeservers on the internet. Your computer's clock allows you to configure the router clock.

User Manual
Page 17
... test the channel out for a while and make sure that they hold the connection. Changing channels is the name that gives you change the router's SSID in this screen. If the computers are unable to enable or disable the broadcasting of your way up. SSID Broadcast: Choose to establish...channels on this field. The SSID is useful when you are experiencing slow, unstable wireless connections, or if you have changed the SSID, your router sends out wirelessly. Start with channel 1 and work your SSID. 17 Channel: Select the desired channel. Once you are able to stop wireless ...
... test the channel out for a while and make sure that they hold the connection. Changing channels is the name that gives you change the router's SSID in this screen. If the computers are unable to enable or disable the broadcasting of your way up. SSID Broadcast: Choose to establish...channels on this field. The SSID is useful when you are experiencing slow, unstable wireless connections, or if you have changed the SSID, your router sends out wirelessly. Start with channel 1 and work your SSID. 17 Channel: Select the desired channel. Once you are able to stop wireless ...
User Manual
Page 18
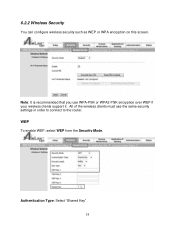
All of the wireless clients must use WPA-PSK or WPA2-PSK encryption over WEP if your wireless clients support it. Note: It is recommended that you use the same security settings in order to connect to the router. Authentication Type: Select "Shared Key" 18 WEP To enable WEP, select WEP from the Security Mode. 6.2.2 Wireless Security You can configure wireless security such as WEP or WPA encryption on this screen.
All of the wireless clients must use WPA-PSK or WPA2-PSK encryption over WEP if your wireless clients support it. Note: It is recommended that you use the same security settings in order to connect to the router. Authentication Type: Select "Shared Key" 18 WEP To enable WEP, select WEP from the Security Mode. 6.2.2 Wireless Security You can configure wireless security such as WEP or WPA encryption on this screen.

User Manual
Page 21
... wireless adapters must support WPS in order to set up the wireless security manually and you can skip this convenient function. Step 1 Go to the router. If your wireless network clients to connect to the computer with the Airlink101 Wireless 300N adapters, and...
... wireless adapters must support WPS in order to set up the wireless security manually and you can skip this convenient function. Step 1 Go to the router. If your wireless network clients to connect to the computer with the Airlink101 Wireless 300N adapters, and...

User Manual
Page 22
Step 2a If you choose the Push Button method, make sure that you click on the router, and the blue LED will be built up in couple minutes. 22 The router will now start the handshake with the wireless adapter, then the connection will start blinking. Step 2b Push the WPS button on the Wi-Fi Protected Setup button.
Step 2a If you choose the Push Button method, make sure that you click on the router, and the blue LED will be built up in couple minutes. 22 The router will now start the handshake with the wireless adapter, then the connection will start blinking. Step 2b Push the WPS button on the Wi-Fi Protected Setup button.
User Manual
Page 23
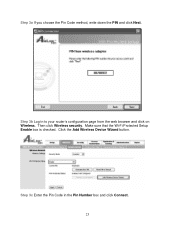
Step 3b Log in the Pin Number box and click Connect. 23 Click the Add Wireless Device Wizard button. Step 3c Enter the Pin Code in to your router's configuration page from the web browser and click on Wireless. Make sure that the Wi-Fi Protected Setup Enable box is checked. Then click Wireless security. Step 3a If you choose the Pin Code method, write down the PIN and click Next.
Step 3b Log in the Pin Number box and click Connect. 23 Click the Add Wireless Device Wizard button. Step 3c Enter the Pin Code in to your router's configuration page from the web browser and click on Wireless. Make sure that the Wi-Fi Protected Setup Enable box is checked. Then click Wireless security. Step 3a If you choose the Pin Code method, write down the PIN and click Next.

User Manual
Page 24
After a few moments both the router configuration screen and the adapter configuration screen should show a message telling you that you are connected. Step 4 Click Finish on the router configuration screen. Step 3d Click Continue on the WPS Connection screen. 24
After a few moments both the router configuration screen and the adapter configuration screen should show a message telling you that you are connected. Step 4 Click Finish on the router configuration screen. Step 3d Click Continue on the WPS Connection screen. 24

