User Manual
Page 2
... Wireless MAC Filter 26 6.2.4 Advanced Wireless Settings 27 6.3 Security ...28 6.3.1 Firewall ...28 6.3.2 VPN Passthrough ...29 6.4 Access Restrictions ...29 6.4.1 IP Filters...29 6.4.2 MAC Filters ...30 6.4.3 URL Blocking...31 6.4.4 Domain Blocking ...32 6.4.5 Schedule...32 6.5 Applications & Gaming ...33 6.5.1 Port Range Forwarding 33 6.5.2 Port Range Triggering 34 6.5.3 DMZ...35 6.5.4 QoS ...36 6.6 Administration ...37 6.6.1 Management...37 6.6.2 Log ...38 6.6.3 Diagnostics...39 6.6.4 Factory Defaults...39 2 Configuring the Router ...9 Cable Modem...10 DSL ...10 5. Web Configuration...
... Wireless MAC Filter 26 6.2.4 Advanced Wireless Settings 27 6.3 Security ...28 6.3.1 Firewall ...28 6.3.2 VPN Passthrough ...29 6.4 Access Restrictions ...29 6.4.1 IP Filters...29 6.4.2 MAC Filters ...30 6.4.3 URL Blocking...31 6.4.4 Domain Blocking ...32 6.4.5 Schedule...32 6.5 Applications & Gaming ...33 6.5.1 Port Range Forwarding 33 6.5.2 Port Range Triggering 34 6.5.3 DMZ...35 6.5.4 QoS ...36 6.6 Administration ...37 6.6.1 Management...37 6.6.2 Log ...38 6.6.3 Diagnostics...39 6.6.4 Factory Defaults...39 2 Configuring the Router ...9 Cable Modem...10 DSL ...10 5. Web Configuration...
User Manual
Page 4
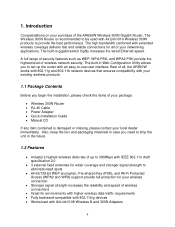
... the installation, please check the items of the AR690W Wireless 300N Gigabit Router. Best of all of wireless network security. Introduction Congratulations on your purchase of your local dealer immediately. The Wireless 300N Router is damaged or missing, please contact your package: • Wireless 300N Router • RJ-45 Cable • Power Adapter • Quick Installation Guide • Manual CD If any item contained is recommended to be used with your networking...
... the installation, please check the items of the AR690W Wireless 300N Gigabit Router. Best of all of wireless network security. Introduction Congratulations on your purchase of your local dealer immediately. The Wireless 300N Router is damaged or missing, please contact your package: • Wireless 300N Router • RJ-45 Cable • Power Adapter • Quick Installation Guide • Manual CD If any item contained is recommended to be used with your networking...

User Manual
Page 5
.... Step 3 Power on the DSL/Cable modem and wait for the lights on the router by connecting one end of the cable to your computer's network card and connect the other end of the router and connecting the other end to settle down. Step 5 Power on Status Blinking: Functioning properly WAN On: Link established Blinking: Data transmission Wireless On: Wireless is connected to setup any wireless connections. AR690W Icon Illustrations: Power On: Power on your computer, DSL/Cable modem, and the router.
.... Step 3 Power on the DSL/Cable modem and wait for the lights on the router by connecting one end of the cable to your computer's network card and connect the other end of the router and connecting the other end to settle down. Step 5 Power on Status Blinking: Functioning properly WAN On: Link established Blinking: Data transmission Wireless On: Wireless is connected to setup any wireless connections. AR690W Icon Illustrations: Power On: Power on your computer, DSL/Cable modem, and the router.

User Manual
Page 6
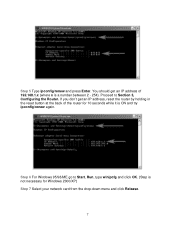
... 3, Configuring the Router. You should get Request timed out, or Destination host unreachable, double-check the network cable connection between the computer and the router and try Step 2 again. Blinking: Data transmission LAN On (Green): 1000Mbps device is connected Blinking (Green): Data transmit under 1000Mbps mode On (Orange): 100Mbps device is connected Blinking (Orange): Data transmit under 100Mbps mode WPS (WiFi Protected Setup) Blinking Blue: WPS set up in progress Static Blue: WPS set up successfully Blinking Red: Error...
... 3, Configuring the Router. You should get Request timed out, or Destination host unreachable, double-check the network cable connection between the computer and the router and try Step 2 again. Blinking: Data transmission LAN On (Green): 1000Mbps device is connected Blinking (Green): Data transmit under 1000Mbps mode On (Orange): 100Mbps device is connected Blinking (Orange): Data transmit under 100Mbps mode WPS (WiFi Protected Setup) Blinking Blue: WPS set up in progress Static Blue: WPS set up successfully Blinking Red: Error...
User Manual
Page 7
Proceed to Start, Run, type winipcfg and click OK. (Step is not necessary for 10 seconds while it is a number between 2 - 254). Step 6 For Windows 95/98/ME go to Section 3, Configuring the Router. If you don't get an IP address of the router for Windows 2000/XP) Step 7 Select your network card from the drop-down menu and click Release. 7 You should get an IP address, reset the router by holding in the reset button at the back of 192.168.1.x (where x is ON and try ipconfig/renew again. Step 5 Type ipconfig/renew and press Enter.
Proceed to Start, Run, type winipcfg and click OK. (Step is not necessary for 10 seconds while it is a number between 2 - 254). Step 6 For Windows 95/98/ME go to Section 3, Configuring the Router. If you don't get an IP address of the router for Windows 2000/XP) Step 7 Select your network card from the drop-down menu and click Release. 7 You should get an IP address, reset the router by holding in the reset button at the back of 192.168.1.x (where x is ON and try ipconfig/renew again. Step 5 Type ipconfig/renew and press Enter.

User Manual
Page 8
If you don't get an IP address of the router for 10 seconds while it is released, click Renew. Step 8 After your IP address is ON and try Renew again. 8 You should get an IP address, reset the router by holding in the reset button at the back of 192.168.1.x (where x is a number between 2 - 254).
If you don't get an IP address of the router for 10 seconds while it is released, click Renew. Step 8 After your IP address is ON and try Renew again. 8 You should get an IP address, reset the router by holding in the reset button at the back of 192.168.1.x (where x is a number between 2 - 254).

User Manual
Page 9
... Apply. Step 2 Enter admin for both the username and password fields and click Login. Incorrectly selecting the current region of operation before using this device. Warning: This device requires that the user or installer properly selects the current region of operation may result in the URL Address field and press Enter. Configuring the Router Step 1 Open the web browser and type 192.168.1.1 in illegal...
... Apply. Step 2 Enter admin for both the username and password fields and click Login. Incorrectly selecting the current region of operation before using this device. Warning: This device requires that the user or installer properly selects the current region of operation may result in the URL Address field and press Enter. Configuring the Router Step 1 Open the web browser and type 192.168.1.1 in illegal...

User Manual
Page 10
... MAC Address button. If you have trouble connecting to the Internet, please refer to the Internet without any configuration. DSL For DSL users, follow the steps below to save the settings. Step 1 Select PPPoE from the drop-down menu. 10 If your ISP has provided you should be able to connect to the Troubleshooting section at the end of operation. Click Apply and OK to configure the router. Cable Modem...
... MAC Address button. If you have trouble connecting to the Internet, please refer to the Internet without any configuration. DSL For DSL users, follow the steps below to save the settings. Step 1 Select PPPoE from the drop-down menu. 10 If your ISP has provided you should be able to connect to the Troubleshooting section at the end of operation. Click Apply and OK to configure the router. Cable Modem...
User Manual
Page 11
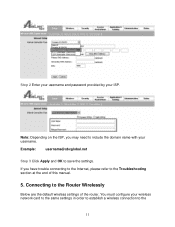
Example: username@sbcglobal.net Step 3 Click Apply and OK to the Troubleshooting section at the end of the router. You must configure your ISP. Connecting to the Router Wirelessly Below are the default wireless settings of this manual. 5. If you may need to include the domain name with your username. Step 2 Enter your username and password provided by your wireless network card to the same settings in order to establish a wireless connection to the 11 Note: Depending on the ISP, you have trouble connecting to the Internet, please refer to save the settings.
Example: username@sbcglobal.net Step 3 Click Apply and OK to the Troubleshooting section at the end of the router. You must configure your ISP. Connecting to the Router Wirelessly Below are the default wireless settings of this manual. 5. If you may need to include the domain name with your username. Step 2 Enter your username and password provided by your wireless network card to the same settings in order to establish a wireless connection to the 11 Note: Depending on the ISP, you have trouble connecting to the Internet, please refer to save the settings.
User Manual
Page 12
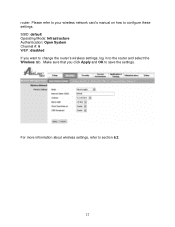
Please refer to your wireless network card's manual on how to section 6.2. 12 SSID: default Operating Mode: Infrastructure Authentication: Open System Channel #: 6 WEP: disabled If you click Apply and OK to the router and select the Wireless tab. For more information about wireless settings, refer to configure these settings. router. Make sure that you want to change the router's wireless settings, log in to save the settings.
Please refer to your wireless network card's manual on how to section 6.2. 12 SSID: default Operating Mode: Infrastructure Authentication: Open System Channel #: 6 WEP: disabled If you click Apply and OK to the router and select the Wireless tab. For more information about wireless settings, refer to configure these settings. router. Make sure that you want to change the router's wireless settings, log in to save the settings.

User Manual
Page 13
You can setup your computer's web browser. 6.1 Setup 6.1.1 Internet Setup This is the default screen when you can use to the router's web configuration utility. 6. Web Configuration Utility This router has a built-in web configuration utility that you log in to the router using your Internet connection here. 13 Simply log in to configure the router's settings.
You can setup your computer's web browser. 6.1 Setup 6.1.1 Internet Setup This is the default screen when you can use to the router's web configuration utility. 6. Web Configuration Utility This router has a built-in web configuration utility that you log in to the router using your Internet connection here. 13 Simply log in to configure the router's settings.

User Manual
Page 14
Step 3 Enter the Static IP Address in the IP Address field Step 4 Enter the MAC address of the corresponding computer in the under the Static DHCP Settings section Step 2 Select a computer name from the drop-down menu or enter a name associated with this Static IP Address . Assigning Static DHCP Settings Step 1 Select Enabled in the MAC Address field Remember to click Apply and OK to save your changes. 14 6.1.2 Network Setup Network Setup allows manually configuring TCP/IP and DHCP settings.
Step 3 Enter the Static IP Address in the IP Address field Step 4 Enter the MAC address of the corresponding computer in the under the Static DHCP Settings section Step 2 Select a computer name from the drop-down menu or enter a name associated with this Static IP Address . Assigning Static DHCP Settings Step 1 Select Enabled in the MAC Address field Remember to click Apply and OK to save your changes. 14 6.1.2 Network Setup Network Setup allows manually configuring TCP/IP and DHCP settings.
User Manual
Page 18
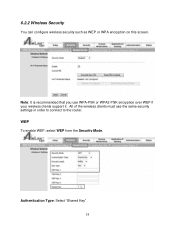
Note: It is recommended that you use the same security settings in order to connect to the router. Authentication Type: Select "Shared Key" 18 WEP To enable WEP, select WEP from the Security Mode. All of the wireless clients must use WPA-PSK or WPA2-PSK encryption over WEP if your wireless clients support it. 6.2.2 Wireless Security You can configure wireless security such as WEP or WPA encryption on this screen.
Note: It is recommended that you use the same security settings in order to connect to the router. Authentication Type: Select "Shared Key" 18 WEP To enable WEP, select WEP from the Security Mode. All of the wireless clients must use WPA-PSK or WPA2-PSK encryption over WEP if your wireless clients support it. 6.2.2 Wireless Security You can configure wireless security such as WEP or WPA encryption on this screen.
User Manual
Page 19
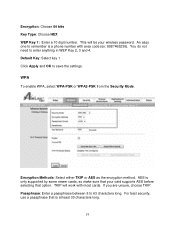
...Default Key: Select key 1 Click Apply and OK to 63 characters long. Passphrase: Enter a passphrase between 8 to save the settings. An easy one to enter anything in WEP Key 2, 3 and 4. TKIP will be your card supports AES before selecting that is a phone number with most cards. If you are unsure, choose TKIP. For best security, use...bits Key Type: Choose HEX WEP Key 1: Enter a 10 digit number. WPA To enable WPA, select WPA-PSK or WPA2-PSK from the Security Mode. AES is only supported by some newer cards, so make sure that your wireless password. This will work with area code (ex...
...Default Key: Select key 1 Click Apply and OK to 63 characters long. Passphrase: Enter a passphrase between 8 to save the settings. An easy one to enter anything in WEP Key 2, 3 and 4. TKIP will be your card supports AES before selecting that is a phone number with most cards. If you are unsure, choose TKIP. For best security, use...bits Key Type: Choose HEX WEP Key 1: Enter a 10 digit number. WPA To enable WPA, select WPA-PSK or WPA2-PSK from the Security Mode. AES is only supported by some newer cards, so make sure that your wireless password. This will work with area code (ex...

User Manual
Page 21
... the computer with the Airlink101 Wireless 300N adapters, and AR690W Wireless 300N Gigabit Router as the example. In the instructions below, we are going to use this section. Note: If you do not support WPS, you will need to set up the wireless security manually and you can skip this convenient function. Click on the WPS Connect button. WiFi Protected Setup Wi-Fi Protected Setup™ (WPS) is a new...
... the computer with the Airlink101 Wireless 300N adapters, and AR690W Wireless 300N Gigabit Router as the example. In the instructions below, we are going to use this section. Note: If you do not support WPS, you will need to set up the wireless security manually and you can skip this convenient function. Click on the WPS Connect button. WiFi Protected Setup Wi-Fi Protected Setup™ (WPS) is a new...
User Manual
Page 23
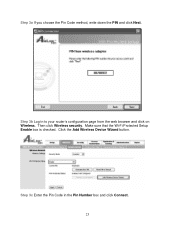
Click the Add Wireless Device Wizard button. Step 3b Log in the Pin Number box and click Connect. 23 Make sure that the Wi-Fi Protected Setup Enable box is checked. Step 3c Enter the Pin Code in to your router's configuration page from the web browser and click on Wireless. Then click Wireless security. Step 3a If you choose the Pin Code method, write down the PIN and click Next.
Click the Add Wireless Device Wizard button. Step 3b Log in the Pin Number box and click Connect. 23 Make sure that the Wi-Fi Protected Setup Enable box is checked. Step 3c Enter the Pin Code in to your router's configuration page from the web browser and click on Wireless. Then click Wireless security. Step 3a If you choose the Pin Code method, write down the PIN and click Next.

User Manual
Page 28
... save the settings. 28 However, it may want to disable this feature to eliminate lag problems with VOIP Phones. If you are having trouble connecting to your internet IP address. You can also prevent VPN clients from being able to ping your VPN, you may slow down some applications such as VOIP Phones and other services that require constant streams of security. 6.3 Security 6.3.1 Firewall Block WAN Ping: This setting blocks remote users from working properly.
... save the settings. 28 However, it may want to disable this feature to eliminate lag problems with VOIP Phones. If you are having trouble connecting to your internet IP address. You can also prevent VPN clients from being able to ping your VPN, you may slow down some applications such as VOIP Phones and other services that require constant streams of security. 6.3 Security 6.3.1 Firewall Block WAN Ping: This setting blocks remote users from working properly.
User Manual
Page 37
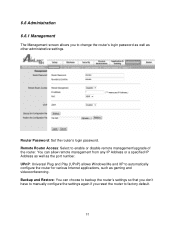
... and videoconferencing. Remote Router Access: Select to enable or disable remote management/upgrade of the router. Backup and Restore: You can allow remote management from any IP Address or a specified IP Address as well as the port number. UPnP: Universal Plug and Play (UPnP) allows Windows Me and XP to automatically configure the router for various Internet applications, such as other administrative settings. Router Password: Set the router's login password. 6.6 Administration 6.6.1 Management The Management screen allows you reset the router to factory default. 37
... and videoconferencing. Remote Router Access: Select to enable or disable remote management/upgrade of the router. Backup and Restore: You can allow remote management from any IP Address or a specified IP Address as well as the port number. UPnP: Universal Plug and Play (UPnP) allows Windows Me and XP to automatically configure the router for various Internet applications, such as other administrative settings. Router Password: Set the router's login password. 6.6 Administration 6.6.1 Management The Management screen allows you reset the router to factory default. 37

User Manual
Page 44
... Packet Inspection (SPI) / DoS • VPN Pass-through Data Rate • Transmitting: Up to 300Mbps* • Receiving: Up to 300Mbps* WiFi Protected Setup • PIN (Personal Identification Number) • PBC (Push button configuration) System Requirement • Windows®, Mac®, or Linux® operating system • Internet Explore 5.5 or above • Installed Ethernet adapter • Recommended use with Wireless 300N Adapters: AWLH6090 and AWLL6090 for best performance...
... Packet Inspection (SPI) / DoS • VPN Pass-through Data Rate • Transmitting: Up to 300Mbps* • Receiving: Up to 300Mbps* WiFi Protected Setup • PIN (Personal Identification Number) • PBC (Push button configuration) System Requirement • Windows®, Mac®, or Linux® operating system • Internet Explore 5.5 or above • Installed Ethernet adapter • Recommended use with Wireless 300N Adapters: AWLH6090 and AWLL6090 for best performance...
User Manual
Page 45
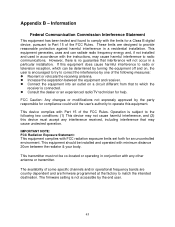
.... However, there is not accessible by the party responsible for a Class B digital device, pursuant to match the intended destination. Appendix B - FCC Caution: Any changes or modifications not expressly approved by the end user. 45 Information Federal Communication Commission Interference Statement This equipment has been tested and found to comply with the instructions, may cause undesired operation...
.... However, there is not accessible by the party responsible for a Class B digital device, pursuant to match the intended destination. Appendix B - FCC Caution: Any changes or modifications not expressly approved by the end user. 45 Information Federal Communication Commission Interference Statement This equipment has been tested and found to comply with the instructions, may cause undesired operation...


