User Manual
Page 2
... and Benefits 4 1.4 System Requirement 5 CHAPTER 2 ...6 HARDWARE INSTALLATION 6 2.1 Installing the Wall Mount Kit 6 2.2 Connecting the Camera to LAN/WLAN 7 2.3 Applications of the Camera 7 CHAPTER 3 ...8 SOFTWARE INSTALLATION 8 3.1 Installing SkyIPCam Utility 8 3.2 Using SkyIPCam Utility 9 3.3 Viewing Images 14 3.4 Using SkyIPCam View 18 CHAPTER 4 ...31 CONFIGURATION ...31 4.1 Using the Web Configuration 31 4.2 ...
... and Benefits 4 1.4 System Requirement 5 CHAPTER 2 ...6 HARDWARE INSTALLATION 6 2.1 Installing the Wall Mount Kit 6 2.2 Connecting the Camera to LAN/WLAN 7 2.3 Applications of the Camera 7 CHAPTER 3 ...8 SOFTWARE INSTALLATION 8 3.1 Installing SkyIPCam Utility 8 3.2 Using SkyIPCam Utility 9 3.3 Viewing Images 14 3.4 Using SkyIPCam View 18 CHAPTER 4 ...31 CONFIGURATION ...31 4.1 Using the Web Configuration 31 4.2 ...

User Manual
Page 3
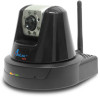
You should have the following: 5 One Pan-Tilt AICN747W Network Camera. 5 One Antenna. 5 One AC Power Adapter. 5 One Wall Mount Kit. 5 One GPIO Connector 5 One Ethernet Cable (RJ-45 type). 5 One Installation CD-ROM. 5 One Quick Installation Guide. -2- CHAPTER 1 INTRODUCTION TO YOUR CAMERA 1.1 Checking the Package Contents Check the items contained in the package carefully.
You should have the following: 5 One Pan-Tilt AICN747W Network Camera. 5 One Antenna. 5 One AC Power Adapter. 5 One Wall Mount Kit. 5 One GPIO Connector 5 One Ethernet Cable (RJ-45 type). 5 One Installation CD-ROM. 5 One Quick Installation Guide. -2- CHAPTER 1 INTRODUCTION TO YOUR CAMERA 1.1 Checking the Package Contents Check the items contained in the package carefully.

User Manual
Page 5
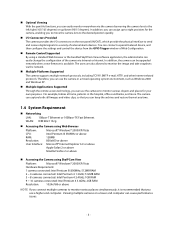
... When the Light Sensor detects the environmental light level as being too low, the camera captures the images in dark environments or at night. 1.3 Features and Benefits „ MJPEG Codec Supported The camera provides you with excellent images by the MJPEG codec technology, allowing you to adjust image...environment. „ 2-way Audio Capability The built-in microphone of the camera provides on-the-spot audio via the Internet, allowing you can connect an external speaker to the camera to talk to people at the camera view. „ Day & Night Surveillance Supported The seven Infrared LEDs ...
... When the Light Sensor detects the environmental light level as being too low, the camera captures the images in dark environments or at night. 1.3 Features and Benefits „ MJPEG Codec Supported The camera provides you with excellent images by the MJPEG codec technology, allowing you to adjust image...environment. „ 2-way Audio Capability The built-in microphone of the camera provides on-the-spot audio via the Internet, allowing you can connect an external speaker to the camera to talk to people at the camera view. „ Day & Night Surveillance Supported The seven Infrared LEDs ...
User Manual
Page 6
... can easily change the configuration of external alarm devices. In addition, you can assign up /down (90/15 degrees). In addition, the camera can be upgraded remotely when a new firmware is recommended that you can keep the archives and restore them at home, patients in a mixed... e-mail, HTTP, and other Internet related protocols. Therefore, you can use a higher end computer. WLAN: IEEE 802.11b/g. „ Accessing the Camera using Web Browser Platform: CPU: RAM: Resolution: User Interface: Microsoft® Windows® 2000/XP/Vista Intel Pentium III 350MHz or above 128MB 800x600...
... can easily change the configuration of external alarm devices. In addition, you can assign up /down (90/15 degrees). In addition, the camera can be upgraded remotely when a new firmware is recommended that you can keep the archives and restore them at home, patients in a mixed... e-mail, HTTP, and other Internet related protocols. Therefore, you can use a higher end computer. WLAN: IEEE 802.11b/g. „ Accessing the Camera using Web Browser Platform: CPU: RAM: Resolution: User Interface: Microsoft® Windows® 2000/XP/Vista Intel Pentium III 350MHz or above 128MB 800x600...

User Manual
Page 7
Screw Wall Mount Kit Screw Screw -6- CHAPTER 2 HARDWARE INSTALLATION 2.1 Installing the Wall Mount Kit The camera comes with a Wall Mount Kit, which allows you to place your camera anywhere by mounting the camera through the three screw holes located in the base of the Wall Mount Kit.
Screw Wall Mount Kit Screw Screw -6- CHAPTER 2 HARDWARE INSTALLATION 2.1 Installing the Wall Mount Kit The camera comes with a Wall Mount Kit, which allows you to place your camera anywhere by mounting the camera through the three screw holes located in the base of the Wall Mount Kit.

User Manual
Page 8
... email messages with "default" SSID. Connecting the Ethernet Cable If you use now. Connecting the External Antenna 2.3 Applications of the Camera The camera can verify the power status from the Power LED on , the camera will automatically search any access point with the still images attached. When the...external antenna to your application environment, you connect the AC power adapter, the camera is powered on the front panel of the camera. You can be applied in your local area network (LAN). 2.2 Connecting the Camera to LAN/WLAN Use the provided Ethernet cable to connect the...
... email messages with "default" SSID. Connecting the Ethernet Cable If you use now. Connecting the External Antenna 2.3 Applications of the Camera The camera can verify the power status from the Power LED on , the camera will automatically search any access point with the still images attached. When the...external antenna to your application environment, you connect the AC power adapter, the camera is powered on the front panel of the camera. You can be applied in your local area network (LAN). 2.2 Connecting the Camera to LAN/WLAN Use the provided Ethernet cable to connect the...

User Manual
Page 11
... list and click on the Search button. Enter "admin" for both the ID and password, and click Change. - 10 - Note: If the Camera's IP address does not show up in the window, make sure the camera is properly connected to the same network as your computer is enabled, you want to your... 3 You may simply accept the suggested one has already been used by another device in the same network. Step 2 Select the IP Camera you can manually change the last 3-digit number of the IP Address, in case that if your router's DHCP server is , and then click on ...
... list and click on the Search button. Enter "admin" for both the ID and password, and click Change. - 10 - Note: If the Camera's IP address does not show up in the window, make sure the camera is properly connected to the same network as your computer is enabled, you want to your... 3 You may simply accept the suggested one has already been used by another device in the same network. Step 2 Select the IP Camera you can manually change the last 3-digit number of the IP Address, in case that if your router's DHCP server is , and then click on ...

User Manual
Page 12
Step 5 When you are prompted for the username and password, enter "admin" for both User name and Password, and click OK. - 11 - Select your camera from the list and click Link. Step 4 Once the utility has saved changes, it will return to the original screen.
Step 5 When you are prompted for the username and password, enter "admin" for both User name and Password, and click OK. - 11 - Select your camera from the list and click Link. Step 4 Once the utility has saved changes, it will return to the original screen.

User Manual
Page 13
Click Next. Step 8 You may change the camera's IP settings in the below window, and click Next. - 12 - Then enter "admin" for the Location if you like. Step 6 The camera viewing window will appear. Step 7 You may also change the default Camera Name and enter a name for both Admin Password and Confirm Password. Click on Setup, and then click Smart Wizard.
Click Next. Step 8 You may change the camera's IP settings in the below window, and click Next. - 12 - Then enter "admin" for the Location if you like. Step 6 The camera viewing window will appear. Step 7 You may also change the default Camera Name and enter a name for both Admin Password and Confirm Password. Click on Setup, and then click Smart Wizard.
User Manual
Page 14
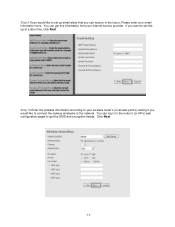
Step 9 If you would like to set this information from your wireless router's (or access point's) setting if you can log in the future, Please enter your email information here. Step 10 Enter the wireless information according to set up at a later time, click Next. You can receive in to the router's (or AP's) web configuration pages to get this up email alerts that you would like to connect the camera wirelessly to the network. Click Next. - 13 - You can get the SSID and encryption details. If you want to your internet service provider.
Step 9 If you would like to set this information from your wireless router's (or access point's) setting if you can log in the future, Please enter your email information here. Step 10 Enter the wireless information according to set up at a later time, click Next. You can receive in to the router's (or AP's) web configuration pages to get this up email alerts that you would like to connect the camera wirelessly to the network. Click Next. - 13 - You can get the SSID and encryption details. If you want to your internet service provider.
User Manual
Page 15
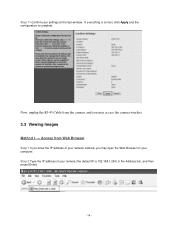
Now, unplug the RJ-45 Cable from Web Browser Step 1 If you know the IP address of your camera (the default IP is complete. Access from the camera, and you may access the camera wireless. 3.3 Viewing Images Method 1 --- Step 11 Confirm your computer. Step 2 Type the IP address of your network camera, you may open the Web Browser on your settings at the last window. If everything is correct, click Apply and the configuration is 192.168.1.240) in the Address bar, and then press [Enter]. - 14 -
Now, unplug the RJ-45 Cable from Web Browser Step 1 If you know the IP address of your camera (the default IP is complete. Access from the camera, and you may access the camera wireless. 3.3 Viewing Images Method 1 --- Step 11 Confirm your computer. Step 2 Type the IP address of your network camera, you may open the Web Browser on your settings at the last window. If everything is correct, click Apply and the configuration is 192.168.1.240) in the Address bar, and then press [Enter]. - 14 -

User Manual
Page 17
Restart Internet Explorer. - 16 - Select the Security tab, uncheck the box for protected mode, and click Apply. Step 6 To get a clear view of images, you may also need to adjust the focus. Note: If you are not able to find the pictures or video clips saved by "Snapshot' or "Manual Record" under Windows Vista, you can simply rotate the camera's lens clockwise or counterclockwise to disable Internet Explorer's Protected Mode: Open Internet Explorer and click Tools. Then click Internet Options.
Restart Internet Explorer. - 16 - Select the Security tab, uncheck the box for protected mode, and click Apply. Step 6 To get a clear view of images, you may also need to adjust the focus. Note: If you are not able to find the pictures or video clips saved by "Snapshot' or "Manual Record" under Windows Vista, you can simply rotate the camera's lens clockwise or counterclockwise to disable Internet Explorer's Protected Mode: Open Internet Explorer and click Tools. Then click Internet Options.

User Manual
Page 18
Method 2 --- Access from the list and click Link. Step 3 Follow Step 3 to Start > (All) Programs > AirLink101 > AirLink101 SkyIPCam Utiliy, and open the Airlink101 SkyIPCam Utility. Step 2 Select your camera from SkyIPCam Utility Step 1 Go to Step 6 mentioned in Method 1. - 17 -
Method 2 --- Access from the list and click Link. Step 3 Follow Step 3 to Start > (All) Programs > AirLink101 > AirLink101 SkyIPCam Utiliy, and open the Airlink101 SkyIPCam Utility. Step 2 Select your camera from SkyIPCam Utility Step 1 Go to Step 6 mentioned in Method 1. - 17 -

User Manual
Page 21
... view to change the ID and password of SkyIPCam View. TIP To set ID and Password in turn. - Click SETTING > Account to the next camera. SCAN: When you will be asked to enter the required information to stop recording and save the files in the Time interval of SkyIPCam View... in the computer. Item Features The following describes the function of scanning, click SETTING > Other and then adjust the time from 1 to the previous camera. - Click again to return to start recording video clips using the media player on the main screen: „ CONTROLS Panel - If you connect multiple...
... view to change the ID and password of SkyIPCam View. TIP To set ID and Password in turn. - Click SETTING > Account to the next camera. SCAN: When you will be asked to enter the required information to stop recording and save the files in the Time interval of SkyIPCam View... in the computer. Item Features The following describes the function of scanning, click SETTING > Other and then adjust the time from 1 to the previous camera. - Click again to return to start recording video clips using the media player on the main screen: „ CONTROLS Panel - If you connect multiple...

User Manual
Page 22
...132; SYSTEM Panel This panel displays the current date and time. „ PAN-TILT CONTROL Panel When you connect a pan/tilt camera, the system will detect the camera's function automatically and the PAN-TILT CONTROL buttons will become functional. TALK: Click to turn on -site sound and voice from ...the camera. Click the Home button ( ) to return the camera to stop recording and save the file in the computer. - This button is used to control the external device ...
...132; SYSTEM Panel This panel displays the current date and time. „ PAN-TILT CONTROL Panel When you connect a pan/tilt camera, the system will detect the camera's function automatically and the PAN-TILT CONTROL buttons will become functional. TALK: Click to turn on -site sound and voice from ...the camera. Click the Home button ( ) to return the camera to stop recording and save the file in the computer. - This button is used to control the external device ...

User Manual
Page 23
... display the Setting screen. 2. Click Add New Camera. 3. Camera List: This list displays the information of the selected camera, which can : - 22 - In the pop-up Add New Camera dialog window, you have saved two or more positions for the selected camera, click this button to control the camera swinging from one position to another position...
... display the Setting screen. 2. Click Add New Camera. 3. Camera List: This list displays the information of the selected camera, which can : - 22 - In the pop-up Add New Camera dialog window, you have saved two or more positions for the selected camera, click this button to control the camera swinging from one position to another position...

User Manual
Page 24
...to the Video View Window. Enter the User name and Password for the camera, and then click OK. Enter the camera's IP address (default: 192.168.1.240) and Port (default: 80), and then click Add Camera. 4. The video view of the camera's IP address. z Select the Search tab if you are not sure... of the selected camera will be displayed now. - 23 - The connected camera will be displayed in the list, select it and click Add...
...to the Video View Window. Enter the User name and Password for the camera, and then click OK. Enter the camera's IP address (default: 192.168.1.240) and Port (default: 80), and then click Add Camera. 4. The video view of the camera's IP address. z Select the Search tab if you are not sure... of the selected camera will be displayed now. - 23 - The connected camera will be displayed in the list, select it and click Add...

User Manual
Page 25
...schedule in the CONTROLS panel to record by motion detection When the motion detection function of the selected camera is to stop. z Trigger recording by motion detection. - 24 - To Remove a Camera 1. To Record Video SkyIPCam View provides three methods to record video clips: one is to launch the... Web browser that displays live view image and Web Configuration of the Camera Click SETTING > Camera List > Camera Configuration and then Link web page to record by the motion detected. the second is to click the RECORD/ALL RECORD ...
...schedule in the CONTROLS panel to record by motion detection When the motion detection function of the selected camera is to stop. z Trigger recording by motion detection. - 24 - To Remove a Camera 1. To Record Video SkyIPCam View provides three methods to record video clips: one is to launch the... Web browser that displays live view image and Web Configuration of the Camera Click SETTING > Camera List > Camera Configuration and then Link web page to record by the motion detected. the second is to click the RECORD/ALL RECORD ...

User Manual
Page 26
Click Apply to the list. Schedule Period: First, select the camera from the pull-down list. Then, click Add to set the Start/Stop date and time and then click OK to add the recording schedule to save the settings. - 25 - z Schedule recording This recording method will work after you have completed the required settings in Schedule Recording Configuration. The recording schedule can be defined by Schedule Period or Recording Time. -
Click Apply to the list. Schedule Period: First, select the camera from the pull-down list. Then, click Add to set the Start/Stop date and time and then click OK to add the recording schedule to save the settings. - 25 - z Schedule recording This recording method will work after you have completed the required settings in Schedule Recording Configuration. The recording schedule can be defined by Schedule Period or Recording Time. -

User Manual
Page 27
...select Recording time tab. z Recording File Path: To change the destination folder to clear the files when the unreserved space of each camera: This option allows you can check the available storage space that the video will be recorded as another file automatically when the recording file... reaches the specified size limit. z Enable Recycle Recording: Click on the hard disk drive for each camera. z Reserved HDD space for the recording of the hard disk drive is displayed in the HDD Free space field. Before setting the ...
...select Recording time tab. z Recording File Path: To change the destination folder to clear the files when the unreserved space of each camera: This option allows you can check the available storage space that the video will be recorded as another file automatically when the recording file... reaches the specified size limit. z Enable Recycle Recording: Click on the hard disk drive for each camera. z Reserved HDD space for the recording of the hard disk drive is displayed in the HDD Free space field. Before setting the ...

