User Manual
Page 2
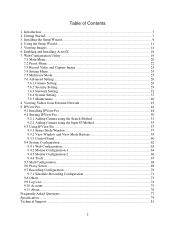
...20 7.2 Preset Menu ...22 7.3 Record Video and Capture Image 23 7.4 Setting Menu...24 7.5 Multiview Mode...25 7.6 Advanced Setting ...26 7.6.1 Camera Setting...26 7.6.2 Security Setting...29 7.6.3 Network Setting ...32 7.6.4 System Setting ...37 7.6.5 Maintenance...40 8. Introduction...3 2. IPView Pro...48 9.1 ...Installing IPView Pro...48 9.2 Starting IPView Pro ...50 9.2.1 Adding Camera using the Search Method 51 9.2.2 Adding Camera using the Input IP Method 55 9.3 Using IPView Pro ...57 9.3.1 Status Mode Window 57 9.3.2 View Window and...
...20 7.2 Preset Menu ...22 7.3 Record Video and Capture Image 23 7.4 Setting Menu...24 7.5 Multiview Mode...25 7.6 Advanced Setting ...26 7.6.1 Camera Setting...26 7.6.2 Security Setting...29 7.6.3 Network Setting ...32 7.6.4 System Setting ...37 7.6.5 Maintenance...40 8. Introduction...3 2. IPView Pro...48 9.1 ...Installing IPView Pro...48 9.2 Starting IPView Pro ...50 9.2.1 Adding Camera using the Search Method 51 9.2.2 Adding Camera using the Input IP Method 55 9.3 Using IPView Pro ...57 9.3.1 Status Mode Window 57 9.3.2 View Window and...
User Manual
Page 3
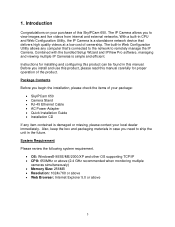
... videos at a low cost of the product. Combined with the bundled Setup Wizard and IPView Pro software, managing and viewing multiple IP Cameras is damaged or missing, please contact your purchase of this SkyIPCam 650. Package Contents Before you to ship the unit in this manual... • OS: Windows® 98SE/ME/2000/XP and other OS supporting TCP/IP • CPU: 650MHz or above (2.4 GHz recommended when monitoring multiple cameras simultaneously) • Memory Size: 256MB • Resolution: 1024x768 or above • Web Browser: Internet Explorer 5.0 or above 3 Before you need to view...
... videos at a low cost of the product. Combined with the bundled Setup Wizard and IPView Pro software, managing and viewing multiple IP Cameras is damaged or missing, please contact your purchase of this SkyIPCam 650. Package Contents Before you to ship the unit in this manual... • OS: Windows® 98SE/ME/2000/XP and other OS supporting TCP/IP • CPU: 650MHz or above (2.4 GHz recommended when monitoring multiple cameras simultaneously) • Memory Size: 256MB • Resolution: 1024x768 or above • Web Browser: Internet Explorer 5.0 or above 3 Before you need to view...

User Manual
Page 4
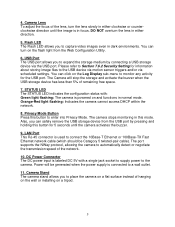
...In order to use this motion detection feature, you to enable the sensor from the LAN port. Green light flashing: The camera is powered on : The camera is sending/receiving data to record sound. 2. PIR Sensor The Passive Infrared Sensor (PIR) Sensor detects motion of each component...3. ACCESS LED The ACCESS LED indicates the system status with: Green light on . Orange light flashing slowly: The camera is in Omni-directional microphone allows the camera to /from the Web Configuration Utility. 4 Components Guide This section explains the function of an infrared emitting source which...
...In order to use this motion detection feature, you to enable the sensor from the LAN port. Green light flashing: The camera is powered on : The camera is sending/receiving data to record sound. 2. PIR Sensor The Passive Infrared Sensor (PIR) Sensor detects motion of each component...3. ACCESS LED The ACCESS LED indicates the system status with: Green light on . Orange light flashing slowly: The camera is in Omni-directional microphone allows the camera to /from the Web Configuration Utility. 4 Components Guide This section explains the function of an infrared emitting source which...
User Manual
Page 5
... you can safely remove the USB storage device from the Web Configuration Utility. 6. The port supports the NWay protocol, allowing the camera to the camera. DO NOT overturn the lens in dark environments. STATUS LED The STATUS LED indicates the configuration status with a single jack socket ... in normal mode. LAN Port This RJ-45 connector is connected to monitor any activity for 5 seconds until the camera activates the buzzer. 9. Camera Stand The camera stand allows you to connect the 10Base-T Ethernet or 100Base-TX Fast Ethernet network cable (which should be generated when...
... you can safely remove the USB storage device from the Web Configuration Utility. 6. The port supports the NWay protocol, allowing the camera to the camera. DO NOT overturn the lens in dark environments. STATUS LED The STATUS LED indicates the configuration status with a single jack socket ... in normal mode. LAN Port This RJ-45 connector is connected to monitor any activity for 5 seconds until the camera activates the buzzer. 9. Camera Stand The camera stand allows you to connect the 10Base-T Ethernet or 100Base-TX Fast Ethernet network cable (which should be generated when...

User Manual
Page 6
Alternatively, you to reboot the camera. Press and hold the button for 5 seconds will reset the camera' settings to a stand or tripod. 2. Screw Hole The screw hole is used to attach the camera to the factory default. Hanging Hole These two holes allow you can perform reboot or factory reset from the Web Configuration Utility. 3. Rear and Bottom View 1. Reset Button Press the button to hang the camera on a wall. 6
Alternatively, you to reboot the camera. Press and hold the button for 5 seconds will reset the camera' settings to a stand or tripod. 2. Screw Hole The screw hole is used to attach the camera to the factory default. Hanging Hole These two holes allow you can perform reboot or factory reset from the Web Configuration Utility. 3. Rear and Bottom View 1. Reset Button Press the button to hang the camera on a wall. 6

User Manual
Page 7
... to protect the IP Camera. Then, secure the camera stand with the bottom part of the IP Camera. Getting Started Note: Before using the Setup Wizard. Connect the IP Camera to perform the following tasks: 1. Step 1 Align the camera stand with the screw. 7 2. Configure the IP Camera using the IP Camera, you'll need to... your network. 2. Direct exposure to sunlight may cause permanent damage to ensure proper setup of the camera. Please follow the steps in extremely bright environment, an iris lens or sun visor is designed for indoor use only. When operating in this...
... to protect the IP Camera. Then, secure the camera stand with the bottom part of the IP Camera. Getting Started Note: Before using the Setup Wizard. Connect the IP Camera to perform the following tasks: 1. Step 1 Align the camera stand with the screw. 7 2. Configure the IP Camera using the IP Camera, you'll need to... your network. 2. Direct exposure to sunlight may cause permanent damage to ensure proper setup of the camera. Please follow the steps in extremely bright environment, an iris lens or sun visor is designed for indoor use only. When operating in this...

User Manual
Page 8
If not, verify that the LED lights on the IP Camera by connecting one of the LAN ports of the Camera and connecting the other end to the power jack of the router or switch. Step 4 Verify that all the connections are lit. Step 2 Connect one end of the network cable to the IP Camera and connect the other end to one end of the supplied power adapter to an electrical outlet. Step 3 Power on the Camera are secure and try again. 8
If not, verify that the LED lights on the IP Camera by connecting one of the LAN ports of the Camera and connecting the other end to the power jack of the router or switch. Step 4 Verify that all the connections are lit. Step 2 Connect one end of the network cable to the IP Camera and connect the other end to one end of the supplied power adapter to an electrical outlet. Step 3 Power on the Camera are secure and try again. 8

User Manual
Page 11
Using the Setup Wizard Step 1 Go to configure from the list and click on the Wizard button. 11 Step 2 Select the IP Camera you want to Start > (All) Programs > AirLink101 IP Camera Setup Wizard > AirLink101 IP Camera Setup Wizard. 4.
Using the Setup Wizard Step 1 Go to configure from the list and click on the Wizard button. 11 Step 2 Select the IP Camera you want to Start > (All) Programs > AirLink101 IP Camera Setup Wizard > AirLink101 IP Camera Setup Wizard. 4.
User Manual
Page 12
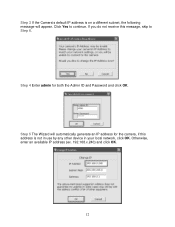
Step 4 Enter admin for the camera, if this message, skip to continue. Step 5 The Wizard will appear. Click Yes to Step 6. Otherwise, enter an available IP address (ex. 192.168.x.240) and click OK. 12 Step 3 If the Camera's default IP address is not in use by any other device in your local network, click OK. If you do not receive this address is on a different subnet, the following message will automatically generate an IP address for both the Admin ID and Password and click OK.
Step 4 Enter admin for the camera, if this message, skip to continue. Step 5 The Wizard will appear. Click Yes to Step 6. Otherwise, enter an available IP address (ex. 192.168.x.240) and click OK. 12 Step 3 If the Camera's default IP address is not in use by any other device in your local network, click OK. If you do not receive this address is on a different subnet, the following message will automatically generate an IP address for both the Admin ID and Password and click OK.
User Manual
Page 13
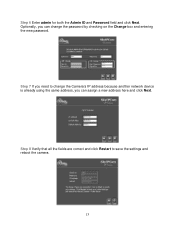
Step 6 Enter admin for both the Admin ID and Password field and click Next. Optionally, you can change the Camera's IP address because another network device is already using the same address, you need to save the settings and reboot the camera. 13 Step 7 If you can assign a new address here and click Next. Step 8 Verify that all the fields are correct and click Restart to change the password by checking on the Change box and entering the new password.
Step 6 Enter admin for both the Admin ID and Password field and click Next. Optionally, you can change the Camera's IP address because another network device is already using the same address, you need to save the settings and reboot the camera. 13 Step 7 If you can assign a new address here and click Next. Step 8 Verify that all the fields are correct and click Restart to change the password by checking on the Change box and entering the new password.
User Manual
Page 14
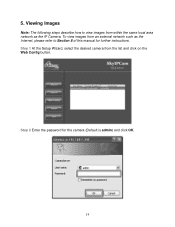
Viewing Images Note: The following steps describe how to Section 8 of this manual for the camera (Default is admin) and click OK. 14 Step 2 Enter the password for further instructions. Step 1 At the Setup Wizard, select the desired camera from within the same local area network as the Internet, please refer to view images from the list and click on the Web Config button. 5. To view images from an external network such as the IP Camera.
Viewing Images Note: The following steps describe how to Section 8 of this manual for the camera (Default is admin) and click OK. 14 Step 2 Enter the password for further instructions. Step 1 At the Setup Wizard, select the desired camera from within the same local area network as the Internet, please refer to view images from the list and click on the Web Config button. 5. To view images from an external network such as the IP Camera.

User Manual
Page 15
For more information, please refer to do so before you will be installed and enabled on screen. Note: ActiveX must be prompted to the next section. 15 Step 3 The welcome page appears. Step 4 The Main menu along with the live videos. The IP camera is ready for use now. If you did not change the default password, you can view the live video appears on your Web Browser (Internet Explorer) before accessing the camera.
For more information, please refer to do so before you will be installed and enabled on screen. Note: ActiveX must be prompted to the next section. 15 Step 3 The welcome page appears. Step 4 The Main menu along with the live videos. The IP camera is ready for use now. If you did not change the default password, you can view the live video appears on your Web Browser (Internet Explorer) before accessing the camera.
User Manual
Page 19
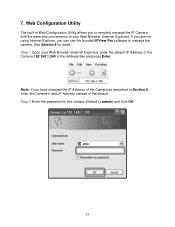
...Note: If you have changed the IP Address of your Web Browser (Internet Explorer), enter the default IP Address of the Camera 192.168.1.240 in Section 5, enter the Camera's new IP Address instead of the default. Web Configuration Utility The built-in Web Configuration Utility allows you can use the... bundled IPView Pro software to remotely manage the IP Camera with the ease and convenience of the Camera as described in the Address Bar and press Enter. If you are not using Internet Explorer, you to manage the...
...Note: If you have changed the IP Address of your Web Browser (Internet Explorer), enter the default IP Address of the Camera 192.168.1.240 in Section 5, enter the Camera's new IP Address instead of the default. Web Configuration Utility The built-in Web Configuration Utility allows you can use the... bundled IPView Pro software to remotely manage the IP Camera with the ease and convenience of the Camera as described in the Address Bar and press Enter. If you are not using Internet Explorer, you to manage the...

User Manual
Page 21
..., Alarm, Bi-Bo-Bi-Bo, or Robot according to the selected sound in the area of the live video to change the position of the camera. In low light environment, click the Flash LED button ( ) to test the internal buzzer of the Web Configuration Utility. Privacy Mode On/Off Click... on the Privacy mode button ( ) to monitor the target area dynamically. Additionally, you can use the Buzzer button ( ) to turn on /off the camera's motion detection feature which allows you to the original home position. PIR Sensor On/Off The Sensor button ( ) turns on the flash light of the...
..., Alarm, Bi-Bo-Bi-Bo, or Robot according to the selected sound in the area of the live video to change the position of the camera. In low light environment, click the Flash LED button ( ) to test the internal buzzer of the Web Configuration Utility. Privacy Mode On/Off Click... on the Privacy mode button ( ) to monitor the target area dynamically. Additionally, you can use the Buzzer button ( ) to turn on /off the camera's motion detection feature which allows you to the original home position. PIR Sensor On/Off The Sensor button ( ) turns on the flash light of the...

User Manual
Page 22
This enables you have assigned the position for the camera from the pull-down list, then click the Register button. When you to move the camera lens to 8 positions for the camera, simply click the Number button (1~8) and the camera lens will move to the desired position quickly. To identify the assigned... position easily, you can preset up the position, move the camera lens to the pre-defined position immediately. 22 7.2 Preset Menu You can name the position by entering a descriptive name in the Register ...
This enables you have assigned the position for the camera from the pull-down list, then click the Register button. When you to move the camera lens to 8 positions for the camera, simply click the Number button (1~8) and the camera lens will move to the desired position quickly. To identify the assigned... position easily, you can preset up the position, move the camera lens to the pre-defined position immediately. 22 7.2 Preset Menu You can name the position by entering a descriptive name in the Register ...

User Manual
Page 24
7.4 Setting Menu The Setting menu contains the basic camera settings. Click on the Setting Menu bar to Multiview Mode. Quality: You can set the image quality by selecting 176x144, 320x240, or 640x480. Advanced Setting: ... resolution by selecting Low, Med, or High. Vertical degree(s): Allows you to change the moving range (1°~10°) when you to enable/disable the camera's microphone. Horizontal degree(s): Allows you tilt the camera lens position. Voice: Select On/Off to change the moving range (1°~10°) when you pan the...
7.4 Setting Menu The Setting menu contains the basic camera settings. Click on the Setting Menu bar to Multiview Mode. Quality: You can set the image quality by selecting 176x144, 320x240, or 640x480. Advanced Setting: ... resolution by selecting Low, Med, or High. Vertical degree(s): Allows you to change the moving range (1°~10°) when you to enable/disable the camera's microphone. Horizontal degree(s): Allows you tilt the camera lens position. Voice: Select On/Off to change the moving range (1°~10°) when you pan the...

User Manual
Page 25
Click the Multiview Mode button in the Setting menu to change to the Home page, click Back. 25 To return to the following multiview screen. You can monitor the videos of these cameras simultaneously by switching to Multiview Mode. 7.5 Multiview Mode If you have multiple cameras connected to your network, you can select the refresh interval from the Refresh interval drop-down list. To add an additional camera, enter the new camera's IP address and click Register.
Click the Multiview Mode button in the Setting menu to change to the Home page, click Back. 25 To return to the following multiview screen. You can monitor the videos of these cameras simultaneously by switching to Multiview Mode. 7.5 Multiview Mode If you have multiple cameras connected to your network, you can select the refresh interval from the Refresh interval drop-down list. To add an additional camera, enter the new camera's IP address and click Register.

User Manual
Page 26
...to 12. 26 Quality: Select the desired image quality from three formats: 176x144, 320x240, and 640x480. Camera Setting Camera name: Assign a descriptive name for the camera. Brightness: Adjust the brightness level ranging from 1 to 128. Contrast: Adjust the contrast level ranging ... Advanced Setting The Advanced Setting allows you to configure various settings of the camera, including Camera setting, Security setting, Network setting, System setting, and Maintenance. 7.6.1 Camera Setting The Camera setting provides three sub-menus: Camera setting, Date/Time setting, and Buzzer setting.
...to 12. 26 Quality: Select the desired image quality from three formats: 176x144, 320x240, and 640x480. Camera Setting Camera name: Assign a descriptive name for the camera. Brightness: Adjust the brightness level ranging from 1 to 128. Contrast: Adjust the contrast level ranging ... Advanced Setting The Advanced Setting allows you to configure various settings of the camera, including Camera setting, Security setting, Network setting, System setting, and Maintenance. 7.6.1 Camera Setting The Camera setting provides three sub-menus: Camera setting, Date/Time setting, and Buzzer setting.
User Manual
Page 27
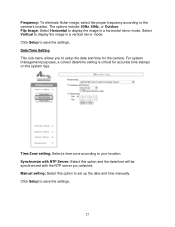
...time stamps on the system logs. Click Setup to your location. For system management purposes, a correct date/time setting is critical for the camera. Manual setting: Select this option and the date/time will be synchronized with the NTP server you to set up the date and time... manually. Frequency: To eliminate flicker image, select the proper frequency according to save the settings. 27 Click Setup to the camera's location. Select Vertical to display the image in a vertical mirror mode. The options include: 50Hz, 60Hz, or Outdoor. Date/Time Setting This ...
...time stamps on the system logs. Click Setup to your location. For system management purposes, a correct date/time setting is critical for the camera. Manual setting: Select this option and the date/time will be synchronized with the NTP server you to set up the date and time... manually. Frequency: To eliminate flicker image, select the proper frequency according to save the settings. 27 Click Setup to the camera's location. Select Vertical to display the image in a vertical mirror mode. The options include: 50Hz, 60Hz, or Outdoor. Date/Time Setting This ...

User Manual
Page 28
The available buzzer sound include: Bi-Bi, Bi, Alarm, Bi-Bo-Bi-Bo, and Robot. Buzzer Setting If you enabled the camera's buzzer feature, you can setup the buzzer type for the following action: System start, Motion detected, Scheduled operation, and Buzzer button pressed. Click Setup to save the settings. 28
The available buzzer sound include: Bi-Bi, Bi, Alarm, Bi-Bo-Bi-Bo, and Robot. Buzzer Setting If you enabled the camera's buzzer feature, you can setup the buzzer type for the following action: System start, Motion detected, Scheduled operation, and Buzzer button pressed. Click Setup to save the settings. 28


