User Manual
Page 3
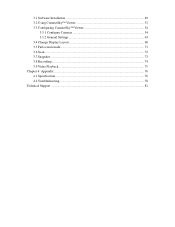
3.1 Software Installation 49 3.2 Using ConnectSky™ Viewer 51 3.3 Configuring ConnectSky™ Viewer 54 3.3.1 Configure Cameras 54 3.3.2 General Settings 63 3.4 Change Display Layout 68 3.5 Full-screen mode 71 3.6 Scan...72 3.7 Snapshot...73 3.8 Recording ...74 3.9 Video Playback...75 Chapter 4: Appendix ...76 4.1 Specification...76 4.2 Troubleshooting...78 Technical Support ...81
3.1 Software Installation 49 3.2 Using ConnectSky™ Viewer 51 3.3 Configuring ConnectSky™ Viewer 54 3.3.1 Configure Cameras 54 3.3.2 General Settings 63 3.4 Change Display Layout 68 3.5 Full-screen mode 71 3.6 Scan...72 3.7 Snapshot...73 3.8 Recording ...74 3.9 Video Playback...75 Chapter 4: Appendix ...76 4.1 Specification...76 4.2 Troubleshooting...78 Technical Support ...81
User Manual
Page 5
... package, and you don't have problem installing a new cable from anywhere in the world where Internet access is transmitted over the air is , you to this network camera supports data encryption (WEP & WPA), which video will provide ultimate data security level. This network camera AIC600W is installed to Internet, you can link to setup wireless security in next section! Once this camera is connected to your monitoring computer, don't worry! Worry...
... package, and you don't have problem installing a new cable from anywhere in the world where Internet access is transmitted over the air is , you to this network camera supports data encryption (WEP & WPA), which video will provide ultimate data security level. This network camera AIC600W is installed to Internet, you can link to setup wireless security in next section! Once this camera is connected to your monitoring computer, don't worry! Worry...
User Manual
Page 6
... set different password to least sensitive). • Built-in real-time clock, date and time information will discover this IP camera in network neighbor automatically. • Send captured picture by Email or FTP when motion is a browser like Internet Explorer 6 (and above ) will be recorded with a fixed Internet address). • Supports UPnP, Windows XP (and above , with plugin installed). • Supports VGA (640 x 480), QVGA (320 x 240), and QQVGA (160 x 120) video resolution. • Supports...
... set different password to least sensitive). • Built-in real-time clock, date and time information will discover this IP camera in network neighbor automatically. • Send captured picture by Email or FTP when motion is a browser like Internet Explorer 6 (and above ) will be recorded with a fixed Internet address). • Supports UPnP, Windows XP (and above , with plugin installed). • Supports VGA (640 x 480), QVGA (320 x 240), and QQVGA (160 x 120) video resolution. • Supports...
User Manual
Page 8
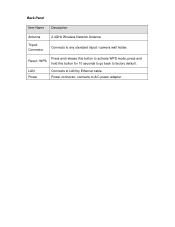
LAN Power Connects to A/C power adapter. press and Reset / WPS hold this button to activate WPS mode; Press and release this button for 10 seconds to go back to any standard tripod / camera wall holder. Power connector, connects to LAN by Ethernet cable. Back Panel Item Name Description Antenna 2.4GHz Wireless Network Antenna Tripod Connector Connects to factory default.
LAN Power Connects to A/C power adapter. press and Reset / WPS hold this button to activate WPS mode; Press and release this button for 10 seconds to go back to any standard tripod / camera wall holder. Power connector, connects to LAN by Ethernet cable. Back Panel Item Name Description Antenna 2.4GHz Wireless Network Antenna Tripod Connector Connects to factory default.
User Manual
Page 12
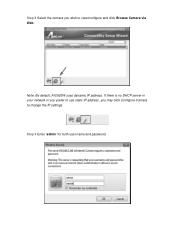
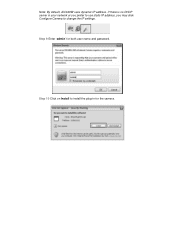
If there is no DHCP server in your network or you prefer to use static IP address, you wish to change the IP settings. Note: By default, AIC600W uses dynamic IP address. Step 9 Enter 'admin' for both user name and password. Step 8 Select the camera you may click Configure Camera to view/configure and click Browse Camera via Web.
If there is no DHCP server in your network or you prefer to use static IP address, you wish to change the IP settings. Note: By default, AIC600W uses dynamic IP address. Step 9 Enter 'admin' for both user name and password. Step 8 Select the camera you may click Configure Camera to view/configure and click Browse Camera via Web.

User Manual
Page 14
... to configure the wireless settings. If you did Step 2A, your camera has connected to you wireless network already, and you wish to connect to 2) enter the wireless Key below : 1) Select the wireless network you do not need any further configuration to start using your wireless network is now complete. Step 13 Click on WLAN on the top menu bar to the desired location. You can disconnect the Ethernet...
... to configure the wireless settings. If you did Step 2A, your camera has connected to you wireless network already, and you wish to connect to 2) enter the wireless Key below : 1) Select the wireless network you do not need any further configuration to start using your wireless network is now complete. Step 13 Click on WLAN on the top menu bar to the desired location. You can disconnect the Ethernet...

User Manual
Page 16
The descriptions of zoom from 100% (no magnification) to 400%. Start video recording and save the picture to save snapshot file. Click on directory display and you wish captured image to your computer's hard drive. To resume, double-click the image. MPEG4 mode also supports motion detection (see chapter 2.2.1). Click this button and the image captured by mouse and put it on the area you 'll be prompted to select...
The descriptions of zoom from 100% (no magnification) to 400%. Start video recording and save the picture to save snapshot file. Click on directory display and you wish captured image to your computer's hard drive. To resume, double-click the image. MPEG4 mode also supports motion detection (see chapter 2.2.1). Click this button and the image captured by mouse and put it on the area you 'll be prompted to select...

User Manual
Page 19
... to view video from DHCP server automatically (i.e. AV Control Port HTTP Port This field is unreachable, IP camera will be able to add ':port' after the IP address / hostname of the local network here. Select 'DHCP' to obtain IP address automatically or 'Static IP Address' to save settings and make the new settings take effect. Specify the port number of Internet explorer. The descriptions of DNS server here. Specify the IP address of every setting...
... to view video from DHCP server automatically (i.e. AV Control Port HTTP Port This field is unreachable, IP camera will be able to add ':port' after the IP address / hostname of the local network here. Select 'DHCP' to obtain IP address automatically or 'Static IP Address' to save settings and make the new settings take effect. Specify the port number of Internet explorer. The descriptions of DNS server here. Specify the IP address of every setting...

User Manual
Page 26
... Configure via PinCode Wireless Connection Network Type You can discover this IP camera. The descriptions of every setting in IP camera will be lost! If the wireless AP already generates a 8-digit code, please input the code here and click 'Start PIN' button to 'Infrastructure' when you have wireless access point, and you may have computers with wired network connection. This code changes every time you wish to connect supports push button WPS configuration, click 'Start...
... Configure via PinCode Wireless Connection Network Type You can discover this IP camera. The descriptions of every setting in IP camera will be lost! If the wireless AP already generates a 8-digit code, please input the code here and click 'Start PIN' button to 'Infrastructure' when you have wireless access point, and you may have computers with wired network connection. This code changes every time you wish to connect supports push button WPS configuration, click 'Start...
User Manual
Page 43
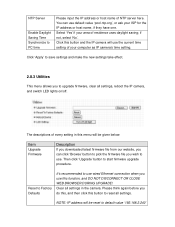
...' Reset to Factory Defaults It's recommended to use wired Ethernet connection when you wish to use the current time setting of every setting in the camera. Clear all settings. Then click 'Upgrade' button to reset all settings in this button and the IP camera will be given below: Item Upgrade Firmware Description If you downloaded latest firmware file from our website, you can use this button to start firmware upgrade procedure. if not, select 'No'. Click 'Apply' to save settings...
...' Reset to Factory Defaults It's recommended to use wired Ethernet connection when you wish to use the current time setting of every setting in the camera. Clear all settings. Then click 'Upgrade' button to reset all settings in this button and the IP camera will be given below: Item Upgrade Firmware Description If you downloaded latest firmware file from our website, you can use this button to start firmware upgrade procedure. if not, select 'No'. Click 'Apply' to save settings...
User Manual
Page 46
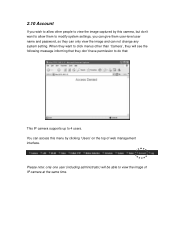
You can not change any system setting. When they want to allow other than 'Camera', they will be able to view the image of web management interface. 2.10 Account If you can give them to modify system settings, you wish to allow them user-level user name and password, so they can only view the image and can access this menu by this camera, but...
You can not change any system setting. When they want to allow other than 'Camera', they will be able to view the image of web management interface. 2.10 Account If you can give them to modify system settings, you wish to allow them user-level user name and password, so they can only view the image and can access this menu by this camera, but...
User Manual
Page 47
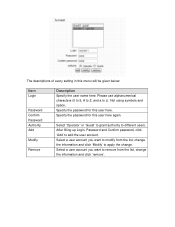
... and space. The descriptions of every setting in this user here again. Specify the password for this user here. Select a user account you want to modify from the list, change . After filling up Login, Password and Confirm password, click 'Add' to different users. Select 'Operator' or 'Guest' to grant authority to add the user account. Please use alphanumerical characters (0 to 9, A to Z, and a to apply the...
... and space. The descriptions of every setting in this user here again. Specify the password for this user here. Select a user account you want to modify from the list, change . After filling up Login, Password and Confirm password, click 'Add' to different users. Select 'Operator' or 'Guest' to grant authority to add the user account. Please use alphanumerical characters (0 to 9, A to Z, and a to apply the...
User Manual
Page 52
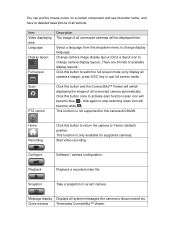
... blue ), click again to change display language. Close window Terminates ConnectSky™ Viewer. Select a language from this camera AIC600W. Change camera image display layout (Click a layout icon to stop scanning (scan icon will be displayed here. This function is not supported for supported cameras. Start video recording. Playback Playback a recorded video file. Click this button to return the camera to change camera display layout). Snapshot Take a snapshot of all connected cameras will become white ). You...
... blue ), click again to change display language. Close window Terminates ConnectSky™ Viewer. Select a language from this camera AIC600W. Change camera image display layout (Click a layout icon to stop scanning (scan icon will be displayed here. This function is not supported for supported cameras. Start video recording. Playback Playback a recorded video file. Click this button to return the camera to change camera display layout). Snapshot Take a snapshot of all connected cameras will become white ). You...
User Manual
Page 56
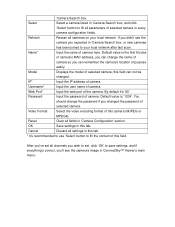
... camera's MAC address, you can change the password if you 've set , click 'OK' to your local network. If you expected in this field. Password Input the password of camera. OK Save settings in 'Camera Search' box, or new cameras has been joined to save settings, and if everything's correct, you'll see the camera you didn't see the camera's image in 'Camera Configuration' section. Username* Input the user name of purpose easily. Video...
... camera's MAC address, you can change the password if you 've set , click 'OK' to your local network. If you expected in this field. Password Input the password of camera. OK Save settings in 'Camera Search' box, or new cameras has been joined to save settings, and if everything's correct, you'll see the camera you didn't see the camera's image in 'Camera Configuration' section. Username* Input the user name of purpose easily. Video...

User Manual
Page 61
... not waste extra hard disk space on storing images you don't need to know may need to pay attention to trigger the camera and the camera will not start recording. WARNING: For applications that camera will record when a motion has been detected from dropdown menu in seconds. Here are the descriptions of all setting items: Item Channel Enable Disable Recording Time Description Select the channel number you wish...
... not waste extra hard disk space on storing images you don't need to know may need to pay attention to trigger the camera and the camera will not start recording. WARNING: For applications that camera will record when a motion has been detected from dropdown menu in seconds. Here are the descriptions of all setting items: Item Channel Enable Disable Recording Time Description Select the channel number you wish...

User Manual
Page 76
...-Based Image Compression Utility: Includes easy-to 16 at a time Supports four additional user accounts for viewing camera Manual / Schedule / Cycle Recording Auto sending video by E-mail and FTP Supports Windows XP/Vista/Win7 Firmware upgradeable Hardware Specifications: Image Sensor Sensor : 0.3Mega pixel CMOS sensor Sensor Resolution : 640 x 480 pixel Lens Fixed Focus View Angle (Diagonal) : 60 degree Video Compression : MPEG4 & MJPEG Image Resolution and Frame Rate: - Up to -use 16 channel Viewer & Recorder utility Provide Admin utility, Camera Viewer & WEB browser management View multiple...
...-Based Image Compression Utility: Includes easy-to 16 at a time Supports four additional user accounts for viewing camera Manual / Schedule / Cycle Recording Auto sending video by E-mail and FTP Supports Windows XP/Vista/Win7 Firmware upgradeable Hardware Specifications: Image Sensor Sensor : 0.3Mega pixel CMOS sensor Sensor Resolution : 640 x 480 pixel Lens Fixed Focus View Angle (Diagonal) : 60 degree Video Compression : MPEG4 & MJPEG Image Resolution and Frame Rate: - Up to -use 16 channel Viewer & Recorder utility Provide Admin utility, Camera Viewer & WEB browser management View multiple...

User Manual
Page 77
Communication Wireless: IEEE802.11b / g / n, data rate up to 150Mbps* Wireless Security: WPA2, WPA, WEP Ethernet: 1x 10/100Mbps RJ-45 Interface & Buttons DC Power Connector Ethernet Cable Connector Reset / WPS Button LED Power / WPS Link Power Adapter DC 5V / 1A Software Requirements OS: Windows XP/Vista/7 Browser : Internet Explorer 6 SP1 or above Operating Environment Temperature : 0°C ~ 40°C Humidity : 10% ~ 90% non-condensing Safety Approval FCC and CE
Communication Wireless: IEEE802.11b / g / n, data rate up to 150Mbps* Wireless Security: WPA2, WPA, WEP Ethernet: 1x 10/100Mbps RJ-45 Interface & Buttons DC Power Connector Ethernet Cable Connector Reset / WPS Button LED Power / WPS Link Power Adapter DC 5V / 1A Software Requirements OS: Windows XP/Vista/7 Browser : Internet Explorer 6 SP1 or above Operating Environment Temperature : 0°C ~ 40°C Humidity : 10% ~ 90% non-condensing Safety Approval FCC and CE
Quick Installation Guide
Page 7
Note: By default, AIC600W uses dynamic IP address. If there is no DHCP server in your network or you prefer to use static IP address, you may click Configure Camera to install the plug-in for both user name and password. Step 10 Click on Install to change the IP settings. Step 9 Enter 'admin' for the camera.
Note: By default, AIC600W uses dynamic IP address. If there is no DHCP server in your network or you prefer to use static IP address, you may click Configure Camera to install the plug-in for both user name and password. Step 10 Click on Install to change the IP settings. Step 9 Enter 'admin' for the camera.

Quick Installation Guide
Page 8
If you did Step 2A, your camera has connected to you wireless network already, and you did Step 2B, please continue the following steps to start using your camera. Step 12 You should now be able to view the camera image. Step 11 Click on the white box to install ActiveX control in order to view the image. If you do not need any further configuration to configure the wireless settings.
If you did Step 2A, your camera has connected to you wireless network already, and you did Step 2B, please continue the following steps to start using your camera. Step 12 You should now be able to view the camera image. Step 11 Click on the white box to install ActiveX control in order to view the image. If you do not need any further configuration to configure the wireless settings.
Quick Installation Guide
Page 10
... is now complete. You can monitor up to change without notice. Section 3 Technical Support E-mail: support@airlink101.com Toll Free: 1-888-746-3238 Website: www.airlink101.com *Theoretical maximum wireless signal rate derived from the camera and move it to the User's Manual for detailed instructions. The configuration is not guaranteed. Congratulations! Compatibility with the bundled software "ConnectSky™ Viewer" installed on your computer.
... is now complete. You can monitor up to change without notice. Section 3 Technical Support E-mail: support@airlink101.com Toll Free: 1-888-746-3238 Website: www.airlink101.com *Theoretical maximum wireless signal rate derived from the camera and move it to the User's Manual for detailed instructions. The configuration is not guaranteed. Congratulations! Compatibility with the bundled software "ConnectSky™ Viewer" installed on your computer.

