Acer X203H Service Guide
Page 5
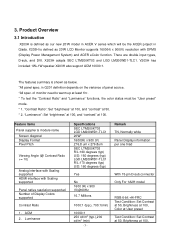
...10) Analog interface with Scaling supported HDMI interface with DPMS (Display Power Management System) and ACER eColor function. ACM 2. X203H adopts SEC LTM200KT03 and LGD LM200WD1-TLC1. X203H is defined as 20'W LCD Monitor supports 1600(H) x 900(V) resolution with Scaling supported ...The features summary is defined as below, *All panel spec. Product Overview 3.1 Introduction X203H is shown as our new 20'W model in ACER V series which will be "User preset" mode. * 1. "Contrast Ratio": Set "brightness" at 100, and "contrast" at 100, Luminance Specifications SEC LTM200KT03 LGD ...
...10) Analog interface with Scaling supported HDMI interface with DPMS (Display Power Management System) and ACER eColor function. ACM 2. X203H adopts SEC LTM200KT03 and LGD LM200WD1-TLC1. X203H is defined as 20'W LCD Monitor supports 1600(H) x 900(V) resolution with Scaling supported ...The features summary is defined as below, *All panel spec. Product Overview 3.1 Introduction X203H is shown as our new 20'W model in ACER V series which will be "User preset" mode. * 1. "Contrast Ratio": Set "brightness" at 100, and "contrast" at 100, Luminance Specifications SEC LTM200KT03 LGD ...
Acer X203H Service Guide
Page 10
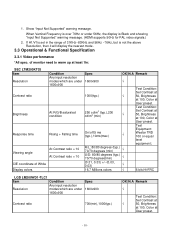
... 56Hz ~76Hz, but is over 76Hz or under 1600x900 Spec 1600x900 Contrast ratio 700(min),1000(typ.) OK N.A Remark √ Test Condition: Set Contrast at √ 50, Brightness at 100, Color at User preset. Test Equipment: Westar TRD 100 or equal level equipment ; 6 bit...; U/D: 80/80 degrees (typ.) 70/70 degrees(min) √ (0.31, 0.33) +/- (0.03, 0.03) √ 16.7 Millions colors √ Test Condition: Set Contrast at 50, Brightness at 100, Color at least 1hr. Show "Input Not Supported" warning message. 1. When Vertical Frequency is not the above Resolution, then...
... 56Hz ~76Hz, but is over 76Hz or under 1600x900 Spec 1600x900 Contrast ratio 700(min),1000(typ.) OK N.A Remark √ Test Condition: Set Contrast at √ 50, Brightness at 100, Color at User preset. Test Equipment: Westar TRD 100 or equal level equipment ; 6 bit...; U/D: 80/80 degrees (typ.) 70/70 degrees(min) √ (0.31, 0.33) +/- (0.03, 0.03) √ 16.7 Millions colors √ Test Condition: Set Contrast at 50, Brightness at 100, Color at least 1hr. Show "Input Not Supported" warning message. 1. When Vertical Frequency is not the above Resolution, then...
Acer X203H Service Guide
Page 11
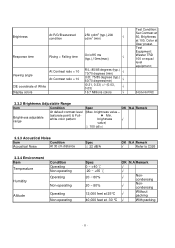
....) 70/70 degrees (min) √ U/D: 75/85 degrees (typ.) 60/70 degrees(min) √ (0.31, 0.33) +/- (0.03, 0.03) √ 16.7 Millions colors √ Test Condition: Set Contrast at 50, Brightness at 100, Color at -30 °C OK N.A Remark √ √ √ Noncondensing √ Noncondensing √ Without packing √ With packing - 11...
....) 70/70 degrees (min) √ U/D: 75/85 degrees (typ.) 60/70 degrees(min) √ (0.31, 0.33) +/- (0.03, 0.03) √ 16.7 Millions colors √ Test Condition: Set Contrast at 50, Brightness at 100, Color at -30 °C OK N.A Remark √ √ √ Noncondensing √ Noncondensing √ Without packing √ With packing - 11...
Acer X203H Service Guide
Page 18
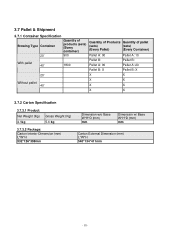
3.7 Pallet & Shipment 3.7.1 Container Specification Stowing Type Container 20' Quantity of products (sets) (Every container) 900 Quantity of Products Quantity of pallet (sets) (sets) (Every Pallet) (Every Container) Pallet A: 90 Pallet A: 10 With pallet 40' 1800 Pallet B: Pallet A: 90 Pallet B: Pallet A: 20 Pallet B: X Pallet B: X 20' X X Without pallet 40' X X X X X X 3.7.2 Carton ...
3.7 Pallet & Shipment 3.7.1 Container Specification Stowing Type Container 20' Quantity of products (sets) (Every container) 900 Quantity of Products Quantity of pallet (sets) (sets) (Every Pallet) (Every Container) Pallet A: 90 Pallet A: 10 With pallet 40' 1800 Pallet B: Pallet A: 90 Pallet B: Pallet A: 20 Pallet B: X Pallet B: X 20' X X Without pallet 40' X X X X X X 3.7.2 Carton ...

Acer X203H Service Guide
Page 34
... function adjustment) 5.1.1 Preparation 1.Setup input timing to any preset modes or patterns. 2.Enter factory mode (press "Empowering" & "Power" buttons at least 30 minutes. 5.1.2. Check the settings to enable burn-in Mode" tag and select "On" to following values: Contrast = 50 Brightness = 85 Color = Warm Language = English Then, turn on monitor). 3.Move... up at the same time to turn off the monitor, remove the input source and then power on power enter user area. - 34 - Enter factory setting area (press "Empowering" and then press "SOFTPOWER"). 2.
... function adjustment) 5.1.1 Preparation 1.Setup input timing to any preset modes or patterns. 2.Enter factory mode (press "Empowering" & "Power" buttons at least 30 minutes. 5.1.2. Check the settings to enable burn-in Mode" tag and select "On" to following values: Contrast = 50 Brightness = 85 Color = Warm Language = English Then, turn on monitor). 3.Move... up at the same time to turn off the monitor, remove the input source and then power on power enter user area. - 34 - Enter factory setting area (press "Empowering" and then press "SOFTPOWER"). 2.
Acer X203H Service Guide
Page 38
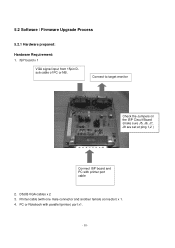
ISP board x 1 VGA signal input from 15pin Dsub cable of PC or NB. DSUB VGA cables x 2 3. PC or Notebook with printer port cable 2. Connect to target monitor Check the Jumpers on the ISP Circuit Board (make sure J5, J6, J7, J8 are set at ping 1,2 ) Connect ISP board and PC with parallel (printer) port x1. - 38 - 5.2 Software / Firmware Upgrade Process 5.2.1 Hardware prepared: Hardware Requirement: 1. Printer cable (with one male connector and another female connector) x 1. 4.
ISP board x 1 VGA signal input from 15pin Dsub cable of PC or NB. DSUB VGA cables x 2 3. PC or Notebook with printer port cable 2. Connect to target monitor Check the Jumpers on the ISP Circuit Board (make sure J5, J6, J7, J8 are set at ping 1,2 ) Connect ISP board and PC with parallel (printer) port x1. - 38 - 5.2 Software / Firmware Upgrade Process 5.2.1 Hardware prepared: Hardware Requirement: 1. Printer cable (with one male connector and another female connector) x 1. 4.

Acer X203H Service Guide
Page 59
...filter Inverter circuit PWM contrller Switching element Feedback Isolation Fig.1 - 59 - capable of this interface board, just like the OSD display setting, the adjustable items, adjusted data storage, the external IIC communication, support DDC2Bi. . 4.) EEPROM: We use 24C016 to store all the adjustable ..." key: to select next and to decrease adjustment (4) "Auto" key: to perform auto adjustment and Exit key (5) "Empowering": to Open the Acer eColor Management OSD and access the scenario modes (6) "Power" key: to turn/off (Power Saving). Rectifier and filter Audio circuit LDO regulator It ...
...filter Inverter circuit PWM contrller Switching element Feedback Isolation Fig.1 - 59 - capable of this interface board, just like the OSD display setting, the adjustable items, adjusted data storage, the external IIC communication, support DDC2Bi. . 4.) EEPROM: We use 24C016 to store all the adjustable ..." key: to select next and to decrease adjustment (4) "Auto" key: to perform auto adjustment and Exit key (5) "Empowering": to Open the Acer eColor Management OSD and access the scenario modes (6) "Power" key: to turn/off (Power Saving). Rectifier and filter Audio circuit LDO regulator It ...
User Manual
Page 4
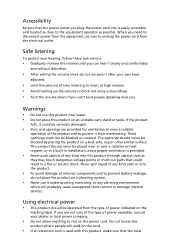
... To protect your hearing, follow these instructions. • Gradually increase the volume until you can hear it clearly and comfortably and without distortion. • After setting the volume level, do not place the product on a vibrating surface. • Never use this product near water. • Do not place this product where...
... To protect your hearing, follow these instructions. • Gradually increase the volume until you can hear it clearly and comfortably and without distortion. • After setting the volume level, do not place the product on a vibrating surface. • Never use this product near water. • Do not place this product where...
User Manual
Page 5
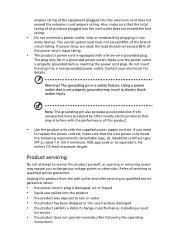
... this product. • Use the product only with a three-wire grounded plug. Make sure the power outlet is equipped with the supplied power supply cord set , make sure that may expose you need for details. ampere rating of the equipment plugged into a non-grounded power outlet. Do not insert the plug... does not exceed the extension cord ampere rating. The grounding pin is damaged, cut or frayed • liquid was exposed to replace the power cord set .
... this product. • Use the product only with a three-wire grounded plug. Make sure the power outlet is equipped with the supplied power supply cord set , make sure that may expose you need for details. ampere rating of the equipment plugged into a non-grounded power outlet. Do not insert the plug... does not exceed the extension cord ampere rating. The grounding pin is damaged, cut or frayed • liquid was exposed to replace the power cord set .
User Manual
Page 7
...black or red dots. This has no effect on the Waste from Electrical and Electronics Equipment (WEEE) regulations, visit http://global.acer.com/about/sustainability.htm Mercury advisory For projectors or electronic products containing an LCD/CRT monitor or display: lamp(s) inside this ...and services worldwide that are ENERGY STAR qualified use less energy and prevent greenhouse gas emissions by meeting strict energy efficiency guidelines set by reducing energy costs and helps protect the environment without sacrificing features or performance. Disposal instructions Do not throw this product...
...black or red dots. This has no effect on the Waste from Electrical and Electronics Equipment (WEEE) regulations, visit http://global.acer.com/about/sustainability.htm Mercury advisory For projectors or electronic products containing an LCD/CRT monitor or display: lamp(s) inside this ...and services worldwide that are ENERGY STAR qualified use less energy and prevent greenhouse gas emissions by meeting strict energy efficiency guidelines set by reducing energy costs and helps protect the environment without sacrificing features or performance. Disposal instructions Do not throw this product...
User Manual
Page 13
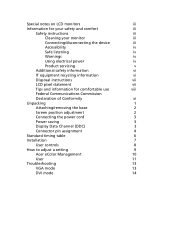
... 2 Screen position adjustment 2 Connecting the power cord 3 Power saving 3 Display Data Channel (DDC) 3 Connector pin assignment 4 Standard timing table 6 Installation 7 User controls 8 How to adjust a setting 9 Acer eColor Management 10 User 11 Troubleshooting 13 VGA mode 13 DVI mode 14
... 2 Screen position adjustment 2 Connecting the power cord 3 Power saving 3 Display Data Channel (DDC) 3 Connector pin assignment 4 Standard timing table 6 Installation 7 User controls 8 How to adjust a setting 9 Acer eColor Management 10 User 11 Troubleshooting 13 VGA mode 13 DVI mode 14
User Manual
Page 17
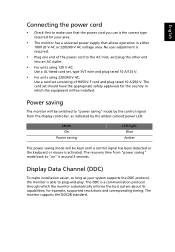
No user-adjustment is required. • Plug one end of H05VV-F cord and plug rated 10 A/250 V. The cord set consisting of the power cord to "power saving" mode by the amber-colored power LED. Mode On Power saving LED light Blue Amber The power ... other end into an AC outlet. • For units using 120 V AC: Use a UL-listed cord set, type SVT wire and plug rated 10 A/125 V. • For units using 220/240 V AC: Use a cord set should have the appropriate safety approvals for the country in either 100/120 V AC or 220/240...
No user-adjustment is required. • Plug one end of H05VV-F cord and plug rated 10 A/250 V. The cord set consisting of the power cord to "power saving" mode by the amber-colored power LED. Mode On Power saving LED light Blue Amber The power ... other end into an AC outlet. • For units using 120 V AC: Use a UL-listed cord set, type SVT wire and plug rated 10 A/125 V. • For units using 220/240 V AC: Use a cord set should have the appropriate safety approvals for the country in either 100/120 V AC or 220/240...
User Manual
Page 22
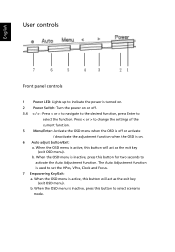
Press < or > to change the settings of the current function. 5 Menu/Enter: Activate the OSD menu when the OSD is off . 3.4 < / > : Press < or > to navigate to the desired function, press Enter ... function when the OSD is inactive, press this button will act as the exit key (exit OSD menu). When the OSD menu is used to set the HPos, VPos, Clock and Focus. 7 Empowering Key/Exit: a. b. The Auto Adjustment function is active, this button for two seconds to activate the Auto Adjustment...
Press < or > to change the settings of the current function. 5 Menu/Enter: Activate the OSD menu when the OSD is off . 3.4 < / > : Press < or > to navigate to the desired function, press Enter ... function when the OSD is inactive, press this button will act as the exit key (exit OSD menu). When the OSD menu is used to set the HPos, VPos, Clock and Focus. 7 Empowering Key/Exit: a. b. The Auto Adjustment function is active, this button for two seconds to activate the Auto Adjustment...

User Manual
Page 23
... function that you want to adjust. 4 Press < or > to 4. A. I. Only analog-input mode II. User: If "User" is selected, the Acer eColor Management OSD will appear. If you want to adjust any other function, repeat steps 2 to change the settings of the current function. 5 To exit and save, select the exit function.
... function that you want to adjust. 4 Press < or > to 4. A. I. Only analog-input mode II. User: If "User" is selected, the Acer eColor Management OSD will appear. If you want to adjust any other function, repeat steps 2 to change the settings of the current function. 5 To exit and save, select the exit function.
User Manual
Page 24
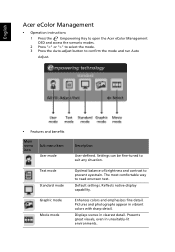
Settings can be fine-tuned to read onscreen text. Reflects native display capability. The most comfortable way to suit any situation. Enhances colors and emphasizes fine ... menu icon Sub menu item User mode Text mode Standard mode Graphic mode Movie mode Description User-defined. English Acer eColor Management • Operation instructions 1 Press the Empowering Key to open the Acer eColor Management OSD and access the scenario modes. 2 Press "" to select the mode. 3 Press the Auto-adjust button to...
Settings can be fine-tuned to read onscreen text. Reflects native display capability. The most comfortable way to suit any situation. Enhances colors and emphasizes fine ... menu icon Sub menu item User mode Text mode Standard mode Graphic mode Movie mode Description User-defined. English Acer eColor Management • Operation instructions 1 Press the Empowering Key to open the Acer eColor Management OSD and access the scenario modes. 2 Press "" to select the mode. 3 Press the Auto-adjust button to...
User Manual
Page 25
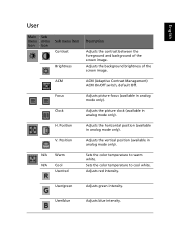
... color temperature to cool white. Focus Adjusts picture focus (available in analog mode only). Sets the color temperature to warm white. Clock Adjusts the picture clock (available in analog mode only). V. User/green Adjusts green intensity. Adjusts red intensity. User/...
... color temperature to cool white. Focus Adjusts picture focus (available in analog mode only). Sets the color temperature to warm white. Clock Adjusts the picture clock (available in analog mode only). V. User/green Adjusts green intensity. Adjusts red intensity. User/...
User Manual
Page 27
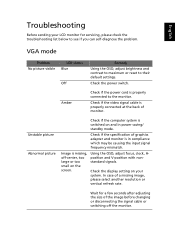
... on your LCD monitor for a few seconds after adjusting the size of graphics adapter and monitor is in power saving/ standby mode. Check the display setting on the screen. English Troubleshooting Before sending your system. In case of monitor. Wait for servicing, please check the troubleshooting list below to see if... mismatch. Using the OSD, adjust focus, clock, Hposition and V-position with nonstandard signals. Check if the video signal cable is properly connected to their default settings.
... on your LCD monitor for a few seconds after adjusting the size of graphics adapter and monitor is in power saving/ standby mode. Check the display setting on the screen. English Troubleshooting Before sending your system. In case of monitor. Wait for servicing, please check the troubleshooting list below to see if... mismatch. Using the OSD, adjust focus, clock, Hposition and V-position with nonstandard signals. Check if the video signal cable is properly connected to their default settings.
User Manual
Page 28
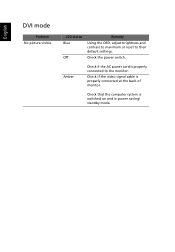
Check the power switch. Check if the video signal cable is switched on and in power saving/ standby mode. Check that the computer system is properly connected at the back of monitor. English DVI mode Problem No picture visible LED status Blue Off Remedy Using the OSD, adjust brightness and contrast to maximum or reset to the monitor. Amber Check if the AC power cord is properly connected to their default settings.
Check the power switch. Check if the video signal cable is switched on and in power saving/ standby mode. Check that the computer system is properly connected at the back of monitor. English DVI mode Problem No picture visible LED status Blue Off Remedy Using the OSD, adjust brightness and contrast to maximum or reset to the monitor. Amber Check if the AC power cord is properly connected to their default settings.


