

User Manual (3D)
Page 3
... your projector to a DVD or Blu-ray player, please read sections "Using DLP 3D / NVIDIA 3DTV Play technology" on page 7. Note: Require DLP Link 3D glasses and support 96Hz, 100Hz, 120Hz sync signal. Using 3D glasses DLP 3D glasses are turned on one of inactivity. Note: Suggest to use Acer DLP 3D glasses to support 144Hz sync signal for instructions how to turn them on and how to view...
... your projector to a DVD or Blu-ray player, please read sections "Using DLP 3D / NVIDIA 3DTV Play technology" on page 7. Note: Require DLP Link 3D glasses and support 96Hz, 100Hz, 120Hz sync signal. Using 3D glasses DLP 3D glasses are turned on one of inactivity. Note: Suggest to use Acer DLP 3D glasses to support 144Hz sync signal for instructions how to turn them on and how to view...

User Manual (3D)
Page 4
... set automatically. 2 Press the menu button on your graphics card. To download software and use an NVIDIA 3DTV Play ready projector with DLP glasses, refer to your graphics card supports 3D playback. Note: Please refer to the NVIDIA 3DTV Play website: www.nvidia.com/3dtv. Note: Blu-ray 3D content over an HDMI 1.4a or later connection, this will need to open...
... set automatically. 2 Press the menu button on your graphics card. To download software and use an NVIDIA 3DTV Play ready projector with DLP glasses, refer to your graphics card supports 3D playback. Note: Please refer to the NVIDIA 3DTV Play website: www.nvidia.com/3dtv. Note: Blu-ray 3D content over an HDMI 1.4a or later connection, this will need to open...
User Manual
Page 4
.../or injury. Contact your dealer or local power company. • Do not allow anything to service this product yourself, as opening or removing covers may interfere with a three-wire grounded plug. Using a power outlet that the total ampere rating of the equipment plugged into the extension cord does not exceed the extension cord ampere rating. The overall system load...
.../or injury. Contact your dealer or local power company. • Do not allow anything to service this product yourself, as opening or removing covers may interfere with a three-wire grounded plug. Using a power outlet that the total ampere rating of the equipment plugged into the extension cord does not exceed the extension cord ampere rating. The overall system load...
User Manual
Page 5
.... • Locations where temperatures may contain small parts. It might cause fire or electric shock. It can lead to fire. • When switching the projector off, suggest to turn off before disconnecting power. • Do not frequently turn off . Keep them out of the reach of other controls may contaminate optical components, shortening the life span and darkening the image. • Locations near...
.... • Locations where temperatures may contain small parts. It might cause fire or electric shock. It can lead to fire. • When switching the projector off, suggest to turn off before disconnecting power. • Do not frequently turn off . Keep them out of the reach of other controls may contaminate optical components, shortening the life span and darkening the image. • Locations near...
User Manual
Page 6
.... • Clean the air filter frequently if have. To temporarily turn off the lamp, press HIDE on end vertically. Refer servicing only to fall over, causing injury or damage. • This product is showing warning message. • When changing the lamp, please allow unit to cool down, and follow all changing instructions. • Reset the "Lamp Hour Reset" function from the Onscreen display "Management" menu after replacing the lamp module...
.... • Clean the air filter frequently if have. To temporarily turn off the lamp, press HIDE on end vertically. Refer servicing only to fall over, causing injury or damage. • This product is showing warning message. • When changing the lamp, please allow unit to cool down, and follow all changing instructions. • Reset the "Lamp Hour Reset" function from the Onscreen display "Management" menu after replacing the lamp module...
User Manual
Page 8
... changing instructions. • This product will detect the life of its cooling cycle before cleaning. • Use a soft cloth moistened with mild detergent to clean the display housing. • Disconnect the power plug from the Onscreen display "Management" menu after replacing the lamp module. • When switching the projector off the product before disconnecting power. • Turn on the projector first and then the signal sources. • Do not use lens...
... changing instructions. • This product will detect the life of its cooling cycle before cleaning. • Use a soft cloth moistened with mild detergent to clean the display housing. • Disconnect the power plug from the Onscreen display "Management" menu after replacing the lamp module. • When switching the projector off the product before disconnecting power. • Turn on the projector first and then the signal sources. • Do not use lens...

User Manual
Page 11
..., 1080i/p) supported • Lower power consumption and economy (ECO) mode extend lamp life • Acer EcoProjeciton Technology delivers Intelligent power management approach and physical efficiency improvement • Equipped with HDMI™ & MHL connection supporting HDCP • Smart detection delivers quick, intelligent source detection • Multi-language onscreen display (OSD) menus • Manual focus projection lens zooms up to 1.0x / 1.1x / 1.3x • 2x digital zoom • Microsoft® Windows®...
..., 1080i/p) supported • Lower power consumption and economy (ECO) mode extend lamp life • Acer EcoProjeciton Technology delivers Intelligent power management approach and physical efficiency improvement • Equipped with HDMI™ & MHL connection supporting HDCP • Smart detection delivers quick, intelligent source detection • Multi-language onscreen display (OSD) menus • Manual focus projection lens zooms up to 1.0x / 1.1x / 1.3x • 2x digital zoom • Microsoft® Windows®...
User Manual
Page 17
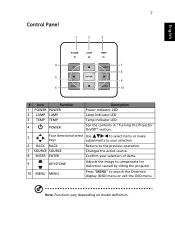
...7 Control Panel 1 2 3 English 4 7 8 5 9 6 10 # Icon Function 1 POWER POWER 2 LAMP LAMP 3 TEMP TEMP 4 POWER Description Power Indicator LED Lamp Indicator LED Temp Indicator LED See the contents in "Turning the Projector On/Off" section. 5 Four directional select Use to select items or make keys adjustments to your selection. 6 BACK BACK Returns to the previous operation. 7 SOURCE SOURCE Changes the active source. 8 ENTER ENTER Confirm your selection of items. 9 KEYSTONE Adjusts the image to compensate for distortion caused by tilting the projector. 10 MENU MENU...
...7 Control Panel 1 2 3 English 4 7 8 5 9 6 10 # Icon Function 1 POWER POWER 2 LAMP LAMP 3 TEMP TEMP 4 POWER Description Power Indicator LED Lamp Indicator LED Temp Indicator LED See the contents in "Turning the Projector On/Off" section. 5 Four directional select Use to select items or make keys adjustments to your selection. 6 BACK BACK Returns to the previous operation. 7 SOURCE SOURCE Changes the active source. 8 ENTER ENTER Confirm your selection of items. 9 KEYSTONE Adjusts the image to compensate for distortion caused by tilting the projector. 10 MENU MENU...
User Manual
Page 19
... when USB Ctrl connector (mini type B) is connected to a computer via a USB cable. 17 MEDIA Press "MEDIA" to return to the home page of media mode. 18 KeyPad 0~9 Press "0~9" to input a password in the "Security" OSD. 19 MENU Press "MENU" to launch the Onscreen display (OSD) menu or exit the OSD menu. 20 HDMI™/MHL To change source to the previous operation. This 12 VGA connector supports analog...
... when USB Ctrl connector (mini type B) is connected to a computer via a USB cable. 17 MEDIA Press "MEDIA" to return to the home page of media mode. 18 KeyPad 0~9 Press "0~9" to input a password in the "Security" OSD. 19 MENU Press "MENU" to launch the Onscreen display (OSD) menu or exit the OSD menu. 20 HDMI™/MHL To change source to the previous operation. This 12 VGA connector supports analog...

User Manual
Page 20
Note: Functions vary depending on model definition. English 10 # Icon Function Description 22 ZOOM IN Zooms the projector display in. 23 VIDEO To change source to COMPOSITE VIDEO. 24 ZOOM OUT Zooms the projector display out. 25 LAN/WiFi No function. 26 Backlight Remote backlight. 27 Laser pointer Aim the remote at the viewing screen. 28 Laser button Aim the remote at the viewing screen, press and hold this button to activate the laser pointer.
Note: Functions vary depending on model definition. English 10 # Icon Function Description 22 ZOOM IN Zooms the projector display in. 23 VIDEO To change source to COMPOSITE VIDEO. 24 ZOOM OUT Zooms the projector display out. 25 LAN/WiFi No function. 26 Backlight Remote backlight. 27 Laser pointer Aim the remote at the viewing screen. 28 Laser button Aim the remote at the viewing screen, press and hold this button to activate the laser pointer.
User Manual
Page 26
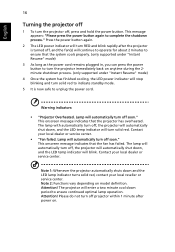
... fan has failed. Lamp will blink. Contact your local dealer or service center. Warning indicators: • "Projector Overheated. This message appears: "Please press the power button again to ensure continued optimal lamp operation. The lamp will automatically turn off, the projector will automatically shut down , and the LED temp indicator will automatically turn solid red. English 16 Turning the projector off 1 To turn off projector within 1 minute after the projector is now safe to unplug the power cord. Attention! Lamp...
... fan has failed. Lamp will blink. Contact your local dealer or service center. Warning indicators: • "Projector Overheated. This message appears: "Please press the power button again to ensure continued optimal lamp operation. The lamp will automatically turn off, the projector will automatically shut down , and the LED temp indicator will automatically turn solid red. English 16 Turning the projector off 1 To turn off projector within 1 minute after the projector is now safe to unplug the power cord. Attention! Lamp...
User Manual
Page 40
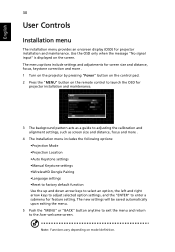
... distance, focus and more . 1 Turn on the projector by pressing "Power" button on the control pad. 2 Press the "MENU" button on the remote control to launch the OSD for projector installation and maintenance. The menu options include settings and adjustments for screen size and distance, focus, keystone correction and more . 4 The Installation menu includes the following options: •Projection Mode •Projection Location •Auto Keystone settings •Manual Keystone settings •WirelessHD Dongle Pairing •Language settings •Reset to factory default function Use...
... distance, focus and more . 1 Turn on the projector by pressing "Power" button on the control pad. 2 Press the "MENU" button on the remote control to launch the OSD for projector installation and maintenance. The menu options include settings and adjustments for screen size and distance, focus, keystone correction and more . 4 The Installation menu includes the following options: •Projection Mode •Projection Location •Auto Keystone settings •Manual Keystone settings •WirelessHD Dongle Pairing •Language settings •Reset to factory default function Use...
User Manual
Page 43
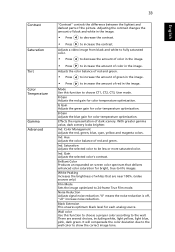
... on-screen color spectrum that are several choices, including white, light yellow, light blue, pink, dark green. Black Extension This ensures optimum black level for color temperature optimization. There are near 100%. (video sources only) Film Mode Sets the image optimized to increase the contrast. Adjusting the contrast changes the amount of whites that delivers enhanced color saturation for bright, true-to choose CT1, CT2, CT3, User mode. B Gain Adjusts the blue gain...
... on-screen color spectrum that are several choices, including white, light yellow, light blue, pink, dark green. Black Extension This ensures optimum black level for color temperature optimization. There are near 100%. (video sources only) Film Mode Sets the image optimized to increase the contrast. Adjusting the contrast changes the amount of whites that delivers enhanced color saturation for bright, true-to choose CT1, CT2, CT3, User mode. B Gain Adjusts the blue gain...
User Manual
Page 45
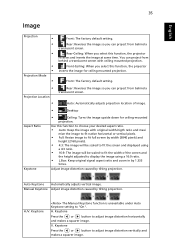
... display the image using a 16:9 ratio. • L.Box: Keep original signal aspect ratio and zoom in by 1.333 times. V. Front: The factory default setting. • Projection Location • Rear: Reverses the image so you select this function, the projector inverts the image for ceiling-mounted projection. H./V. Keystone Press the or button to adjust image distortion vertically and makes a squarer image. Keystone Press the or button to adjust image distortion horizontally and makes a squarer image. Keystone The Manual Keystone function is unavailable under Auto Keystone...
... display the image using a 16:9 ratio. • L.Box: Keep original signal aspect ratio and zoom in by 1.333 times. V. Front: The factory default setting. • Projection Location • Rear: Reverses the image so you select this function, the projector inverts the image for ceiling-mounted projection. H./V. Keystone Press the or button to adjust image distortion vertically and makes a squarer image. Keystone Press the or button to adjust image distortion horizontally and makes a squarer image. Keystone The Manual Keystone function is unavailable under Auto Keystone...

User Manual
Page 46
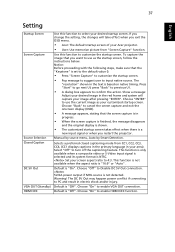
... the signal timing of the HDMI image on screen. • Auto: Automatically adjust by information from player. • Underscan: Always no overscan on HDMI image. • Overscan: Always keep overscan on HDMI image. If you experience an unstable or flickering image, use this function to correct color display error. • Auto: Automatically adjust by information from player. • Limited Range: Prosess the input image as limited color range data. • Full Range: Prosess the input image...
... the signal timing of the HDMI image on screen. • Auto: Automatically adjust by information from player. • Underscan: Always no overscan on HDMI image. • Overscan: Always keep overscan on HDMI image. If you experience an unstable or flickering image, use this function to correct color display error. • Auto: Automatically adjust by information from player. • Limited Range: Prosess the input image as limited color range data. • Full Range: Prosess the input image...
User Manual
Page 47
..., make sure that you restart the projector. The "resolution" shown in your customized startup screen. Press "Start" to enable HDMI CEC function. This function is only available when a composite video or S-Video input signal is selected and its system format is based on native timing. Manual by source menu, Auto by Smart Detection. Choose "On" to confirm the action. Default is "Off". press "Back" to...
..., make sure that you restart the projector. The "resolution" shown in your customized startup screen. Press "Start" to enable HDMI CEC function. This function is only available when a composite video or S-Video input signal is selected and its system format is based on native timing. Manual by source menu, Auto by Smart Detection. Choose "On" to confirm the action. Default is "Off". press "Back" to...
User Manual
Page 48
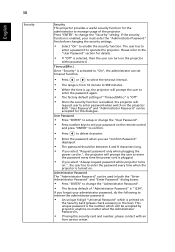
... power cord in.", the projector will prompt the user to enter the password every time the power cord is plugged. • If you forgot your password on the remote control and press "ENTER" to confirm. • Press to delete character. • Enter the password when you see "Confirm Password" displayed. • The password should be used in the box). Administrator Password The "Administrator Password" can turn on the projector without password...
... power cord in.", the projector will prompt the user to enter the password every time the power cord is plugged. • If you forgot your password on the remote control and press "ENTER" to confirm. • Press to delete character. • Enter the password when you see "Confirm Password" displayed. • The password should be used in the box). Administrator Password The "Administrator Password" can turn on the projector without password...
User Manual
Page 50
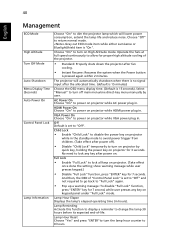
... operating time (in . Lamp Reminding Activate this function to display a reminder to power on projector for proper high altitude cooling of -life. Lamp Hour Reset Choose "Yes" and press "ENTER"to 0 hours. Choose "On" to turn the lamp hour counter to turn on projector by user. Off Default is "On". Operate the fans at full speed continuously to turn on High Altitude mode. Select "Manual" to turn off ). • Disable "Child Lock" temporarily to allow for 3 seconds. show warning message...
... operating time (in . Lamp Reminding Activate this function to display a reminder to power on projector for proper high altitude cooling of -life. Lamp Hour Reset Choose "Yes" and press "ENTER"to 0 hours. Choose "On" to turn the lamp hour counter to turn on projector by user. Off Default is "On". Operate the fans at full speed continuously to turn on High Altitude mode. Select "Manual" to turn off ). • Disable "Child Lock" temporarily to allow for 3 seconds. show warning message...
User Manual
Page 54
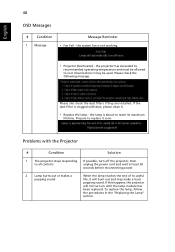
If the problem still appears, change the monitor display you have removed the lens cap and the projector is switched on. 2 Partial, scrolling • For an incorrectly displayed image: or incorrectly displayed image (for PC (Windows 2000/XP/Vista/ • Open "My Computer", open the "Control Panel", and then double-click the "Display" icon. Image Problems and Solutions # Problem Solution 1 No image appears • Connected as described in the "Getting Started" onscreen section. •...
If the problem still appears, change the monitor display you have removed the lens cap and the projector is switched on. 2 Partial, scrolling • For an incorrectly displayed image: or incorrectly displayed image (for PC (Windows 2000/XP/Vista/ • Open "My Computer", open the "Control Panel", and then double-click the "Display" icon. Image Problems and Solutions # Problem Solution 1 No image appears • Connected as described in the "Getting Started" onscreen section. •...
User Manual
Page 58
... replace the lamp, follow the procedures in the "Replacing the Lamp" section. the system fan is about to reach its useful life, it will not turn off the projector, then to replace it soon. Problems with dust, please clean it may make a loud popping sound. Prepare to all controls unplug the power cord and wait at least 30 seconds before it . • Replace the lamp - Please check the following message...
... replace the lamp, follow the procedures in the "Replacing the Lamp" section. the system fan is about to reach its useful life, it will not turn off the projector, then to replace it soon. Problems with dust, please clean it may make a loud popping sound. Prepare to all controls unplug the power cord and wait at least 30 seconds before it . • Replace the lamp - Please check the following message...


