
X1160 User's Guide EN
Page 3
... power supplies. Follow all power cords from the wall outlet before removing the power supply unit from the projector. • If the system has multiple sources of any kind onto or into is provided. • Never push objects of power, disconnect power from the system by placing the product on the product. Warnings! • Do not use liquid cleaners or aerosol cleaners. These openings...
... power supplies. Follow all power cords from the wall outlet before removing the power supply unit from the projector. • If the system has multiple sources of any kind onto or into is provided. • Never push objects of power, disconnect power from the system by placing the product on the product. Warnings! • Do not use liquid cleaners or aerosol cleaners. These openings...

X1160 User's Guide EN
Page 5
... refer servicing to qualified service personnel when: • the power cord or plug is damaged, cut or frayed • liquid was spilled into the projector's lens when the lamp is necessary. • Locations where temperatures may become excessively high, such as opening or removing covers may expose you to dangerous voltage points or other controls may result in damage and will often require extensive work...
... refer servicing to qualified service personnel when: • the power cord or plug is damaged, cut or frayed • liquid was spilled into the projector's lens when the lamp is necessary. • Locations where temperatures may become excessively high, such as opening or removing covers may expose you to dangerous voltage points or other controls may result in damage and will often require extensive work...
X1160 User's Guide EN
Page 6
.... To temporarily turn off . • Do not touch air outlet grille and bottom plate which may hurt your eyes. • Always open the lens shutter or remove the lens cap when the projector is showing warning message. • When changing the lamp, please allow unit to cool down, and follow all changing instructions. • Reset the "Lamp Hour Reset" function from the Onscreen display "Management" menu after replacing the lamp module...
.... To temporarily turn off . • Do not touch air outlet grille and bottom plate which may hurt your eyes. • Always open the lens shutter or remove the lens cap when the projector is showing warning message. • When changing the lamp, please allow unit to cool down, and follow all changing instructions. • Reset the "Lamp Hour Reset" function from the Onscreen display "Management" menu after replacing the lamp module...
X1160 User's Guide EN
Page 7
... any area, and always switch off your device, and move it and its normal operating positions. This device meets RF exposure guidelines when used normally, and it . In some cases, transmission of data files or messages may be delayed until the transmission is prohibited or when it may be sensitive to : wireless LAN (WLAN), Bluetooth and/or...
... any area, and always switch off your device, and move it and its normal operating positions. This device meets RF exposure guidelines when used normally, and it . In some cases, transmission of data files or messages may be delayed until the transmission is prohibited or when it may be sensitive to : wireless LAN (WLAN), Bluetooth and/or...
X1160 User's Guide EN
Page 10
... operation. • When the lamp reaches the end of its life, it shows warning messages. • Reset the "Lamp Hour Reset" function from the Onscreen display "Management" menu after replacing the lamp module. • When switching the projector off, please ensure the projector completes its cooling cycle before disconnecting power. • Turn on the unit provided for a long period of time. The bright light may hurt your unit. To replace the lamp...
... operation. • When the lamp reaches the end of its life, it shows warning messages. • Reset the "Lamp Hour Reset" function from the Onscreen display "Management" menu after replacing the lamp module. • When switching the projector off, please ensure the projector completes its cooling cycle before disconnecting power. • Turn on the unit provided for a long period of time. The bright light may hurt your unit. To replace the lamp...
X1160 User's Guide EN
Page 11
... 6 Connecting the Projector 6 Turning the Projector On/Off 7 Turning on the Projector 7 Turning off the Projector 8 Adjusting the Projected Image 9 Adjusting the Height of Projected Image 9 How to optimize image size and distance 10 How to get a preferred image size by adjusting distance and zoom 12 User Controls 14 Acer Empowering Technology 14 Onscreen Display (OSD) Menus 15 Color setting 16 Image setting 17 Management setting 19 Audio setting 21 Language setting 22 Appendices 23 Troubleshooting 23 LED & Alarm Definition Listing 27 Replacing the Lamp...
... 6 Connecting the Projector 6 Turning the Projector On/Off 7 Turning on the Projector 7 Turning off the Projector 8 Adjusting the Projected Image 9 Adjusting the Height of Projected Image 9 How to optimize image size and distance 10 How to get a preferred image size by adjusting distance and zoom 12 User Controls 14 Acer Empowering Technology 14 Onscreen Display (OSD) Menus 15 Color setting 16 Image setting 17 Management setting 19 Audio setting 21 Language setting 22 Appendices 23 Troubleshooting 23 LED & Alarm Definition Listing 27 Replacing the Lamp...
X1160 User's Guide EN
Page 13
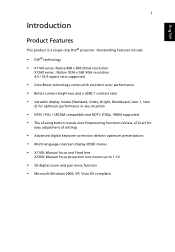
... display modes (Standard, Video, Bright, Blackboard, User 1, User 2) for optimum performance in any situation • NTSC / PAL / SECAM compatible and HDTV (720p, 1080i) supported • The eCaring button reveals Acer Empowering functions (eView, eTimer) for easy adjustment of settings • Advanced digital keystone correction delivers optimum presentations • Multi-language onscreen display (OSD) menus • X1160: Manual focus and Fixed lens X1260: Manual focus projection lens zooms up to 1.1X • 2X digital zoom...
... display modes (Standard, Video, Bright, Blackboard, User 1, User 2) for optimum performance in any situation • NTSC / PAL / SECAM compatible and HDTV (720p, 1080i) supported • The eCaring button reveals Acer Empowering functions (eView, eTimer) for easy adjustment of settings • Advanced digital keystone correction delivers optimum presentations • Multi-language onscreen display (OSD) menus • X1160: Manual focus and Fixed lens X1260: Manual focus projection lens zooms up to 1.1X • 2X digital zoom...

X1160 User's Guide EN
Page 15
... Projector Outlook Front / upper side 1 2 3 4 # Description 1 Zoom ring (X1260 series) 2 Focus ring 3 Zoom lens 4 Lens cap Rear side 5 6 7 # Description 5 Power button and Power Indicator LED 6 Remote control 7 Remote control receiver 1 237 4 8 9 5 # Description 1 PC analog signal/HDTV/component video input connector 2 S-Video input connector 3 Composite video input connector 4 USB connector 5 Power socket 6 # Description 6 KensingtonTM lock port Below items are for X1260 series only: 7 RS232 connector 8 Monitor loop-through output connector (VGA-Out) 9 Audio input...
... Projector Outlook Front / upper side 1 2 3 4 # Description 1 Zoom ring (X1260 series) 2 Focus ring 3 Zoom lens 4 Lens cap Rear side 5 6 7 # Description 5 Power button and Power Indicator LED 6 Remote control 7 Remote control receiver 1 237 4 8 9 5 # Description 1 PC analog signal/HDTV/component video input connector 2 S-Video input connector 3 Composite video input connector 4 USB connector 5 Power socket 6 # Description 6 KensingtonTM lock port Below items are for X1260 series only: 7 RS232 connector 8 Monitor loop-through output connector (VGA-Out) 9 Audio input...
X1160 User's Guide EN
Page 16
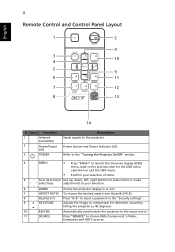
... "0~9" to input a password in the "Security settings". 9 KEYSTONE Adjusts the image to compensate for distortion caused by tilting the projector (± 40 degrees). 10 RESYNC 11 SOURCE Automatically synchronizes the projector to choose RGB, Component, S-Video, Composite and HDTV sources. Press "SOURCE" to the input source. English 4 Remote Control and Control Panel Layout 1 2 9 3 10 4 5 9 6 11 7 12 8 13 14 # Icon Function 1 Infrared transmitter 2 Power/Power LED 3 POWER Description Sends signals to the projector. Power button and Power Indicator LED.
... "0~9" to input a password in the "Security settings". 9 KEYSTONE Adjusts the image to compensate for distortion caused by tilting the projector (± 40 degrees). 10 RESYNC 11 SOURCE Automatically synchronizes the projector to choose RGB, Component, S-Video, Composite and HDTV sources. Press "SOURCE" to the input source. English 4 Remote Control and Control Panel Layout 1 2 9 3 10 4 5 9 6 11 7 12 8 13 14 # Icon Function 1 Infrared transmitter 2 Power/Power LED 3 POWER Description Sends signals to the projector. Power button and Power Indicator LED.
X1160 User's Guide EN
Page 17
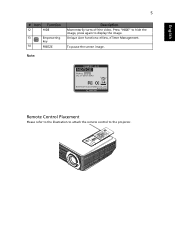
Unique Acer functions: eView, eTimer Management. Note: Remote Control Placement Please refer to the illustration to attach the remote control to display the image. English 5 # Icon Function 12 HIDE 13 Empowering key 14 FREEZE Description Momentarily turns off the video. To pause the screen image. Press "HIDE" to hide the image, press again to the projector.
Unique Acer functions: eView, eTimer Management. Note: Remote Control Placement Please refer to the illustration to attach the remote control to display the image. English 5 # Icon Function 12 HIDE 13 Empowering key 14 FREEZE Description Momentarily turns off the video. To pause the screen image. Press "HIDE" to hide the image, press again to the projector.
X1160 User's Guide EN
Page 19
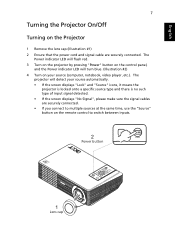
... projector is locked onto a specific source type and there is no such type of input signal detected. • If the screen displays "No Signal", please make sure the signal cables are securely connected. The Power indicator LED will flash red. 3 Turn on the projector by pressing "Power" button on the control panel, and the Power indicator LED will detect your source (computer, notebook, video player ,etc.). The projector will turn blue. (Illustration #2) 4 Turn on the Projector 1 Remove the lens cap.(Illustration #1) 2 Ensure that the power cord and signal cable...
... projector is locked onto a specific source type and there is no such type of input signal detected. • If the screen displays "No Signal", please make sure the signal cables are securely connected. The Power indicator LED will flash red. 3 Turn on the projector by pressing "Power" button on the control panel, and the Power indicator LED will detect your source (computer, notebook, video player ,etc.). The projector will turn blue. (Illustration #2) 4 Turn on the Projector 1 Remove the lens cap.(Illustration #1) 2 Ensure that the power cord and signal cable...

X1160 User's Guide EN
Page 20
... Power indicator LED will automatically turn off soon." The message below is about 120 seconds. Warning indicators: • If the projector automatically shuts down and the Power indicator quick flashing RED and steady BLUE by returns, please contact your local dealer or service center: "Fan fail. English 8 Turning off the Projector 1 To turn solid RED which means projector enter standby mode. 4 It is to ensure that the projector has overheated. Lamp will turn off the projector, press the "Power" button...
... Power indicator LED will automatically turn off soon." The message below is about 120 seconds. Warning indicators: • If the projector automatically shuts down and the Power indicator quick flashing RED and steady BLUE by returns, please contact your local dealer or service center: "Fan fail. English 8 Turning off the Projector 1 To turn solid RED which means projector enter standby mode. 4 It is to ensure that the projector has overheated. Lamp will turn off the projector, press the "Power" button...
X1160 User's Guide EN
Page 22
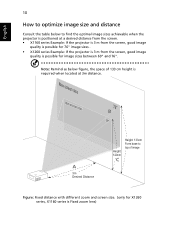
... the screen, good image quality is possible for X1260 series, X1160 series is positioned at 3m distance. English 10 How to optimize image size and distance Consult the table below figure, the space of image Figure: Fixed distance with different zoom and screen size. (only for image sizes between 69" and 76". Note: Remind as below to find the optimal image sizes achievable when the projector is Fixed zoom lens)
... the screen, good image quality is possible for X1260 series, X1160 series is positioned at 3m distance. English 10 How to optimize image size and distance Consult the table below figure, the space of image Figure: Fixed distance with different zoom and screen size. (only for image sizes between 69" and 76". Note: Remind as below to find the optimal image sizes achievable when the projector is Fixed zoom lens)
X1160 User's Guide EN
Page 31
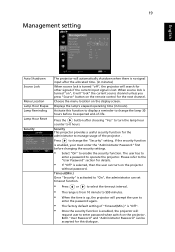
... allocated time. (in hours). Please refer to the "User Password" section for other signals if the current input signal is enabled, the projector will request user to enter password when switch on the projector . Choose the menu location on ", it will prompt the user to manage usage of "Timeout(Min.)" is "Off". • Once the security function is lost. 19 Management setting English Auto Shutdown Source Lock Menu Location Lamp Hour Elapse Lamp Reminding Lamp Hour Reset...
... allocated time. (in hours). Please refer to the "User Password" section for other signals if the current input signal is enabled, the projector will request user to enter password when switch on the projector . Choose the menu location on ", it will prompt the user to manage usage of "Timeout(Min.)" is "Off". • Once the security function is lost. 19 Management setting English Auto Shutdown Source Lock Menu Location Lamp Hour Elapse Lamp Reminding Lamp Hour Reset...
X1160 User's Guide EN
Page 32
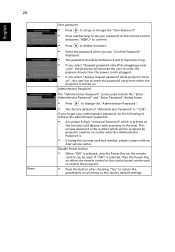
... remote control or the control panel can be used to control the projector. • Press the button after plugging power cord", the projector will be accepted by projector anytime no matter what the Administrator Password is "1234". English 20 Reset User password • Press to setup or change the "Administrator Password". • The factory default of "Administrator Password" is . • If losing this security card and number, please contact with an Acer service center. Administrator Password...
... remote control or the control panel can be used to control the projector. • Press the button after plugging power cord", the projector will be accepted by projector anytime no matter what the Administrator Password is "1234". English 20 Reset User password • Press to setup or change the "Administrator Password". • The factory default of "Administrator Password" is . • If losing this security card and number, please contact with an Acer service center. Administrator Password...
X1160 User's Guide EN
Page 35
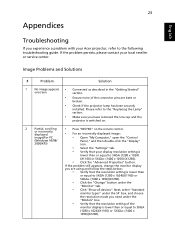
... or equal to the following troubleshooting guide. Please refer to the "Replacing the Lamp" section. • Make sure you have removed the lens cap and the projector is switched on. 2 Partial, scrolling or incorrectly displayed image(For PC • Press "RESYNC" on the remote control. • For an incorrectly displayed image: • Open "My Computer," open the "Control (Windows 95/98/ 2000/XP)) Panel," and then double-click the...
... or equal to the following troubleshooting guide. Please refer to the "Replacing the Lamp" section. • Make sure you have removed the lens cap and the projector is switched on. 2 Partial, scrolling or incorrectly displayed image(For PC • Press "RESYNC" on the remote control. • For an incorrectly displayed image: • Open "My Computer," open the "Control (Windows 95/98/ 2000/XP)) Panel," and then double-click the...
X1160 User's Guide EN
Page 36
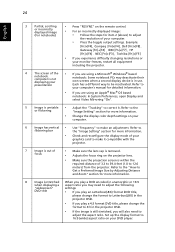
... equipment including the projector. 4 The screen of your computer's manual for more information. • Change the display color depth settings on the projector lens. • Make sure the projection screen is in the projector OSD. • If the image is still stretched, you are using an Apple® Mac® OS based notebook: In System Preferences, open Display and select Video Mirroring "On". 5 Image is unstable • Adjust the "Tracking...
... equipment including the projector. 4 The screen of your computer's manual for more information. • Change the display color depth settings on the projector lens. • Make sure the projection screen is in the projector OSD. • If the image is still stretched, you are using an Apple® Mac® OS based notebook: In System Preferences, open Display and select Video Mirroring "On". 5 Image is unstable • Adjust the "Tracking...
X1160 User's Guide EN
Page 37
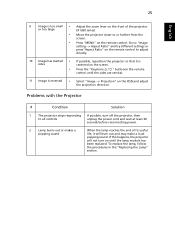
..., the projector will burn out and may make a loud popping sound. Problems with the Projector # Condition Solution 1 The projector stops responding If possible, turn on until the sides are vertical. 11 Image is too small • Adjust the zoom lever on the front of its useful life, it is sides centered on the screen. • Press the "Keystone / " buttonon the remote control until the lamp module...
..., the projector will burn out and may make a loud popping sound. Problems with the Projector # Condition Solution 1 The projector stops responding If possible, turn on until the sides are vertical. 11 Image is too small • Adjust the zoom lever on the front of its useful life, it is sides centered on the screen. • Press the "Keystone / " buttonon the remote control until the lamp module...

X1160 User's Guide EN
Page 44
Projection system Resolution Computer compatibility Video compatibility Aspect ratio Contrast ratio Displayable colors Noise level Projection lens Projection screen size (diagonal) Projection distance Throw ratio Horizontal scan rate Vertical refresh scan rate Lamp type Lamp life Keystone correction Audio Weight Dimensions (W x D x H) Digital Zoom Power supply Power consumption Operating temperature Uniformity DLP® X1160: Native: SVGA (800 x 600) , Maximum: SXGA (1280 x 1024), WXGA+ (1440 x 900) X1260: Native: XGA (1024 x 768), Maximum: SXGA+ (1400 x 1050), WXGA+ (1440 x 900) IBM...
Projection system Resolution Computer compatibility Video compatibility Aspect ratio Contrast ratio Displayable colors Noise level Projection lens Projection screen size (diagonal) Projection distance Throw ratio Horizontal scan rate Vertical refresh scan rate Lamp type Lamp life Keystone correction Audio Weight Dimensions (W x D x H) Digital Zoom Power supply Power consumption Operating temperature Uniformity DLP® X1160: Native: SVGA (800 x 600) , Maximum: SXGA (1280 x 1024), WXGA+ (1440 x 900) X1260: Native: XGA (1024 x 768), Maximum: SXGA+ (1400 x 1050), WXGA+ (1440 x 900) IBM...

X1160 User's Guide EN
Page 49
... which it has been approved for models with wireless LAN and/or Bluetooth only. This device may cause undesired operation of Directive 1999/5/EC. (Please visit http://global.acer.com/support/certificate.htm for complete documents.) Compliant with such devices. Depending on configurations, this device is intended to be operated indoors and installation outdoors is subject to licensing...
... which it has been approved for models with wireless LAN and/or Bluetooth only. This device may cause undesired operation of Directive 1999/5/EC. (Please visit http://global.acer.com/support/certificate.htm for complete documents.) Compliant with such devices. Depending on configurations, this device is intended to be operated indoors and installation outdoors is subject to licensing...


