
User Manual
Page 2
... information in new editions of this publication without the prior written permission of this publication may be incorporated in the space provided below. No part of Acer Incorporated. Model number Serial number Date of purchase Place of purchase "HDMI™, the HDMI logo and High-Definition Multimedia Interface are recorded on the label affixed to the contents hereof and specifically disclaims the...
... information in new editions of this publication without the prior written permission of this publication may be incorporated in the space provided below. No part of Acer Incorporated. Model number Serial number Date of purchase Place of purchase "HDMI™, the HDMI logo and High-Definition Multimedia Interface are recorded on the label affixed to the contents hereof and specifically disclaims the...
User Manual
Page 5
... the life span and darkening the image. • Locations near fire alarms. • Locations with all servicing to dangerous voltage points or other controls may contain small parts. The bright may hurt your projector. v Product servicing Do not attempt to service this product from walls and free flow of air around the projector is necessary. • Locations where temperatures may become excessively high, such as opening or removing covers...
... the life span and darkening the image. • Locations near fire alarms. • Locations with all servicing to dangerous voltage points or other controls may contain small parts. The bright may hurt your projector. v Product servicing Do not attempt to service this product from walls and free flow of air around the projector is necessary. • Locations where temperatures may become excessively high, such as opening or removing covers...
User Manual
Page 6
... only user serviceable part is securely installed. In this case, unplug immediately and contact your eyes. • Always open the lens shutter or remove the lens cap when the projector is on rare occasions. • Never replace the lamp assembly or any object when the projector is showing warning message. • When changing the lamp, please allow unit to cool down, and follow all changing instructions. • Reset the "Lamp Hour Reset...
... only user serviceable part is securely installed. In this case, unplug immediately and contact your eyes. • Always open the lens shutter or remove the lens cap when the projector is on rare occasions. • Never replace the lamp assembly or any object when the projector is showing warning message. • When changing the lamp, please allow unit to cool down, and follow all changing instructions. • Reset the "Lamp Hour Reset...
User Manual
Page 8
... or solvents to clean the display housing. • Disconnect the power plug from AC outlet if the product is in this may make a loud popping sound. Please be sure to change the lamp when it shows warning messages. • Reset the "Lamp Hour Reset" function from the Onscreen display "Management" menu after replacing the lamp module. • When switching the projector off the product before cleaning. • Use a soft cloth...
... or solvents to clean the display housing. • Disconnect the power plug from AC outlet if the product is in this may make a loud popping sound. Please be sure to change the lamp when it shows warning messages. • Reset the "Lamp Hour Reset" function from the Onscreen display "Management" menu after replacing the lamp module. • When switching the projector off the product before cleaning. • Use a soft cloth...
User Manual
Page 9
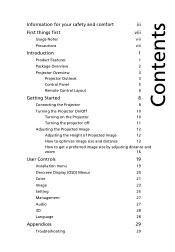
... 1 Package Overview 2 Projector Overview 3 Projector Outlook 3 Control Panel 5 Remote Control Layout 6 Getting Started 8 Connecting the Projector 8 Turning the Projector On/Off 10 Turning on the Projector 10 Turning the projector off 11 Adjusting the Projected Image 12 Adjusting the Height of Projected Image 12 How to optimize image size and distance 13 How to get a preferred image size by adjusting distance and zoom 16 User Controls 19 Installation menu 19 Onscreen Display (OSD) Menus 20 Color 21 Image 23 Setting 25 Management 27 Audio 27 3D 28...
... 1 Package Overview 2 Projector Overview 3 Projector Outlook 3 Control Panel 5 Remote Control Layout 6 Getting Started 8 Connecting the Projector 8 Turning the Projector On/Off 10 Turning on the Projector 10 Turning the projector off 11 Adjusting the Projected Image 12 Adjusting the Height of Projected Image 12 How to optimize image size and distance 13 How to get a preferred image size by adjusting distance and zoom 16 User Controls 19 Installation menu 19 Onscreen Display (OSD) Menus 20 Color 21 Image 23 Setting 25 Management 27 Audio 27 3D 28...
User Manual
Page 11
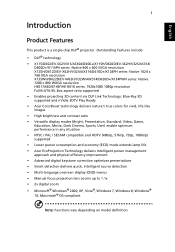
.../p) supported • Lower power consumption and economy (ECO) mode extends lamp life • Acer EcoProjeciton Technology delivers Intelligent power management approach and physical efficiency improvement • Advanced digital keystone correction optimizes presentations • Smart detection delivers quick, intelligent source detection • Multi-language onscreen display (OSD) menus • Manual focus projection lens zooms up to 1.1x • 2x digital zoom • Microsoft® Windows® 2000, XP, Vista®, Windows 7, Windows 8, Windows...
.../p) supported • Lower power consumption and economy (ECO) mode extends lamp life • Acer EcoProjeciton Technology delivers Intelligent power management approach and physical efficiency improvement • Advanced digital keystone correction optimizes presentations • Smart detection delivers quick, intelligent source detection • Multi-language onscreen display (OSD) menus • Manual focus projection lens zooms up to 1.1x • 2x digital zoom • Microsoft® Windows® 2000, XP, Vista®, Windows 7, Windows 8, Windows...

User Manual
Page 12
Check to make sure your dealer immediately if any thing is complete. English Projector Power cord VGA cable Remote control 2 x Batteries (option) Security card User's guide Quick start guide Carrying case (option) Dust filters (option) HDMI cable (option) 2 Package Overview This projector comes with all the items shown below. Contact your unit is missing.
Check to make sure your dealer immediately if any thing is complete. English Projector Power cord VGA cable Remote control 2 x Batteries (option) Security card User's guide Quick start guide Carrying case (option) Dust filters (option) HDMI cable (option) 2 Package Overview This projector comes with all the items shown below. Contact your unit is missing.
User Manual
Page 15
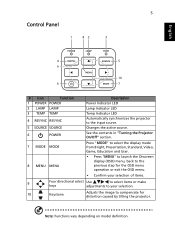
... the projector. Note: Functions vary depending on model definition. 5 Control Panel 1 82 3 English 4 5 9 10 6 7 # Icon Function 1 POWER POWER 2 LAMP LAMP 3 TEMP TEMP 4 RESYNC RESYNC 5 SOURCE SOURCE 6 POWER Description Power Indicator LED Lamp Indicator LED Temp Indicator LED Automatically synchronizes the projector to compensate for the OSD menu operation or exit the OSD menu. • Confirm your selection of items. 9 Four directional select Use to select items or make keys adjustments to your selection. 10 Keystone Adjusts the image to the input source.
... the projector. Note: Functions vary depending on model definition. 5 Control Panel 1 82 3 English 4 5 9 10 6 7 # Icon Function 1 POWER POWER 2 LAMP LAMP 3 TEMP TEMP 4 RESYNC RESYNC 5 SOURCE SOURCE 6 POWER Description Power Indicator LED Lamp Indicator LED Temp Indicator LED Automatically synchronizes the projector to compensate for the OSD menu operation or exit the OSD menu. • Confirm your selection of items. 9 Four directional select Use to select items or make keys adjustments to your selection. 10 Keystone Adjusts the image to the input source.
User Manual
Page 16
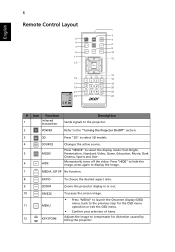
... signals to the projector. 2 POWER Refer to the "Turning the Projector On/Off" section. 3 3D Press "3D" to select 3D models. 4 SOURCE SOURCE Changes the active source. 5 MODE MODE 6 HIDE HIDE Press "MODE" to compensate for the OSD menu operation or exit the OSD menu. • Confirm your selection of items. Adjusts the image to select the display mode from Bright, Presentation, Standard, Video, Game, Education, Movie, Dark Cinema, Sports and User. SETUP...
... signals to the projector. 2 POWER Refer to the "Turning the Projector On/Off" section. 3 3D Press "3D" to select 3D models. 4 SOURCE SOURCE Changes the active source. 5 MODE MODE 6 HIDE HIDE Press "MODE" to compensate for the OSD menu operation or exit the OSD menu. • Confirm your selection of items. Adjusts the image to select the display mode from Bright, Presentation, Standard, Video, Game, Education, Movie, Dark Cinema, Sports and User. SETUP...

User Manual
Page 20
... the screen displays "No Signal", please make sure the signal cables are securely connected. • If you connect to switch between inputs. English 10 Turning the Projector On/Off Turning on the remote control to multiple sources at the same time, use the "Source" button on either control panel or the remote control or direct source key on the Projector 1 Ensure that the power cord and signal cable are securely connected. Power button The Power indicator LED will flash red. 2 Turn on the projector by pressing "Power" button on the control panel or remote control...
... the screen displays "No Signal", please make sure the signal cables are securely connected. • If you connect to switch between inputs. English 10 Turning the Projector On/Off Turning on the remote control to multiple sources at the same time, use the "Source" button on either control panel or the remote control or direct source key on the Projector 1 Ensure that the power cord and signal cable are securely connected. Power button The Power indicator LED will flash red. 2 Turn on the projector by pressing "Power" button on the control panel or remote control...

User Manual
Page 21
.... Warning indicators: • "Projector Overheated. The lamp with automatically turn solid red to indicate standby mode. 5 It is turned off, and the fan(s) will continue to operate for about 2 minutes to ensure that the system cools properly. (only supported under "Instant Resume" mode) 3 As long as the power cord remains plugged in, you can press the power button to turn the projector immediately back on model definition. This onscreen message indicates that the projector has overheated...
.... Warning indicators: • "Projector Overheated. The lamp with automatically turn solid red to indicate standby mode. 5 It is turned off, and the fan(s) will continue to operate for about 2 minutes to ensure that the system cools properly. (only supported under "Instant Resume" mode) 3 As long as the power cord remains plugged in, you can press the power button to turn the projector immediately back on model definition. This onscreen message indicates that the projector has overheated...
User Manual
Page 23
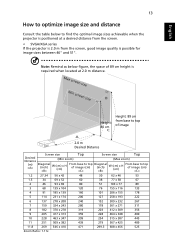
... find the optimal image sizes achievable when the projector is positioned at 2.0 m distance. Max screen size Min screen size 51" B 46" Height: 80 cm C Height: 89 cm from the screen, good image quality is required when located at a desired distance from the screen. • SVGA/XGA series If the projector is 2.0 m from base to top of image A 2.0 m Desired Distance Screen size Top Screen size Top Desired Distance (Min zoom) (Max zoom) (m) Diagonal (inch) W (cm...
... find the optimal image sizes achievable when the projector is positioned at 2.0 m distance. Max screen size Min screen size 51" B 46" Height: 80 cm C Height: 89 cm from the screen, good image quality is required when located at a desired distance from the screen. • SVGA/XGA series If the projector is 2.0 m from base to top of image A 2.0 m Desired Distance Screen size Top Screen size Top Desired Distance (Min zoom) (Max zoom) (m) Diagonal (inch) W (cm...

User Manual
Page 29
Installation Projection Mode Projection Location Auto Keystone Manual Keystone Language Reset Select Adjust Off English Press Exit 3 The background pattern acts as a guide to adjusting the calibration and alignment settings, such as screen size and distance, focus and more . 1 Turn on the projector by pressing "Power" button on the control pad. 2 Press the "MENU" button on the remote control to launch the OSD for projector installation and maintenance. Use the OSD only when the message "No signal input" is displayed on model definition. Note: Functions vary...
Installation Projection Mode Projection Location Auto Keystone Manual Keystone Language Reset Select Adjust Off English Press Exit 3 The background pattern acts as a guide to adjusting the calibration and alignment settings, such as screen size and distance, focus and more . 1 Turn on the projector by pressing "Power" button on the control pad. 2 Press the "MENU" button on the remote control to launch the OSD for projector installation and maintenance. Use the OSD only when the message "No signal input" is displayed on model definition. Note: Functions vary...
User Manual
Page 32
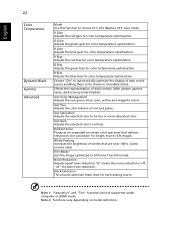
... display of whites that delivers enhanced color saturation for color temperature optimization. Ind. Ind. Saturation Adjusts the selected color to be less or more saturated color. Ind. Note 2: Functions vary depending on -screen color spectrum that are not supported under computer or HDMI mode. With greater gamma value, dark scenery looks brighter. Note 1: "Saturation" and "Tint" functions are near 100%. (video sources only) Film Mode Sets the image...
... display of whites that delivers enhanced color saturation for color temperature optimization. Ind. Ind. Saturation Adjusts the selected color to be less or more saturated color. Ind. Note 2: Functions vary depending on -screen color spectrum that are not supported under computer or HDMI mode. With greater gamma value, dark scenery looks brighter. Note 1: "Saturation" and "Tint" functions are near 100%. (video sources only) Film Mode Sets the image...

User Manual
Page 33
...Ratio Keystone Auto Keystone Manual Keystone • Ceiling: Turns the image upside down for ceiling-mounted projection. Adjust image distortion caused by tilting projection. Sharpness The Manual Keystone function is unavailable under Auto Keystone setting to choose your desired aspect ratio. • Auto: Keep the image with ceiling mounted projection. • Projection Mode • Front-Ceiling: When you can project from behind a translucent screen. • Rear-Ceiling: When you select this function, the projector reverses and inverts the image at same time. Use this...
...Ratio Keystone Auto Keystone Manual Keystone • Ceiling: Turns the image upside down for ceiling-mounted projection. Adjust image distortion caused by tilting projection. Sharpness The Manual Keystone function is unavailable under Auto Keystone setting to choose your desired aspect ratio. • Auto: Keep the image with ceiling mounted projection. • Projection Mode • Front-Ceiling: When you can project from behind a translucent screen. • Rear-Ceiling: When you select this function, the projector reverses and inverts the image at same time. Use this...

User Manual
Page 35
... enabled, your area). Select "Off" to change the "Security" setting. English When Source Lock is turned "On", it will "lock" the current source channel unless you press "Source" button on the remote control for other signals if the current input signal is selected, then the user can turn off the captioning feature. Press to turn on the projector . Please refer to the factory default settings. This function is not available when...
... enabled, your area). Select "Off" to change the "Security" setting. English When Source Lock is turned "On", it will "lock" the current source channel unless you press "Source" button on the remote control for other signals if the current input signal is selected, then the user can turn off the captioning feature. Press to turn on the projector . Please refer to the factory default settings. This function is not available when...
User Manual
Page 37
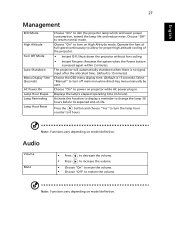
... projector will lower power consumption, extend the lamp life and reduce noise. Choose "On" to power on model definition. Choose "On" to allow for proper high altitude cooling of -life. Operate the fans at full speed continuously to turn off main menu/one direct-key menu manually by user. Displays the lamp's elapsed operating time (in . Note: Functions vary depending on projector while AC power plug in hours). Select "Manual" to change the lamp 30 hours...
... projector will lower power consumption, extend the lamp life and reduce noise. Choose "On" to power on model definition. Choose "On" to allow for proper high altitude cooling of -life. Operate the fans at full speed continuously to turn off main menu/one direct-key menu manually by user. Displays the lamp's elapsed operating time (in . Note: Functions vary depending on projector while AC power plug in hours). Select "Manual" to change the lamp 30 hours...

User Manual
Page 39
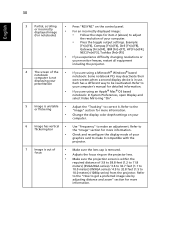
... Acer projector, refer to the following troubleshooting guide. or incorrectly displayed image • For an incorrectly displayed image: (for PC (Windows • Open "My Computer", open the "Control 2000/XP/Vista/ Panel", and then double-click the "Display" Windows 7/ Windows 8)) icon. • Select the "Settings" tab. • Verify that the resolution setting is lower than or equal to WUXGA-RB (1920 x 1200). 29 Appendices English Troubleshooting If you have removed the lens...
... Acer projector, refer to the following troubleshooting guide. or incorrectly displayed image • For an incorrectly displayed image: (for PC (Windows • Open "My Computer", open the "Control 2000/XP/Vista/ Panel", and then double-click the "Display" Windows 7/ Windows 8)) icon. • Select the "Settings" tab. • Verify that the resolution setting is lower than or equal to WUXGA-RB (1920 x 1200). 29 Appendices English Troubleshooting If you have removed the lens...
User Manual
Page 40
... flickering bar the "Image" section for more information. • Change the display color depth settings on the control panel. Each has a different way to correct it compatible with the projector. 7 Image is out of focus • Make sure the lens cap is removed. • Adjusts the focus ring on the projector lens. • Make sure the projection screen is in use. Refer to the "How to get a preferred image size by adjusting distance and zoom...
... flickering bar the "Image" section for more information. • Change the display color depth settings on the control panel. Each has a different way to correct it compatible with the projector. 7 Image is out of focus • Make sure the lens cap is removed. • Adjusts the focus ring on the projector lens. • Make sure the projection screen is in use. Refer to the "How to get a preferred image size by adjusting distance and zoom...
User Manual
Page 42
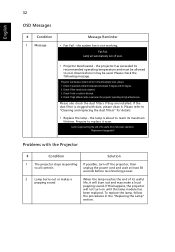
...; Projector Overheated - If this happens, the projector will burn out and may be cleaned. 3. the projector has exceeded its recommended operating temperature and must be allowed to all controls unplug the power cord and wait at high altitude area. Check if operation ambient temperature between 5 degree and 40 degree. 2. Lamp will turn on until the lamp module has been replaced. Please check the following message. Projector overheated, system will automatically turn off the projector...
...; Projector Overheated - If this happens, the projector will burn out and may be cleaned. 3. the projector has exceeded its recommended operating temperature and must be allowed to all controls unplug the power cord and wait at high altitude area. Check if operation ambient temperature between 5 degree and 40 degree. 2. Lamp will turn on until the lamp module has been replaced. Please check the following message. Projector overheated, system will automatically turn off the projector...


