User Manual
Page 2
...model number and purchase information. Acer Projector X1161P/X1161PA/X1161PN/X112/X1261P/X1261PN Series Model number Serial number Date of purchase Place of purchase Acer and the Acer logo are used herein for a particular purpose. Acer Projector X1161P/X1161PA/X1161PN/X112/X1261P/X1261PN Series User's ...warranties, either expressed or implied, with respect to the information in the space provided below. All correspondence concerning your projector. Acer Incorporated. Such changes will be reproduced, stored in a retrieval system, or transmitted, in any form or by any...
...model number and purchase information. Acer Projector X1161P/X1161PA/X1161PN/X112/X1261P/X1261PN Series Model number Serial number Date of purchase Place of purchase Acer and the Acer logo are used herein for a particular purpose. Acer Projector X1161P/X1161PA/X1161PN/X112/X1261P/X1261PN Series User's ...warranties, either expressed or implied, with respect to the information in the space provided below. All correspondence concerning your projector. Acer Incorporated. Such changes will be reproduced, stored in a retrieval system, or transmitted, in any form or by any...
User Manual
Page 3
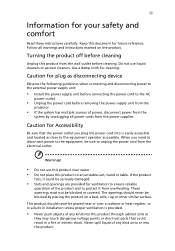
... supply unit before connecting the power cord to the AC power outlet. • Unplug the power cord before removing the power supply unit from the projector. • If the system has multiple sources of any kind into the product. This product should never be blocked or covered.
... supply unit before connecting the power cord to the AC power outlet. • Unplug the power cord before removing the power supply unit from the projector. • If the system has multiple sources of any kind into the product. This product should never be blocked or covered.
User Manual
Page 5
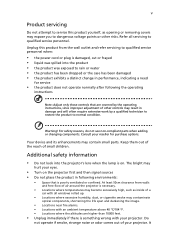
...following environments: • Space that are higher than 10000 feet. • Unplug immediately if there is something wrong with your projector. Warning! Additional safety information • Do not look into the product • the product was exposed to qualified service personnel....not place the product in following the operating instructions Note: Adjust only those controls that is poorly ventilated or confined. Consult your projector. Your device and its enhancements may contaminate optical components, shortening the life span and darkening the image. • Locations near...
...following environments: • Space that are higher than 10000 feet. • Unplug immediately if there is something wrong with your projector. Warning! Additional safety information • Do not look into the product • the product was exposed to qualified service personnel....not place the product in following the operating instructions Note: Adjust only those controls that is poorly ventilated or confined. Consult your projector. Your device and its enhancements may contaminate optical components, shortening the life span and darkening the image. • Locations near...
User Manual
Page 6
...; Always open the lens shutter or remove the lens cap when the projector is on rare occasions. • Never replace the lamp assembly or any object when the projector is operating. The best way is securely installed. Only use acer ceiling mount kit for the fan to break or drop it is to... wait for mounting the projector and ensure it . The only user serviceable part is the lamp which...
...; Always open the lens shutter or remove the lens cap when the projector is on rare occasions. • Never replace the lamp assembly or any object when the projector is operating. The best way is securely installed. Only use acer ceiling mount kit for the fan to break or drop it is to... wait for mounting the projector and ensure it . The only user serviceable part is the lamp which...
User Manual
Page 7
... the volume gradually until you . For more information on the Waste from Electrical and Electronics Equipment (WEEE) regulations, visit http://www.acer-group.com/public/ Sustainability/sustainability01.htm Mercury advisory For projectors or electronic products containing an LCD/CRT monitor or display: "Lamp(s) contain Mercury, Dispose Properly." Disposal instructions Do not throw...
... the volume gradually until you . For more information on the Waste from Electrical and Electronics Equipment (WEEE) regulations, visit http://www.acer-group.com/public/ Sustainability/sustainability01.htm Mercury advisory For projectors or electronic products containing an LCD/CRT monitor or display: "Lamp(s) contain Mercury, Dispose Properly." Disposal instructions Do not throw...
User Manual
Page 8
...the display housing. • Disconnect the power plug from the Onscreen display "Management" menu after replacing the lamp module. • When switching the projector off the product before disconnecting power. • Turn on until the lamp module has been replaced. Please be sure to change the lamp when ... dirt. • Near any appliance that generates a strong magnetic field. • Place In direct sunlight. Warning: • Do not look into the projector's lens when the lamp is on the unit provided for a long period of the lamp itself. If this may make a loud popping sound.
...the display housing. • Disconnect the power plug from the Onscreen display "Management" menu after replacing the lamp module. • When switching the projector off the product before disconnecting power. • Turn on until the lamp module has been replaced. Please be sure to change the lamp when ... dirt. • Near any appliance that generates a strong magnetic field. • Place In direct sunlight. Warning: • Do not look into the projector's lens when the lamp is on the unit provided for a long period of the lamp itself. If this may make a loud popping sound.
User Manual
Page 9
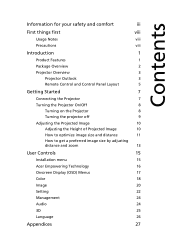
...Package Overview 2 Projector Overview 3 Projector Outlook 3 Remote Control and Control Panel Layout 5 Getting Started 7 Connecting the Projector 7 Turning the Projector On/Off 8 Turning on the Projector 8 Turning the projector off 9 ...Adjusting the Projected Image 10 Adjusting the Height of Projected Image 10 How to optimize image size and distance 11 How to get a preferred image size by adjusting distance and zoom 13 User Controls 15 Installation menu 15 Acer...
...Package Overview 2 Projector Overview 3 Projector Outlook 3 Remote Control and Control Panel Layout 5 Getting Started 7 Connecting the Projector 7 Turning the Projector On/Off 8 Turning on the Projector 8 Turning the projector off 9 ...Adjusting the Projected Image 10 Adjusting the Height of Projected Image 10 How to optimize image size and distance 11 How to get a preferred image size by adjusting distance and zoom 13 User Controls 15 Installation menu 15 Acer...
User Manual
Page 11
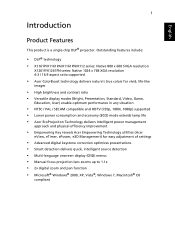
... DLP® projector. Outstanding features include: • DLP® technology • X1161P/X1161PA/X1161PN/X112 series: Native 800 x 600 SVGA resolution X1261P/X1261PN series: Native 1024 x 768 XGA resolution 4:3 / 16:9 aspect ratio supported • Acer ColorBoost technology delivers...consumption and economy (ECO) mode extends lamp life • Acer EcoProjeciton Technology delivers Intelligent power management approach and physical efficiency improvement • Empowering Key reveals Acer Empowering Technology utilities (Acer eView, eTimer, ePower, e3D Management) for easy adjustment of...
... DLP® projector. Outstanding features include: • DLP® technology • X1161P/X1161PA/X1161PN/X112 series: Native 800 x 600 SVGA resolution X1261P/X1261PN series: Native 1024 x 768 XGA resolution 4:3 / 16:9 aspect ratio supported • Acer ColorBoost technology delivers...consumption and economy (ECO) mode extends lamp life • Acer EcoProjeciton Technology delivers Intelligent power management approach and physical efficiency improvement • Empowering Key reveals Acer Empowering Technology utilities (Acer eView, eTimer, ePower, e3D Management) for easy adjustment of...
User Manual
Page 12
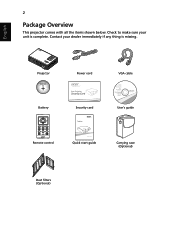
Contact your unit is missing. Check to make sure your dealer immediately if any thing is complete. Projector XXXXXX 3V Battery Power cord VGA cable Security card User's guide Remote control Quick start guide Carrying case (Optional) Dust filters (Optional) English 2 Package Overview This projector comes with all the items shown below.
Contact your unit is missing. Check to make sure your dealer immediately if any thing is complete. Projector XXXXXX 3V Battery Power cord VGA cable Security card User's guide Remote control Quick start guide Carrying case (Optional) Dust filters (Optional) English 2 Package Overview This projector comes with all the items shown below.
User Manual
Page 13
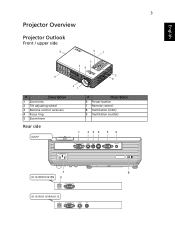
English 3 Projector Overview Projector Outlook Front / upper side 8 6 7 5 3 4 9 3 8 2 1 # Description 1 Zoom lens 2 Tilt adjusting wheel 3 Remote control receivers 4 Focus ring 5 Zoom lever Rear side X261P # Description 6 Power button 7 Remote control 8 Ventilation (inlet) 9 Ventilation (outlet) 1 234 56 VGA IN S-VIDEO VIDEO RS232 VGA OUT AUDIO IN 7 8 X1161PN/X1261PN 9 VGA IN X1161P/X1161PA/X112 VGA IN S-VIDEO VIDEO
English 3 Projector Overview Projector Outlook Front / upper side 8 6 7 5 3 4 9 3 8 2 1 # Description 1 Zoom lens 2 Tilt adjusting wheel 3 Remote control receivers 4 Focus ring 5 Zoom lever Rear side X261P # Description 6 Power button 7 Remote control 8 Ventilation (inlet) 9 Ventilation (outlet) 1 234 56 VGA IN S-VIDEO VIDEO RS232 VGA OUT AUDIO IN 7 8 X1161PN/X1261PN 9 VGA IN X1161P/X1161PA/X112 VGA IN S-VIDEO VIDEO
User Manual
Page 15
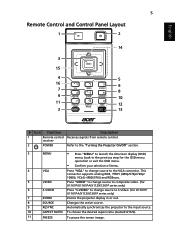
... aspect ratio (Auto/4:3/16:9). 11 FREEZE To pause the screen image. receiver 2 POWER Refer to the "Turning the Projector On/Off" section. 3 MENU • Press "MENU" to launch the Onscreen display (OSD) menu, back to the previous step... for X1161P/ X1161PA/X112/X1261P series only) 7 ZOOM Zooms the projector display in or out. 8 SOURCE Changes the active source. 9 RESYNC Automatically synchronizes the projector to the VGA connector. English 5 Remote Control and Control Panel Layout 1 2 14 3 15...
... aspect ratio (Auto/4:3/16:9). 11 FREEZE To pause the screen image. receiver 2 POWER Refer to the "Turning the Projector On/Off" section. 3 MENU • Press "MENU" to launch the Onscreen display (OSD) menu, back to the previous step... for X1161P/ X1161PA/X112/X1261P series only) 7 ZOOM Zooms the projector display in or out. 8 SOURCE Changes the active source. 9 RESYNC Automatically synchronizes the projector to the VGA connector. English 5 Remote Control and Control Panel Layout 1 2 14 3 15...
User Manual
Page 16
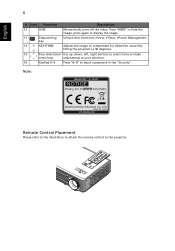
...control to input a password in the "Security". key 14 KEYSTONE Adjusts the image to compensate for distortion caused by tilting the projector (± 40 degrees). 15 Four directional Use up, down, left, right buttons to select items or make select keys adjustments... to your selection. 16 KeyPad 0~9 Press "0~9" to the projector. Press "HIDE" to hide the image, press again to display the image. 13 Empowering Unique Acer functions: eView, eTimer, ePower Management. English 6 # Icon Function Description 12 HIDE Momentarily turns...
...control to input a password in the "Security". key 14 KEYSTONE Adjusts the image to compensate for distortion caused by tilting the projector (± 40 degrees). 15 Four directional Use up, down, left, right buttons to select items or make select keys adjustments... to your selection. 16 KeyPad 0~9 Press "0~9" to the projector. Press "HIDE" to hide the image, press again to display the image. 13 Empowering Unique Acer functions: eView, eTimer, ePower Management. English 6 # Icon Function Description 12 HIDE Momentarily turns...
User Manual
Page 17
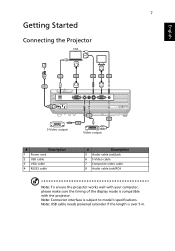
... extender if the length is compatible with your computer, please make sure the timing of the display mode is over 5 m. English 7 Getting Started Connecting the Projector VGA RS232 USB D-Sub D-Sub 2 3 4 3 5 1 D-Sub D-Sub VGA IN S-VIDEO VIDEO RS232 VGA OUT AUDIO IN USB RW S-Video output Y 7 8 6 Y Video output... VGA cable 4 RS232 cable # Description 5 Audio cable jack/jack 6 S-Video cable 7 Composite video cable 8 Audio cable jack/RCA Note: To ensure the projector works well with the projector. Note: Connector interface is subject to model's specifications.
... extender if the length is compatible with your computer, please make sure the timing of the display mode is over 5 m. English 7 Getting Started Connecting the Projector VGA RS232 USB D-Sub D-Sub 2 3 4 3 5 1 D-Sub D-Sub VGA IN S-VIDEO VIDEO RS232 VGA OUT AUDIO IN USB RW S-Video output Y 7 8 6 Y Video output... VGA cable 4 RS232 cable # Description 5 Audio cable jack/jack 6 S-Video cable 7 Composite video cable 8 Audio cable jack/RCA Note: To ensure the projector works well with the projector. Note: Connector interface is subject to model's specifications.
User Manual
Page 18
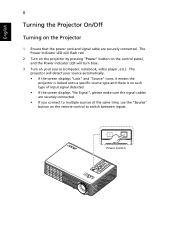
... turn blue. 3 Turn on your source automatically. • If the screen displays "Lock" and "Source" icons, it means the projector is locked onto a specific source type and there is no such type of input signal detected. • If the screen displays "No Signal", please make ...sure the signal cables are securely connected. • If you connect to multiple sources at the same time, use the "Source" button on the Projector 1 Ensure that the power cord and signal cable are securely connected. The Power indicator LED will flash red. 2 Turn on the...
... turn blue. 3 Turn on your source automatically. • If the screen displays "Lock" and "Source" icons, it means the projector is locked onto a specific source type and there is no such type of input signal detected. • If the screen displays "No Signal", please make ...sure the signal cables are securely connected. • If you connect to multiple sources at the same time, use the "Source" button on the Projector 1 Ensure that the power cord and signal cable are securely connected. The Power indicator LED will flash red. 2 Turn on the...
User Manual
Page 19
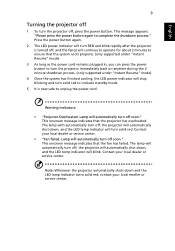
...Contact your local reseller or service center. This onscreen message indicates that the fan has failed. Lamp will automatically turn off , the projector will automatically shut down and the LED lamp indicator turns solid red, contact your local dealer or service center. The lamp with ...automatically turn solid red to indicate standby mode. 5 It is now safe to complete the shutdown process." This onscreen message indicates that the projector has overheated. Contact your local dealer or service center. • "Fan failed. The lamp will automatically turn off , and the fan...
...Contact your local reseller or service center. This onscreen message indicates that the fan has failed. Lamp will automatically turn off , the projector will automatically shut down and the LED lamp indicator turns solid red, contact your local dealer or service center. The lamp with ...automatically turn solid red to indicate standby mode. 5 It is now safe to complete the shutdown process." This onscreen message indicates that the projector has overheated. Contact your local dealer or service center. • "Fan failed. The lamp will automatically turn off , and the fan...
User Manual
Page 20
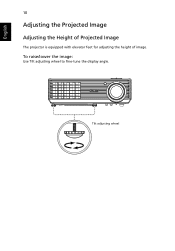
Tilt adjusting wheel To raise/lower the image: Use Tilt adjusting wheel to fine-tune the display angle. English 10 Adjusting the Projected Image Adjusting the Height of Projected Image The projector is equipped with elevator feet for adjusting the height of image.
Tilt adjusting wheel To raise/lower the image: Use Tilt adjusting wheel to fine-tune the display angle. English 10 Adjusting the Projected Image Adjusting the Height of Projected Image The projector is equipped with elevator feet for adjusting the height of image.
User Manual
Page 21
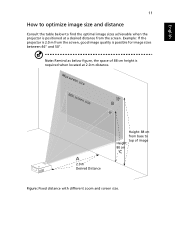
... size. Max screen size Min screen size 50" B 46" A 2.0 m Desired Distance Height: 88 cm from base to find the optimal image sizes achievable when the projector is 2.0 m from the screen. Example: If the...
... size. Max screen size Min screen size 50" B 46" A 2.0 m Desired Distance Height: 88 cm from base to find the optimal image sizes achievable when the projector is 2.0 m from the screen. Example: If the...
User Manual
Page 23
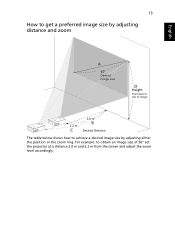
13 How to get a preferred image size by adjusting either the position or the zoom ring. For example: to obtain an image size of image 2.2 m C 2.0 m B Desired Distance The table below shows how to top of 50" set the projector at a distance 2.0 m and 2.2 m from base to achieve a desired image size by adjusting distance and zoom English A 50" Desired image size D Height from the screen and adjust the zoom level accordingly.
13 How to get a preferred image size by adjusting either the position or the zoom ring. For example: to obtain an image size of image 2.2 m C 2.0 m B Desired Distance The table below shows how to top of 50" set the projector at a distance 2.0 m and 2.2 m from base to achieve a desired image size by adjusting distance and zoom English A 50" Desired image size D Height from the screen and adjust the zoom level accordingly.
User Manual
Page 25
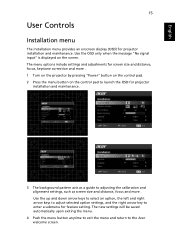
...down arrow keys to select an option, the left and right arrow keys to adjust selected option settings, and the right arrow key to the Acer welcome screen. The new settings will be saved automatically upon exiting the menu. 4 Push the menu button anytime to exit the menu and ...return to enter a submenu for projector installation and maintenance. 3 The background pattern acts as a guide to adjusting the calibration and alignment settings, such as screen size and distance, focus ...
...down arrow keys to select an option, the left and right arrow keys to adjust selected option settings, and the right arrow key to the Acer welcome screen. The new settings will be saved automatically upon exiting the menu. 4 Push the menu button anytime to exit the menu and ...return to enter a submenu for projector installation and maintenance. 3 The background pattern acts as a guide to adjusting the calibration and alignment settings, such as screen size and distance, focus ...
User Manual
Page 26
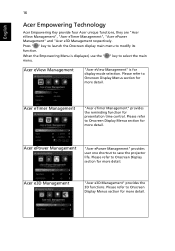
... refer to Onscreen Display Menus section for more detail. Please refer to Onscreen Display Menus section for more detail. Please refer to save the projector life. Acer ePower Management "Acer ePower Management" provides user one shortcut to Onscreen Display Menus section for more detail. When the Empowering Menu is for presentation time control...
... refer to Onscreen Display Menus section for more detail. Please refer to Onscreen Display Menus section for more detail. Please refer to save the projector life. Acer ePower Management "Acer ePower Management" provides user one shortcut to Onscreen Display Menus section for more detail. When the Empowering Menu is for presentation time control...


