User Manual
Page 3
... guidelines when connecting and disconnecting power to the external power supply unit: • Install the power supply unit before connecting the power cord to protect it from overheating. This product should never be blocked by unplugging all warnings and instructions marked on a bed, sofa, rug or other similar surface. Caution for future reference. Warnings! • Do not use liquid cleaners or aerosol cleaners. The openings should...
... guidelines when connecting and disconnecting power to the external power supply unit: • Install the power supply unit before connecting the power cord to protect it from overheating. This product should never be blocked by unplugging all warnings and instructions marked on a bed, sofa, rug or other similar surface. Caution for future reference. Warnings! • Do not use liquid cleaners or aerosol cleaners. The openings should...
User Manual
Page 5
... are covered by the operating instructions, since improper adjustment of other risks. v Product servicing Do not attempt to service this product from walls and free flow of air around the projector is necessary. • Locations where temperatures may become excessively high, such as opening or removing covers may expose you to dangerous voltage points or other controls may result in damage and will often require extensive work...
... are covered by the operating instructions, since improper adjustment of other risks. v Product servicing Do not attempt to service this product from walls and free flow of air around the projector is necessary. • Locations where temperatures may become excessively high, such as opening or removing covers may expose you to dangerous voltage points or other controls may result in damage and will often require extensive work...
User Manual
Page 6
... showing warning message. • When changing the lamp, please allow unit to cool down, and follow all changing instructions. • Reset the "Lamp Hour Reset" function from the Onscreen display "Management" menu after replacing the lamp module. • Do not attempt to break on end vertically. It may hurt you. Refer servicing only to fall over, causing injury or damage. • This product is operating. Only use acer ceiling mount...
... showing warning message. • When changing the lamp, please allow unit to cool down, and follow all changing instructions. • Reset the "Lamp Hour Reset" function from the Onscreen display "Management" menu after replacing the lamp module. • Do not attempt to break on end vertically. It may hurt you. Refer servicing only to fall over, causing injury or damage. • This product is operating. Only use acer ceiling mount...
User Manual
Page 8
... Notes Do: • Turn off , please ensure the projector completes its life, it shows warning messages. • Reset the "Lamp Hour Reset" function from the Onscreen display "Management" menu after replacing the lamp module. • When switching the projector off the product before disconnecting power. • Turn on the projector first and then the signal sources. • Do not use lens cap when projector is in this user's guide to maximize the life of your eyes...
... Notes Do: • Turn off , please ensure the projector completes its life, it shows warning messages. • Reset the "Lamp Hour Reset" function from the Onscreen display "Management" menu after replacing the lamp module. • When switching the projector off the product before disconnecting power. • Turn on the projector first and then the signal sources. • Do not use lens cap when projector is in this user's guide to maximize the life of your eyes...
User Manual
Page 9
... 2 Projector Overview 3 Projector Outlook 3 Remote Control and Control Panel Layout 5 Getting Started 7 Connecting the Projector 7 Turning the Projector On/Off 8 Turning on the Projector 8 Turning the projector off 9 Adjusting the Projected Image 10 Adjusting the Height of Projected Image 10 How to optimize image size and distance 11 How to get a preferred image size by adjusting distance and zoom 13 User Controls 15 Installation menu 15 Acer Empowering Technology 16 Onscreen Display (OSD) Menus 17 Color 18 Image 20 Setting 22 Management 24 Audio 24...
... 2 Projector Overview 3 Projector Outlook 3 Remote Control and Control Panel Layout 5 Getting Started 7 Connecting the Projector 7 Turning the Projector On/Off 8 Turning on the Projector 8 Turning the projector off 9 Adjusting the Projected Image 10 Adjusting the Height of Projected Image 10 How to optimize image size and distance 11 How to get a preferred image size by adjusting distance and zoom 13 User Controls 15 Installation menu 15 Acer Empowering Technology 16 Onscreen Display (OSD) Menus 17 Color 18 Image 20 Setting 22 Management 24 Audio 24...
User Manual
Page 11
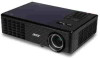
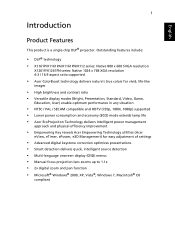
... is a single-chip DLP® projector. Outstanding features include: • DLP® technology • X1161P/X1161PA/X1161PN/X112 series: Native 800 x 600 SVGA resolution X1261P/X1261PN series: Native 1024 x 768 XGA resolution 4:3 / 16:9 aspect ratio supported • Acer ColorBoost technology delivers nature's true colors for vivid, life-like images • High brightness and contrast ratio • Versatile display modes (Bright, Presentation, Standard, Video, Game, Education, User) enable optimum...
... is a single-chip DLP® projector. Outstanding features include: • DLP® technology • X1161P/X1161PA/X1161PN/X112 series: Native 800 x 600 SVGA resolution X1261P/X1261PN series: Native 1024 x 768 XGA resolution 4:3 / 16:9 aspect ratio supported • Acer ColorBoost technology delivers nature's true colors for vivid, life-like images • High brightness and contrast ratio • Versatile display modes (Bright, Presentation, Standard, Video, Game, Education, User) enable optimum...
User Manual
Page 15
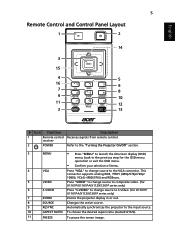
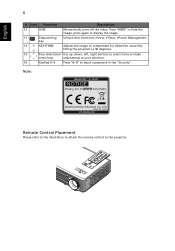
... Description 1 Remote control Receives signals from remote control. receiver 2 POWER Refer to the "Turning the Projector On/Off" section. 3 MENU • Press "MENU" to launch the Onscreen display (OSD) menu, back to the previous step for the OSD menu operation or exit the OSD menu. • Confirm your selection of items. 4 VGA Press "VGA" to change source to S-Video. (for X1161P/X1161PA/X112/X1261P series only) 6 S-VIDEO Press "S-VIDEO" to change source to the input source. 10...
... Description 1 Remote control Receives signals from remote control. receiver 2 POWER Refer to the "Turning the Projector On/Off" section. 3 MENU • Press "MENU" to launch the Onscreen display (OSD) menu, back to the previous step for the OSD menu operation or exit the OSD menu. • Confirm your selection of items. 4 VGA Press "VGA" to change source to S-Video. (for X1161P/X1161PA/X112/X1261P series only) 6 S-VIDEO Press "S-VIDEO" to change source to the input source. 10...
User Manual
Page 16
... to input a password in the "Security". key 14 KEYSTONE Adjusts the image to compensate for distortion caused by tilting the projector (± 40 degrees). 15 Four directional Use up, down, left, right buttons to select items or make select keys adjustments to your selection. 16 KeyPad 0~9 Press "0~9" to display the image. 13 Empowering Unique Acer functions: eView, eTimer, ePower Management. Note: Remote Control Placement...
... to input a password in the "Security". key 14 KEYSTONE Adjusts the image to compensate for distortion caused by tilting the projector (± 40 degrees). 15 Four directional Use up, down, left, right buttons to select items or make select keys adjustments to your selection. 16 KeyPad 0~9 Press "0~9" to display the image. 13 Empowering Unique Acer functions: eView, eTimer, ePower Management. Note: Remote Control Placement...
User Manual
Page 18
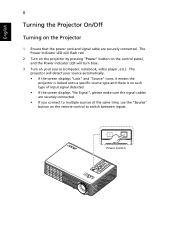
... turn blue. 3 Turn on the remote control to multiple sources at the same time, use the "Source" button on your source automatically. • If the screen displays "Lock" and "Source" icons, it means the projector is locked onto a specific source type and there is no such type of input signal detected. • If the screen displays "No Signal", please make sure the signal cables are securely connected. Power button The Power indicator LED will flash red. 2 Turn on the projector by pressing "Power" button on the control panel, and the Power indicator LED...
... turn blue. 3 Turn on the remote control to multiple sources at the same time, use the "Source" button on your source automatically. • If the screen displays "Lock" and "Source" icons, it means the projector is locked onto a specific source type and there is no such type of input signal detected. • If the screen displays "No Signal", please make sure the signal cables are securely connected. Power button The Power indicator LED will flash red. 2 Turn on the projector by pressing "Power" button on the control panel, and the Power indicator LED...
User Manual
Page 19
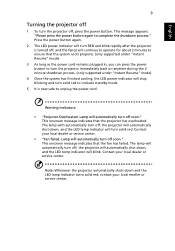
...or service center. The lamp will stop blinking and turn solid red. Lamp will automatically turn off, the projector will automatically shut down and the LED lamp indicator turns solid red, contact your local dealer or service center. • "Fan failed. Note: Whenever the projector automatically shuts down , and the LED temp indicator will automatically turn the projector off, press the power button. Warning indicators: • "Projector Overheated. Lamp will blink. This onscreen message indicates that the projector has overheated. This onscreen message indicates that...
...or service center. The lamp will stop blinking and turn solid red. Lamp will automatically turn off, the projector will automatically shut down and the LED lamp indicator turns solid red, contact your local dealer or service center. • "Fan failed. Note: Whenever the projector automatically shuts down , and the LED temp indicator will automatically turn the projector off, press the power button. Warning indicators: • "Projector Overheated. Lamp will blink. This onscreen message indicates that the projector has overheated. This onscreen message indicates that...
User Manual
Page 25
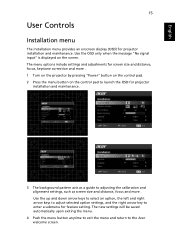
... a guide to enter a submenu for feature setting. The menu options include settings and adjustments for projector installation and maintenance. The new settings will be saved automatically upon exiting the menu. 4 Push the menu button anytime to exit the menu and return to the Acer welcome screen. English 15 User Controls Installation menu The installation menu provides an onscreen display (OSD) for screen size and distance, focus, keystone correction and more . Use the OSD only when the message "No signal input" is displayed...
... a guide to enter a submenu for feature setting. The menu options include settings and adjustments for projector installation and maintenance. The new settings will be saved automatically upon exiting the menu. 4 Push the menu button anytime to exit the menu and return to the Acer welcome screen. English 15 User Controls Installation menu The installation menu provides an onscreen display (OSD) for screen size and distance, focus, keystone correction and more . Use the OSD only when the message "No signal input" is displayed...
User Manual
Page 29
B Gain Adjusts the blue gain for color temperature optimization. With greater gamma value, dark scenery looks brighter. Note: "Saturation" and "Tint" functions are not supported under computer or HDMI mode. R Gain Adjusts the red gain for color temperature optimization. G Gain Adjusts the green gain for color temperature optimization. Effects the representation of dark scenery. English 19 Color Temperature Gamma Mode Use this function to choose CT1, CT2 (Native), CT3, User mode.
B Gain Adjusts the blue gain for color temperature optimization. With greater gamma value, dark scenery looks brighter. Note: "Saturation" and "Tint" functions are not supported under computer or HDMI mode. R Gain Adjusts the red gain for color temperature optimization. G Gain Adjusts the green gain for color temperature optimization. Effects the representation of dark scenery. English 19 Color Temperature Gamma Mode Use this function to choose CT1, CT2 (Native), CT3, User mode.
User Manual
Page 32
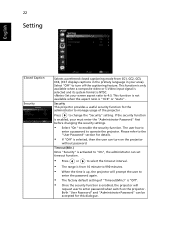
... "Auto" . 22 Setting English Closed Caption Security Selects a preferred closed captioning mode from 10 minute to 990 minutes. • When the time is up, the projector will prompt the user to enter the password again. • The factory default setting of the projector . This function is not available when the aspect ratio is enabled, your must enter the "Administrator Password" first before changing...
... "Auto" . 22 Setting English Closed Caption Security Selects a preferred closed captioning mode from 10 minute to 990 minutes. • When the time is up, the projector will prompt the user to enter the password again. • The factory default setting of the projector . This function is not available when the aspect ratio is enabled, your must enter the "Administrator Password" first before changing...
User Manual
Page 33
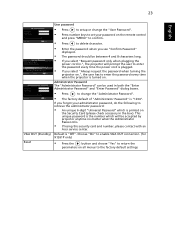
... password every time the power cord is plugged. • If you select "Always request the password when turning the projector on.", the user has to change the "User Password". • Press number keys to set your administrator password, do the following to the factory default settings. Default is . • If losing this security card and number, please contact with an Acer service center. If you forgot your password on the remote control and press "MENU...
... password every time the power cord is plugged. • If you select "Always request the password when turning the projector on.", the user has to change the "User Password". • Press number keys to set your administrator password, do the following to the factory default settings. Default is . • If losing this security card and number, please contact with an Acer service center. If you forgot your password on the remote control and press "MENU...
User Manual
Page 34
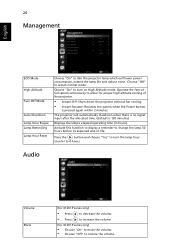
... projector will lower power consumption, extend the lamp life and reduce noise. Choose "Off" to dim the projector lamp which will automatically shutdown when there is no signal input after the allocated time. (default is pressed again within 2 minutes. 24 Management English ECO Mode High Altitude Turn Off Mode Auto Shutdown Lamp Hour Elapse Lamp Reminding Lamp Hour Reset Choose "On" to return normal mode. Activate this function to display a reminder to change the lamp...
... projector will lower power consumption, extend the lamp life and reduce noise. Choose "Off" to dim the projector lamp which will automatically shutdown when there is no signal input after the allocated time. (default is pressed again within 2 minutes. 24 Management English ECO Mode High Altitude Turn Off Mode Auto Shutdown Lamp Hour Elapse Lamp Reminding Lamp Hour Reset Choose "On" to return normal mode. Activate this function to display a reminder to change the lamp...
User Manual
Page 37
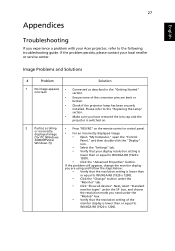
..., and choose the resolution mode you experience a problem with your Acer projector, refer to the following troubleshooting guide. If the problem still appears, change the monitor display you have removed the lens cap and the projector is switched on. 2 Partial, scrolling • Press "RESYNC" on the remote control or control panel. 27 Appendices English Troubleshooting If you need under the "Models" box. • Verify that your display resolution setting is lower than or...
..., and choose the resolution mode you experience a problem with your Acer projector, refer to the following troubleshooting guide. If the problem still appears, change the monitor display you have removed the lens cap and the projector is switched on. 2 Partial, scrolling • Press "RESYNC" on the remote control or control panel. 27 Appendices English Troubleshooting If you need under the "Models" box. • Verify that your display resolution setting is lower than or...
User Manual
Page 38
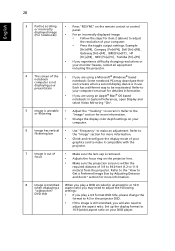
...) aspect ratio on the projector lens. • Make sure the projection screen is removed. • Adjusts the focus ring on your computer. • Press the toggle output settings. displayed image (For notebooks) • For an incorrectly displayed image: • Follow the steps for more information. • Change the display color depth settings on the remote control or control or incorrectly panel. Set up the display format to adjust the resolution of the • If...
...) aspect ratio on the projector lens. • Make sure the projection screen is removed. • Adjusts the focus ring on your computer. • Press the toggle output settings. displayed image (For notebooks) • For an incorrectly displayed image: • Follow the steps for more information. • Change the display color depth settings on the remote control or control or incorrectly panel. Set up the display format to adjust the resolution of the • If...
User Manual
Page 43
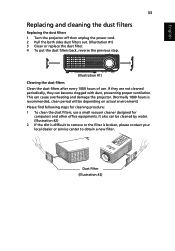
... following steps for cleaning procdure: 1 To clean the dust filters, use . English 33 Replacing and cleaning the dust filters Replacing the dust filters 1 Turn the projector off then unplug the power cord. 2 Pull the both sides dust filters out. (Illustration #1) 3 Clean or replace the dust filter. 4 To put the dust filters back, reverse the previous step. (Illustration #1) Cleaning the dust filters Clean the dust filters after every 1000 hours of use a small vacuum cleaner...
... following steps for cleaning procdure: 1 To clean the dust filters, use . English 33 Replacing and cleaning the dust filters Replacing the dust filters 1 Turn the projector off then unplug the power cord. 2 Pull the both sides dust filters out. (Illustration #1) 3 Clean or replace the dust filter. 4 To put the dust filters back, reverse the previous step. (Illustration #1) Cleaning the dust filters Clean the dust filters after every 1000 hours of use a small vacuum cleaner...
User Manual
Page 48
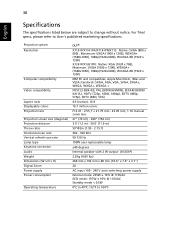
... final specs, please refer to 104ºF Projection system Resolution Computer compatibility Video compatibility Aspect ratio Displayable colors Projection lens Projection screen size (diagonal) Projection distance Throw ratio Horizontal scan rate Vertical refresh scan rate Lamp type Keystone correction Audio Weight Dimensions (W x D x H) Digital Zoom Power supply Power consumption Operating temperature DLP® X1161P/X1161PA/X1161PN/X112: Native: SVGA (800 x 600) , Maximum: UXGA (1600 x 1200), WSXGA+ (1680x1050), 1080p(1920x1080), WUXGA-RB (1920 x 1200) X1261P/X1261PN: Native: XGA...
... final specs, please refer to 104ºF Projection system Resolution Computer compatibility Video compatibility Aspect ratio Displayable colors Projection lens Projection screen size (diagonal) Projection distance Throw ratio Horizontal scan rate Vertical refresh scan rate Lamp type Keystone correction Audio Weight Dimensions (W x D x H) Digital Zoom Power supply Power consumption Operating temperature DLP® X1161P/X1161PA/X1161PN/X112: Native: SVGA (800 x 600) , Maximum: UXGA (1600 x 1200), WSXGA+ (1680x1050), 1080p(1920x1080), WUXGA-RB (1920 x 1200) X1261P/X1261PN: Native: XGA...
User Manual
Page 49
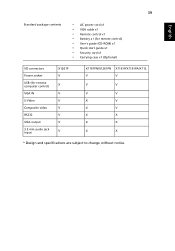
39 English Standard package contents • AC power cord x1 • VGA cable x1 • Remote control x1 • Battery x1 (for remote control) • User's guide (CD-ROM) x1 • Quick start guide x1 • Security card x1 • Carrying case x1 (Optional) I/O connectors Power socket USB (for remote computer control) VGA IN S-Video Composite video RS232 VGA output 3.5 mm audio jack input X1261P V X V V V V V V X1161PN/X1261PN X1161P/X1161PA/X112 V V V V V V X V X V X X X X X X * Design and specifications are subject to change without notice.
39 English Standard package contents • AC power cord x1 • VGA cable x1 • Remote control x1 • Battery x1 (for remote control) • User's guide (CD-ROM) x1 • Quick start guide x1 • Security card x1 • Carrying case x1 (Optional) I/O connectors Power socket USB (for remote computer control) VGA IN S-Video Composite video RS232 VGA output 3.5 mm audio jack input X1261P V X V V V V V V X1161PN/X1261PN X1161P/X1161PA/X112 V V V V V V X V X V X X X X X X * Design and specifications are subject to change without notice.


