
Veriton 3200 Service Guide
Page 12
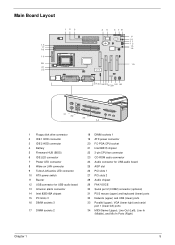
... 15 U13 23 24 25 262728 29 30 31 32 33 34 1 Floppy disk drive connector 2 IDE 1 HDD connector 3 IDE 2 HDD connector 4 Battery 5 Firmware HUB (BIOS) 6 IDE LED connector 7 Power LED connector 8 Wake on LAN connector 9 Turbo/LAN active LED connector 10 ATX power switch 11 Buzzer 12 USB connector for...
... 15 U13 23 24 25 262728 29 30 31 32 33 34 1 Floppy disk drive connector 2 IDE 1 HDD connector 3 IDE 2 HDD connector 4 Battery 5 Firmware HUB (BIOS) 6 IDE LED connector 7 Power LED connector 8 Wake on LAN connector 9 Turbo/LAN active LED connector 10 ATX power switch 11 Buzzer 12 USB connector for...
Veriton 3200 Service Guide
Page 16
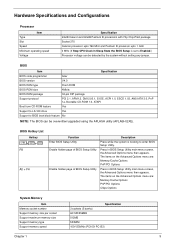
BIOS Item Specification BIOS code programmer Acer BIOS version V4.0 BIOS ROM type Flash ROM BIOS ROM size 4Mbits BIOS ROM package 32-pin DIP package Support protocol PCI 2.1, APM1.2, DMI 2.00.1, E-IDE, ACPI 1.0, ESCD 1.03, ANSI ATA 3.0, PnP 1a, ...Bootable CD-ROM 1.0, ATAPI Boot from CD-ROM feature Yes Support to LS-120 drive Yes Support to BIOS...
BIOS Item Specification BIOS code programmer Acer BIOS version V4.0 BIOS ROM type Flash ROM BIOS ROM size 4Mbits BIOS ROM package 32-pin DIP package Support protocol PCI 2.1, APM1.2, DMI 2.00.1, E-IDE, ACPI 1.0, ESCD 1.03, ANSI ATA 3.0, PnP 1a, ...Bootable CD-ROM 1.0, ATAPI Boot from CD-ROM feature Yes Support to LS-120 drive Yes Support to BIOS...
Veriton 3200 Service Guide
Page 17
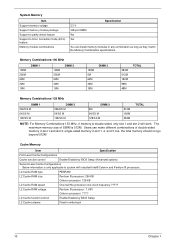
L2 Cache RAM voltage Pentium III processor: 1.65V Celeron processor: ????/ L2 Cache function control Enable/Disable by BIOS Setup (Advanced options) Second-Level Cache Configurations Below information is double-sided, only slot 1 and slot 2 will work. Memory Combinations-100 ... Yes Specification You can make different combinations of S58M is 512M. Cache Memory Item Specification First-Level Cache Configurations Cache function control Enable/Disable by BIOS Setup L2 Cache scheme Fixed in slot 1, 2, and 3, but, the total memory should not go beyond 512M . L2 Cache RAM type...
L2 Cache RAM voltage Pentium III processor: 1.65V Celeron processor: ????/ L2 Cache function control Enable/Disable by BIOS Setup (Advanced options) Second-Level Cache Configurations Below information is double-sided, only slot 1 and slot 2 will work. Memory Combinations-100 ... Yes Specification You can make different combinations of S58M is 512M. Cache Memory Item Specification First-Level Cache Configurations Cache function control Enable/Disable by BIOS Setup L2 Cache scheme Fixed in slot 1, 2, and 3, but, the total memory should not go beyond 512M . L2 Cache RAM type...
Veriton 3200 Service Guide
Page 18
... Video controller resident bus Video interface support Specification Embedded in Intel 815E AGP bus (AGP 2X/4X for AGP slot) Video YUV texture in the BIOS Utility. Display Screen Resolution Bits Per Pixel (Frequency in Hz) 8-bit Indexed 320x240 70 320x240 70 352x480 70 352x576 70 400x300 70 512x384 70 640x400...
... Video controller resident bus Video interface support Specification Embedded in Intel 815E AGP bus (AGP 2X/4X for AGP slot) Video YUV texture in the BIOS Utility. Display Screen Resolution Bits Per Pixel (Frequency in Hz) 8-bit Indexed 320x240 70 320x240 70 352x480 70 352x576 70 400x300 70 512x384 70 640x400...
Veriton 3200 Service Guide
Page 19
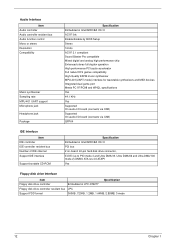
... synthesizer Sampling rate MPU-401 UART support Microphone jack Headphone jack Package Specification Embedded in Intel 82801BA ICH II AC'97 link Enable/disable by BIOS Setup Stereo 16 bits AC'97 2.1 compliant Sound Blaster Pro compatible Mixed digital and analog high performance chip Enhanced stereo full duplex operation High performance...
... synthesizer Sampling rate MPU-401 UART support Microphone jack Headphone jack Package Specification Embedded in Intel 82801BA ICH II AC'97 link Enable/disable by BIOS Setup Stereo 16 bits AC'97 2.1 compliant Sound Blaster Pro compatible Mixed digital and analog high performance chip Enhanced stereo full duplex operation High performance...

Veriton 3200 Service Guide
Page 28
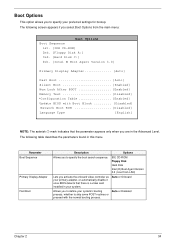
Boot Options ! System Security Load Default Settings Abort Settings Change The system supports two BIOS Utility levels: Basic and Advanced. The above screen is booting. Detailed system configurations are in the main menu. This means...simultaneously. Date and Time ! Advanced Options Load Default Settings Abort Settings Change 21 Chapter 2 NOTE: You must press simultaneously while the system is the BIOS Utility Basic Level screen. If you to check the detailed configuration of your system. System Security ! Product Information ! Power Management ! Product Information ...
Boot Options ! System Security Load Default Settings Abort Settings Change The system supports two BIOS Utility levels: Basic and Advanced. The above screen is booting. Detailed system configurations are in the main menu. This means...simultaneously. Date and Time ! Advanced Options Load Default Settings Abort Settings Change 21 Chapter 2 NOTE: You must press simultaneously while the system is the BIOS Utility Basic Level screen. If you to check the detailed configuration of your system. System Security ! Product Information ! Power Management ! Product Information ...
Veriton 3200 Service Guide
Page 31
... Installed or Disabled Chapter 2 24 The None setting indicates that there is no DRAM installed. The None setting indicates that there is automatically detected by BIOS during the POST. If enabled, indicates the IRQ and I/O port Address I/O port address assigned to display the new memory size. If you install additional memory...
... Installed or Disabled Chapter 2 24 The None setting indicates that there is no DRAM installed. The None setting indicates that there is automatically detected by BIOS during the POST. If enabled, indicates the IRQ and I/O port Address I/O port address assigned to display the new memory size. If you install additional memory...
Veriton 3200 Service Guide
Page 32
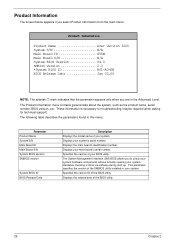
... The screen below appears if you select Product Information from the main menu: Product Information Product Name Acer Veriton 3200 System S/N N/A Main Board ID S58M Main Board S/N N/A System BIOS Version V4.0 SMBIOS Version 2.3 *System BIOS ID R01-A0-EN BIOS Release Date Jan 03,00 NOTE: The asterisk (*) mark indicates that the parameter appears only when...
... The screen below appears if you select Product Information from the main menu: Product Information Product Name Acer Veriton 3200 System S/N N/A Main Board ID S58M Main Board S/N N/A System BIOS Version V4.0 SMBIOS Version 2.3 *System BIOS ID R01-A0-EN BIOS Release Date Jan 03,00 NOTE: The asterisk (*) mark indicates that the parameter appears only when...
Veriton 3200 Service Guide
Page 35
... know your hard disk, select Auto. Auto, None, or User. The Auto setting also sets the Cylinder, Head, Sector, and Size parameters. If you want BIOS to enter your settings manually if you specify the type of hard disk installed in the Advanced Level. If you are in your hard disk...
... know your hard disk, select Auto. Auto, None, or User. The Auto setting also sets the Cylinder, Head, Sector, and Size parameters. If you want BIOS to enter your settings manually if you specify the type of hard disk installed in the Advanced Level. If you are in your hard disk...
Veriton 3200 Service Guide
Page 36
...the size of 256 bytes per cycle. If supported, it allows data transfer in the BIOS Setup, both the Ultra DMA and Multi-DMA modes require the DMA driver to Auto, the BIOS utility automatically detects if the installed hard disk drive supports the Block Mode function. Otherwise ... number of cylinders, and is automatically set depending on your hard disk, in MB, and is non-configurable. Set to Auto, the BIOS utility automatically detects if the installed hard disk supports the function, it is Hard Disk. Cylinder Specifies your Type parameter setting. Enabled or Disabled...
...the size of 256 bytes per cycle. If supported, it allows data transfer in the BIOS Setup, both the Ultra DMA and Multi-DMA modes require the DMA driver to Auto, the BIOS utility automatically detects if the installed hard disk drive supports the Block Mode function. Otherwise ... number of cylinders, and is automatically set depending on your hard disk, in MB, and is non-configurable. Set to Auto, the BIOS utility automatically detects if the installed hard disk supports the function, it is Hard Disk. Cylinder Specifies your Type parameter setting. Enabled or Disabled...
Veriton 3200 Service Guide
Page 41
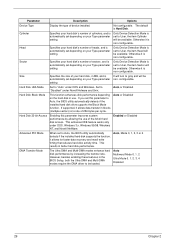
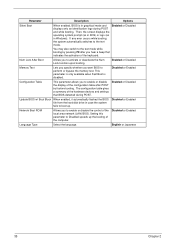
... Display Adapter Auto] Fast Boot Auto] Silent Boot Enabled] Num Lock After BOOT Enabled] Memory Test Disabled] *Configuration Table Enabled] Update BIOS with the normal booting process. Chapter 2 34 The following screen appears if you select Boot Options from LAN) Lets you activate the onboard... video controller as your primary adapter, or automatically disable it once BIOS detects that the parameter appears only when you to define your system. Auto or Onboard Allows you are in the Advanced Level...
... Display Adapter Auto] Fast Boot Auto] Silent Boot Enabled] Num Lock After BOOT Enabled] Memory Test Disabled] *Configuration Table Enabled] Update BIOS with the normal booting process. Chapter 2 34 The following screen appears if you select Boot Options from LAN) Lets you activate the onboard... video controller as your primary adapter, or automatically disable it once BIOS detects that the parameter appears only when you to define your system. Auto or Onboard Allows you are in the Advanced Level...
Veriton 3200 Service Guide
Page 42
... of the configuration table after you to Disabled speeds up . English or Japanese 35 Chapter 2 Parameter Description Options Silent Boot When enabled, BIOS is disabled. Disabled or Enabled Configuration Table This parameter allows you to the text mode while booting by pressing F9 after POST but before ...to perform or bypass the memory test. Num Lock After Boot Allows you to boot up the booting of the local area network (LAN) BIOS. This parameter is only available when Fast Boot is in Windows). Then, the screen displays the operating system prompt (as in DOS) or ...
... of the configuration table after you to Disabled speeds up . English or Japanese 35 Chapter 2 Parameter Description Options Silent Boot When enabled, BIOS is disabled. Disabled or Enabled Configuration Table This parameter allows you to the text mode while booting by pressing F9 after POST but before ...to perform or bypass the memory test. Num Lock After Boot Allows you to boot up the booting of the local area network (LAN) BIOS. This parameter is only available when Fast Boot is in Windows). Then, the screen displays the operating system prompt (as in DOS) or ...

Veriton 3200 Service Guide
Page 44
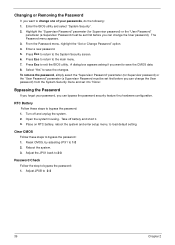
... password, refer to "Setting a Password" on Boot Disk Drive Controller Floppy Drive Hard Disk Drive Processor Serial Number Description Options Prevents unauthorized access to the BIOS utility. Parameter Supervisor Password User Password Password on page 38. Secures your system's floppy drive and hard disk data from being modified. Once you set...
... password, refer to "Setting a Password" on Boot Disk Drive Controller Floppy Drive Hard Disk Drive Processor Serial Number Description Options Prevents unauthorized access to the BIOS utility. Parameter Supervisor Password User Password Password on page 38. Secures your system's floppy drive and hard disk data from being modified. Once you set...
Veriton 3200 Service Guide
Page 45
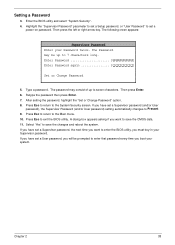
.... Highlight the "Supervisor Password" parameter to set a Setup password, or "User Password" to set a User password, you want to enter the BIOS utility, you have set a Supervisor password (and/or User password), the Supervisor Password (and/or User password) setting automatically changes to 7 characters long...Enter. 7. Setting a Password 3. Then press Enter. 6. If you must key-in your Password twice. Press Esc to return to exit the BIOS utility. Select "Yes" to seven characters. A dialog box appears asking if you will be up to save the CMOS data. 11. If you...
.... Highlight the "Supervisor Password" parameter to set a Setup password, or "User Password" to set a User password, you want to enter the BIOS utility, you have set a Supervisor password (and/or User password), the Supervisor Password (and/or User password) setting automatically changes to 7 characters long...Enter. 7. Setting a Password 3. Then press Enter. 6. If you must key-in your Password twice. Press Esc to return to exit the BIOS utility. Select "Yes" to seven characters. A dialog box appears asking if you will be up to save the CMOS data. 11. If you...
Veriton 3200 Service Guide
Page 46
... password: 1. Select "Yes" to save the CMOS data. 8. RTC Battery Follow these steps to 1-2 2. Open the system housing. Adjust JPXB to exit the BIOS utility. Enter the BIOS utility and select "System Security". 2. Highlight the "Supervisor Password" parameter (for Supervisor password) or the "User Password" parameter (a Supervisor Password must be set first...
... password: 1. Select "Yes" to save the CMOS data. 8. RTC Battery Follow these steps to 1-2 2. Open the system housing. Adjust JPXB to exit the BIOS utility. Enter the BIOS utility and select "System Security". 2. Highlight the "Supervisor Password" parameter (for Supervisor password) or the "User Password" parameter (a Supervisor Password must be set first...
Veriton 3200 Service Guide
Page 49
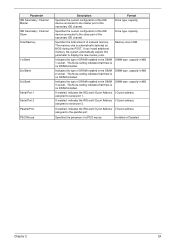
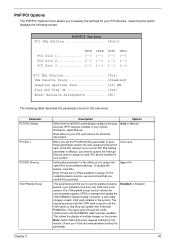
... the same IRQ to two different devices. Parameter PCI IRQ Setting PCI Slot 1 PCI IRQ Sharing VGA Palette Snoop Description Options Select Auto to let BIOS automatically configure the plugand-play (PnP) devices installed in the system. Check your system. Auto or Manual When you installed more than one VGA card...
... the same IRQ to two different devices. Parameter PCI IRQ Setting PCI Slot 1 PCI IRQ Sharing VGA Palette Snoop Description Options Select Auto to let BIOS automatically configure the plugand-play (PnP) devices installed in the system. Check your system. Auto or Manual When you installed more than one VGA card...
Veriton 3200 Service Guide
Page 50
...Set this parameter to Yes only if your operating system is set to No, BIOS initializes all installed PnP devices the next time the system boots. This clears all resource assignments and allows BIOS to reassign resources to manage graphical objects. After clearing the resource data, the parameter... When set to avoid IRQ conflict when installing non-PnP or PnP ISA cards. Note: Set this parameter to Yes to Yes, BIOS initializes only PnP boot devices such as sound cards. Parameter Graphics Aperture Size Plug and Play OS Reset Resource Assignments Description This parameter ...
...Set this parameter to Yes only if your operating system is set to No, BIOS initializes all installed PnP devices the next time the system boots. This clears all resource assignments and allows BIOS to reassign resources to manage graphical objects. After clearing the resource data, the parameter... When set to avoid IRQ conflict when installing non-PnP or PnP ISA cards. Note: Set this parameter to Yes to Yes, BIOS initializes only PnP boot devices such as sound cards. Parameter Graphics Aperture Size Plug and Play OS Reset Resource Assignments Description This parameter ...
Veriton 3200 Service Guide
Page 52
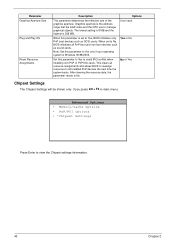
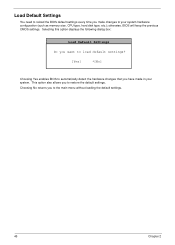
... settings. This option also allows you to the main menu without loading the default settings. 45 Chapter 2 otherwise, BIOS will keep the previous CMOS settings. Load Default Settings You need to reload the BIOS default settings every time you make changes to automatically detect the hardware changes that you have made in... type, etc.); Selecting this option displays the following dialog box: Load Default Settings Do you want to load default settings? [Yes] *[No] Choosing Yes enables BIOS to your system.
... settings. This option also allows you to the main menu without loading the default settings. 45 Chapter 2 otherwise, BIOS will keep the previous CMOS settings. Load Default Settings You need to reload the BIOS default settings every time you make changes to automatically detect the hardware changes that you have made in... type, etc.); Selecting this option displays the following dialog box: Load Default Settings Do you want to load default settings? [Yes] *[No] Choosing Yes enables BIOS to your system.
Veriton 3200 Service Guide
Page 53
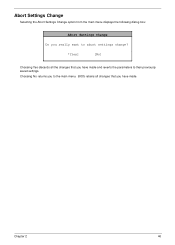
Abort Settings Change Selecting the Abort Settings Change option from the main menu displays the following dialog box: Abort Settings Change Do you really want to abort settings change? *[Yes] [No] Choosing Yes discards all changes that you to their previously saved settings. Chapter 2 46 Choosing No returns you have made and reverts the parameters to the main menu. BIOS retains all the changes that you have made .
Abort Settings Change Selecting the Abort Settings Change option from the main menu displays the following dialog box: Abort Settings Change Do you really want to abort settings change? *[Yes] [No] Choosing Yes discards all changes that you to their previously saved settings. Chapter 2 46 Choosing No returns you have made and reverts the parameters to the main menu. BIOS retains all the changes that you have made .
Veriton 3200 Service Guide
Page 54
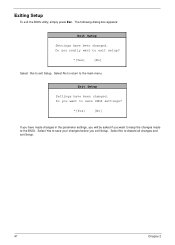
...] If you have made changes in the parameter settings, you will be asked if you want to exit setup? *[Yes] [No] Select Yes to the BIOS. Do you want to save your changes before you really want to keep the changes made to exit Setup. Select No to return to discard... all changes and exit Setup. 47 Chapter 2 Select No to the main menu. Exiting Setup To exit the BIOS utility, simply press Esc. The following dialog box appears: Exit Setup Settings have been changed . Do you exit Setup.
...] If you have made changes in the parameter settings, you will be asked if you want to exit setup? *[Yes] [No] Select Yes to the BIOS. Do you want to save your changes before you really want to keep the changes made to exit Setup. Select No to return to discard... all changes and exit Setup. 47 Chapter 2 Select No to the main menu. Exiting Setup To exit the BIOS utility, simply press Esc. The following dialog box appears: Exit Setup Settings have been changed . Do you exit Setup.


