

TravelMate C210 Service Guide
Page 7
... models 25 Acer eLock Management 27 Acer eRecovery Management 28 Acer eSettings Management 29 Acer ePerformance Management 29 Hardware Specifications and Configurations 31 Chapter 2 System Utilities 35 BIOS Setup Utility 41 Navigating the BIOS Utility 42 Information 43 Main 44 Advanced 45 Security 46 Boot 49 Exit 50 BIOS Flash Utility 51 Remove HDD/BIOS Utility 52 Chapter 3 Machine Disassembly and Replacement 47 General Information 58 Before You Begin 58 Disassembly Procedure Flowchart 59 Removing the Battery Pack 60 Removing the HDD Module/ODD Module/Memory...
... models 25 Acer eLock Management 27 Acer eRecovery Management 28 Acer eSettings Management 29 Acer ePerformance Management 29 Hardware Specifications and Configurations 31 Chapter 2 System Utilities 35 BIOS Setup Utility 41 Navigating the BIOS Utility 42 Information 43 Main 44 Advanced 45 Security 46 Boot 49 Exit 50 BIOS Flash Utility 51 Remove HDD/BIOS Utility 52 Chapter 3 Machine Disassembly and Replacement 47 General Information 58 Before You Begin 58 Disassembly Procedure Flowchart 59 Removing the Battery Pack 60 Removing the HDD Module/ODD Module/Memory...
TravelMate C210 Service Guide
Page 8
... Removing the Hard Disk Drive Module 61 Removing the Optical Disk Drive Module 61 Removing the Memory 61 Removing the Wireless LAN Card 61 Removing the LCD Module 62 Removing the Keyboard 63 Disassembling the Main Unit 64 Separating the Main Unit into the Upper Case And the Lower Case Assembly 64 Disassembling the Upper Case, the Lower Case and the Main Board Assembly 65 Disassembling the LCD Module 67 Disassembling the External Modules 69 Disassembling the HDD Module 69 Disassembling the Optical Disc Drive Module...
... Removing the Hard Disk Drive Module 61 Removing the Optical Disk Drive Module 61 Removing the Memory 61 Removing the Wireless LAN Card 61 Removing the LCD Module 62 Removing the Keyboard 63 Disassembling the Main Unit 64 Separating the Main Unit into the Upper Case And the Lower Case Assembly 64 Disassembling the Upper Case, the Lower Case and the Main Board Assembly 65 Disassembling the LCD Module 67 Disassembling the External Modules 69 Disassembling the HDD Module 69 Disassembling the Optical Disc Drive Module...

TravelMate C210 Service Guide
Page 17
... devices. Bluetooth Press to enable/disable the wireless function. Fast infrared (FIR) port Interfaces with eraser For entering data in tablet PC mode. # Icon Item Description 1 Ethernet (RJ-45) port Connects to a gigabit Ethernet network. 2 Modem (RJ-11) port Connects to indicated the status of Bluetooth indicator communications. button 4 LED indicator Lights up when battery is being charged. communication button/ Lights to a phone line. 3 Optical drive eject Ejects the optical drive tray. Lights up when the optical drive is active...
... devices. Bluetooth Press to enable/disable the wireless function. Fast infrared (FIR) port Interfaces with eraser For entering data in tablet PC mode. # Icon Item Description 1 Ethernet (RJ-45) port Connects to a gigabit Ethernet network. 2 Modem (RJ-11) port Connects to indicated the status of Bluetooth indicator communications. button 4 LED indicator Lights up when battery is being charged. communication button/ Lights to a phone line. 3 Optical drive eject Ejects the optical drive tray. Lights up when the optical drive is active...
TravelMate C210 Service Guide
Page 18
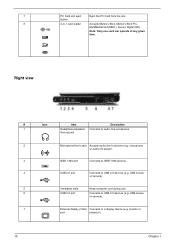
...audio line-in -1 card reader Accepts Memory Stick, Memory Stick Pro, MultiMediaCard (MMC), Secure Digital (SD). monitor or port projector). 10 Chapter 1 Note: Only one card can operate at any given time. microphone or audio CD player). 3 IEEE 1394 port Connects to IEEE 1394 devices. 4 USB 2.0 port Connects to audio line-out devices. USB mouse or camera). 7 External display (VGA) Connects to USB 2.0 devices (e.g. USB mouse or camera). 5 Ventilation slots Keep computer cool during use. 6 USB 2.0 port Connects to a display device (e.g. button 8 4-in devices...
...audio line-in -1 card reader Accepts Memory Stick, Memory Stick Pro, MultiMediaCard (MMC), Secure Digital (SD). monitor or port projector). 10 Chapter 1 Note: Only one card can operate at any given time. microphone or audio CD player). 3 IEEE 1394 port Connects to IEEE 1394 devices. 4 USB 2.0 port Connects to audio line-out devices. USB mouse or camera). 7 External display (VGA) Connects to USB 2.0 devices (e.g. USB mouse or camera). 5 Ventilation slots Keep computer cool during use. 6 USB 2.0 port Connects to a display device (e.g. button 8 4-in devices...
TravelMate C210 Service Guide
Page 23
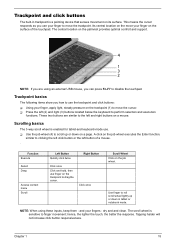
... right (3) buttons located below the keyboard to move the trackpoint. These two buttons are using these inputs, keep them - Function Function LLeftt Bbuttttoonn Execute Quickly click twice Select Drag Access context menu Scroll Click once Click and hold, then use the trackpoint and click buttons: (1) T Using your finger on a mouse. Click once Use finger to roll scroll wheel lightly up or down in trackpoint is a pointing device that senses...
... right (3) buttons located below the keyboard to move the trackpoint. These two buttons are using these inputs, keep them - Function Function LLeftt Bbuttttoonn Execute Quickly click twice Select Drag Access context menu Scroll Click once Click and hold, then use the trackpoint and click buttons: (1) T Using your finger on a mouse. Click once Use finger to roll scroll wheel lightly up or down in trackpoint is a pointing device that senses...
TravelMate C210 Service Guide
Page 24
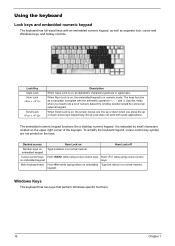
... operators +, -, *, and /). Desired access Num Lock on Num Lock off Number keys on the keys. The embedded numeric keypad functions like a desktop numeric keypad. When Scroll Lock is indicated by small characters located on , the screen moves one line up or down arrow keys respectively. keypad. Using the keyboard Lock keys and embedded numeric keypad The keyboard has full-sized keys with some applications. The keys function as separate lock, cursor and Windows keys, and hotkey controls...
... operators +, -, *, and /). Desired access Num Lock on Num Lock off Number keys on the keys. The embedded numeric keypad functions like a desktop numeric keypad. When Scroll Lock is indicated by small characters located on , the screen moves one line up or down arrow keys respectively. keypad. Using the keyboard Lock keys and embedded numeric keypad The keyboard has full-sized keys with some applications. The keys function as separate lock, cursor and Windows keys, and hotkey controls...
TravelMate C210 Service Guide
Page 25
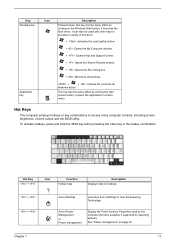
... Computer window. + : Opens Help and Support Center. + : Opens the Search Results window. + : Opens the Run dialog box. + : Minimizes all windows. + + : Undoes the minimize all windows action. Acer ePower Management or Power management Display the Power Options Properties used with other key in Acer Empowering Technology. Chapter 1 17 To activate hotkeys, press and hold the key before pressing the other keys to access many computer controls, including screen brightness, volume output and the BIOS utility. See "Power management" on the Windows Start button; This key has...
... Computer window. + : Opens Help and Support Center. + : Opens the Search Results window. + : Opens the Run dialog box. + : Minimizes all windows. + + : Undoes the minimize all windows action. Acer ePower Management or Power management Display the Power Options Properties used with other key in Acer Empowering Technology. Chapter 1 17 To activate hotkeys, press and hold the key before pressing the other keys to access many computer controls, including screen brightness, volume output and the BIOS utility. See "Power management" on the Windows Start button; This key has...

TravelMate C210 Service Guide
Page 28
... < > key to a projector and adjusts display settings conveniently. You also have the option to set Acer eNet Management to start the program from the Start menu. T Acer ePower Management extends battery power via versatile usage profiles. Acer eNet Management (for a new location, while offering you to quickly and easily connect to access frequently used functions and manage your new Acer notebook. Acer eNet Management automatically detects the best settings for selected models) Acer eNet Management helps you the freedom to manually adjust the settings to external storage media. It...
... < > key to a projector and adjusts display settings conveniently. You also have the option to set Acer eNet Management to start the program from the Start menu. T Acer ePower Management extends battery power via versatile usage profiles. Acer eNet Management (for a new location, while offering you to quickly and easily connect to access frequently used functions and manage your new Acer notebook. Acer eNet Management automatically detects the best settings for selected models) Acer eNet Management helps you the freedom to manually adjust the settings to external storage media. It...
TravelMate C210 Service Guide
Page 52
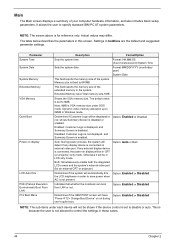
... dim Option: Enabled or Disabled the LCD brightness in boldface are the default and suggested parameter settings. Indicates that whether the notebook can boot from LAN or not. Main The Main screen displays a summary of the system. Both: Simultaneously enable both the integrated LCD screen and the system's external video port (for reference only. NOTE: The sub-items under DOS mode. Settings in order to save power when AC is connected, the power on display will...
... dim Option: Enabled or Disabled the LCD brightness in boldface are the default and suggested parameter settings. Indicates that whether the notebook can boot from LAN or not. Main The Main screen displays a summary of the system. Both: Simultaneously enable both the integrated LCD screen and the system's external video port (for reference only. NOTE: The sub-items under DOS mode. Settings in order to save power when AC is connected, the power on display will...

TravelMate C210 Service Guide
Page 55
Type a password in the Enter Current Password field and press e. 3. The password length can opt to save the changes and exit the BIOS Setup Utility. When you have changed the settings, press u to enable the Password on the screen. 3. Type the current password in the "Enter New Password" field. The Set Supervisor Password box appears: 2. Press e. When you are done, press u to "Clear". 4. Changing a Password 1. Use the w and y keys to "Set". 4. After setting the password, the computer sets the User Password parameter to...
Type a password in the Enter Current Password field and press e. 3. The password length can opt to save the changes and exit the BIOS Setup Utility. When you have changed the settings, press u to enable the Password on the screen. 3. Type the current password in the "Enter New Password" field. The Set Supervisor Password box appears: 2. Press e. When you are done, press u to "Clear". 4. Changing a Password 1. Use the w and y keys to "Set". 4. After setting the password, the computer sets the User Password parameter to...
TravelMate C210 Service Guide
Page 57
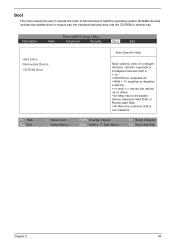
Boot This menu allows the user to decide the order of boot devices to view or configure devices: expnads or Collapses Devices with a + or expnads all enables or disables a device. May move removable device between Hard Disk or Removable Disk. Remove a device that is not installed. F5/F6 Change Values Enter Select 4 Sub -Menu F9 Setup Defaults F10 Save and Exit Chapter 2 49 PhoenixBIOS Setup Utility Information Main Advanced Security Boot Exit Hard Drive Removable Device CD-ROM Drive F1 Help Esc Exit ↑ ↓ Select...
Boot This menu allows the user to decide the order of boot devices to view or configure devices: expnads or Collapses Devices with a + or expnads all enables or disables a device. May move removable device between Hard Disk or Removable Disk. Remove a device that is not installed. F5/F6 Change Values Enter Select 4 Sub -Menu F9 Setup Defaults F10 Save and Exit Chapter 2 49 PhoenixBIOS Setup Utility Information Main Advanced Security Boot Exit Hard Drive Removable Device CD-ROM Drive F1 Help Esc Exit ↑ ↓ Select...

TravelMate C210 Service Guide
Page 60
Remove HDD/BIOS Utility This section provide you with removing HDD/BIOS method: Remove HDD Password: T If you can run HDD_PW.EXE 1. Select "2" 3. T If you need to HDD user password. 52 Chapter 2 Choose one upper-case string T Reboot system and key in "0KJFN42" or "UVEIQ96" to solve HDD password locked problem, you key in "hdd_pw 15494 0" 2. Key in wrong HDD password for three time, "HDD password error code" would display on the screen. See the image below.
Remove HDD/BIOS Utility This section provide you with removing HDD/BIOS method: Remove HDD Password: T If you can run HDD_PW.EXE 1. Select "2" 3. T If you need to HDD user password. 52 Chapter 2 Choose one upper-case string T Reboot system and key in "0KJFN42" or "UVEIQ96" to solve HDD password locked problem, you key in "hdd_pw 15494 0" 2. Key in wrong HDD password for three time, "HDD password error code" would display on the screen. See the image below.
TravelMate C210 Service Guide
Page 67
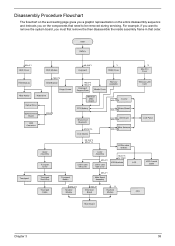
... Covers HDD Drive Optical Drive Optical Device Board ODD Connector M2L4*2 Touchpad Upper Assembly Toucpad Cover Touchpad Scroll Key Touchpad Button M2L8*3 M2L4*4 Keyboard Support Plate Middle Cover Memory (upgrade) Memory/ MDC board Inverter M2L4.5*2 RTC Battery Button Board M2L4.5*2 Wireless LAN Card Disconnect Bluetooth M2.5L5*4 LCD Module LED Board M2L4.5*2 Main Antenna M2L4.5*2 M2.5L6*2 M2L6*12 Lower case left cover Lower Assembly M2L4*2 Lower case right cover LCD/w cable, brakets M2L3*8 for CMO LCD Brackets LCD M2L4*1 Main Board Assembly LCD Panel LCD Coaxial Cable...
... Covers HDD Drive Optical Drive Optical Device Board ODD Connector M2L4*2 Touchpad Upper Assembly Toucpad Cover Touchpad Scroll Key Touchpad Button M2L8*3 M2L4*4 Keyboard Support Plate Middle Cover Memory (upgrade) Memory/ MDC board Inverter M2L4.5*2 RTC Battery Button Board M2L4.5*2 Wireless LAN Card Disconnect Bluetooth M2.5L5*4 LCD Module LED Board M2L4.5*2 Main Antenna M2L4.5*2 M2.5L6*2 M2L6*12 Lower case left cover Lower Assembly M2L4*2 Lower case right cover LCD/w cable, brakets M2L3*8 for CMO LCD Brackets LCD M2L4*1 Main Board Assembly LCD Panel LCD Coaxial Cable...
TravelMate C210 Service Guide
Page 69
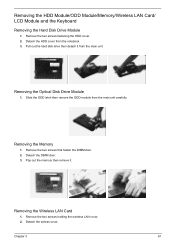
... . Remove the two screws fastening the HDD cover. 2. Removing the Wireless LAN Card 1. Detach the HDD cover from the main unit carefully. Removing the Optical Disk Drive Module 1. Detach the wirless cover. Remove the two screws that fasten the DIMM door. 2. Pop out the memory then remove it from the main unit. Slide the ODD latch then remove the ODD module from the notebook. 3. Removing the HDD Module/ODD Module/Memory/Wireless LAN Card/ LCD Module and the Keyboard Removing the Hard Disk Drive Module 1. Removing the Memory 1.
... . Remove the two screws fastening the HDD cover. 2. Removing the Wireless LAN Card 1. Detach the HDD cover from the main unit carefully. Removing the Optical Disk Drive Module 1. Detach the wirless cover. Remove the two screws that fasten the DIMM door. 2. Pop out the memory then remove it from the main unit. Slide the ODD latch then remove the ODD module from the notebook. 3. Removing the HDD Module/ODD Module/Memory/Wireless LAN Card/ LCD Module and the Keyboard Removing the Hard Disk Drive Module 1. Removing the Memory 1.

TravelMate C210 Service Guide
Page 87
... devices Initialize all video adapters in system QuietBoot start (optional) Shadow video BIOS ROM Display BIOS copyright notice Display CPU type and speed Initialize EISA board Test keyboard Set key click if enabled Test for unexpected interrupts Initialize POST display service Display prompt "Press F2 to enter SETUP" Disable CPU cache Test RAM between 512 and 640 KB Test extended memory Test extended memory address lines Jump to User Patch1 Configure advanced cache registers Initialize Multi Processor APIC Enable external and CPU caches Setup...
... devices Initialize all video adapters in system QuietBoot start (optional) Shadow video BIOS ROM Display BIOS copyright notice Display CPU type and speed Initialize EISA board Test keyboard Set key click if enabled Test for unexpected interrupts Initialize POST display service Display prompt "Press F2 to enter SETUP" Disable CPU cache Test RAM between 512 and 640 KB Test extended memory Test extended memory address lines Jump to User Patch1 Configure advanced cache registers Initialize Multi Processor APIC Enable external and CPU caches Setup...

TravelMate C210 Service Guide
Page 89
... the CPU Initialize the system timer Initialize system I/O Check force recovery boot Checksum BIOS ROM Go to BIOS Set Huge Segment Initialize Multi Processor Initialize OEM special code Initialize PIC and DMA Initialize Memory type Initialize Memory size Shadow Boot Block System memory test Initialize interrupt vectors Initialize Run Time Clock Initialize video Initialize System Management Mode Output one beep before boot Boot to Mini DOS Clear Huge Segment Boot...
... the CPU Initialize the system timer Initialize system I/O Check force recovery boot Checksum BIOS ROM Go to BIOS Set Huge Segment Initialize Multi Processor Initialize OEM special code Initialize PIC and DMA Initialize Memory type Initialize Memory size Shadow Boot Block System memory test Initialize interrupt vectors Initialize Run Time Clock Initialize video Initialize System Management Mode Output one beep before boot Boot to Mini DOS Clear Huge Segment Boot...
TravelMate C210 Service Guide
Page 90
...-ROM active indicators cannot work HDD/CD-ROM drive Device driver Main board Action in Sequence Power source (battery pack and power adapter). See "Power System Check" on page 73. Battery pack AC adapter See if the thermal module is OK. LCD cable LCD inverter LCD Main board Enter BIOS Utility to running "Load Default Settings" then reboot the system. Battery pack Power adapter CPU Main board In Windows XP operating system, hold and press the power switch for more than 4 seconds. Next, enter BIOS utility to execute "Load Setup Default Settings", then reboot system. LCD cable LCD...
...-ROM active indicators cannot work HDD/CD-ROM drive Device driver Main board Action in Sequence Power source (battery pack and power adapter). See "Power System Check" on page 73. Battery pack AC adapter See if the thermal module is OK. LCD cable LCD inverter LCD Main board Enter BIOS Utility to running "Load Default Settings" then reboot the system. Battery pack Power adapter CPU Main board In Windows XP operating system, hold and press the power switch for more than 4 seconds. Next, enter BIOS utility to execute "Load Setup Default Settings", then reboot system. LCD cable LCD...
TravelMate C210 Service Guide
Page 91
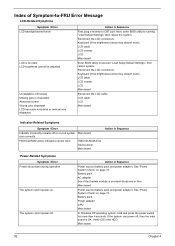
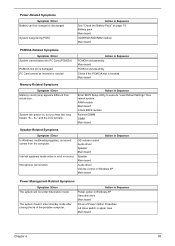
... Hard disk drive Main board Driver of the portable computer. RAM module Main board Check BIOS revision Reinsert DIMM DIMM Main board Speaker-Related Symptoms Symptom / Error In Windows, multimedia programs, no sound. Internal speakers make noise or emit no sound comes from actual size. PC Card cannot be charged or discharged System hang during POST Action in Sequence Enter BIOS Setup Utility to execute "Load Default Settings" then reboot system. Battery pack Main board ODD/HDD/FDD/RAM module...
... Hard disk drive Main board Driver of the portable computer. RAM module Main board Check BIOS revision Reinsert DIMM DIMM Main board Speaker-Related Symptoms Symptom / Error In Windows, multimedia programs, no sound. Internal speakers make noise or emit no sound comes from actual size. PC Card cannot be charged or discharged System hang during POST Action in Sequence Enter BIOS Setup Utility to execute "Load Default Settings" then reboot system. Battery pack Main board ODD/HDD/FDD/RAM module...
TravelMate C210 Service Guide
Page 92
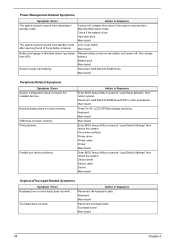
... mode. USB does not work correctly. Main board Press Fn+F5, LCD/CRT/Both display switching Keyboard Main board Main board Enter BIOS Setup Utility to execute "Load Setup defaults", then reboot system. Run printer self-test. Printer driver Printer cable Printer Main board Enter BIOS Setup Utility to execute "Load Default Settings" then reboot the system. Reconnect hard disk/CD-ROM drives. Main board Peripheral-Related Symptoms Symptom / Error System configuration does not match the installed devices. Reconnect hard disk/CD-ROM drives/FDD or other peripherals. Power Management...
... mode. USB does not work correctly. Main board Press Fn+F5, LCD/CRT/Both display switching Keyboard Main board Main board Enter BIOS Setup Utility to execute "Load Setup defaults", then reboot system. Run printer self-test. Printer driver Printer cable Printer Main board Enter BIOS Setup Utility to execute "Load Default Settings" then reboot the system. Reconnect hard disk/CD-ROM drives. Main board Peripheral-Related Symptoms Symptom / Error System configuration does not match the installed devices. Reconnect hard disk/CD-ROM drives/FDD or other peripherals. Power Management...
TravelMate C210 Service Guide
Page 129
... Disassembly Battery Pack 59 Index Index LCD Module 67 Procedure Flowchart 59 Display 3 E Easy-launch buttons 14 Error Symptom-to-Spare Part Index 75 External CD-ROM Drive Check 72 External Diskette Drive Check 72 F Features 1 Flash Utility 51 Floppy Disk removing the 67 FRU (Field Replaceable Unit) List 93 H Hard disk 34 HDD 34 I Indicators 13 Intermittent Problems 86 J Jumper and Connector Locations 89 Top View 89 Bottom View 90 K Keyboard 37 Keyboard or Auxiliary Input Device...
... Disassembly Battery Pack 59 Index Index LCD Module 67 Procedure Flowchart 59 Display 3 E Easy-launch buttons 14 Error Symptom-to-Spare Part Index 75 External CD-ROM Drive Check 72 External Diskette Drive Check 72 F Features 1 Flash Utility 51 Floppy Disk removing the 67 FRU (Field Replaceable Unit) List 93 H Hard disk 34 HDD 34 I Indicators 13 Intermittent Problems 86 J Jumper and Connector Locations 89 Top View 89 Bottom View 90 K Keyboard 37 Keyboard or Auxiliary Input Device...


