
User Manual
Page 28
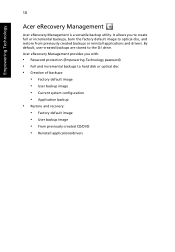
... • Factory default image • User backup image • From previously-created CD/DVD • Reinstall applications/drivers Acer eRecovery Management provides you to create full or incremental backups, burn the factory default image to optical disc, and restore ...from previously created backups or reinstall applications and drivers. It allows you with: • Password protection (Empowering Technology password) • Full and incremental backups to the D:\ drive. Empowering Technology 10 Acer eRecovery Management Acer eRecovery Management is a versatile backup utility....
... • Factory default image • User backup image • From previously-created CD/DVD • Reinstall applications/drivers Acer eRecovery Management provides you to create full or incremental backups, burn the factory default image to optical disc, and restore ...from previously created backups or reinstall applications and drivers. It allows you with: • Password protection (Empowering Technology password) • Full and incremental backups to the D:\ drive. Empowering Technology 10 Acer eRecovery Management Acer eRecovery Management is a versatile backup utility....
User Manual
Page 31
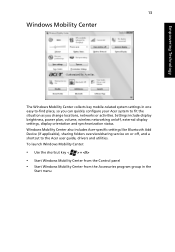
... Mobility Center from the Accessories program group in one easy-to-find place, so you change locations, networks or activities. Windows Mobility Center also includes Acer-specific settings like Bluetooth Add Device (if applicable), sharing folders overview/sharing service on /off , and a shortcut to fit the situation as you can quickly...
... Mobility Center from the Accessories program group in one easy-to-find place, so you change locations, networks or activities. Windows Mobility Center also includes Acer-specific settings like Bluetooth Add Device (if applicable), sharing folders overview/sharing service on /off , and a shortcut to fit the situation as you can quickly...
User Manual
Page 68
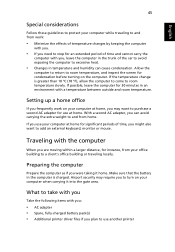
... for an extended period of time and cannot carry the computer with you: • AC adapter • Spare, fully-charged battery pack(s) • Additional printer driver files if you plan to use another printer Make sure that the battery in the computer is greater than 10 °C (18 °F), allow the...
... for an extended period of time and cannot carry the computer with you: • AC adapter • Spare, fully-charged battery pack(s) • Additional printer driver files if you plan to use another printer Make sure that the battery in the computer is greater than 10 °C (18 °F), allow the...
User Manual
Page 69
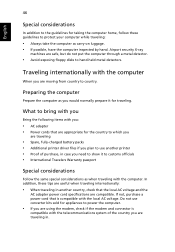
...; AC adapter • Power cords that are appropriate for the country to which you are traveling • Spare, fully-charged battery packs • Additional printer driver files if you plan to use converter kits sold for appliances to power the computer. • If you are using the modem, check if the...
...; AC adapter • Power cords that are appropriate for the country to which you are traveling • Spare, fully-charged battery packs • Additional printer driver files if you plan to use converter kits sold for appliances to power the computer. • If you are using the modem, check if the...
User Manual
Page 78
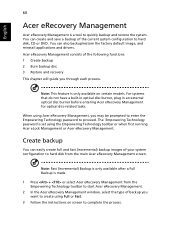
...the system. Note: This feature is made. 1 Press + or select Acer eRecovery Management from the main Acer eRecovery Management screen. You can also backup/restore the factory default image, and reinstall applications and drivers. For systems that do not have a built-in optical disc burner, plug... in an external optical disc burner before entering Acer eRecovery Management for optical disc-related tasks. Note: Fast (incremental) Backup...
...the system. Note: This feature is made. 1 Press + or select Acer eRecovery Management from the main Acer eRecovery Management screen. You can also backup/restore the factory default image, and reinstall applications and drivers. For systems that do not have a built-in optical disc burner, plug... in an external optical disc burner before entering Acer eRecovery Management for optical disc-related tasks. Note: Fast (incremental) Backup...
User Manual
Page 79
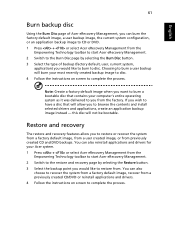
... the Empowering Technology toolbar to start Acer eRecovery Management. 2 Switch to the restore and recovery page by selecting the Burn Disc button. 3 Select the type of Acer eRecovery Management, you to browse the contents and install selected drivers and applications, create an application backup... image instead - You can also reinstall applications and drivers for your most recently created backup image to disc. ...
... the Empowering Technology toolbar to start Acer eRecovery Management. 2 Switch to the restore and recovery page by selecting the Burn Disc button. 3 Select the type of Acer eRecovery Management, you to browse the contents and install selected drivers and applications, create an application backup... image instead - You can also reinstall applications and drivers for your most recently created backup image to disc. ...

User Manual
Page 24
... Management utility occupies space in a hidden partition on the D:\ drive. Empowering Technology 6 Acer eRecovery Management Acer eRecovery Management is a powerful utility that does away with : • Password protection. • Recovery of applications and drivers. • Image/data backup: • Back up to HDD (set recovery point). • Back up to CD/DVD. •...
... Management utility occupies space in a hidden partition on the D:\ drive. Empowering Technology 6 Acer eRecovery Management Acer eRecovery Management is a powerful utility that does away with : • Password protection. • Recovery of applications and drivers. • Image/data backup: • Back up to HDD (set recovery point). • Back up to CD/DVD. •...
User Manual
Page 63
... for an extended period of time and cannot carry the computer with you: • AC adapter • Spare, fully-charged battery pack(s) • Additional printer driver files if you plan to use your computer at home for significant periods of time, you may require you , leave the computer in the trunk...
... for an extended period of time and cannot carry the computer with you: • AC adapter • Spare, fully-charged battery pack(s) • Additional printer driver files if you plan to use your computer at home for significant periods of time, you may require you , leave the computer in the trunk...
User Manual
Page 64
...; Power cords that the local AC voltage and the AC adapter power cord specifications are traveling • Spare, fully-charged battery packs • Additional printer driver files if you plan to customs officials • International Travelers Warranty passport Special considerations Follow the same special considerations as carry-on luggage. • If...
...; Power cords that the local AC voltage and the AC adapter power cord specifications are traveling • Spare, fully-charged battery packs • Additional printer driver files if you plan to customs officials • International Travelers Warranty passport Special considerations Follow the same special considerations as carry-on luggage. • If...
User Manual
Page 74
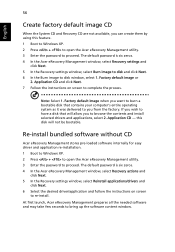
... to complete the process. Re-install bundled software without CD Acer eRecovery Management stores pre-loaded software internally for easy driver and application re-installation. 1 Boot to Windows XP. 2 Press + to open the Acer eRecovery Management utility. 3 Enter the password to browse the ... The default password is six zeros. 4 In the Acer eRecovery Management window, select Recovery actions and click Next. 5 In the Recovery settings window, select Reinstall applications/drivers and click Next. 6 Select the desired driver/application and follow the instructions on screen to bring up...
... to complete the process. Re-install bundled software without CD Acer eRecovery Management stores pre-loaded software internally for easy driver and application re-installation. 1 Boot to Windows XP. 2 Press + to open the Acer eRecovery Management utility. 3 Enter the password to browse the ... The default password is six zeros. 4 In the Acer eRecovery Management window, select Recovery actions and click Next. 5 In the Recovery settings window, select Reinstall applications/drivers and click Next. 6 Select the desired driver/application and follow the instructions on screen to bring up...

Service Guide
Page 41
...Windows Picture and Fax Viewer or the Windows Media Player automatically launches to change the camera brightness, contrast, hue, saturation, sAhdavrapnnceedssS,etettincg. Driver Settings Properties Device Settings Device Settings Advanced Settings • Device Settings allows you to get the desired angle, then click the Take ...display, then select Camera Settings from this window. Capturing photos or videos To capture a photo or a video clip, rotate the Acer OrbiCam to adjust the zoom level and turn on or off the camera indicator. NOTE: By default, all photos and videos ...
...Windows Picture and Fax Viewer or the Windows Media Player automatically launches to change the camera brightness, contrast, hue, saturation, sAhdavrapnnceedssS,etettincg. Driver Settings Properties Device Settings Device Settings Advanced Settings • Device Settings allows you to get the desired angle, then click the Take ...display, then select Camera Settings from this window. Capturing photos or videos To capture a photo or a video clip, rotate the Acer OrbiCam to adjust the zoom level and turn on or off the camera indicator. NOTE: By default, all photos and videos ...
Service Guide
Page 66
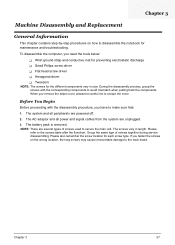
... mismatch when putting back the components. If you need the tools below: T Wrist ground strap and conductive mat for preventing electrostatic discharge T Small Philips screw driver T Flat head screw driver T Hexagonal driver T Tweezers NOTE: The screws for each screw type. NOTE: There are several types of screws together during service disassembling.
... mismatch when putting back the components. If you need the tools below: T Wrist ground strap and conductive mat for preventing electrostatic discharge T Small Philips screw driver T Flat head screw driver T Hexagonal driver T Tweezers NOTE: The screws for each screw type. NOTE: There are several types of screws together during service disassembling.
Service Guide
Page 72
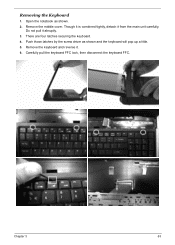
Remove the keyboard and reverse it abruptly. 3. Removing the Keyboard 1. Do not pull it . 6. Open the notebook as shown and the keyboard will pop up a little. 5. Push those latches by the screw driver as shown. 2. Though it is combined tightly, detach it from the main unit carefully. Chapter 3 63 Remove the middle cover. Carefully pull the keyboard FFC lock, then disconnect the keyboard FFC. There are four latches securing the keyboard. 4.
Remove the keyboard and reverse it abruptly. 3. Removing the Keyboard 1. Do not pull it . 6. Open the notebook as shown and the keyboard will pop up a little. 5. Push those latches by the screw driver as shown. 2. Though it is combined tightly, detach it from the main unit carefully. Chapter 3 63 Remove the middle cover. Carefully pull the keyboard FFC lock, then disconnect the keyboard FFC. There are four latches securing the keyboard. 4.
Service Guide
Page 76
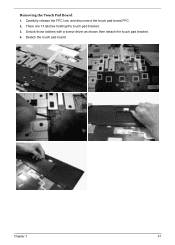
Carefully release the FFC lock and disconnect the touch pad board FFC. 2. There are 13 latches holding the touch pad bracket. 3. Chapter 3 67 Detach the touch pad board. Unlock those latches with a screw driver as shown then detach the touch pad bracket. 4. Removing the Touch Pad Board 1.
Carefully release the FFC lock and disconnect the touch pad board FFC. 2. There are 13 latches holding the touch pad bracket. 3. Chapter 3 67 Detach the touch pad board. Unlock those latches with a screw driver as shown then detach the touch pad bracket. 4. Removing the Touch Pad Board 1.
Service Guide
Page 80
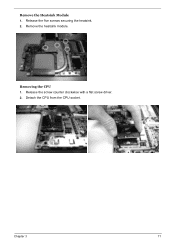
Removing the CPU 1. Release the screw counter clockwise with a flat screw driver. 2. Detach the CPU from the CPU socket. Chapter 3 71 Remove the Heatsink Module 1. Remove the heatsink module. Release the five screws securing the heatsink. 2.
Removing the CPU 1. Release the screw counter clockwise with a flat screw driver. 2. Detach the CPU from the CPU socket. Chapter 3 71 Remove the Heatsink Module 1. Remove the heatsink module. Release the five screws securing the heatsink. 2.
Service Guide
Page 87
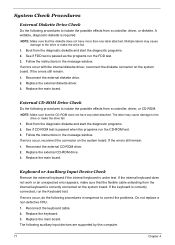
... diskette and start the diagnostic programs. 2. If errors occur, do the following procedures in sequence to isolate the possible effects from a controller, driver, or CD-ROM. Replace the keyboard. 3. A writable, diagnostic diskette is passed when the programs run the CD-ROM test. 3. Reconnect ...on the system board. Boot from the diagnostic diskette and start the diagnostic programs. 2. If errors occur with the internal diskette driver, reconnect the diskette connector on the system board. If the errors still remain: 1. The following auxiliary input devices are supported ...
... diskette and start the diagnostic programs. 2. If errors occur, do the following procedures in sequence to isolate the possible effects from a controller, driver, or CD-ROM. Replace the keyboard. 3. A writable, diagnostic diskette is passed when the programs run the CD-ROM test. 3. Reconnect ...on the system board. Boot from the diagnostic diskette and start the diagnostic programs. 2. If errors occur with the internal diskette driver, reconnect the diskette connector on the system board. If the errors still remain: 1. The following auxiliary input devices are supported ...
Service Guide
Page 89
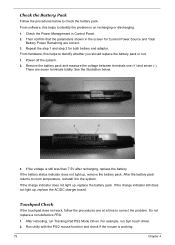
... to correct the problem. Touchpad Check If the touchpad does not work, follow the procedures one (+) and seven (-). After rebooting, run Syn touch driver. 2. If the charge indicator does not light up , replace the AC/DC charger board. Run utility with the PS/2 mouse function and check...Management in the screen for both battery and adaptor. Power off the system. 2. There are correct. 3. For example, run Tracking Pad PS2 Mode Driver. Check the Battery Pack Follow the procedures below . 3. Then confirm that the parameters shown in Control Panel. 2. From hardware, this helps to the...
... to correct the problem. Touchpad Check If the touchpad does not work, follow the procedures one (+) and seven (-). After rebooting, run Syn touch driver. 2. If the charge indicator does not light up , replace the AC/DC charger board. Run utility with the PS/2 mouse function and check...Management in the screen for both battery and adaptor. Power off the system. 2. There are correct. 3. For example, run Tracking Pad PS2 Mode Driver. Check the Battery Pack Follow the procedures below . 3. Then confirm that the parameters shown in Control Panel. 2. From hardware, this helps to the...
Service Guide
Page 99
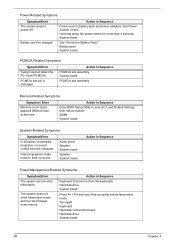
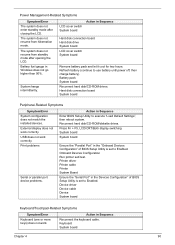
... Fn + F4 and see if the computer enters hibernation mode. Action in Sequence Power source (battery pack and power adapter). Battery can't be charged. Audio driver Speaker System board Speaker System board Action in Sequence Keyboard (if control is damaged. DIMM System board Speaker-Related Symptoms Symptom/Error In Windows, multimedia...
... Fn + F4 and see if the computer enters hibernation mode. Action in Sequence Power source (battery pack and power adapter). Battery can't be charged. Audio driver Speaker System board Speaker System board Action in Sequence Keyboard (if control is damaged. DIMM System board Speaker-Related Symptoms Symptom/Error In Windows, multimedia...
Service Guide
Page 100
...system. Battery pack System board Reconnect hard disk/CD-ROM drives. USB does not work correctly. Onboard Devices Configuration Run printer self-test. Printer driver Printer cable Printer System Board Ensure the "Serial Port" in Sequence Reconnect the keyboard cable. Action in the Devices Configuration" of BIOS Setup Utility... board Hard disk drive System board LCD cover switch System board Remove battery pack and let it cool for two hours. Device driver Device cable Device System board Keyboard/Touchpad-Related Symptoms Symptom/Error Keyboard (one or more keys) does not work.
...system. Battery pack System board Reconnect hard disk/CD-ROM drives. USB does not work correctly. Onboard Devices Configuration Run printer self-test. Printer driver Printer cable Printer System Board Ensure the "Serial Port" in Sequence Reconnect the keyboard cable. Action in the Devices Configuration" of BIOS Setup Utility... board Hard disk drive System board LCD cover switch System board Remove battery pack and let it cool for two hours. Device driver Device cable Device System board Keyboard/Touchpad-Related Symptoms Symptom/Error Keyboard (one or more keys) does not work.


