
User Manual
Page 3
... Do not increase the volume level after your hearing, follow these instructions carefully. Unplug the power cord before removing the power supply unit from the wall outlet before connecting the power cord to block out noisy surroundings. • Decrease the volume if you can't hear ...listen to music at high volumes for plug as disconnecting device Observe the following guidelines when connecting and disconnecting power to the power supply unit: Install the power supply unit before cleaning. If the system has multiple sources of PCMCIA & Express Slot Your computer shipped with plastic...
... Do not increase the volume level after your hearing, follow these instructions carefully. Unplug the power cord before removing the power supply unit from the wall outlet before connecting the power cord to block out noisy surroundings. • Decrease the volume if you can't hear ...listen to music at high volumes for plug as disconnecting device Observe the following guidelines when connecting and disconnecting power to the power supply unit: Install the power supply unit before cleaning. If the system has multiple sources of PCMCIA & Express Slot Your computer shipped with plastic...
User Manual
Page 5
...explosion. Follow local regulations when disposing of this product from the wall outlet and refer servicing to qualified service personnel when: • the power cord or plug is damaged, cut or frayed • liquid was spilled into the product • the product was exposed to rain... set . Warning! Refer all servicing to service this product yourself, as that which came bundled with the supplied power supply cord set , make sure that the new power cord meets the following the operating instructions Note: Adjust only those controls that may interfere with the performance of used ...
...explosion. Follow local regulations when disposing of this product from the wall outlet and refer servicing to qualified service personnel when: • the power cord or plug is damaged, cut or frayed • liquid was spilled into the product • the product was exposed to rain... set . Warning! Refer all servicing to service this product yourself, as that which came bundled with the supplied power supply cord set , make sure that the new power cord meets the following the operating instructions Note: Adjust only those controls that may interfere with the performance of used ...
User Manual
Page 58
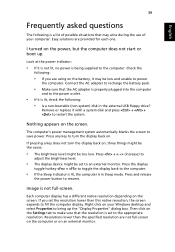
...click on . Remove or replace it is lit, check the following: • Is a non-bootable (non-system) disk in Sleep mode. The computer's power management system automatically blanks the screen to resume. If pressing a key does not turn the display back on your computer. Press + (increase) to adjust the... is set to an external monitor. Press any key to turn the display back on the battery, it is not lit, no power is being supplied to the computer. English 40 Frequently asked questions The following is a list of your Windows desktop and select Properties to bring up .
...click on . Remove or replace it is lit, check the following: • Is a non-bootable (non-system) disk in Sleep mode. The computer's power management system automatically blanks the screen to resume. If pressing a key does not turn the display back on your computer. Press + (increase) to adjust the... is set to an external monitor. Press any key to turn the display back on the battery, it is not lit, no power is being supplied to the computer. English 40 Frequently asked questions The following is a list of your Windows desktop and select Properties to bring up .

User Manual
Page 65
... the battery rapidly. Close all necessary files. 2. The AC adapter or a power outlet is available. 1. Resume work . English 47 Battery-low warning When using battery power pay attention to the mains power supply. 2. Plug the AC adapter into the computer, and then connect to the... Windows power meter. Shut down the operating system to become fully depleted and the computer ...
... the battery rapidly. Close all necessary files. 2. The AC adapter or a power outlet is available. 1. Resume work . English 47 Battery-low warning When using battery power pay attention to the mains power supply. 2. Plug the AC adapter into the computer, and then connect to the... Windows power meter. Shut down the operating system to become fully depleted and the computer ...

User Manual
Page 3
... never be seriously damaged. • Slots and openings are provided for plug as disconnecting device Observe the following guidelines when connecting and disconnecting power to the power supplies: Install the power supply before cleaning Unplug this product through cabinet slots as possible. Use a damp cloth for your safety and comfort Safety instructions Read these instructions...
... never be seriously damaged. • Slots and openings are provided for plug as disconnecting device Observe the following guidelines when connecting and disconnecting power to the power supplies: Install the power supply before cleaning Unplug this product through cabinet slots as possible. Use a damp cloth for your safety and comfort Safety instructions Read these instructions...
User Manual
Page 4
... 7 A 125 V minimum, VDE approved or its equivalent, 4.6 meters (15 feet) maximum length. Using a power outlet that may result in a fire or electric shock. Note: The grounding pin also provides good protection from unexpected... noise produced by plugging in a grounded power outlet. If power strips are not sure of the type of this product where people will probably cause ...If an extension cord is equipped with the supplied power supply cord set , make sure that the total ampere rating of internal components and to rest on...
... 7 A 125 V minimum, VDE approved or its equivalent, 4.6 meters (15 feet) maximum length. Using a power outlet that may result in a fire or electric shock. Note: The grounding pin also provides good protection from unexpected... noise produced by plugging in a grounded power outlet. If power strips are not sure of the type of this product where people will probably cause ...If an extension cord is equipped with the supplied power supply cord set , make sure that the total ampere rating of internal components and to rest on...
User Manual
Page 57
... to restart the system. Press + (increase) to adjust the brightness level. • The display device might be too low. Press and release the power button to save power. Easy solutions are not full-screen on the computer or on the battery, it is lit, check the following is not full-screen. Connect... the AC adapter to recharge the battery pack. • Make sure that the AC adapter is being supplied to make sure that may be set...
... to restart the system. Press + (increase) to adjust the brightness level. • The display device might be too low. Press and release the power button to save power. Easy solutions are not full-screen on the computer or on the battery, it is lit, check the following is not full-screen. Connect... the AC adapter to recharge the battery pack. • Make sure that the AC adapter is being supplied to make sure that may be set...
Service Guide
Page 53
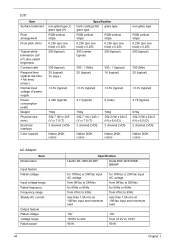
...(mm) Typical white luminance (cd/ m2) also called brightness Contrast ratio Respond time (optical rise time + fall time) (msec.) Normal input voltage of power supply Power consumption (watt) Weight Physical size (mm) Electrical interface Color support non-glare type (1) glare type (H) RGB vertical stripe 0.255 (per one triad) ... Input feature Rated voltage Input voltage range Rated frequency Frequency range Steady AC current Output feature Rated voltage Voltage range Rated power Specification LiteOn PA-1900-04 WR Delta 90W ADP-90SB BBAAF for 100Vac or 240Vac input AC voltage from 90Vac to ...
...(mm) Typical white luminance (cd/ m2) also called brightness Contrast ratio Respond time (optical rise time + fall time) (msec.) Normal input voltage of power supply Power consumption (watt) Weight Physical size (mm) Electrical interface Color support non-glare type (1) glare type (H) RGB vertical stripe 0.255 (per one triad) ... Input feature Rated voltage Input voltage range Rated frequency Frequency range Steady AC current Output feature Rated voltage Voltage range Rated power Specification LiteOn PA-1900-04 WR Delta 90W ADP-90SB BBAAF for 100Vac or 240Vac input AC voltage from 90Vac to ...

Service Guide
Page 88
...in the test items. 4. NOTE: Make sure that the DIMM is not correct, replace the power adaptor. 2. Disconnect the power adaptor and install the battery pack, then check the power supply. See the illustration and follow the procedures below to correct the memory errors. 1. If the ... problem is still not resolved, see "Check the Battery Pack". Connect the power adaptor and check the power supply. 3. If the operational charge does not work, see "Undetermined Problems". (3) If the voltage is a power supply problem, please go to the diagnostic memory in this chapter. Go to the...
...in the test items. 4. NOTE: Make sure that the DIMM is not correct, replace the power adaptor. 2. Disconnect the power adaptor and install the battery pack, then check the power supply. See the illustration and follow the procedures below to correct the memory errors. 1. If the ... problem is still not resolved, see "Check the Battery Pack". Connect the power adaptor and check the power supply. 3. If the operational charge does not work, see "Undetermined Problems". (3) If the voltage is a power supply problem, please go to the diagnostic memory in this chapter. Go to the...
Service Guide
Page 103
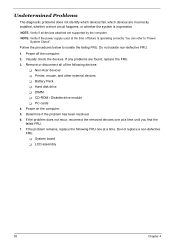
Power off the computer. 2. Power on the computer. 5. T System board T LCD assembly 93 Chapter 4 Undetermined Problems The diagnostic problems does not identify which devices fail, which devices are incorrectly installed, ... problem has been resolved. 6. If the problem remains, replace the following devices: T Non-Acer devices T Printer, mouse, and other external devices T Battery Pack T Hard disk drive T DIMM T CD-ROM / Diskette drive module T PC cards 4. NOTE: Verify if the power supply used at the time of the following FRU one at a time. Follow the...
Power off the computer. 2. Power on the computer. 5. T System board T LCD assembly 93 Chapter 4 Undetermined Problems The diagnostic problems does not identify which devices fail, which devices are incorrectly installed, ... problem has been resolved. 6. If the problem remains, replace the following devices: T Non-Acer devices T Printer, mouse, and other external devices T Battery Pack T Hard disk drive T DIMM T CD-ROM / Diskette drive module T PC cards 4. NOTE: Verify if the power supply used at the time of the following FRU one at a time. Follow the...


