TravelMate 290 Service Guide
Page 7
... Windows Keys 15 Hot Keys 16 The Euro Symbol 17 Launch Keys 18 Touchpad 19 Touchpad Basics 19 Hardware Specifications and Configurations 20 Chapter 2 System Utilities 33 BIOS Setup Utility 33 Navigating the BIOS Utility 33 Main 34 Advanced 35 Security 38 Boot 40 Exit 41 BIOS Flash Utility 42 System Diagnostic Diskette 42 Chapter 3 Machine Disassembly and Replacement 43 General Information 44 Before You Begin 44 Disassembly Procedure Flowchart 45 Removing ODD Module, Memory and HDD Module...
... Windows Keys 15 Hot Keys 16 The Euro Symbol 17 Launch Keys 18 Touchpad 19 Touchpad Basics 19 Hardware Specifications and Configurations 20 Chapter 2 System Utilities 33 BIOS Setup Utility 33 Navigating the BIOS Utility 33 Main 34 Advanced 35 Security 38 Boot 40 Exit 41 BIOS Flash Utility 42 System Diagnostic Diskette 42 Chapter 3 Machine Disassembly and Replacement 43 General Information 44 Before You Begin 44 Disassembly Procedure Flowchart 45 Removing ODD Module, Memory and HDD Module...
TravelMate 290 Service Guide
Page 28
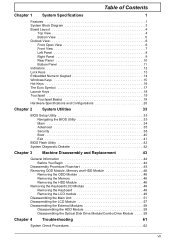
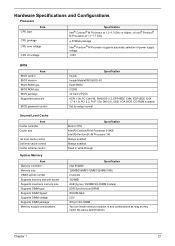
... control System Memory Item Memory controller Memory size DIMM socket number Supports memory size per socket Supports maximum memory size Supports DIMM type Supports DIMM Speed Supports DIMM voltage Supports DIMM package Memory module combinations Specification Insyde Insyde MobilePRO BIOS 4.0 Flash ROM 512KB 32 lead of PLCC ACPI 1.0b,PC Card 95, SM BIOS 2.3, EPP/IEEE 1284, ECP/IEEE 1284 1.7 & 1.9, PCI 2.2, PnP 1.0a, DMI 2.0, USB, VGA BIOS, CD-ROM bootable Set by setup manual Built-in CPU 1MB Always enabled Always enabled Fixed...
... control System Memory Item Memory controller Memory size DIMM socket number Supports memory size per socket Supports maximum memory size Supports DIMM type Supports DIMM Speed Supports DIMM voltage Supports DIMM package Memory module combinations Specification Insyde Insyde MobilePRO BIOS 4.0 Flash ROM 512KB 32 lead of PLCC ACPI 1.0b,PC Card 95, SM BIOS 2.3, EPP/IEEE 1284, ECP/IEEE 1284 1.7 & 1.9, PCI 2.2, PnP 1.0a, DMI 2.0, USB, VGA BIOS, CD-ROM bootable Set by setup manual Built-in CPU 1MB Always enabled Always enabled Fixed...
TravelMate 290 Service Guide
Page 46
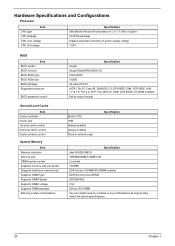
... Alphanumeric keys only. Option Chapter 2 The table below describes the parameters in boldface are the default and suggested parameter settings. Set Supervisor/User Password If password on boot is required, the password must be set the user password. When set, this screen. The formats of the password are ignored. Settings in this password protects the BIOS Setup Utility from unauthorized use. The shift status i.e. Parameter Set User Password 38 Description Press Enter to set otherwise it cannot be enabled...
... Alphanumeric keys only. Option Chapter 2 The table below describes the parameters in boldface are the default and suggested parameter settings. Set Supervisor/User Password If password on boot is required, the password must be set the user password. When set, this screen. The formats of the password are ignored. Settings in this password protects the BIOS Setup Utility from unauthorized use. The shift status i.e. Parameter Set User Password 38 Description Press Enter to set otherwise it cannot be enabled...
TravelMate 290 Service Guide
Page 50
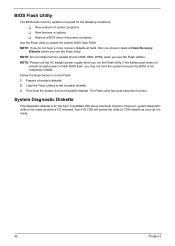
..., then you should create a Crisis Recovery Diskette before you run the Flash. 1. NOTE: Do not install memory-related drivers (XMS, EMS, DPMI) when you may not boot the system because the BIOS is not ready as it becomes corrupted. Prepare a bootable diskette. 2. The Flash utility has auto-execution function. Copy the Flash utilities to update the system BIOS flash ROM. BIOS Flash Utility The BIOS flash memory update is required for the Acer TravelMate 290 series notebook machine. System...
..., then you should create a Crisis Recovery Diskette before you run the Flash. 1. NOTE: Do not install memory-related drivers (XMS, EMS, DPMI) when you may not boot the system because the BIOS is not ready as it becomes corrupted. Prepare a bootable diskette. 2. The Flash utility has auto-execution function. Copy the Flash utilities to update the system BIOS flash ROM. BIOS Flash Utility The BIOS flash memory update is required for the Acer TravelMate 290 series notebook machine. System...

TravelMate 290 Service Guide
Page 57
... detach the entire LCD module. Then remove the middle cover from the main unit. 3. Disconnect the keyboard cable then remove the keyboard. Remove one screw as the picture shows. 5. Removing the Keyboard/LCD Module Removing the Keyboard 1. Remove the two screws holding the keyboard. 4. Removing the LCD module 1. Then disconnecto the LCD coaxial cable. 4. See step 1 and step 2 on the rear and the bottom panel; Chapter 3 49 Use a plastic flat head screw driver or any...
... detach the entire LCD module. Then remove the middle cover from the main unit. 3. Disconnect the keyboard cable then remove the keyboard. Remove one screw as the picture shows. 5. Removing the Keyboard/LCD Module Removing the Keyboard 1. Remove the two screws holding the keyboard. 4. Removing the LCD module 1. Then disconnecto the LCD coaxial cable. 4. See step 1 and step 2 on the rear and the bottom panel; Chapter 3 49 Use a plastic flat head screw driver or any...
TravelMate 290 Service Guide
Page 69
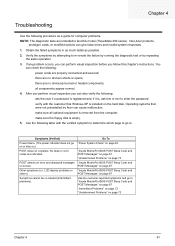
... same operation. 3. Chapter 4 Troubleshooting Use the following procedure as possible. 2. make sure all components appear normal. 4. After you perform visual inspection you fellow this model (TravelMate 290 series). Go To "Power System Check" on screen. Verify the symptoms by attempting to re-create the failure by running the diagnostic test or by Acer can also verify the following: ask the user if a password is...
... same operation. 3. Chapter 4 Troubleshooting Use the following procedure as possible. 2. make sure all components appear normal. 4. After you perform visual inspection you fellow this model (TravelMate 290 series). Go To "Power System Check" on screen. Verify the symptoms by attempting to re-create the failure by running the diagnostic test or by Acer can also verify the following: ask the user if a password is...
TravelMate 290 Service Guide
Page 73
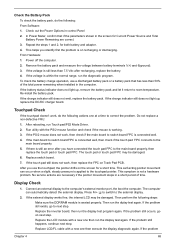
... is still an error after recharging, replace the battery. 4. To check the battery charge operation, use the touchpad, the pointer drifts on recharging or discharging. If the charge indicator still does not light up , remove the battery pack and let it return to next step. Run utility with a new one then execute the display diagnostic again. This symptom is working. 3. If the external display works fine, the internal LCD may be damaged...
... is still an error after recharging, replace the battery. 4. To check the battery charge operation, use the touchpad, the pointer drifts on recharging or discharging. If the charge indicator still does not light up , remove the battery pack and let it return to next step. Run utility with a new one then execute the display diagnostic again. This symptom is working. 3. If the external display works fine, the internal LCD may be damaged...
TravelMate 290 Service Guide
Page 75
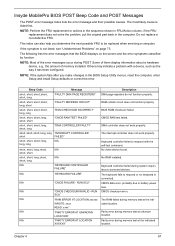
... controller does not work properly. Keyboard controller failed during system inquiry about a hardware device, e.g., the amount of the error messages occur during memory test at the indicated location. NOTE: Perform the FRU replacement or actions in the sequence shown in FRU/Action column, if the FRU replacement does not solve the problem, put the original part back in the BIOS Setup Utility menus, reset the computer, enter Setup and install Setup defaults or...
... controller does not work properly. Keyboard controller failed during system inquiry about a hardware device, e.g., the amount of the error messages occur during memory test at the indicated location. NOTE: Perform the FRU replacement or actions in the sequence shown in FRU/Action column, if the FRU replacement does not solve the problem, put the original part back in the BIOS Setup Utility menus, reset the computer, enter Setup and install Setup defaults or...

TravelMate 290 Service Guide
Page 77
... pack Power adapter Hard drive & battery connection board Main board Power source (battery pack and power adapter). Battery pack Main board Chapter 4 69 Keyboard (if contrast and brightness function key doesn't work LCD is too dark LCD brightness cannot be adjusted LCD contrast cannot be charged Action in Sequence Power source (battery pack and power adapter). See "Power System Check" on page 63. LCD cable LCD inverter LCD Main board Reconnect the LCD connector LCD cable LCD inverter LCD Main board LCD inverter LCD cable LCD Main board Indicator-Related Symptoms Symptom / Error...
... pack Power adapter Hard drive & battery connection board Main board Power source (battery pack and power adapter). Battery pack Main board Chapter 4 69 Keyboard (if contrast and brightness function key doesn't work LCD is too dark LCD brightness cannot be adjusted LCD contrast cannot be charged Action in Sequence Power source (battery pack and power adapter). See "Power System Check" on page 63. LCD cable LCD inverter LCD Main board Reconnect the LCD connector LCD cable LCD inverter LCD Main board LCD inverter LCD cable LCD Main board Indicator-Related Symptoms Symptom / Error...

TravelMate 290 Service Guide
Page 79
... cable is firmly connected into the telephone wall socket and the modem port of BIOS Setup Utility is an erro beep, then change main board. Reconnect hard disk/CD-ROM/diskette drives. Modem port is secured to execute "Load Setup defaults", then reboot system. Touchpad does not work correctly. Modem phone port is secured to the main board Touch pad FPC Audio/Touch pad board Main board Modem-Related Symptoms Symptom / Error Action in Sequence Enter BIOS Setup Utility to the main board...
... cable is firmly connected into the telephone wall socket and the modem port of BIOS Setup Utility is an erro beep, then change main board. Reconnect hard disk/CD-ROM/diskette drives. Modem port is secured to execute "Load Setup defaults", then reboot system. Touchpad does not work correctly. Modem phone port is secured to the main board Touch pad FPC Audio/Touch pad board Main board Modem-Related Symptoms Symptom / Error Action in Sequence Enter BIOS Setup Utility to the main board...
TravelMate 290 Service Guide
Page 113
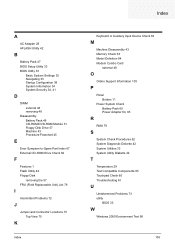
... BIOS Utility 33 Basic System Settings 35 Navigating 33 Startup Configuration 38 System Information 34 System Security 34, 41 D DIMM external 48 removing 48 Disassembly Battery Pack 46 CD-ROM/DVD-ROM Module 51 Floppy Disk Drive 57 Machine 43 Procedure Flowchart 45 E Error Symptom-to-Spare Part Index 67 External CD-ROM Drive Check 62 F Features 1 Flash Utility 42 Floppy Disk removing the 57 FRU (Field Replaceable Unit) List 79 I Intermittent Problems 72 J Jumper and Connector Locations...
... BIOS Utility 33 Basic System Settings 35 Navigating 33 Startup Configuration 38 System Information 34 System Security 34, 41 D DIMM external 48 removing 48 Disassembly Battery Pack 46 CD-ROM/DVD-ROM Module 51 Floppy Disk Drive 57 Machine 43 Procedure Flowchart 45 E Error Symptom-to-Spare Part Index 67 External CD-ROM Drive Check 62 F Features 1 Flash Utility 42 Floppy Disk removing the 57 FRU (Field Replaceable Unit) List 79 I Intermittent Problems 72 J Jumper and Connector Locations...

TravelMate 290 User's Guide
Page 57
... you set to an external monitor. I pressed the power button and opened the display, but the computer does not start or boot-up. Connect the AC adapter to recharge the battery pack. • Make sure that may be set the resolution lower than this, the screen Image is in the external USB floppy drive? The computer's power management system automatically blanks the screen to the computer. Press the display toggle hot key Fn-F5...
... you set to an external monitor. I pressed the power button and opened the display, but the computer does not start or boot-up. Connect the AC adapter to recharge the battery pack. • Make sure that may be set the resolution lower than this, the screen Image is in the external USB floppy drive? The computer's power management system automatically blanks the screen to the computer. Press the display toggle hot key Fn-F5...
TravelMate 290 User's Guide
Page 77
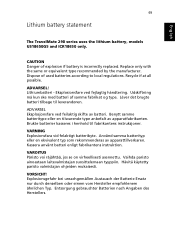
... des Herstellers. English 69 Lithium battery statement The TravelMate 290 series uses the lithium battery, models US18650G5 and ICR18650 only. CAUTION Danger of used batteries according to local regulations. VARNING Explosionsfara vid felaktigt batteribyte. Kassera anvãnt batteri enligt fabrikantens instruktion. Brukte batterier kasseres i henhold til fabrikantens instruksjoner. VORSICHT! Benytt samme batteritype eller en tilsvarende type anbefalt av apparatfabrikanten. Hävit...
... des Herstellers. English 69 Lithium battery statement The TravelMate 290 series uses the lithium battery, models US18650G5 and ICR18650 only. CAUTION Danger of used batteries according to local regulations. VARNING Explosionsfara vid felaktigt batteribyte. Kassera anvãnt batteri enligt fabrikantens instruktion. Brukte batterier kasseres i henhold til fabrikantens instruksjoner. VORSICHT! Benytt samme batteritype eller en tilsvarende type anbefalt av apparatfabrikanten. Hävit...
TravelMate 290E Service Guide
Page 29
... cache control Cache scheme control System Memory Item Memory controller Memory size DIMM socket number Supports memory size per socket Supports maximum memory size Supports DIMM type Supports DIMM Speed Supports DIMM voltage Supports DIMM package Memory module combinations Specification Insyde Insyde MobilePRO BIOS 4.0 Flash ROM 512KB 32 lead of PLCC ACPI 1.0b,PC Card 95, SM BIOS 2.3, EPP/IEEE 1284, ECP/IEEE 1284 1.7 & 1.9, PCI 2.2, PnP 1.0a, DMI 2.0, USB, VGA BIOS, CD-ROM bootable Set by setup manual Specification Built-in CPU...
... cache control Cache scheme control System Memory Item Memory controller Memory size DIMM socket number Supports memory size per socket Supports maximum memory size Supports DIMM type Supports DIMM Speed Supports DIMM voltage Supports DIMM package Memory module combinations Specification Insyde Insyde MobilePRO BIOS 4.0 Flash ROM 512KB 32 lead of PLCC ACPI 1.0b,PC Card 95, SM BIOS 2.3, EPP/IEEE 1284, ECP/IEEE 1284 1.7 & 1.9, PCI 2.2, PnP 1.0a, DMI 2.0, USB, VGA BIOS, CD-ROM bootable Set by setup manual Specification Built-in CPU...

TravelMate 290E Service Guide
Page 46
Parameter Set User Password 38 Description Press Enter to set otherwise it cannot be enabled. Set Supervisor/User Password If password on boot is required, the password must be set the user password. The table below describes the parameters in boldface are ignored. When set, this screen. Settings in this password protects the BIOS Setup Utility from unauthorized use. Ctrl, Shift, Alt and Capital are the default and suggested parameter settings. Option Chapter 2 Security The Security screen contains...
Parameter Set User Password 38 Description Press Enter to set otherwise it cannot be enabled. Set Supervisor/User Password If password on boot is required, the password must be set the user password. The table below describes the parameters in boldface are ignored. When set, this screen. Settings in this password protects the BIOS Setup Utility from unauthorized use. Ctrl, Shift, Alt and Capital are the default and suggested parameter settings. Option Chapter 2 Security The Security screen contains...

TravelMate 290E Service Guide
Page 57
... shows. 5. Then disconnect the LCD coaxial cable. 4. Chapter 3 49 Disconnect the keyboard cable then remove the keyboard. Remove the middle cover. See step 1 and step 2 on each side. 5. three on "Removing the Keyboard" section. 2. Turn the keyboard over as the picture shows. 3. Removing the Keyboard/LCD Module Removing the Keyboard 1. Use a plastic flat head screw driver or any plastic tool to detach the middle cover carefully. 2. Removing the LCD module 1. Remove the six screws on...
... shows. 5. Then disconnect the LCD coaxial cable. 4. Chapter 3 49 Disconnect the keyboard cable then remove the keyboard. Remove the middle cover. See step 1 and step 2 on each side. 5. three on "Removing the Keyboard" section. 2. Turn the keyboard over as the picture shows. 3. Removing the Keyboard/LCD Module Removing the Keyboard 1. Use a plastic flat head screw driver or any plastic tool to detach the middle cover carefully. 2. Removing the LCD module 1. Remove the six screws on...

TravelMate 290E Service Guide
Page 69
... Problems" on page 72 "Undetermined Problems" on the hard disk. After you perform visual inspection you fellow this model (TravelMate 290E series). Use the following : ask the user if a password is registered and, if it is removed from the computer. No beep or error codes are indicated. POST detects an error and displayed messages on page 63. Go To "Power System Check" on screen. "Insyde MobilePro BIOS POST Beep Code...
... Problems" on page 72 "Undetermined Problems" on the hard disk. After you perform visual inspection you fellow this model (TravelMate 290E series). Use the following : ask the user if a password is registered and, if it is removed from the computer. No beep or error codes are indicated. POST detects an error and displayed messages on page 63. Go To "Power System Check" on screen. "Insyde MobilePro BIOS POST Beep Code...

TravelMate 290E Service Guide
Page 73
... total power remaining when installed in control Panel 2. This symptom is not a hardware problem. Then perform the following : From Software: 1. Replace the inverter board, then run the diplay test again. From Hardware: 1. If the charge indicator still does not light up , remove the battery pack and let it return to the external display. 2. After rebooting, run the display test again. Connect an external display to the main board properly, then replace the touch pad or touch pad FPC...
... total power remaining when installed in control Panel 2. This symptom is not a hardware problem. Then perform the following : From Software: 1. Replace the inverter board, then run the diplay test again. From Hardware: 1. If the charge indicator still does not light up , remove the battery pack and let it return to the external display. 2. After rebooting, run the display test again. Connect an external display to the main board properly, then replace the touch pad or touch pad FPC...

TravelMate 290E Service Guide
Page 77
.../ Error Power shuts down during operation The system doesn't power-on. See "Power System Check" on page 64. Battery pack Power adapter Hard drive & battery connection board Main board Power source (battery pack and power adapter). Battery can't be adjusted Unreadable LCD screen Missing pels in Sequence Enter BIOS Utility to execute "Load Setup Defaults" on Exit screen, then reboot system. Hold and press the power switch for more than 4 seconds. Battery pack Power adapter Hard drive & battery connection board Main board Power source (battery pack and power adapter).
.../ Error Power shuts down during operation The system doesn't power-on. See "Power System Check" on page 64. Battery pack Power adapter Hard drive & battery connection board Main board Power source (battery pack and power adapter). Battery can't be adjusted Unreadable LCD screen Missing pels in Sequence Enter BIOS Utility to execute "Load Setup Defaults" on Exit screen, then reboot system. Hold and press the power switch for more than 4 seconds. Battery pack Power adapter Hard drive & battery connection board Main board Power source (battery pack and power adapter).
TravelMate 290E Service Guide
Page 113
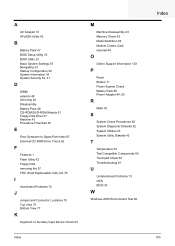
... BIOS Utility 33 Basic System Settings 35 Navigating 33 Startup Configuration 38 System Information 34 System Security 34, 41 D DIMM external 48 removing 48 Disassembly Battery Pack 46 CD-ROM/DVD-ROM Module 51 Floppy Disk Drive 57 Machine 43 Procedure Flowchart 45 E Error Symptom-to-Spare Part Index 67 External CD-ROM Drive Check 62 F Features 1 Flash Utility 42 Floppy Disk removing the 57 FRU (Field Replaceable Unit) List 79 I Intermittent Problems 72 J Jumper and Connector Locations...
... BIOS Utility 33 Basic System Settings 35 Navigating 33 Startup Configuration 38 System Information 34 System Security 34, 41 D DIMM external 48 removing 48 Disassembly Battery Pack 46 CD-ROM/DVD-ROM Module 51 Floppy Disk Drive 57 Machine 43 Procedure Flowchart 45 E Error Symptom-to-Spare Part Index 67 External CD-ROM Drive Check 62 F Features 1 Flash Utility 42 Floppy Disk removing the 57 FRU (Field Replaceable Unit) List 79 I Intermittent Problems 72 J Jumper and Connector Locations...


