
Quick Start Guide
Page 1
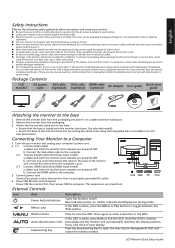
...prevent overheating, these openings should open the Acer eColor Management OSD and access the scenario modes. Remove the monitor from where people could trip over it on a stable and level workspace. 2. b. Power-ON Monitor and Computer Power-ON the monitor first, then power-ON the computer.... External Controls DC D-Sub 2 DVI HDMI DC IN HDMI DVI D-Sub Icon Item Description Power button/indicator Turns the monitor on/off your monitor and unplug your monitor if the power cable has been damaged. Also, avoid using the integrated tab or a suitable coin. (for selected ...
...prevent overheating, these openings should open the Acer eColor Management OSD and access the scenario modes. Remove the monitor from where people could trip over it on a stable and level workspace. 2. b. Power-ON Monitor and Computer Power-ON the monitor first, then power-ON the computer.... External Controls DC D-Sub 2 DVI HDMI DC IN HDMI DVI D-Sub Icon Item Description Power button/indicator Turns the monitor on/off your monitor and unplug your monitor if the power cable has been damaged. Also, avoid using the integrated tab or a suitable coin. (for selected ...
Quick Start Guide
Page 2
...by handing it is connected. Consult the dealer or an experienced radio/television technician for the recycling of Conformity Hereby, Acer Inc., declares that this product. Notice: Shielded cables All connections to other relevant provisions of EMC Directive 2004/108/EC, ...two conditions: (1) this device may be attached to this device must be determined by the Federal Communications Commission, to operate this LCD monitor is subject to the following measures: Reorient or relocate the receiving antenna. Increase the separation between the device and ...
...by handing it is connected. Consult the dealer or an experienced radio/television technician for the recycling of Conformity Hereby, Acer Inc., declares that this product. Notice: Shielded cables All connections to other relevant provisions of EMC Directive 2004/108/EC, ...two conditions: (1) this device may be attached to this device must be determined by the Federal Communications Commission, to operate this LCD monitor is subject to the following measures: Reorient or relocate the receiving antenna. Increase the separation between the device and ...
User Manual
Page 2
...form or by any means, electronically, mechanically, by photocopy, recording or otherwise, without obligation to their respective companies. Acer LCD Monitor User Guide Original Issue: 03/2010 Changes may be made periodically to the information in the space provided below. Record ... affixed to the contents hereof and specifically disclaims the implied warranties of Acer Incorporated. Acer LCD Monitor User Guide Model number Serial number Date of purchase Place of Acer Incorporated. Acer Incorporated. All Rights Reserved. This company makes no representations or warranties,...
...form or by any means, electronically, mechanically, by photocopy, recording or otherwise, without obligation to their respective companies. Acer LCD Monitor User Guide Original Issue: 03/2010 Changes may be made periodically to the information in the space provided below. Record ... affixed to the contents hereof and specifically disclaims the implied warranties of Acer Incorporated. Acer LCD Monitor User Guide Model number Serial number Date of purchase Place of Acer Incorporated. Acer Incorporated. All Rights Reserved. This company makes no representations or warranties,...
User Manual
Page 3
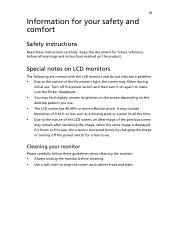
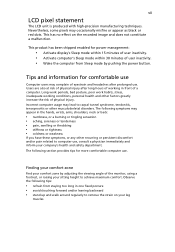
...displayed for hours. In this document for a few hours. Cleaning your safety and comfort Safety instructions Read these guidelines when cleaning the monitor: • Always unplug the monitor before cleaning. • Use a soft cloth to wipe the screen and cabinet front and sides. Turn off the power switch ... image or turning off the power switch and then turn it on the desktop pattern you use . Special notes on LCD monitors The following are normal with the LCD monitor and do not indicate a problem. • Due to the nature of the previous screen may flicker during initial use ....
...displayed for hours. In this document for a few hours. Cleaning your safety and comfort Safety instructions Read these guidelines when cleaning the monitor: • Always unplug the monitor before cleaning. • Use a soft cloth to wipe the screen and cabinet front and sides. Turn off the power switch ... image or turning off the power switch and then turn it on the desktop pattern you use . Special notes on LCD monitors The following are normal with the LCD monitor and do not indicate a problem. • Due to the nature of the previous screen may flicker during initial use ....

User Manual
Page 4
... an unstable cart, stand or table. iv Accessibility Be sure that the power outlet you plug the power cord into is only used for this monitor ,do not be used with this product, make sure that could be seriously damaged. • Slots and openings are not sure of the type of...
... an unstable cart, stand or table. iv Accessibility Be sure that the power outlet you plug the power cord into is only used for this monitor ,do not be used with this product, make sure that could be seriously damaged. • Slots and openings are not sure of the type of...
User Manual
Page 7
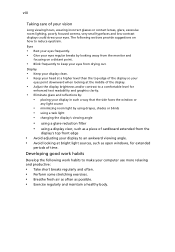
... enabled for power management: • Activate display's Sleep mode within 15 minutes of user inactivity. • Activate computer's Sleep mode within 30 minutes of the monitor, using a footrest, or raising your leg muscles Observe the following symptoms may occasionally misfire or appear as black or red dots. The following tips: •...
... enabled for power management: • Activate display's Sleep mode within 15 minutes of user inactivity. • Activate computer's Sleep mode within 30 minutes of the monitor, using a footrest, or raising your leg muscles Observe the following symptoms may occasionally misfire or appear as black or red dots. The following tips: •...
User Manual
Page 8
..., such as possible. • Exercise regularly and maintain a healthy body. The following work habits to an awkward viewing angle. • Avoid looking away from the monitor and focusing on how to keep your eyes from the display's top front edge • Avoid adjusting your display to make your eyes.
..., such as possible. • Exercise regularly and maintain a healthy body. The following work habits to an awkward viewing angle. • Avoid looking away from the monitor and focusing on how to keep your eyes from the display's top front edge • Avoid adjusting your display to make your eyes.
User Manual
Page 9
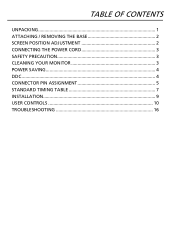
TABLE OF CONTENTS UNPACKING 1 ATTACHING / REMOVING THE BASE 2 SCREEN POSITION ADJUSTMENT 2 CONNECTING THE POWER CORD 3 SAFETY PRECAUTION 3 CLEANING YOUR MONITOR 3 POWER SAVING 4 DDC...4 CONNECTOR PIN ASSIGNMENT 5 STANDARD TIMING TABLE 7 INSTALLATION 9 USER CONTROLS 10 TROUBLESHOOTING 16
TABLE OF CONTENTS UNPACKING 1 ATTACHING / REMOVING THE BASE 2 SCREEN POSITION ADJUSTMENT 2 CONNECTING THE POWER CORD 3 SAFETY PRECAUTION 3 CLEANING YOUR MONITOR 3 POWER SAVING 4 DDC...4 CONNECTOR PIN ASSIGNMENT 5 STANDARD TIMING TABLE 7 INSTALLATION 9 USER CONTROLS 10 TROUBLESHOOTING 16
User Manual
Page 10
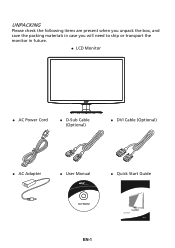
UNPACKING Please check the following items are present when you unpack the box, and save the packing materials in case you will need to ship or transport the monitor in future. LCD Monitor AC Power Cord D-Sub Cable (Optional) DVI Cable (Optional) AC Adapter User Manual Quick Start Guide EN-1
UNPACKING Please check the following items are present when you unpack the box, and save the packing materials in case you will need to ship or transport the monitor in future. LCD Monitor AC Power Cord D-Sub Cable (Optional) DVI Cable (Optional) AC Adapter User Manual Quick Start Guide EN-1
User Manual
Page 11
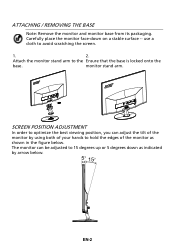
use a cloth to the Ensure that the base is locked onto the base. EN-2 Attach the monitor stand arm to avoid scratching the screen. 1. 2. monitor stand arm. Carefully place the monitor face-down as indicated by using both of your hands to 15 degrees up or 5 degrees down on a ...In order to optimize the best viewing position, you can be adjusted to hold the edges of the monitor by arrow below . ATTACHING / REMOVING THE BASE Note: Remove the monitor and monitor base from its packaging. The monitor can adjust the tilt of the monitor as shown in the figure below .
use a cloth to the Ensure that the base is locked onto the base. EN-2 Attach the monitor stand arm to avoid scratching the screen. 1. 2. monitor stand arm. Carefully place the monitor face-down as indicated by using both of your hands to 15 degrees up or 5 degrees down on a ...In order to optimize the best viewing position, you can be adjusted to hold the edges of the monitor by arrow below . ATTACHING / REMOVING THE BASE Note: Remove the monitor and monitor base from its packaging. The monitor can adjust the tilt of the monitor as shown in the figure below .
User Manual
Page 12
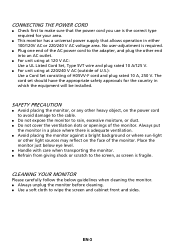
... rain, excessive moisture, or dust. Do not cover the ventilation slots or openings of the monitor. EN-3 The cord set should have the appropriate safety approvals for your area. This monitor has a universal power supply that the power cord you use is required. Plug one end of the AC...; Check first to make sure that allows operation in either 100/120V AC or 220/240 V AC voltage area. SAFETY PRECAUTION Avoid placing the monitor, or any other end into an AC outlet. For unit using at 120 V AC: Use a UL Listed Cord Set, Type SVT wire and plug...
... rain, excessive moisture, or dust. Do not cover the ventilation slots or openings of the monitor. EN-3 The cord set should have the appropriate safety approvals for your area. This monitor has a universal power supply that the power cord you use is required. Plug one end of the AC...; Check first to make sure that allows operation in either 100/120V AC or 220/240 V AC voltage area. SAFETY PRECAUTION Avoid placing the monitor, or any other end into an AC outlet. For unit using at 120 V AC: Use a UL Listed Cord Set, Type SVT wire and plug...
User Manual
Page 13
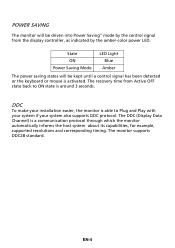
The monitor supports DDC2B standard. State ON Power Saving Mode LED Light Blue Amber The power saving states will be kept until a control signal has been detected ... also supports DDC protocol. The DDC (Display Data Channel) is able to ON state is around 3 seconds. EN-4 DDC To make your installation easier, the monitor is a communication protocol through which the monitor automatically informs the host system about its capabilities, for example, supported resolutions and corresponding timing. POWER SAVING The...
The monitor supports DDC2B standard. State ON Power Saving Mode LED Light Blue Amber The power saving states will be kept until a control signal has been detected ... also supports DDC protocol. The DDC (Display Data Channel) is able to ON state is around 3 seconds. EN-4 DDC To make your installation easier, the monitor is a communication protocol through which the monitor automatically informs the host system about its capabilities, for example, supported resolutions and corresponding timing. POWER SAVING The...
User Manual
Page 14
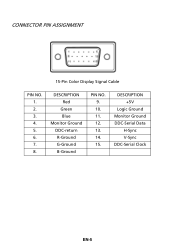
CONNECTOR PIN ASSIGNMENT 15-Pin Color Display Signal Cable PIN NO. 1. 2. 3. 4. 5. 6. 7. 8. DESCRIPTION Red Green Blue Monitor Ground DDC-return R-Ground G-Ground B-Ground PIN NO. 9. 10. 11. 12. 13. 14. 15. DESCRIPTION +5V Logic Ground Monitor Ground DDC-Serial Data H-Sync V-Sync DDC-Serial Clock EN-5
CONNECTOR PIN ASSIGNMENT 15-Pin Color Display Signal Cable PIN NO. 1. 2. 3. 4. 5. 6. 7. 8. DESCRIPTION Red Green Blue Monitor Ground DDC-return R-Ground G-Ground B-Ground PIN NO. 9. 10. 11. 12. 13. 14. 15. DESCRIPTION +5V Logic Ground Monitor Ground DDC-Serial Data H-Sync V-Sync DDC-Serial Clock EN-5
User Manual
Page 18
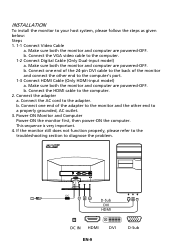
... to diagnose the problem. DC D-Sub DVI HDMI D DC IN HDMI DVI EN-9 2 D-Sub Make sure both the monitor and computer are powered-OFF. b. If the monitor still does not function properly, please refer to the troubleshooting section to the adapter. b. Connect the HDMI cable to the ... power-ON the computer. This sequence is very important. 4. Connect the VGA video cable to the computer. 2. b. Connect one end of the monitor and connect the other end to your host system, please follow the steps as given below: Steps 1. 1-1 Connect Video Cable a. Connect the adapter...
... to diagnose the problem. DC D-Sub DVI HDMI D DC IN HDMI DVI EN-9 2 D-Sub Make sure both the monitor and computer are powered-OFF. b. If the monitor still does not function properly, please refer to the troubleshooting section to the adapter. b. Connect the HDMI cable to the ... power-ON the computer. This sequence is very important. 4. Connect the VGA video cable to the computer. 2. b. Connect one end of the monitor and connect the other end to your host system, please follow the steps as given below: Steps 1. 1-1 Connect Video Cable a. Connect the adapter...

User Manual
Page 19
... the OSD menu. EN-10 Empowering: Press the Empowering Key to activate the Auto Adjustment function. MENU OSD functions Press this button to open the Acer eColor Management OSD and access the scenario modes. USER CONTROLS Base Controls Power Switch / Power LED: To turn the...
... the OSD menu. EN-10 Empowering: Press the Empowering Key to activate the Auto Adjustment function. MENU OSD functions Press this button to open the Acer eColor Management OSD and access the scenario modes. USER CONTROLS Base Controls Power Switch / Power LED: To turn the...
User Manual
Page 21
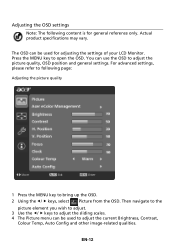
For advanced settings, please refer to following content is for adjusting the settings of your LCD Monitor. You can be used to adjust the picture quality, OSD position and general settings. EN-12 Press the MENU key to bring up the OSD. 2 ...
For advanced settings, please refer to following content is for adjusting the settings of your LCD Monitor. You can be used to adjust the picture quality, OSD position and general settings. EN-12 Press the MENU key to bring up the OSD. 2 ...
User Manual
Page 24
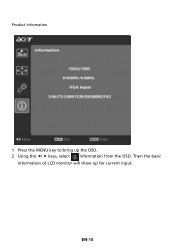
EN-15 Product information 1 Press the MENU key to bring up for current input. Then the basic information of LCD monitor will show up the OSD. 2 Using the / keys, select Information from the OSD.
EN-15 Product information 1 Press the MENU key to bring up for current input. Then the basic information of LCD monitor will show up the OSD. 2 Using the / keys, select Information from the OSD.
User Manual
Page 25
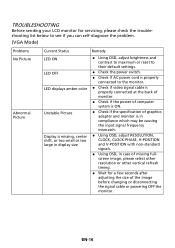
...their default settings. Check the power switch. Check if AC power cord is properly connected to the monitor. Check if video signal cable is properly connected at the back of monitor. Check if the power of computer system is ON. Check if the specification of graphics adapter... and monitor is in compliance which may be causing the input signal frequency mismatch. Using OSD, adjust RESOLUTION, CLOCK, CLOCK-PHASE, H-POSITION and V-POSITION with ...
...their default settings. Check the power switch. Check if AC power cord is properly connected to the monitor. Check if video signal cable is properly connected at the back of monitor. Check if the power of computer system is ON. Check if the specification of graphics adapter... and monitor is in compliance which may be causing the input signal frequency mismatch. Using OSD, adjust RESOLUTION, CLOCK, CLOCK-PHASE, H-POSITION and V-POSITION with ...
User Manual
Page 26
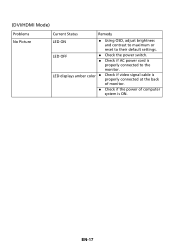
EN-17 (DVI/HDMI Mode) Problems No Picture Current Status Remedy LED ON Using OSD, adjust brightness and contrast to maximum or reset to the monitor. LED OFF Check the power switch. Check if AC power cord is ON. LED displays amber color Check if video signal cable is properly connected at the back of monitor. Check if the power of computer system is properly connected to their default settings.
EN-17 (DVI/HDMI Mode) Problems No Picture Current Status Remedy LED ON Using OSD, adjust brightness and contrast to maximum or reset to the monitor. LED OFF Check the power switch. Check if AC power cord is ON. LED displays amber color Check if video signal cable is properly connected at the back of monitor. Check if the power of computer system is properly connected to their default settings.
User Manual
Page 27
... by conformity with regard to establishing a framework for the setting of ecodesign requirements for energy-related product. Easy Lai /Manager Regulation, Acer Inc. Acer Incorporated 8F, 88, Sec. 1, Hsin Tai Wu Rd., Hsichih Taipei Hsien 221, Taiwan Tel : 886-2-2696-1234 Fax :... SA Via Cantonale, Centro Galleria 2 6928 Manno Switzerland Hereby declare that: Product: Trade Name: Model Number: SKU Number: LCD Monitor Acer S222HQL/S212HL S222HQL/S212HL 0~9, a ~ z, or A ~ Z) Is compliant with the essential requirements and other relevant provisions of the following EC directives...
... by conformity with regard to establishing a framework for the setting of ecodesign requirements for energy-related product. Easy Lai /Manager Regulation, Acer Inc. Acer Incorporated 8F, 88, Sec. 1, Hsin Tai Wu Rd., Hsichih Taipei Hsien 221, Taiwan Tel : 886-2-2696-1234 Fax :... SA Via Cantonale, Centro Galleria 2 6928 Manno Switzerland Hereby declare that: Product: Trade Name: Model Number: SKU Number: LCD Monitor Acer S222HQL/S212HL S222HQL/S212HL 0~9, a ~ z, or A ~ Z) Is compliant with the essential requirements and other relevant provisions of the following EC directives...


