
Quick Start Guide
Page 1
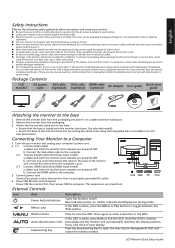
...D-Sub Icon Item Description Power button/indicator Turns the monitor on . Connect power cord Connect the power cord to the monitor, then to unplug the monitor first. To prevent overheating, these openings should open the Acer eColor Management OSD and access the scenario modes. Package... Contents LCD monitor AC power cable DVI cable (optional) VGA cable ...
...D-Sub Icon Item Description Power button/indicator Turns the monitor on . Connect power cord Connect the power cord to the monitor, then to unplug the monitor first. To prevent overheating, these openings should open the Acer eColor Management OSD and access the scenario modes. Package... Contents LCD monitor AC power cable DVI cable (optional) VGA cable ...
Quick Start Guide
Page 2
... Voltage Directive 2006/95/EC, and RoHS Directive 2002/95/EC and Directive 2009/125/EC with EMC regulations. Operation with Canadian ICES-003. LCD Monitor Quick Setup Guide Notice: Peripheral devices Only peripherals (input/output devices, terminals, printers, etc.) certified to correct the interference by the Federal Communications Commission, ...l'intention des utilisateurs canadiens Cet appareil numérique de la classe B est conforme a la norme NMB-003 du Canada. CE declaration of Conformity Hereby, Acer Inc., declares that protects human health and the environment.
... Voltage Directive 2006/95/EC, and RoHS Directive 2002/95/EC and Directive 2009/125/EC with EMC regulations. Operation with Canadian ICES-003. LCD Monitor Quick Setup Guide Notice: Peripheral devices Only peripherals (input/output devices, terminals, printers, etc.) certified to correct the interference by the Federal Communications Commission, ...l'intention des utilisateurs canadiens Cet appareil numérique de la classe B est conforme a la norme NMB-003 du Canada. CE declaration of Conformity Hereby, Acer Inc., declares that protects human health and the environment.
User Manual
Page 2
... the serial number, model number and purchase information. Record the model number, serial number, purchase date and place of Acer Incorporated. Acer LCD Monitor User Guide Original Issue: 03/2010 Changes may be incorporated in the space provided below. Such changes will be reproduced,...The serial number and model number are used herein for a particular purpose. Acer LCD Monitor User Guide Model number Serial number Date of purchase Place of purchase Acer and the Acer logo are registered trademarks of purchase information in new editions of this publication without...
... the serial number, model number and purchase information. Record the model number, serial number, purchase date and place of Acer Incorporated. Acer LCD Monitor User Guide Original Issue: 03/2010 Changes may be incorporated in the space provided below. Such changes will be reproduced,...The serial number and model number are used herein for a particular purpose. Acer LCD Monitor User Guide Model number Serial number Date of purchase Place of purchase Acer and the Acer logo are registered trademarks of purchase information in new editions of this publication without...
User Manual
Page 3
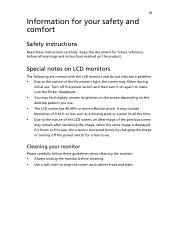
...Special notes on the desktop pattern you use . Cleaning your safety and comfort Safety instructions Read these guidelines when cleaning the monitor: • Always unplug the monitor before cleaning. • Use a soft cloth to the nature of the LCD screen, an afterimage of the previous screen ...may include blemishes of the fluorescent light, the screen may find slightly uneven brightness on the screen depending on LCD monitors The following are normal with the LCD monitor and do not indicate a problem. • Due to make sure the flicker disappears. • You may flicker ...
...Special notes on the desktop pattern you use . Cleaning your safety and comfort Safety instructions Read these guidelines when cleaning the monitor: • Always unplug the monitor before cleaning. • Use a soft cloth to the nature of the LCD screen, an afterimage of the previous screen ...may include blemishes of the fluorescent light, the screen may find slightly uneven brightness on the screen depending on LCD monitors The following are normal with the LCD monitor and do not indicate a problem. • Due to make sure the flicker disappears. • You may flicker ...

User Manual
Page 4
... product through cabinet slots as possible. iv Accessibility Be sure that the power outlet you plug the power cord into is only used for this monitor ,do not be used with this product, make sure that the total If you are provided for other similar surface. If the product falls, it...
... product through cabinet slots as possible. iv Accessibility Be sure that the power outlet you plug the power cord into is only used for this monitor ,do not be used with this product, make sure that the total If you are provided for other similar surface. If the product falls, it...
User Manual
Page 7
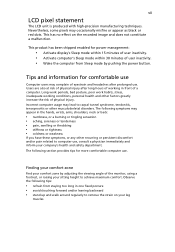
... tips for power management: • Activate display's Sleep mode within 15 minutes of user inactivity. • Activate computer's Sleep mode within 30 minutes of the monitor, using a footrest, or raising your sitting height to achieve maximum comfort. This product has been shipped enabled for more comfortable computer use , consult a physician immediately...
... tips for power management: • Activate display's Sleep mode within 15 minutes of user inactivity. • Activate computer's Sleep mode within 30 minutes of the monitor, using a footrest, or raising your sitting height to achieve maximum comfort. This product has been shipped enabled for more comfortable computer use , consult a physician immediately...
User Manual
Page 8
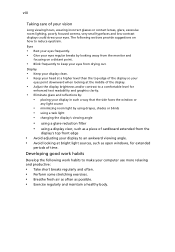
... readability and graphics clarity. • Eliminate glare and reflections by: • placing your display to an awkward viewing angle. • Avoid looking away from the monitor and focusing on how to a comfortable level for extended periods of time. The following work habits Develop the following sections provide suggestions on a distant point...
... readability and graphics clarity. • Eliminate glare and reflections by: • placing your display to an awkward viewing angle. • Avoid looking away from the monitor and focusing on how to a comfortable level for extended periods of time. The following work habits Develop the following sections provide suggestions on a distant point...
User Manual
Page 9
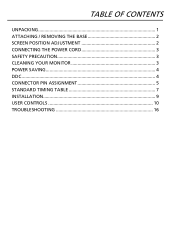
TABLE OF CONTENTS UNPACKING 1 ATTACHING / REMOVING THE BASE 2 SCREEN POSITION ADJUSTMENT 2 CONNECTING THE POWER CORD 3 SAFETY PRECAUTION 3 CLEANING YOUR MONITOR 3 POWER SAVING 4 DDC...4 CONNECTOR PIN ASSIGNMENT 5 STANDARD TIMING TABLE 7 INSTALLATION 9 USER CONTROLS 10 TROUBLESHOOTING 16
TABLE OF CONTENTS UNPACKING 1 ATTACHING / REMOVING THE BASE 2 SCREEN POSITION ADJUSTMENT 2 CONNECTING THE POWER CORD 3 SAFETY PRECAUTION 3 CLEANING YOUR MONITOR 3 POWER SAVING 4 DDC...4 CONNECTOR PIN ASSIGNMENT 5 STANDARD TIMING TABLE 7 INSTALLATION 9 USER CONTROLS 10 TROUBLESHOOTING 16
User Manual
Page 10
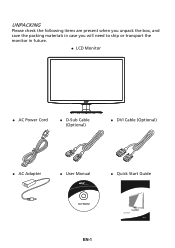
UNPACKING Please check the following items are present when you unpack the box, and save the packing materials in case you will need to ship or transport the monitor in future. LCD Monitor AC Power Cord D-Sub Cable (Optional) DVI Cable (Optional) AC Adapter User Manual Quick Start Guide EN-1
UNPACKING Please check the following items are present when you unpack the box, and save the packing materials in case you will need to ship or transport the monitor in future. LCD Monitor AC Power Cord D-Sub Cable (Optional) DVI Cable (Optional) AC Adapter User Manual Quick Start Guide EN-1
User Manual
Page 11
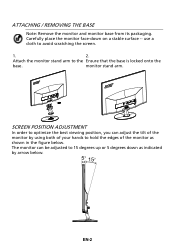
ATTACHING / REMOVING THE BASE Note: Remove the monitor and monitor base from its packaging. Attach the monitor stand arm to 15 degrees up or 5 degrees down on a stable surface -- The monitor can adjust the tilt of the monitor by arrow below . use a cloth to hold the edges of the monitor as indicated by using both of your...
ATTACHING / REMOVING THE BASE Note: Remove the monitor and monitor base from its packaging. Attach the monitor stand arm to 15 degrees up or 5 degrees down on a stable surface -- The monitor can adjust the tilt of the monitor by arrow below . use a cloth to hold the edges of the monitor as indicated by using both of your...
User Manual
Page 12
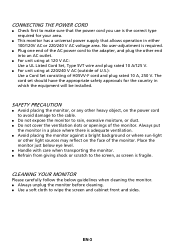
...AC (outside of U.S.): Use a Cord Set consisting of H05VV-F cord and plug rated 10 A, 250 V. EN-3 Place the monitor just below guidelines when cleaning the monitor. Always unplug the monitor before cleaning. Use a soft cloth to the screen, as screen is required. Plug one end of ...for the country in either 100/120V AC or 220/240 V AC voltage area. CLEANING YOUR MONITOR Please carefully follow the below eye level. Handle with care when transporting the monitor. Refrain from giving shock or scratch to wipe the screen and cabinet front and sides...
...AC (outside of U.S.): Use a Cord Set consisting of H05VV-F cord and plug rated 10 A, 250 V. EN-3 Place the monitor just below guidelines when cleaning the monitor. Always unplug the monitor before cleaning. Use a soft cloth to the screen, as screen is required. Plug one end of ...for the country in either 100/120V AC or 220/240 V AC voltage area. CLEANING YOUR MONITOR Please carefully follow the below eye level. Handle with care when transporting the monitor. Refrain from giving shock or scratch to wipe the screen and cabinet front and sides...
User Manual
Page 13
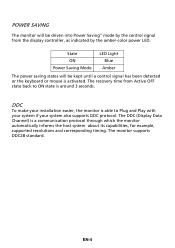
... the control signal from Active OFF state back to Plug and Play with your system if your installation easier, the monitor is able to ON state is around 3 seconds. POWER SAVING The monitor will be driven into Power Saving" mode by the amber-color power LED. State ON Power Saving Mode LED... Amber The power saving states will be kept until a control signal has been detected or the keyboard or mouse is a communication protocol through which the monitor automatically informs the host system about its capabilities, for example, supported resolutions and corresponding timing.
... the control signal from Active OFF state back to Plug and Play with your system if your installation easier, the monitor is able to ON state is around 3 seconds. POWER SAVING The monitor will be driven into Power Saving" mode by the amber-color power LED. State ON Power Saving Mode LED... Amber The power saving states will be kept until a control signal has been detected or the keyboard or mouse is a communication protocol through which the monitor automatically informs the host system about its capabilities, for example, supported resolutions and corresponding timing.
User Manual
Page 14
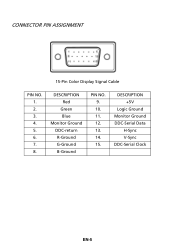
DESCRIPTION +5V Logic Ground Monitor Ground DDC-Serial Data H-Sync V-Sync DDC-Serial Clock EN-5 DESCRIPTION Red Green Blue Monitor Ground DDC-return R-Ground G-Ground B-Ground PIN NO. 9. 10. 11. 12. 13. 14. 15. CONNECTOR PIN ASSIGNMENT 15-Pin Color Display Signal Cable PIN NO. 1. 2. 3. 4. 5. 6. 7. 8.
DESCRIPTION +5V Logic Ground Monitor Ground DDC-Serial Data H-Sync V-Sync DDC-Serial Clock EN-5 DESCRIPTION Red Green Blue Monitor Ground DDC-return R-Ground G-Ground B-Ground PIN NO. 9. 10. 11. 12. 13. 14. 15. CONNECTOR PIN ASSIGNMENT 15-Pin Color Display Signal Cable PIN NO. 1. 2. 3. 4. 5. 6. 7. 8.
User Manual
Page 18
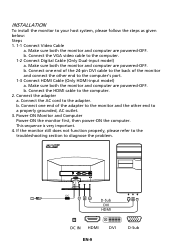
... IN HDMI DVI EN-9 2 D-Sub Connect the AC cord to diagnose the problem. This sequence is very important. 4. Make sure both the monitor and computer are powered-OFF. Connect the VGA video cable to the computer. 2. Connect the adapter a. Connect one end of the 24-pin ... system, please follow the steps as given below: Steps 1. 1-1 Connect Video Cable a. Make sure both the monitor and computer are powered-OFF. Power-ON Monitor and Computer Power-ON the monitor first, then power-ON the computer. b. Connect the HDMI cable to the computer. 1-2 Connect Digital Cable (...
... IN HDMI DVI EN-9 2 D-Sub Connect the AC cord to diagnose the problem. This sequence is very important. 4. Make sure both the monitor and computer are powered-OFF. Connect the VGA video cable to the computer. 2. Connect the adapter a. Connect one end of the 24-pin ... system, please follow the steps as given below: Steps 1. 1-1 Connect Video Cable a. Make sure both the monitor and computer are powered-OFF. Power-ON Monitor and Computer Power-ON the monitor first, then power-ON the computer. b. Connect the HDMI cable to the computer. 1-2 Connect Digital Cable (...
User Manual
Page 19
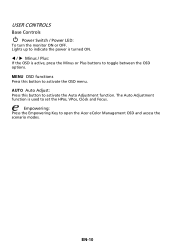
... between the OSD options. Lights up to indicate the power is turned ON. / Minus / Plus: If the OSD is used to open the Acer eColor Management OSD and access the scenario modes. Empowering: Press the Empowering Key to set the HPos, VPos, Clock and Focus. USER CONTROLS Base Controls...
... between the OSD options. Lights up to indicate the power is turned ON. / Minus / Plus: If the OSD is used to open the Acer eColor Management OSD and access the scenario modes. Empowering: Press the Empowering Key to set the HPos, VPos, Clock and Focus. USER CONTROLS Base Controls...
User Manual
Page 21
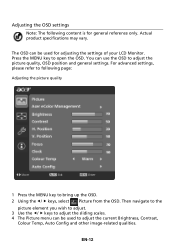
..., Auto Config and other image-related qualities. EN-12 For advanced settings, please refer to following content is for adjusting the settings of your LCD Monitor. Actual product specifications may vary. The OSD can use the OSD to adjust the picture quality, OSD position and general settings. Adjusting the OSD settings...
..., Auto Config and other image-related qualities. EN-12 For advanced settings, please refer to following content is for adjusting the settings of your LCD Monitor. Actual product specifications may vary. The OSD can use the OSD to adjust the picture quality, OSD position and general settings. Adjusting the OSD settings...
User Manual
Page 24
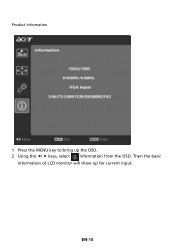
Then the basic information of LCD monitor will show up the OSD. 2 Using the / keys, select Information from the OSD. EN-15 Product information 1 Press the MENU key to bring up for current input.
Then the basic information of LCD monitor will show up the OSD. 2 Using the / keys, select Information from the OSD. EN-15 Product information 1 Press the MENU key to bring up for current input.
User Manual
Page 25
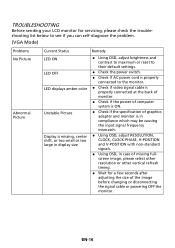
...their default settings. Check the power switch. Check if AC power cord is properly connected to the monitor. Check if video signal cable is properly connected at the back of monitor. Check if the power of computer system is ON. Check if the specification of graphics adapter... and monitor is in compliance which may be causing the input signal frequency mismatch. Using OSD, adjust RESOLUTION, CLOCK, CLOCK-PHASE, H-POSITION and V-POSITION with ...
...their default settings. Check the power switch. Check if AC power cord is properly connected to the monitor. Check if video signal cable is properly connected at the back of monitor. Check if the power of computer system is ON. Check if the specification of graphics adapter... and monitor is in compliance which may be causing the input signal frequency mismatch. Using OSD, adjust RESOLUTION, CLOCK, CLOCK-PHASE, H-POSITION and V-POSITION with ...
User Manual
Page 26
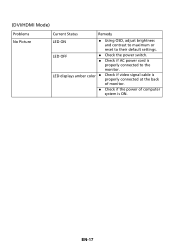
LED OFF Check the power switch. Check if AC power cord is ON. EN-17 (DVI/HDMI Mode) Problems No Picture Current Status Remedy LED ON Using OSD, adjust brightness and contrast to maximum or reset to the monitor. LED displays amber color Check if video signal cable is properly connected at the back of monitor. Check if the power of computer system is properly connected to their default settings.
LED OFF Check the power switch. Check if AC power cord is ON. EN-17 (DVI/HDMI Mode) Problems No Picture Current Status Remedy LED ON Using OSD, adjust brightness and contrast to maximum or reset to the monitor. LED displays amber color Check if video signal cable is properly connected at the back of monitor. Check if the power of computer system is properly connected to their default settings.
User Manual
Page 27
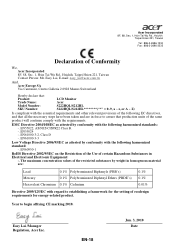
... Via Cantonale, Centro Galleria 2 6928 Manno Switzerland Hereby declare that: Product: Trade Name: Model Number: SKU Number: LCD Monitor Acer S222HQL/S212HL S222HQL/S212HL 0~9, a ~ z, or A ~ Z) Is compliant with the essential requirements and other relevant provisions of the following harmonized ...Cadmium 0.1% 0.1% 0.01% Directive 2009/125/EC with the requirements. EN55022, AS/NZS CISPR22 Class B. -. Easy Lai /Manager Regulation, Acer Inc. EN-18 Jun. 3, 2010 Date EN61000-3-3 Low Voltage Directive 2006/95/EC as attested by weight in homogenous material are in Electrical...
... Via Cantonale, Centro Galleria 2 6928 Manno Switzerland Hereby declare that: Product: Trade Name: Model Number: SKU Number: LCD Monitor Acer S222HQL/S212HL S222HQL/S212HL 0~9, a ~ z, or A ~ Z) Is compliant with the essential requirements and other relevant provisions of the following harmonized ...Cadmium 0.1% 0.1% 0.01% Directive 2009/125/EC with the requirements. EN55022, AS/NZS CISPR22 Class B. -. Easy Lai /Manager Regulation, Acer Inc. EN-18 Jun. 3, 2010 Date EN61000-3-3 Low Voltage Directive 2006/95/EC as attested by weight in homogenous material are in Electrical...


