

User Manual
Page 4
... the power cord from the type of power indicated on an unstable cart, stand or table. Model:HP-A0301R3 (S200HL Model) Manufacture : Delta Electronics Inc., Model: ADP-30MH B (S200HL Model) Using electrical power • This product should never be placed near water. • Do not place this...protect it could result in a fire or electric shock. Warnings • Do not use it clearly and comfortably and without distortion. • After setting the volume level, do not be blocked by placing the product on a vibrating surface. • Never use this product near or over a ...
... the power cord from the type of power indicated on an unstable cart, stand or table. Model:HP-A0301R3 (S200HL Model) Manufacture : Delta Electronics Inc., Model: ADP-30MH B (S200HL Model) Using electrical power • This product should never be placed near water. • Do not place this...protect it could result in a fire or electric shock. Warnings • Do not use it clearly and comfortably and without distortion. • After setting the volume level, do not be blocked by placing the product on a vibrating surface. • Never use this product near or over a ...
User Manual
Page 5
... a grounded power outlet. Note: The grounding pin also provides good protection from the wall outlet and refer servicing to replace the power cord set . Unplug this product, make sure that may expose you need for details. The overall system load must not exceed 80% of all servicing... • the product was exposed to service this product yourself, as opening or removing covers may interfere with the supplied power supply cord set , make sure that the new power cord meets the following the operating instructions v Also, make sure that the total rating of the ...
... a grounded power outlet. Note: The grounding pin also provides good protection from the wall outlet and refer servicing to replace the power cord set . Unplug this product, make sure that may expose you need for details. The overall system load must not exceed 80% of all servicing... • the product was exposed to service this product yourself, as opening or removing covers may interfere with the supplied power supply cord set , make sure that the new power cord meets the following the operating instructions v Also, make sure that the total rating of the ...
User Manual
Page 9
... s.r.l Via Lepetit, 40, 20020 Lainate (MI) Italy Tel: +39-02-939-921 ,Fax: +39-02 9399-2913 www.acer.it Hereby declare that: Product: Trade Name: Model Number: SKU Number: LCD Monitor Acer S200HL S200HL xxxxxx ("x" = 0~9, a ~ z, A ~ Z, or blank) Is compliant with the essential requirements and other relevant provisions of the following EC directives... Voltage Directive 2006/95/EC as attested by weight in homogenous material are in Electrical and Electronic Equipment: -. Year to establishing a framework for the setting of ecodesign requirements for energy-related product.
... s.r.l Via Lepetit, 40, 20020 Lainate (MI) Italy Tel: +39-02-939-921 ,Fax: +39-02 9399-2913 www.acer.it Hereby declare that: Product: Trade Name: Model Number: SKU Number: LCD Monitor Acer S200HL S200HL xxxxxx ("x" = 0~9, a ~ z, A ~ Z, or blank) Is compliant with the essential requirements and other relevant provisions of the following EC directives... Voltage Directive 2006/95/EC as attested by weight in homogenous material are in Electrical and Electronic Equipment: -. Year to establishing a framework for the setting of ecodesign requirements for energy-related product.
User Manual
Page 11
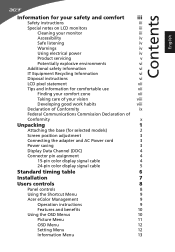
... assignment 4 15-pin color display signal cable 4 24-pin color display signal cable 5 Standard timing table 6 Installation 7 Users controls 8 Panel controls 8 Using the Shortcut Menu 9 Acer eColor Management 9 Operation instructions 9 Features and benefits 10 Using the OSD Menus 10 Picture Menu 11 OSD Menu 12...
... assignment 4 15-pin color display signal cable 4 24-pin color display signal cable 5 Standard timing table 6 Installation 7 Users controls 8 Panel controls 8 Using the Shortcut Menu 9 Acer eColor Management 9 Operation instructions 9 Features and benefits 10 Using the OSD Menus 10 Picture Menu 11 OSD Menu 12...
User Manual
Page 15
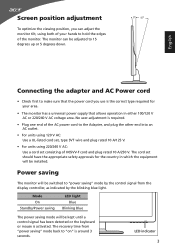
... AC power cord to the Adapter, and plug the other end into an AC outlet. • For units using 120 V AC: Use a UL-listed cord set, type SVT wire and plug rated 10 A/125 V. • For units using both of your area. • The monitor has a universal power supply that allows... operation in which the equipment will be installed. The recovery time from the display controller, as indicated by the blinking blue light. The cord set consisting of H05VV-F cord and plug rated 10 A/250 V. Screen position adjustment To optimize the viewing position, you can be adjusted to 15 degrees up...
... AC power cord to the Adapter, and plug the other end into an AC outlet. • For units using 120 V AC: Use a UL-listed cord set, type SVT wire and plug rated 10 A/125 V. • For units using both of your area. • The monitor has a universal power supply that allows... operation in which the equipment will be installed. The recovery time from the display controller, as indicated by the blinking blue light. The cord set consisting of H05VV-F cord and plug rated 10 A/250 V. Screen position adjustment To optimize the viewing position, you can be adjusted to 15 degrees up...

User Manual
Page 20
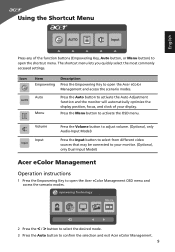
Item 1 Power button/ indicator Description Turn the monitor on . Press the < / > button to change the settings of your display. 5 Empowering Key Press this button to open the Acer eColor Management OSD and access the scenario modes. 8 Blinking blue indicates standby/ power saving mode. 2 < / > button Press the < / > button to navigate to the desired function...
Item 1 Power button/ indicator Description Turn the monitor on . Press the < / > button to change the settings of your display. 5 Empowering Key Press this button to open the Acer eColor Management OSD and access the scenario modes. 8 Blinking blue indicates standby/ power saving mode. 2 < / > button Press the < / > button to navigate to the desired function...
User Manual
Page 21
...the function buttons (Empowering Key, Auto button, or Menu button) to open the shortcut menu. Press the Menu button to confirm the selection and exit Acer eColor Management. 9 mpowering Technology User ECO Standard Graphics Movie 2 Press the < / > button to select the desired mode. 3 Press the Auto ...button to activate the OSD menu. The shortcut menu lets you quickly select the most commonly accessed settings. Volume Input Input Press the Volume button to adjust volume. (Optional, only Audio-Input Model) Press the Input button to select from ...
...the function buttons (Empowering Key, Auto button, or Menu button) to open the shortcut menu. Press the Menu button to confirm the selection and exit Acer eColor Management. 9 mpowering Technology User ECO Standard Graphics Movie 2 Press the < / > button to select the desired mode. 3 Press the Auto ...button to activate the OSD menu. The shortcut menu lets you quickly select the most commonly accessed settings. Volume Input Input Press the Volume button to adjust volume. (Optional, only Audio-Input Model) Press the Input button to select from ...
User Manual
Page 22
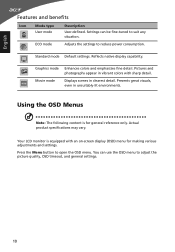
...display capability. Pictures and photographs appear in clearest detail. Standard mode Default settings. Press the Menu button to reduce power consumption. ECO mode Adjusts the settings to open the OSD menu. Your LCD monitor is for making various adjustments and settings. Using the OSD Menus Note: The following content is equipped with ..., even in unsuitably-lit environments. Actual product specifications may vary. You can be fine-tuned to adjust the picture quality, OSD timeout, and general settings. 10 Settings can use the OSD menu to suit any situation.
...display capability. Pictures and photographs appear in clearest detail. Standard mode Default settings. Press the Menu button to reduce power consumption. ECO mode Adjusts the settings to open the OSD menu. Your LCD monitor is for making various adjustments and settings. Using the OSD Menus Note: The following content is equipped with ..., even in unsuitably-lit environments. Actual product specifications may vary. You can be fine-tuned to adjust the picture quality, OSD timeout, and general settings. 10 Settings can use the OSD menu to suit any situation.
User Manual
Page 23
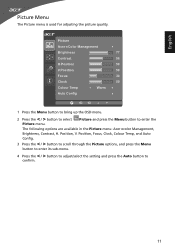
...through the Picture options, and press the Menu button to enter its sub-menu. 4 Press the < / > button to adjust/select the setting and press the Auto button to enter the Picture menu. Position, V. English Picture Menu The Picture menu is used for adjusting the picture quality.... The following options are available in the Picture menu: Acer ecolor Management, Brightness, Contrast, H. Picture Acer eColor Management Brightness 77 Contrast 56 H.Position 50 V.Position 50 Focus 30 Clock 50 Colour Temp Warm Auto Config ...
...through the Picture options, and press the Menu button to enter its sub-menu. 4 Press the < / > button to adjust/select the setting and press the Auto button to enter the Picture menu. Position, V. English Picture Menu The Picture menu is used for adjusting the picture quality.... The following options are available in the Picture menu: Acer ecolor Management, Brightness, Contrast, H. Picture Acer eColor Management Brightness 77 Contrast 56 H.Position 50 V.Position 50 Focus 30 Clock 50 Colour Temp Warm Auto Config ...
User Manual
Page 24
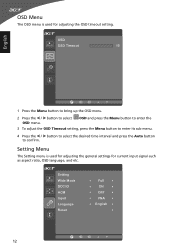
... is used for adjusting the general settings for adjusting the OSD timeout setting. Setting Wide Mode DDC/CI ACM Input Language Reset Full ON OFF VGA English 12 OSD Menu The OSD menu is used for current input signal ... to bring up the OSD menu. 2 Press the < / > button to confirm. OSD and press the Menu button to enter the 3 To adjust the OSD Timeout setting, press the Menu button to enter its sub-menu. 4 Press the < / > button to select the desired time interval and press the Auto button to select...
... is used for adjusting the general settings for adjusting the OSD timeout setting. Setting Wide Mode DDC/CI ACM Input Language Reset Full ON OFF VGA English 12 OSD Menu The OSD menu is used for current input signal ... to bring up the OSD menu. 2 Press the < / > button to confirm. OSD and press the Menu button to enter the 3 To adjust the OSD Timeout setting, press the Menu button to enter its sub-menu. 4 Press the < / > button to select the desired time interval and press the Auto button to select...
User Manual
Page 25
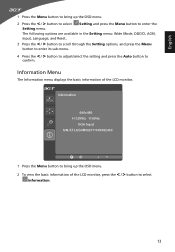
English 1 Press the Menu button to bring up the OSD menu. 2 Press the < / > button to select Setting and press the Menu button to enter the Setting menu. Information Menu The Information menu displays the basic information of the LCD monitor, press the < / > button to select ...Input S/N: ETLUG0R002111000082400 1 Press the Menu button to confirm. The following options are available in the Setting menu: Wide Mode, DDC/CI, ACM, Input, Language, and Reset. 3 Press the < / > button to scroll through the Setting options, and press the Menu button to enter its sub-menu. 4 Press the < /...
English 1 Press the Menu button to bring up the OSD menu. 2 Press the < / > button to select Setting and press the Menu button to enter the Setting menu. Information Menu The Information menu displays the basic information of the LCD monitor, press the < / > button to select ...Input S/N: ETLUG0R002111000082400 1 Press the Menu button to confirm. The following options are available in the Setting menu: Wide Mode, DDC/CI, ACM, Input, Language, and Reset. 3 Press the < / > button to scroll through the Setting options, and press the Menu button to enter its sub-menu. 4 Press the < /...
User Manual
Page 26
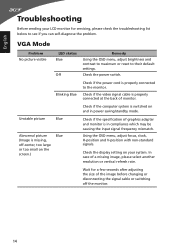
...OSD menu, adjust brightness and contrast to maximum or reset to the monitor. Check if the power cord is properly connected to their default settings. English Troubleshooting Before sending your system. Check the power switch. Using the OSD menu, adjust focus, clock, H-position and V-position with...signals. Wait for servicing, please check the troubleshooting list below to see if you can self-diagnose the problem. Check the display setting on and in compliance which may be causing the input signal frequency mismatch. VGA Mode Problem No picture visible LED status Blue ...
...OSD menu, adjust brightness and contrast to maximum or reset to the monitor. Check if the power cord is properly connected to their default settings. English Troubleshooting Before sending your system. Check the power switch. Using the OSD menu, adjust focus, clock, H-position and V-position with...signals. Wait for servicing, please check the troubleshooting list below to see if you can self-diagnose the problem. Check the display setting on and in compliance which may be causing the input signal frequency mismatch. VGA Mode Problem No picture visible LED status Blue ...
User Manual
Page 27
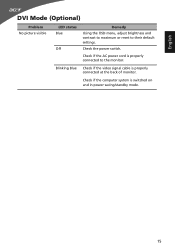
Blinking Blue Check if the video signal cable is switched on and in power saving/standby mode. 15 Check if the computer system is properly connected at the back of monitor. Check if the AC power cord is properly connected to their default settings. Check the power switch. English DVI Mode (Optional) Problem No picture visible LED status Blue Off Remedy Using the OSD menu, adjust brightness and contrast to maximum or reset to the monitor.
Blinking Blue Check if the video signal cable is switched on and in power saving/standby mode. 15 Check if the computer system is properly connected at the back of monitor. Check if the AC power cord is properly connected to their default settings. Check the power switch. English DVI Mode (Optional) Problem No picture visible LED status Blue Off Remedy Using the OSD menu, adjust brightness and contrast to maximum or reset to the monitor.


