User Manual
Page 2
..., without obligation to notify any means, electronically, mechanically, by any person of this manual or supplementary documents and publications. Acer LCD Monitor User's Guide Model number Serial number Date of purchase Place of Acer Incorporated. Such changes will be made periodically to the information in this publication without the prior written permission of...
..., without obligation to notify any means, electronically, mechanically, by any person of this manual or supplementary documents and publications. Acer LCD Monitor User's Guide Model number Serial number Date of purchase Place of Acer Incorporated. Such changes will be made periodically to the information in this publication without the prior written permission of...

User Manual
Page 3
Keep this case, the screen is recovered slowly by unplugging all power cords from the LCD monitor: • Make sure the monitor is displayed for your monitor Please carefully follow these instructions carefully. In this document for a few hours. Connecting/disconnecting the device Observe the following...screen may flicker during initial use . • The LCD screen has 99.99% or more effective pixels. iii Special notes on LCD monitors The following guidelines when connecting and disconnecting power from the power supplies. Follow all the time. • Due to the nature of 0.01...
Keep this case, the screen is recovered slowly by unplugging all power cords from the LCD monitor: • Make sure the monitor is displayed for your monitor Please carefully follow these instructions carefully. In this document for a few hours. Connecting/disconnecting the device Observe the following...screen may flicker during initial use . • The LCD screen has 99.99% or more effective pixels. iii Special notes on LCD monitors The following guidelines when connecting and disconnecting power from the power supplies. Follow all the time. • Due to the nature of 0.01...

User Manual
Page 8
...inadequate working in front of a computer. Users are also at risk of physical injury after prolonged use. The following symptoms may complain of the monitor, using a footrest, or raising your sitting height to remove the strain on your leg muscles viii Power management statement should be as below. &#...8226; Activate display's Sleep mode within 5 minutes of user inactivity. • Wake the monitor when it is in Active Off mode, move the mouse or press any other recurring or persistent discomfort and/or pain related to computer ...
...inadequate working in front of a computer. Users are also at risk of physical injury after prolonged use. The following symptoms may complain of the monitor, using a footrest, or raising your sitting height to remove the strain on your leg muscles viii Power management statement should be as below. &#...8226; Activate display's Sleep mode within 5 minutes of user inactivity. • Wake the monitor when it is in Active Off mode, move the mouse or press any other recurring or persistent discomfort and/or pain related to computer ...

User Manual
Page 9
... following sections provide suggestions on a distant point. • Blink frequently to keep your eyes from the monitor and focusing on how to reduce eyestrain. In order to prevent damage to the monitor, do not lift the monitor by using drapes, shades or blinds • using a task light • changing the display's viewing angle...
... following sections provide suggestions on a distant point. • Blink frequently to keep your eyes from the monitor and focusing on how to reduce eyestrain. In order to prevent damage to the monitor, do not lift the monitor by using drapes, shades or blinds • using a task light • changing the display's viewing angle...
User Manual
Page 10
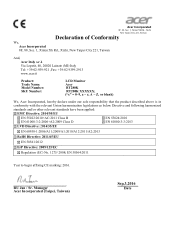
... to begin affixing CE marking: 2016. Acer Incorporated 8F, 88, Sec. 1, Xintai 5th Rd., Xizhi New Taipei City 221, Taiwan Declaration of Conformity We, Acer Incorporated 8F, 88, Sec. 1, Xintai 5th Rd., Xizhi, New Taipei City 221, Taiwan And, Acer Italy s.r.l. Via Lepetit, 40, 20020 ... (MI) Italy Tel: +39-02-939-921 ,Fax: +39-02 9399-2913 www.acer.it Product: Trade Name: Model Number: SKU Number: LCD Monitor Acer RT280K RT280K XXXXXX; ("x" = 0~9, a ~ z, A ~ Z, or blank) We, Acer Incorporated, hereby declare under our sole responsibility that the product described above is in conformity with...
... to begin affixing CE marking: 2016. Acer Incorporated 8F, 88, Sec. 1, Xintai 5th Rd., Xizhi New Taipei City 221, Taiwan Declaration of Conformity We, Acer Incorporated 8F, 88, Sec. 1, Xintai 5th Rd., Xizhi, New Taipei City 221, Taiwan And, Acer Italy s.r.l. Via Lepetit, 40, 20020 ... (MI) Italy Tel: +39-02-939-921 ,Fax: +39-02 9399-2913 www.acer.it Product: Trade Name: Model Number: SKU Number: LCD Monitor Acer RT280K RT280K XXXXXX; ("x" = 0~9, a ~ z, A ~ Z, or blank) We, Acer Incorporated, hereby declare under our sole responsibility that the product described above is in conformity with...
User Manual
Page 11
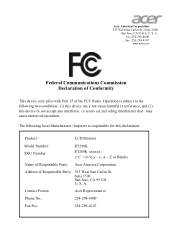
Tel : 254-298-4000 Fax : 254-298-4147 www.acer.com Federal Communications Commission Declaration of Conformity This device com plies with Part 15 of Responsible Party: 333 West San Carlos St. Suite... in terference, and (2) this declaration: Product: LCD Monitor Model Number: SKU Number: RT280K RT280K xxxxxx ; ("x" = 0~9, a ~ z, A ~ Z or Blank) Name of Responsible Party: Acer America Corporation Address of the FCC Rules. S. Contact Person: Acer Representative Phone No.: 254-298-4000 Fax No.: 254-298-4147 Acer America Corporation 333 West San Carlos St., Suite 1500 ...
Tel : 254-298-4000 Fax : 254-298-4147 www.acer.com Federal Communications Commission Declaration of Conformity This device com plies with Part 15 of Responsible Party: 333 West San Carlos St. Suite... in terference, and (2) this declaration: Product: LCD Monitor Model Number: SKU Number: RT280K RT280K xxxxxx ; ("x" = 0~9, a ~ z, A ~ Z or Blank) Name of Responsible Party: Acer America Corporation Address of the FCC Rules. S. Contact Person: Acer Representative Phone No.: 254-298-4000 Fax No.: 254-298-4147 Acer America Corporation 333 West San Carlos St., Suite 1500 ...
User Manual
Page 12
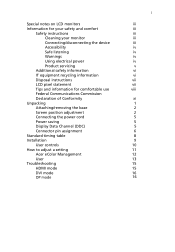
... for your safety and comfort Safety instructions Cleaning your monitor Connecting/disconnecting the device Accessibility Safe listening Warnings Using electrical power Product servicing Additional safety information IT equipment recycling information Disposal instructions LCD pixel ...position adjustment Connecting the power cord Power saving Display Data Channel (DDC) Connector pin assignment Standard timing table Installation User controls How to adjust a setting Acer eColor Management User Troubleshooting HDMI mode DVI mode DP mode 1 iii iii iii iii iii iv iv iv iv v vi vi vii vii viii xi...
... for your safety and comfort Safety instructions Cleaning your monitor Connecting/disconnecting the device Accessibility Safe listening Warnings Using electrical power Product servicing Additional safety information IT equipment recycling information Disposal instructions LCD pixel ...position adjustment Connecting the power cord Power saving Display Data Channel (DDC) Connector pin assignment Standard timing table Installation User controls How to adjust a setting Acer eColor Management User Troubleshooting HDMI mode DVI mode DP mode 1 iii iii iii iii iii iv iv iv iv v vi vi vii vii viii xi...
User Manual
Page 13
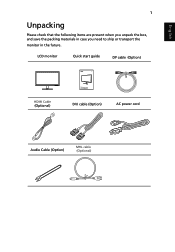
LCD monitor Quick start guide DP cable (Option) RT280K HDMI Cable (Optional) RT0 Series USER GUIDE DVI cable (Option) AC power cord Audio Cable (Option) MHL cable (Optional) MHL English 1 Unpacking Please check that the following items are present when you unpack the box, and save the packing materials in case you need to ship or transport the monitor in the future.
LCD monitor Quick start guide DP cable (Option) RT280K HDMI Cable (Optional) RT0 Series USER GUIDE DVI cable (Option) AC power cord Audio Cable (Option) MHL cable (Optional) MHL English 1 Unpacking Please check that the following items are present when you unpack the box, and save the packing materials in case you need to ship or transport the monitor in the future.

User Manual
Page 14
English 2 ATTACHING/REMOVING THE BASE Install: Align the base with the stand and push the base towards the top of the monitor. Tighten the screw clock-wise. 1 2 3 Remove: Reverse the steps to remove the base.
English 2 ATTACHING/REMOVING THE BASE Install: Align the base with the stand and push the base towards the top of the monitor. Tighten the screw clock-wise. 1 2 3 Remove: Reverse the steps to remove the base.

User Manual
Page 15
Only at the highest point can adjust the height/tilt/ swivel/pivot of the monitor. • Tilt Please see the illustration below for an example of the tilt range. English 3 SCREEN POSITION ADJUSTMENT In oder to make sure that allows ..., you can 15 degrees of H05VV-F cord and plug rated 10 A/250 V. No user-adjustment is the correct type required for your area. • The monitor has a universal power supply that the power cord you use is required. • Plug one end of the power cord to the AC inlet, and...
Only at the highest point can adjust the height/tilt/ swivel/pivot of the monitor. • Tilt Please see the illustration below for an example of the tilt range. English 3 SCREEN POSITION ADJUSTMENT In oder to make sure that allows ..., you can 15 degrees of H05VV-F cord and plug rated 10 A/250 V. No user-adjustment is the correct type required for your area. • The monitor has a universal power supply that the power cord you use is required. • Plug one end of the power cord to the AC inlet, and...

User Manual
Page 16
...DDC) To make installation easier, so long as indicated by the amber-colored power LED. The monitor supports the DDC2B standard. The DDC is around 3 seconds. 4 English Power saving The monitor will be switched to "power saving" mode by the control signal from "power saving" mode...-play. The recovery time from the display controller, as your system supports the DDC protocol, the monitor is able to "on" is a communication protocol through which the monitor automatically informs the host system about its capabilities; for example, supported resolutions and corresponding timing. Mode ...
...DDC) To make installation easier, so long as indicated by the amber-colored power LED. The monitor supports the DDC2B standard. The DDC is around 3 seconds. 4 English Power saving The monitor will be switched to "power saving" mode by the control signal from "power saving" mode...-play. The recovery time from the display controller, as your system supports the DDC protocol, the monitor is able to "on" is a communication protocol through which the monitor automatically informs the host system about its capabilities; for example, supported resolutions and corresponding timing. Mode ...
User Manual
Page 21
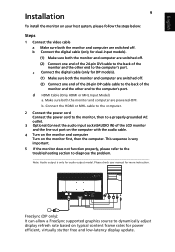
... the computer. 2 Connect the power cord Connect the power cord to the monitor, then to diagnose the problem. Make sure both the monitor and computer are switched off. b. English Installation 9 To install the monitor on your host system, please follow the steps below: Steps 1 Connect the... video cable a Make sure both the monitor and computer are powered-OFF. Note: Audio output is very important. 5 If the monitor does not function properly, please refer to the troubleshooting section to a properly grounded AC outlet. 3...
... the computer. 2 Connect the power cord Connect the power cord to the monitor, then to diagnose the problem. Make sure both the monitor and computer are switched off. b. English Installation 9 To install the monitor on your host system, please follow the steps below: Steps 1 Connect the... video cable a Make sure both the monitor and computer are powered-OFF. Note: Audio output is very important. 5 If the monitor does not function properly, please refer to the troubleshooting section to a properly grounded AC outlet. 3...
User Manual
Page 22
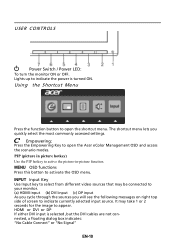
... connected to open the shortcut menu. HDMI or DVI or DP If either DVI input is turned ON. Empowering: Press the Empowering Key to your monitor. (a) HDMI input (b) DVI input (c) DP input As you cycle through the sources you quickly select the most commonly accessed settings. PIP (picture in picture hotkey... to appear. INPUT Input Key Use Input key to select from different video sources that may take 1 or 2 seconds for the image to open the Acer eColor Management OSD and access the scenario modes. USER CONTROLS Power Switch / Power LED: To turn the...
... connected to open the shortcut menu. HDMI or DVI or DP If either DVI input is turned ON. Empowering: Press the Empowering Key to your monitor. (a) HDMI input (b) DVI input (c) DP input As you cycle through the sources you quickly select the most commonly accessed settings. PIP (picture in picture hotkey... to appear. INPUT Input Key Use Input key to select from different video sources that may take 1 or 2 seconds for the image to open the Acer eColor Management OSD and access the scenario modes. USER CONTROLS Power Switch / Power LED: To turn the...

User Manual
Page 24
... following content is for adjusting the settings of the original source. It can simulate high-resolution images by boosting the pixel density of your LCD Monitor. Actual product specifications may vary. EN-12 Adjusting the OSD settings Note: The following page: Adjusting the picture quality Blue Lighe OFF 100 1 Press the...
... following content is for adjusting the settings of the original source. It can simulate high-resolution images by boosting the pixel density of your LCD Monitor. Actual product specifications may vary. EN-12 Adjusting the OSD settings Note: The following page: Adjusting the picture quality Blue Lighe OFF 100 1 Press the...

User Manual
Page 27
EN-15 Then the basic information of LCD monitor will show up the OSD. 2 Using the / keys, select Information from the OSD. Product information 1 Press the MENU key to bring up for current input.
EN-15 Then the basic information of LCD monitor will show up the OSD. 2 Using the / keys, select Information from the OSD. Product information 1 Press the MENU key to bring up for current input.
User Manual
Page 28
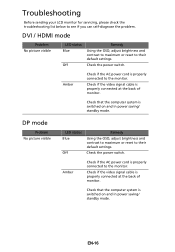
...switch. Problem No picture visible LED status Blue Off Remedy Using the OSD, adjust brightness and contrast to maximum or reset to the monitor. Amber Check if the AC power cord is properly connected to their default settings. Check the power switch. Check that the computer... system is properly connected at the back of monitor. Check if the video signal cable is switched on and in power saving/ standby mode. Check if the video signal cable is...
...switch. Problem No picture visible LED status Blue Off Remedy Using the OSD, adjust brightness and contrast to maximum or reset to the monitor. Amber Check if the AC power cord is properly connected to their default settings. Check the power switch. Check that the computer... system is properly connected at the back of monitor. Check if the video signal cable is switched on and in power saving/ standby mode. Check if the video signal cable is...


