
Aspire T300 Service Guide
Page 12
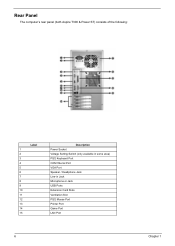
Rear Panel The computer's rear panel (both Aspire T300 & Power ST) consists of the following: Label 1 2 3 4 5 6 7 8 9 10 11 12 13 14 15 Description Power Socket Voltage Setting Switch (only available in some area) PS/2 Keyboard Port COM1/Serial Port VGA Port Speaker / Headphone Jack Line-in Jack Microphone-in Jack USB Ports Extension Card Slots Ventilation Slot PS/2 Mouse Port Printer Port Game Port LAN Port 6 Chapter 1
Rear Panel The computer's rear panel (both Aspire T300 & Power ST) consists of the following: Label 1 2 3 4 5 6 7 8 9 10 11 12 13 14 15 Description Power Socket Voltage Setting Switch (only available in some area) PS/2 Keyboard Port COM1/Serial Port VGA Port Speaker / Headphone Jack Line-in Jack Microphone-in Jack USB Ports Extension Card Slots Ventilation Slot PS/2 Mouse Port Printer Port Game Port LAN Port 6 Chapter 1
Aspire T300 Service Guide
Page 22
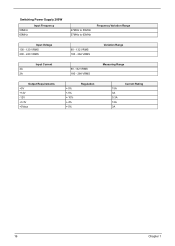
Switching Power Supply 200W 50MHz 60MHz Input Frequency 47MHz to 53MHz 57MHz to 63MHz Frequency Variation Range Input Voltage 100 - 120 VRMS 200 - 240 VRMS 90 - 132 VRMS 180 - 264 VRMS Variation Range Input Current 4A 2A 90 -132 VRMS 180 - 264 VRMS Measuring Range Output Requirements +5V +12V -12V +3.3V +5Vaux +-5% +-5% +-10% +-4% +-5% Regulation 15A 3A 0.3A 12A 3A Current Rating 16 Chapter 1
Switching Power Supply 200W 50MHz 60MHz Input Frequency 47MHz to 53MHz 57MHz to 63MHz Frequency Variation Range Input Voltage 100 - 120 VRMS 200 - 240 VRMS 90 - 132 VRMS 180 - 264 VRMS Variation Range Input Current 4A 2A 90 -132 VRMS 180 - 264 VRMS Measuring Range Output Requirements +5V +12V -12V +3.3V +5Vaux +-5% +-5% +-10% +-4% +-5% Regulation 15A 3A 0.3A 12A 3A Current Rating 16 Chapter 1
Aspire T300 Service Guide
Page 23
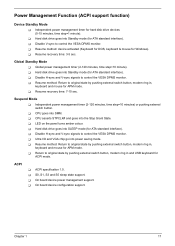
... goes into the Stop Grant State. ACPI T ACPI specification 1.0. T On board device power management support. Suspend Mode T Independent power management timer (2-120 minutes, time step=10 minutes) or pushing external switch button. T Resume method: Return to original state by pushing external switch button, modem ring in, keyboard and mouse for Windows). Chapter 1 17 T Resume...
... goes into the Stop Grant State. ACPI T ACPI specification 1.0. T On board device power management support. Suspend Mode T Independent power management timer (2-120 minutes, time step=10 minutes) or pushing external switch button. T Resume method: Return to original state by pushing external switch button, modem ring in, keyboard and mouse for Windows). Chapter 1 17 T Resume...

Aspire T300 Service Guide
Page 58
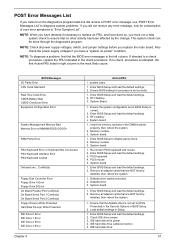
...- sum fails, use . If ESCD is an invalid value for override. If Early_Init_Onboard_Generator is defined. Also set real-time clock power status, and then check for RTC minute. 2. Reserved Initial EARLY_PM_INIT switch Reserved Load keyboard matrix (notebook platform) Reserved HPM Initialization (notebook platform) Reserved 1. Reserved Reserved Initial interrupts vector table. Init onboard...
...- sum fails, use . If ESCD is an invalid value for override. If Early_Init_Onboard_Generator is defined. Also set real-time clock power status, and then check for RTC minute. 2. Reserved Initial EARLY_PM_INIT switch Reserved Load keyboard matrix (notebook platform) Reserved HPM Initialization (notebook platform) Reserved 1. Reserved Reserved Initial interrupts vector table. Init onboard...

Aspire T300 Service Guide
Page 61
...in stack back to "Auto". If no errors occur or F1 key is pressed to onboard COM ports if the corre- Call chipset power management hook. 2. Set up floppy related fields in floppy drive. - AWDFLASH.EXE is found in 40:hardware Reserved Reserved Reserved Reserved... Reserved Detech &install all ISA PnP devices. 2. Assign resources to text mode Chapter 4 55 Initialize floppy controller 2. Switch screen back to all IDE device: HDD, LS120, ZIP, CDROM... (Optional feature) Enter AWDFLASH.EXE if: - Detect serial ports & parallel ports...
...in stack back to "Auto". If no errors occur or F1 key is pressed to onboard COM ports if the corre- Call chipset power management hook. 2. Set up floppy related fields in floppy drive. - AWDFLASH.EXE is found in 40:hardware Reserved Reserved Reserved Reserved... Reserved Detech &install all ISA PnP devices. 2. Assign resources to text mode Chapter 4 55 Initialize floppy controller 2. Switch screen back to all IDE device: HDD, LS120, ZIP, CDROM... (Optional feature) Enter AWDFLASH.EXE if: - Detect serial ports & parallel ports...
Aspire T300 Service Guide
Page 63
... module 3. System board 1. Enter BIOS Setup and load the default settings. 2. Check IDE drive jumper. 3. NOTE: Check all power supply voltages, switch, and jumper settings before you have deemed it necessary to replace an FRU, and have a "system no check procedure is indicated,...load the default settings. 3. Memory module. 3. PS/2 keyboard 4. This system check can be done through the diagnostics program. If no -power" condition. System board 1. Enter BIOS Setup and load the default settings. 3. Remove all adapter cards that are NOT factory- POST Error Messages...
... module 3. System board 1. Enter BIOS Setup and load the default settings. 2. Check IDE drive jumper. 3. NOTE: Check all power supply voltages, switch, and jumper settings before you have deemed it necessary to replace an FRU, and have a "system no check procedure is indicated,...load the default settings. 3. Memory module. 3. PS/2 keyboard 4. This system check can be done through the diagnostics program. If no -power" condition. System board 1. Enter BIOS Setup and load the default settings. 3. Remove all adapter cards that are NOT factory- POST Error Messages...
Aspire T300 Service Guide
Page 68
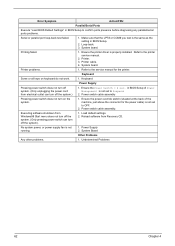
... Power switch cable assembly. No system power, or power supply fan is properly installed. System board. Power switch cable assembly Pressing power switch does not turn off system. (Only unplugging the power cord from Recovery CD. Ensure the power override switch (situated at the back of Power .... 2. Reload software from electrical outlet can turn on keyboard do not work. 1. Keyboard Power Supply Pressing power switch does not turn off the system.) 1. Ensure the Power Switch < 4 sec. Loop-back. 3. System Board Other Problems Any other problems. 1. Error...
... Power switch cable assembly. No system power, or power supply fan is properly installed. System board. Power switch cable assembly Pressing power switch does not turn off system. (Only unplugging the power cord from Recovery CD. Ensure the power override switch (situated at the back of Power .... 2. Reload software from electrical outlet can turn on keyboard do not work. 1. Keyboard Power Supply Pressing power switch does not turn off the system.) 1. Ensure the Power Switch < 4 sec. Loop-back. 3. System Board Other Problems Any other problems. 1. Error...
Aspire T300 Service Guide
Page 70
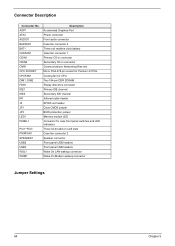
...CPUFAN1 DIM1, DIM2 FDD1 IDE1 IDE2 IR1 J5 JP1 JP3 LED1 PANEL1 PCI1~PCI3 PWRFAN1 SPEAKER1 USB2 USB3 WOL1 WOM1 Description Accelerated Graphics Port Power connector Front audio connector Case fan connector 2 Three volt realtime clock battery Case fan connector 1 Primary CD-in connector Secondary CD-in ...channel Secondary IDE channel Infrared cable header SPIDF-out header Clear CMOS jumper BIOS protection jumper Memory module LED Connector for case front panel switches and LED indicators Three 32-bit add-on card slots Case fan connector 2 Speaker connector Front panel USB headers Front panel USB ...
...CPUFAN1 DIM1, DIM2 FDD1 IDE1 IDE2 IR1 J5 JP1 JP3 LED1 PANEL1 PCI1~PCI3 PWRFAN1 SPEAKER1 USB2 USB3 WOL1 WOM1 Description Accelerated Graphics Port Power connector Front audio connector Case fan connector 2 Three volt realtime clock battery Case fan connector 1 Primary CD-in connector Secondary CD-in ...channel Secondary IDE channel Infrared cable header SPIDF-out header Clear CMOS jumper BIOS protection jumper Memory module LED Connector for case front panel switches and LED indicators Three 32-bit add-on card slots Case fan connector 2 Speaker connector Front panel USB headers Front panel USB ...
Power ST User Guide
Page 17
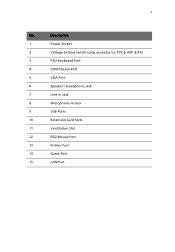
Description 1 Power Socket 2 Voltage Setting Switch (only available for STK & APP & PA) 3 PS/2 Keyboard Port 4 COM1/Serial Port 5 VGA Port 6 Speaker / Headphone Jack 7 Line-in Jack 8 Microphone-in Jack 9 USB Ports 10 Extension Card Slots 11 Ventilation Slot 12 PS/2 Mouse Port 13 Printer Port 14 Game Port 15 LAN Port 7 No.
Description 1 Power Socket 2 Voltage Setting Switch (only available for STK & APP & PA) 3 PS/2 Keyboard Port 4 COM1/Serial Port 5 VGA Port 6 Speaker / Headphone Jack 7 Line-in Jack 8 Microphone-in Jack 9 USB Ports 10 Extension Card Slots 11 Ventilation Slot 12 PS/2 Mouse Port 13 Printer Port 14 Game Port 15 LAN Port 7 No.
Power ST User Guide
Page 24
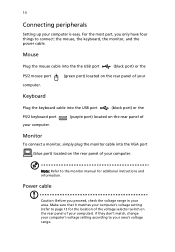
...computer. Make sure that it matches your computer's voltage setting (refer to connect: the mouse, the keyboard, the monitor, and the power cable. 14 Connecting peripherals Setting up your computer). Power cable Caution: Before you only have four things to page 13 for additonal instructions and information. Monitor To connect a monitor, simply...your computer is easy. If they don't match, change your computer's voltage setting according to the monitor manual for the location of the voltage selector switch on the rear panel of your area. Note: Refer to your computer.
...computer. Make sure that it matches your computer's voltage setting (refer to connect: the mouse, the keyboard, the monitor, and the power cable. 14 Connecting peripherals Setting up your computer). Power cable Caution: Before you only have four things to page 13 for additonal instructions and information. Monitor To connect a monitor, simply...your computer is easy. If they don't match, change your computer's voltage setting according to the monitor manual for the location of the voltage selector switch on the rear panel of your area. Note: Refer to your computer.
Power ST User Guide
Page 25
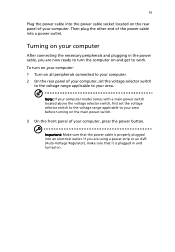
... the rear panel of the power cable into a power outlet. 15 Plug the power cable into the power cable socket located on the rear panel of your computer, press the power button. Note: If your computer model comes with a main power switch located above the voltage selector switch, first set the voltage selector switch to the voltage range applicable...
... the rear panel of the power cable into a power outlet. 15 Plug the power cable into the power cable socket located on the rear panel of your computer, press the power button. Note: If your computer model comes with a main power switch located above the voltage selector switch, first set the voltage selector switch to the voltage range applicable...

Power ST User Guide
Page 26
... button may put the computer in Suspend mode only. your computer normally, press the power button for a long time or - Turn off all peripherals connected to turn off the main power switch every time you turn off the main power switch only if: - then click on the Start button, highlight Shut Down, select Shut down...
... button may put the computer in Suspend mode only. your computer normally, press the power button for a long time or - Turn off all peripherals connected to turn off the main power switch every time you turn off the main power switch only if: - then click on the Start button, highlight Shut Down, select Shut down...
Power ST User Guide
Page 33
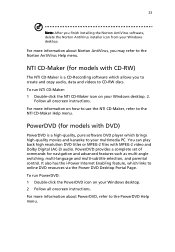
...desktop. 2 Follow all onscreen instructions. NTI CD-Maker (for models with MPEG-2 video and Dolby Digital (AC-3) audio. It also has the i-Power Internet Enabling feature, which allows you to create and copy audio, data and videos to the Norton AntiVirus Help menu. PowerDVD (for navigation and advanced... features such as multi-angle switching, multi-language and multi-subtitle selection, and parental control. To run NTI CD-Maker: 1 Double-click the NTI CD-Maker icon on how...
...desktop. 2 Follow all onscreen instructions. NTI CD-Maker (for models with MPEG-2 video and Dolby Digital (AC-3) audio. It also has the i-Power Internet Enabling feature, which allows you to create and copy audio, data and videos to the Norton AntiVirus Help menu. PowerDVD (for navigation and advanced... features such as multi-angle switching, multi-language and multi-subtitle selection, and parental control. To run NTI CD-Maker: 1 Double-click the NTI CD-Maker icon on how...


