User Manual (3D)
Page 2
© 2012 All Rights Reserved. Acer Projector Series Quick Guide Original Issue: 8/2012 Model number Serial number Date of purchase Place of purchase
© 2012 All Rights Reserved. Acer Projector Series Quick Guide Original Issue: 8/2012 Model number Serial number Date of purchase Place of purchase

User Manual
Page 2
...new editions of such revisions or changes. Copyright © 2015. Acer Projector User's Guide Original Issue: 08/2015 Changes may be made periodically to your unit should include the serial number, model number and purchase information. No part of this manual or supplementary... documents and publications. Model number Serial number Date of purchase Place of purchase Acer and the Acer logo are trademarks or registered trademarks of Acer Incorporated. All Rights Reserved. Record the model number, serial number, purchase date and place of purchase...
...new editions of such revisions or changes. Copyright © 2015. Acer Projector User's Guide Original Issue: 08/2015 Changes may be made periodically to your unit should include the serial number, model number and purchase information. No part of this manual or supplementary... documents and publications. Model number Serial number Date of purchase Place of purchase Acer and the Acer logo are trademarks or registered trademarks of Acer Incorporated. All Rights Reserved. Record the model number, serial number, purchase date and place of purchase...

User Manual
Page 12
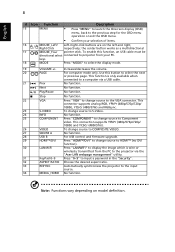
English 2 Note: Functions vary depending on model definition.
English 2 Note: Functions vary depending on model definition.

User Manual
Page 15
... in connector (RCA) 16 Audio in connector 17 Audio out connector 18 12V DC output connector 19 3.5mm Microphone Input Note: Functions vary depending on model definition.
... in connector (RCA) 16 Audio in connector 17 Audio out connector 18 12V DC output connector 19 3.5mm Microphone Input Note: Functions vary depending on model definition.

User Manual
Page 16
... by tilting the projector. 9 POWER • Power Indicator LED • See the contents in "Turning the Projector On/Off" section. Note: Functions vary depending on model definition. Press "MODE" to the input source.
... by tilting the projector. 9 POWER • Power Indicator LED • See the contents in "Turning the Projector On/Off" section. Note: Functions vary depending on model definition. Press "MODE" to the input source.

User Manual
Page 17
..., press again to display the image. 5 FREEZE Pause the screen image. 6 MEDIA_SETUP No function. 7 SOURCE Changes the active source. 8 3D Press "3D" to select 3D models. 9 ZOOM Zooms the projector display in Japanese market. 12 Enter No function. 13 Four directional Use up, down, left, right buttons to select items or...
..., press again to display the image. 5 FREEZE Pause the screen image. 6 MEDIA_SETUP No function. 7 SOURCE Changes the active source. 8 3D Press "3D" to select 3D models. 9 ZOOM Zooms the projector display in Japanese market. 12 Enter No function. 13 Four directional Use up, down, left, right buttons to select items or...
User Manual
Page 18
keys 18 MODE Press "MODE" to a computer via the "Acer LAN webpage management" utility. 31 KeyPad 0~9 Press "0~9" to input a password in the "Security". 32 ASPECT RATIO Choose the desired aspect ratio. 33 RESYNC Automatically synchronizes... source. 34 MEDIA_HOME No function. This function is wire or wirelessly transmitted from your selection of items. 16 MOUSE_Left/ Left-/right-click buttons are on model definition. Play/Pause No function. This connector supports analog RGB, YPbPr (480p/576p/720p/ 1080i), YCbCr (480i/576i) and RGBsync. 23 S-VIDEO To change ...
keys 18 MODE Press "MODE" to a computer via the "Acer LAN webpage management" utility. 31 KeyPad 0~9 Press "0~9" to input a password in the "Security". 32 ASPECT RATIO Choose the desired aspect ratio. 33 RESYNC Automatically synchronizes... source. 34 MEDIA_HOME No function. This function is wire or wirelessly transmitted from your selection of items. 16 MOUSE_Left/ Left-/right-click buttons are on model definition. Play/Pause No function. This connector supports analog RGB, YPbPr (480p/576p/720p/ 1080i), YCbCr (480i/576i) and RGBsync. 23 S-VIDEO To change ...

User Manual
Page 19
... the button to select the next or previous page. (only for Navigation mode) 8 KeyPad 0~9 Number buttons. (only for Numeric mode) Note: Functions vary depending on model definition.
... the button to select the next or previous page. (only for Navigation mode) 8 KeyPad 0~9 Number buttons. (only for Numeric mode) Note: Functions vary depending on model definition.

User Manual
Page 21
... works well with the projector. Note: Some smartphones require a converter (supplied by smartphone maker) to "Removing the cable management" section. Note: Functions vary depending on model definition. Note: USB cable needs powered extender if the length is compatible with your computer, please make sure the timing of the display mode is...
... works well with the projector. Note: Some smartphones require a converter (supplied by smartphone maker) to "Removing the cable management" section. Note: Functions vary depending on model definition. Note: USB cable needs powered extender if the length is compatible with your computer, please make sure the timing of the display mode is...

User Manual
Page 23
... turn off soon." This message appears: "Please press the power button again to turn off soon." Lamp will automatically turn the projector immediately back on model definition. This onscreen message indicates that the fan has failed. Note: Whenever the projector automatically shuts down , and the LED temp indicator will stop blinking...
... turn off soon." This message appears: "Please press the power button again to turn off soon." Lamp will automatically turn the projector immediately back on model definition. This onscreen message indicates that the fan has failed. Note: Whenever the projector automatically shuts down , and the LED temp indicator will stop blinking...

User Manual
Page 34
The new settings will be saved automatically upon exiting the menu. 5 Push the MENU button anytime to exit the menu and return to enter a submenu for feature setting. English 24 •Reset to factory default function Use the up and down arrow keys to select an option, the left and right arrow keys to adjust selected option settings, and the right arrow key to the Acer welcome screen. Note: Functions vary depending on model definition.
The new settings will be saved automatically upon exiting the menu. 5 Push the MENU button anytime to exit the menu and return to enter a submenu for feature setting. English 24 •Reset to factory default function Use the up and down arrow keys to select an option, the left and right arrow keys to adjust selected option settings, and the right arrow key to the Acer welcome screen. Note: Functions vary depending on model definition.

User Manual
Page 35
... item and adjust the settings by using the keys. • Select the next item to the main menu. • To exit OSD, press "MENU" on model definition. Using the OSD menus • To open the OSD menu, press "MENU" on the remote control or control panel. • When the OSD is...
... item and adjust the settings by using the keys. • Select the next item to the main menu. • To exit OSD, press "MENU" on model definition. Using the OSD menus • To open the OSD menu, press "MENU" on the remote control or control panel. • When the OSD is...

User Manual
Page 37
... scenery looks brighter. R Gain Adjusts the red gain for color temperature optimization. Effects the representation of red in the image. Note: Functions vary depending on model definition. Mode Use this function to increase the amount of dark scenery. Note: "Saturation" and "Tint" functions are not supported under computer or HDMI mode...
... scenery looks brighter. R Gain Adjusts the red gain for color temperature optimization. Effects the representation of red in the image. Note: Functions vary depending on model definition. Mode Use this function to increase the amount of dark scenery. Note: "Saturation" and "Tint" functions are not supported under computer or HDMI mode...

User Manual
Page 39
... image on screen. • Auto: Automatically adjust by information from player. • Underscan: Always no overscan on HDMI image. • Overscan: Always keep overscan on model definition. Note: "H. Note: Functions vary depending on HDMI image. to make the necessary adjustments. If you can see a vertical flickering bar in the projected image...
... image on screen. • Auto: Automatically adjust by information from player. • Underscan: Always no overscan on HDMI image. • Overscan: Always keep overscan on model definition. Note: "H. Note: Functions vary depending on HDMI image. to make the necessary adjustments. If you can see a vertical flickering bar in the projected image...

User Manual
Page 42
Control Channel Default is pressed again within 2 minutes. Note: Functions vary depending on model definition. Management ECO Mode High Altitude Turn Off Mode Auto Shutdown AC Power On Lamp Hour Elapse Lamp Reminding Lamp Hour Reset Choose "On" to ...: Resumes the system when the Power button is "RS232/LAN". Choose "On" to turn the lamp hour counter to 0 hours. Note: Functions vary depending on model definition. If lock user startup screen is "Off". English 32 LAN Lock to user startup screen Default Lock User Startup Screen is "Off", Choose "On...
Control Channel Default is pressed again within 2 minutes. Note: Functions vary depending on model definition. Management ECO Mode High Altitude Turn Off Mode Auto Shutdown AC Power On Lamp Hour Elapse Lamp Reminding Lamp Hour Reset Choose "On" to ...: Resumes the system when the Power button is "RS232/LAN". Choose "On" to turn the lamp hour counter to 0 hours. Note: Functions vary depending on model definition. If lock user startup screen is "Off". English 32 LAN Lock to user startup screen Default Lock User Startup Screen is "Off", Choose "On...

User Manual
Page 43
to restore the volume. MIC Volume Mute Adjust the volume from "MIC IN" connector. • Choose "On" to mute the volume. • Choose "Off" to increase the volume. Note: Functions vary depending on /off. Select the function to decrease the volume. English 33 Audio Volume • Press • Press to adjust the volume of any warning notifications. Power On/Off Volume Alarm Volume Select this function to adjust the notification volume when turning the projector on model definition.
to restore the volume. MIC Volume Mute Adjust the volume from "MIC IN" connector. • Choose "On" to mute the volume. • Choose "Off" to increase the volume. Note: Functions vary depending on /off. Select the function to decrease the volume. English 33 Audio Volume • Press • Press to adjust the volume of any warning notifications. Power On/Off Volume Alarm Volume Select this function to adjust the notification volume when turning the projector on model definition.

User Manual
Page 44
... select a 3D format that suits the 3D content you may need to execute "Invert" to get the correct image (for correct 3D display. Note: WUXGA model 24P 3D cannot be not supported. Use the or key to select your purpose. You can download these three players on projector. Choose "96Hz" or...
... select a 3D format that suits the 3D content you may need to execute "Invert" to get the correct image (for correct 3D display. Note: WUXGA model 24P 3D cannot be not supported. Use the or key to select your purpose. You can download these three players on projector. Choose "96Hz" or...

User Manual
Page 48
English 38 Logout After tap Logout, you will return to login page within 5 seconds. Note: Functions vary depending on model definition.
English 38 Logout After tap Logout, you will return to login page within 5 seconds. Note: Functions vary depending on model definition.

User Manual
Page 49
... your display resolution setting is lower than or equal to WUXGA-RB (1920 x 1200). • Click the "Change" button under the "Models" box. • Verify that the resolution setting is lower than or equal to WUXGA-RB (1920 x 1200). 39 Appendices English Troubleshooting If... you experience a problem with your Acer projector, refer to WUXGA-RB (1920 x 1200). • Click the "Advanced Properties" button. Image Problems and Solutions # Problem Solution 1...
... your display resolution setting is lower than or equal to WUXGA-RB (1920 x 1200). • Click the "Change" button under the "Models" box. • Verify that the resolution setting is lower than or equal to WUXGA-RB (1920 x 1200). 39 Appendices English Troubleshooting If... you experience a problem with your Acer projector, refer to WUXGA-RB (1920 x 1200). • Click the "Advanced Properties" button. Image Problems and Solutions # Problem Solution 1...

User Manual
Page 67
...) 28.1 23.97/24 27.0 25 28.1 29.97/30 33.8 15k-50 kHz 24-60 Hz Digital: 75 MHz Note: * Functions vary depending on model definition. English 57 C. MHL Digital Modes VGA 480i 576i 480p 480p_2x 576p 576p_2x 720p 720p 1080i 1080i 1080p 1080p 1080p Graphic source monitor range limits...
...) 28.1 23.97/24 27.0 25 28.1 29.97/30 33.8 15k-50 kHz 24-60 Hz Digital: 75 MHz Note: * Functions vary depending on model definition. English 57 C. MHL Digital Modes VGA 480i 576i 480p 480p_2x 576p 576p_2x 720p 720p 1080i 1080i 1080p 1080p 1080p Graphic source monitor range limits...

