

User Manual (3D)
Page 4
..., you will need to set up a 3D environment Once you are viewing Blu-ray 3D content over an HDMI 1.4a or later connection is not supported on the projector remote control to do the following. 1 Ensure your graphics card. Others, please set automatically. 2 Press the menu button on most of the window. English 4 Using DLP 3D / NVIDIA 3DTV Play technology Requires DLP 3D glasses. Note...
..., you will need to set up a 3D environment Once you are viewing Blu-ray 3D content over an HDMI 1.4a or later connection is not supported on the projector remote control to do the following. 1 Ensure your graphics card. Others, please set automatically. 2 Press the menu button on most of the window. English 4 Using DLP 3D / NVIDIA 3DTV Play technology Requires DLP 3D glasses. Note...

User Manual
Page 4
... that the new power cord meets the following requirements: detachable type, UL listed/CSA certified, VDE approved or its equivalent, 4.5 meters (15 feet) maximum length. If power strips are used with this product from the type of power available, consult your electrician for details. Product servicing Do not attempt to service this product yourself, as opening or removing covers may interfere...
... that the new power cord meets the following requirements: detachable type, UL listed/CSA certified, VDE approved or its equivalent, 4.5 meters (15 feet) maximum length. If power strips are used with this product from the type of power available, consult your electrician for details. Product servicing Do not attempt to service this product yourself, as opening or removing covers may interfere...

User Manual
Page 5
... the projector during operation. v • the power cord or plug is damaged, cut or frayed • liquid was spilled into the projector's lens when the lamp is on the projector first and then signal sources • Do not place the product in following the operating instructions Note: Adjust only those controls that is poorly ventilated or confined. It might cause fire or electric shock. Keep...
... the projector during operation. v • the power cord or plug is damaged, cut or frayed • liquid was spilled into the projector's lens when the lamp is on the projector first and then signal sources • Do not place the product in following the operating instructions Note: Adjust only those controls that is poorly ventilated or confined. It might cause fire or electric shock. Keep...

User Manual
Page 6
...; Always open the lens shutter or remove the lens cap when the projector is on the remote control. • The lamp becomes extremely hot during operation. There are dangerous high voltages inside which has its tilt angles should not exceed 6 degrees, otherwise it is showing warning message. • When changing the lamp, please allow unit to cool down, and follow all changing instructions. • Reset the "Lamp Hour Reset" function...
...; Always open the lens shutter or remove the lens cap when the projector is on the remote control. • The lamp becomes extremely hot during operation. There are dangerous high voltages inside which has its tilt angles should not exceed 6 degrees, otherwise it is showing warning message. • When changing the lamp, please allow unit to cool down, and follow all changing instructions. • Reset the "Lamp Hour Reset" function...

User Manual
Page 8
... popping sound. Precautions Follow all changing instructions. • This product will detect the life of the lamp itself. viii First things first Usage Notes Do: • Turn off the product before cleaning. • Use a soft cloth moistened with mild detergent to clean the display housing. • Disconnect the power plug from the Onscreen display "Management" menu after replacing the lamp module. • When switching the projector off...
... popping sound. Precautions Follow all changing instructions. • This product will detect the life of the lamp itself. viii First things first Usage Notes Do: • Turn off the product before cleaning. • Use a soft cloth moistened with mild detergent to clean the display housing. • Disconnect the power plug from the Onscreen display "Management" menu after replacing the lamp module. • When switching the projector off...

User Manual
Page 9
... 3 Projector Outlook 3 Control Panel 5 Remote Control Layout 6 MHL (Mobile High-Definition Link) Control 8 Getting Started 10 Connecting the Projector 10 Turning the Projector On/Off 11 Turning on the Projector 11 Turning the projector off 12 Adjusting the Projected Image 13 Adjusting the Height of Projected Image 13 How to optimize image size and distance 14 How to get a preferred image size by adjusting distance and zoom 18 User Controls 22 Installation menu 22 Onscreen Display (OSD) Menus 23 Color 24 Image 26 Setting 28 Management 31 Audio 32...
... 3 Projector Outlook 3 Control Panel 5 Remote Control Layout 6 MHL (Mobile High-Definition Link) Control 8 Getting Started 10 Connecting the Projector 10 Turning the Projector On/Off 11 Turning on the Projector 11 Turning the projector off 12 Adjusting the Projected Image 13 Adjusting the Height of Projected Image 13 How to optimize image size and distance 14 How to get a preferred image size by adjusting distance and zoom 18 User Controls 22 Installation menu 22 Onscreen Display (OSD) Menus 23 Color 24 Image 26 Setting 28 Management 31 Audio 32...
User Manual
Page 11
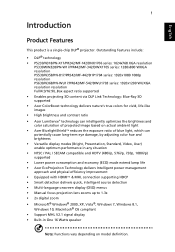
... economy (ECO) mode extend lamp life • Acer EcoProjeciton Technology delivers Intelligent power management approach and physical efficiency improvement • Equipped with HDMI™ & MHL connection supporting HDCP • Smart detection delivers quick, intelligent source detection • Multi-language onscreen display (OSD) menus • Manual focus projection lens zooms up to 1.3x • 2x digital zoom • Microsoft® Windows® 2000, XP, Vista®, Windows 7, Windows 8.1, Windows 10, Macintosh®...
... economy (ECO) mode extend lamp life • Acer EcoProjeciton Technology delivers Intelligent power management approach and physical efficiency improvement • Equipped with HDMI™ & MHL connection supporting HDCP • Smart detection delivers quick, intelligent source detection • Multi-language onscreen display (OSD) menus • Manual focus projection lens zooms up to 1.3x • 2x digital zoom • Microsoft® Windows® 2000, XP, Vista®, Windows 7, Windows 8.1, Windows 10, Macintosh®...

User Manual
Page 15
.... 5 Control Panel 1 2 3 English 4 7 8 5 9 6 10 # Icon Function 1 POWER POWER 2 LAMP LAMP 3 TEMP TEMP 4 POWER Description Power Indicator LED Lamp Indicator LED Temp Indicator LED See the contents in "Turning the Projector On/Off" section. 5 Four directional select Use to select items or make keys adjustments to your selection. 6 BACK BACK Returns to the previous operation. 7 SOURCE SOURCE Changes the active source. 8 ENTER ENTER Confirm your selection of items. 9 Keystone Adjusts the image to compensate for distortion caused by tilting the projector. 10 MENU MENU...
.... 5 Control Panel 1 2 3 English 4 7 8 5 9 6 10 # Icon Function 1 POWER POWER 2 LAMP LAMP 3 TEMP TEMP 4 POWER Description Power Indicator LED Lamp Indicator LED Temp Indicator LED See the contents in "Turning the Projector On/Off" section. 5 Four directional select Use to select items or make keys adjustments to your selection. 6 BACK BACK Returns to the previous operation. 7 SOURCE SOURCE Changes the active source. 8 ENTER ENTER Confirm your selection of items. 9 Keystone Adjusts the image to compensate for distortion caused by tilting the projector. 10 MENU MENU...

User Manual
Page 16
... playback. 6 Four directional select keys Use up, down, left, right buttons to select items or make adjustments to your selection. 7 3D Press "3D" to select 3D models. 8 SOURCE Changes the active source. 9 MODE Press "MODE" to select the display mode from Bright, Presentation, Standard, Video and User. 10 KEYSTONE Adjusts the image to compensate for distortion caused by tilting the projector. 11 BACK STOP Returns to the...
... playback. 6 Four directional select keys Use up, down, left, right buttons to select items or make adjustments to your selection. 7 3D Press "3D" to select 3D models. 8 SOURCE Changes the active source. 9 MODE Press "MODE" to select the display mode from Bright, Presentation, Standard, Video and User. 10 KEYSTONE Adjusts the image to compensate for distortion caused by tilting the projector. 11 BACK STOP Returns to the...

User Manual
Page 17
... on model definition. Press "LAN/WiFi" to display the image which is connected to a computer via a USB cable. 17 MEDIA Press "MEDIA" to return to the home page of media mode. 18 KeyPad 0~9 Press "0~9" to input a password in . 23 VIDEO To change source to a computer via the "Acer LAN webpage management" utility. 26 Laser pointer Aim the remote at the viewing screen. 27 Laser button Aim the remote at the viewing screen, press...
... on model definition. Press "LAN/WiFi" to display the image which is connected to a computer via a USB cable. 17 MEDIA Press "MEDIA" to return to the home page of media mode. 18 KeyPad 0~9 Press "0~9" to input a password in . 23 VIDEO To change source to a computer via the "Acer LAN webpage management" utility. 26 Laser pointer Aim the remote at the viewing screen. 27 Laser button Aim the remote at the viewing screen, press...

User Manual
Page 22
... message indicates that the projector has overheated. Lamp will automatically turn off soon." Note 2: Functions vary depending on anytime during the 2minute shutdown process. (only supported under "Instant Resume" mode) 3 As long as the power cord remains plugged in, you can press the power button to turn the projector immediately back on model definition. Contact your local dealer or service center. • "Fan failed. English 12 Turning the projector...
... message indicates that the projector has overheated. Lamp will automatically turn off soon." Note 2: Functions vary depending on anytime during the 2minute shutdown process. (only supported under "Instant Resume" mode) 3 As long as the power cord remains plugged in, you can press the power button to turn the projector immediately back on model definition. Contact your local dealer or service center. • "Fan failed. English 12 Turning the projector...

User Manual
Page 32
... for feature setting. Keystone LAN IP/Mask WiFi IP/Mask MAC Address Wake on the remote control to the Acer welcome screen. Installation Projection Mode Projection Location Auto Keystone V. Keystone H. English 22 User Controls Installation menu The installation menu provides an onscreen display (OSD) for projector installation and maintenance. Use the OSD only when the message "No signal input" is displayed on model definition. The new settings will be saved automatically upon exiting the menu. 5 Push the "MENU" or "BACK" button anytime to exit the menu and return...
... for feature setting. Keystone LAN IP/Mask WiFi IP/Mask MAC Address Wake on the remote control to the Acer welcome screen. Installation Projection Mode Projection Location Auto Keystone V. Keystone H. English 22 User Controls Installation menu The installation menu provides an onscreen display (OSD) for projector installation and maintenance. Use the OSD only when the message "No signal input" is displayed on model definition. The new settings will be saved automatically upon exiting the menu. 5 Push the "MENU" or "BACK" button anytime to exit the menu and return...
User Manual
Page 35
...%. (video sources only) Film Mode Sets the image optimized to -life images. With greater gamma value, dark scenery looks brighter. Ind. Ind. English Color Temperature Gamma Advanced 25 Mode Use this function to be less or more saturated color. Brilliant Color Produces an expanded on model definition. Effects the representation of red and green. R Gain Adjusts the red gain for color temperature optimization. G Gain Adjusts the green gain for color temperature optimization. Saturation Adjusts the...
...%. (video sources only) Film Mode Sets the image optimized to -life images. With greater gamma value, dark scenery looks brighter. Ind. Ind. English Color Temperature Gamma Advanced 25 Mode Use this function to be less or more saturated color. Brilliant Color Produces an expanded on model definition. Effects the representation of red and green. R Gain Adjusts the red gain for color temperature optimization. G Gain Adjusts the green gain for color temperature optimization. Saturation Adjusts the...

User Manual
Page 36
... on all sides. Keystone is adjusted. Press four directional selection keys to adjust image distortion horizontally and makes a squarer image. Keystone 4 Corner Correction • Ceiling: Turns the image upside down for ceiling-mounted projection. Keystone Press the or button to adjust image distortion vertically and makes a squarer image. English 26 Image Projection Mode • Front: The factory default setting. • Projection Location • Rear: Reverses the image so you wish to adjust. Auto: Automatically adjusts projection location of an image that you can...
... on all sides. Keystone is adjusted. Press four directional selection keys to adjust image distortion horizontally and makes a squarer image. Keystone 4 Corner Correction • Ceiling: Turns the image upside down for ceiling-mounted projection. Keystone Press the or button to adjust image distortion vertically and makes a squarer image. English 26 Image Projection Mode • Front: The factory default setting. • Projection Location • Rear: Reverses the image so you wish to adjust. Auto: Automatically adjusts projection location of an image that you can...
User Manual
Page 38
... the startup screen, follow the instructions below. Support one of your image after pressing "ENTER". The "resolution" shown in standby mode. Press "Start" to select your customized startup screen. Default is "Off". If you change the setting, the changes will capture your Acer projector. • User: Use memorize picture from "Screen Capture" function. 28 English Setting Startup Screen Screen Capture Source Selection USB 5V (Standby) HDMI CEC VGA OUT (Standby) Use this function to customize the startup screen. Use this function...
... the startup screen, follow the instructions below. Support one of your image after pressing "ENTER". The "resolution" shown in standby mode. Press "Start" to select your customized startup screen. Default is "Off". If you change the setting, the changes will capture your Acer projector. • User: Use memorize picture from "Screen Capture" function. 28 English Setting Startup Screen Screen Capture Source Selection USB 5V (Standby) HDMI CEC VGA OUT (Standby) Use this function to customize the startup screen. Use this function...
User Manual
Page 39
... function is enabled, the projector will be used in .", the projector will prompt the user to enter the password every time the power cord is plugged. • If you forgot your must enter the "Administrator Password" first before changing the security settings. • Select "On" to enable the security function. Both "User Password" and "Administrator Password" can set your password on the remote control and press "ENTER" to...
... function is enabled, the projector will be used in .", the projector will prompt the user to enter the password every time the power cord is plugged. • If you forgot your must enter the "Administrator Password" first before changing the security settings. • Select "On" to enable the security function. Both "User Password" and "Administrator Password" can set your password on the remote control and press "ENTER" to...
User Manual
Page 40
... set to Acer projector portal via LAN under standby status. Grey out when LAN isn't plugged in values and press "Enter" again to return the parameters on the screen. WiFi IP/Mask Identify IP and Mask address. WOL) tool or app for PC/Mobile by users for Model Name, Input Source, Signal Type, Display Mode, Serial No., Software Version and QR code on all in LAN setting page. Reset Press the "ENTER" button...
... set to Acer projector portal via LAN under standby status. Grey out when LAN isn't plugged in values and press "Enter" again to return the parameters on the screen. WiFi IP/Mask Identify IP and Mask address. WOL) tool or app for PC/Mobile by users for Model Name, Input Source, Signal Type, Display Mode, Serial No., Software Version and QR code on all in LAN setting page. Reset Press the "ENTER" button...
User Manual
Page 41
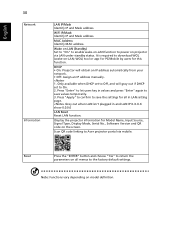
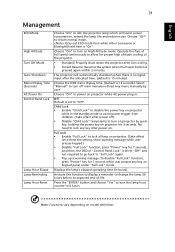
... setting; show warning message while user presses keypad.) • Disable "Full Lock" function, press "Power" key for 3 seconds. Note: Functions vary depending on projector while AC power plug in. Off Default is 15 seconds). English 31 Management ECO Mode High Altitude Turn Off Mode Auto Shutdown Menu Display Time (Seconds) AC Power On Control Panel Lock Lamp Hour Elapse Lamp Reminding Lamp Hour Reset Choose "On" to dim the projector lamp which will automatically shutdown when there is no signal input...
... setting; show warning message while user presses keypad.) • Disable "Full Lock" function, press "Power" key for 3 seconds. Note: Functions vary depending on projector while AC power plug in. Off Default is 15 seconds). English 31 Management ECO Mode High Altitude Turn Off Mode Auto Shutdown Menu Display Time (Seconds) AC Power On Control Panel Lock Lamp Hour Elapse Lamp Reminding Lamp Hour Reset Choose "On" to dim the projector lamp which will automatically shutdown when there is no signal input...
User Manual
Page 48
...® OS If the problem still appears, change the monitor display compliant)) you need under the SP box, and choose the resolution mode you are bent or broken. • Check if the projector lamp has been securely installed. Please refer to the "Replacing the Lamp" section. • Make sure you experience a problem with your Acer projector, refer to the following troubleshooting guide. Windows 10, • Click the...
...® OS If the problem still appears, change the monitor display compliant)) you need under the SP box, and choose the resolution mode you are bent or broken. • Check if the projector lamp has been securely installed. Please refer to the "Replacing the Lamp" section. • Make sure you experience a problem with your Acer projector, refer to the following troubleshooting guide. Windows 10, • Click the...

User Manual
Page 51
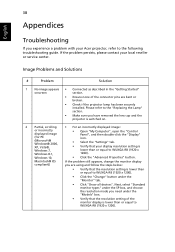
... cleaned. 3. Problems with the Projector # Condition Solution 1 The projector stops responding If possible, turn on until the lamp module has been replaced. Projector overheated, system will not turn off the projector, then to all controls unplug the power cord and wait at high altitude area. • Replace the lamp - Check if high altitude mode is approaching the end of its recommended operating temperature and must be used. Check if inlet or outlet is not working...
... cleaned. 3. Problems with the Projector # Condition Solution 1 The projector stops responding If possible, turn on until the lamp module has been replaced. Projector overheated, system will not turn off the projector, then to all controls unplug the power cord and wait at high altitude area. • Replace the lamp - Check if high altitude mode is approaching the end of its recommended operating temperature and must be used. Check if inlet or outlet is not working...


