
User Manual (3D)
Page 1
Acer Projectors with 3D Technology Quick Guide
Acer Projectors with 3D Technology Quick Guide
User Manual (3D)
Page 2
© 2012 All Rights Reserved. Acer Projector Series Quick Guide Original Issue: 8/2012 Model number Serial number Date of purchase Place of purchase
© 2012 All Rights Reserved. Acer Projector Series Quick Guide Original Issue: 8/2012 Model number Serial number Date of purchase Place of purchase
User Manual (3D)
Page 3
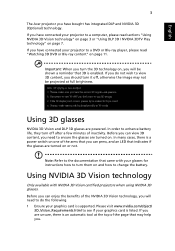
...ray content" on page 11. Please visit www.nvidia.com/object/ 3D_Vision_Requirements.html to see if your projector to change the battery. If you are unsure, there is an automatic tool at the top of ... turn the 3D technology on page 7. In many cases, there is enabled. English 3 The Acer projector you can press, and an LED that indicates if the glasses are turned on or not. If... that you have bought has integrated DLP and NVIDIA 3D (Optional) technology. If you have connected your projector to a DVD or Blu-ray player, please read sections "Using NVIDIA 3D Vision technology" on page ...
...ray content" on page 11. Please visit www.nvidia.com/object/ 3D_Vision_Requirements.html to see if your projector to change the battery. If you are unsure, there is an automatic tool at the top of ... turn the 3D technology on page 7. In many cases, there is enabled. English 3 The Acer projector you can press, and an LED that indicates if the glasses are turned on or not. If... that you have bought has integrated DLP and NVIDIA 3D (Optional) technology. If you have connected your projector to a DVD or Blu-ray player, please read sections "Using NVIDIA 3D Vision technology" on page ...
User Manual (3D)
Page 5
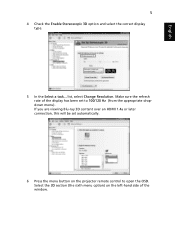
Make sure the refresh rate of the display has been set automatically. 6 Press the menu button on the left-hand side of the window. Select the 3D section (the sixth menu option) on the projector remote control to 100/120 Hz (from the appropriate dropdown menu). list, select Change Resolution. If you are viewing Blu-ray 3D content over an HDMI 1.4a or later connection, this will be set to open the OSD. English 5 4 Check the Enable Stereoscopic 3D option and select the correct display type. 5 In the Select a task...
Make sure the refresh rate of the display has been set automatically. 6 Press the menu button on the left-hand side of the window. Select the 3D section (the sixth menu option) on the projector remote control to 100/120 Hz (from the appropriate dropdown menu). list, select Change Resolution. If you are viewing Blu-ray 3D content over an HDMI 1.4a or later connection, this will be set to open the OSD. English 5 4 Check the Enable Stereoscopic 3D option and select the correct display type. 5 In the Select a task...
User Manual (3D)
Page 6
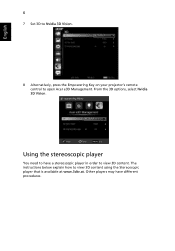
The instructions below explain how to open Acer e3D Management. Other players may have a stereoscopic player in order to have different procedures. Using the stereoscopic player You need to view 3D content. From the 3D options, select Nvidia 3D Vision. English 6 7 Set 3D to Nvidia 3D Vision. 8 Alternatively, press the Empowering Key on your projector's remote control to view 3D content using the Stereoscopic player that is available at www.3dtv.at.
The instructions below explain how to open Acer e3D Management. Other players may have a stereoscopic player in order to have different procedures. Using the stereoscopic player You need to view 3D content. From the 3D options, select Nvidia 3D Vision. English 6 7 Set 3D to Nvidia 3D Vision. 8 Alternatively, press the Empowering Key on your projector's remote control to view 3D content using the Stereoscopic player that is available at www.3dtv.at.
User Manual (3D)
Page 7
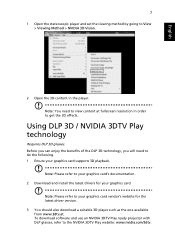
... 3D technology, you will need to the NVIDIA 3DTV Play website: www.nvidia.com/3dtv. To download software and use an NVIDIA 3DTV Play ready projector with DLP glasses, refer to view content at . Using DLP 3D / NVIDIA 3DTV Play technology Requires DLP 3D glasses.
... 3D technology, you will need to the NVIDIA 3DTV Play website: www.nvidia.com/3dtv. To download software and use an NVIDIA 3DTV Play ready projector with DLP glasses, refer to view content at . Using DLP 3D / NVIDIA 3DTV Play technology Requires DLP 3D glasses.
User Manual (3D)
Page 8
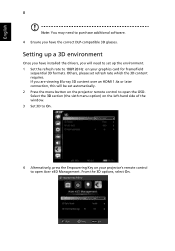
...-compatible 3D glasses. Setting up a 3D environment Once you will be set up the environment. 1 Set the refresh rate to 100/120 Hz on your projector's remote control to open the OSD. From the 3D options, select On. Select the 3D section (the sixth menu option) on the left-hand side... formats. Others, please set refresh rate which the 3D content requires. English 8 Note: You may need to set automatically. 2 Press the menu button on the projector remote control to open Acer e3D Management.
...-compatible 3D glasses. Setting up a 3D environment Once you will be set up the environment. 1 Set the refresh rate to 100/120 Hz on your projector's remote control to open the OSD. From the 3D options, select On. Select the 3D section (the sixth menu option) on the left-hand side... formats. Others, please set refresh rate which the 3D content requires. English 8 Note: You may need to set automatically. 2 Press the menu button on the projector remote control to open Acer e3D Management.
User Manual (3D)
Page 9
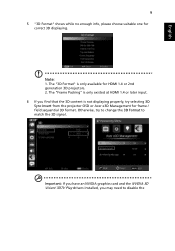
Otherwise, try selecting 3D Sync Invert from the projector OSD or Acer e3D Management for frame / field sequential 3D format. Note: 1. The "3D Format" is only available for correct 3D displaying. Important: If you have an NVIDIA ... change the 3D Format to disable the English 9 5 "3D Format" shows while no enough info, please choose suitable one for HDMI 1.4 or 2nd generation 3D projectors. 2.
Otherwise, try selecting 3D Sync Invert from the projector OSD or Acer e3D Management for frame / field sequential 3D format. Note: 1. The "3D Format" is only available for correct 3D displaying. Important: If you have an NVIDIA ... change the 3D Format to disable the English 9 5 "3D Format" shows while no enough info, please choose suitable one for HDMI 1.4 or 2nd generation 3D projectors. 2.
User Manual (3D)
Page 11
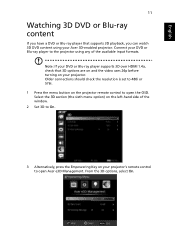
.... 2 Set 3D to open the OSD. Connect your DVD or Blu-ray player to open Acer e3D Management. Older connections should check the resolution is set to 480i or 576i. 1 Press the menu button on your projector. From the 3D options, select On. English 11 Watching 3D DVD or Blu-ray content... If you have a DVD or Blu-ray player that 3D options are on and the video uses 24p before turning on your projector's remote control to On. 3 Alternatively, press the Empowering Key on the projector remote control to the projector using your Acer 3D-enabled...
.... 2 Set 3D to open the OSD. Connect your DVD or Blu-ray player to open Acer e3D Management. Older connections should check the resolution is set to 480i or 576i. 1 Press the menu button on your projector. From the 3D options, select On. English 11 Watching 3D DVD or Blu-ray content... If you have a DVD or Blu-ray player that 3D options are on and the video uses 24p before turning on your projector's remote control to On. 3 Alternatively, press the Empowering Key on the projector remote control to the projector using your Acer 3D-enabled...
User Manual (3D)
Page 12
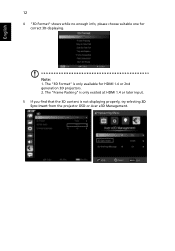
English 12 4 "3D Format" shows while no enough info, please choose suitable one for HDMI 1.4 or 2nd generation 3D projectors. 2. The "3D Format" is not displaying properly, try selecting 3D Sync Invert from the projector OSD or Acer e3D Management. The "Frame Packing" is only existed at HDMI 1.4 or later input. 5 If you find that the 3D content is only available for correct 3D displaying. Note: 1.
English 12 4 "3D Format" shows while no enough info, please choose suitable one for HDMI 1.4 or 2nd generation 3D projectors. 2. The "3D Format" is not displaying properly, try selecting 3D Sync Invert from the projector OSD or Acer e3D Management. The "Frame Packing" is only existed at HDMI 1.4 or later input. 5 If you find that the 3D content is only available for correct 3D displaying. Note: 1.
User Manual (3D)
Page 13
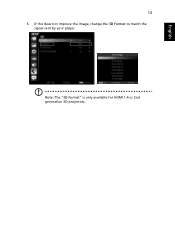
Note: The "3D Format" is only available for HDMI 1.4 or 2nd generation 3D projectors. English 13 6 If this does not improve the image, change the 3D Format to match the signal sent by your player.
Note: The "3D Format" is only available for HDMI 1.4 or 2nd generation 3D projectors. English 13 6 If this does not improve the image, change the 3D Format to match the signal sent by your player.
User Manual (Multimedia)
Page 1
...network security (WPA-PSK, WPA2-PSK). • Acer Projector Gateway Web Management enables a web-based control of Acer projector for Windows NB/PC (only when the projector is a smart, integrated system that enhances presentations via your Acer projector. Multi-media features • Fancy and stylish user...Powerpoint, PDF). • Easy control for all media functions by the remote control. • DLNA compliant. English 1 Acer Projector Gateway Introduction The Acer Projector Gateway (APG) is in AP mode). • Supports firmware upgrade via USB handy drive. • Crestron compliant (...
...network security (WPA-PSK, WPA2-PSK). • Acer Projector Gateway Web Management enables a web-based control of Acer projector for Windows NB/PC (only when the projector is a smart, integrated system that enhances presentations via your Acer projector. Multi-media features • Fancy and stylish user...Powerpoint, PDF). • Easy control for all media functions by the remote control. • DLNA compliant. English 1 Acer Projector Gateway Introduction The Acer Projector Gateway (APG) is in AP mode). • Supports firmware upgrade via USB handy drive. • Crestron compliant (...
User Manual (Multimedia)
Page 2
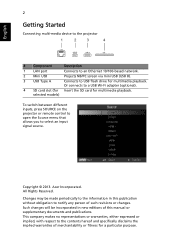
...any person of merchantability or fitness for multimedia playback. selected models) To switch between different inputs, press SOURCE on the projector or remote control to open the Source menu that allows you to a USB Wi-Fi adapter (optional). 4 SD ...hereof and specifically disclaims the implied warranties of such revisions or changes. Acer Incorporated. Changes may be incorporated in this manual or supplementary documents and publications. English 2 Getting Started Connecting multi-media device to the projector 1 2 3 4 USB B # Component Description 1 LAN port Connects...
...any person of merchantability or fitness for multimedia playback. selected models) To switch between different inputs, press SOURCE on the projector or remote control to open the Source menu that allows you to a USB Wi-Fi adapter (optional). 4 SD ...hereof and specifically disclaims the implied warranties of such revisions or changes. Acer Incorporated. Changes may be incorporated in this manual or supplementary documents and publications. English 2 Getting Started Connecting multi-media device to the projector 1 2 3 4 USB B # Component Description 1 LAN port Connects...
User Manual (Multimedia)
Page 3
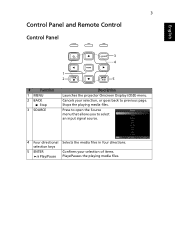
Stops the playing media files. English 3 Control Panel and Remote Control Control Panel 3 4 # Function 1 MENU 2 BACK Stop 3 SOURCE 1 2 5 Description Launches the projector Onscreen Display (OSD) menu. Press to open the Source menu that allows you to previous page. selection keys 5 ENTER Play/Pause Confirms your selection, or goes back to select an input signal source. 4 Four directional Selects the media files in four directions. Cancels your selection of items. Plays/Pauses the playing media files.
Stops the playing media files. English 3 Control Panel and Remote Control Control Panel 3 4 # Function 1 MENU 2 BACK Stop 3 SOURCE 1 2 5 Description Launches the projector Onscreen Display (OSD) menu. Press to open the Source menu that allows you to previous page. selection keys 5 ENTER Play/Pause Confirms your selection, or goes back to select an input signal source. 4 Four directional Selects the media files in four directions. Cancels your selection of items. Plays/Pauses the playing media files.

User Manual (Multimedia)
Page 5
This function is only available when connected to select the next or previous page. Launches the projector OSD subtitle menu during video playback. Use the button to a computer via a USB cable. Displays information of the selected file. English 5 # Function 7 SOURCE Description Press to open the Source menu that allows you to select an input signal source. 8 MENU 9 MEDIA SETUP 10 PAGE ^/v PgUp/PgDn 11 INFO 12 A/a Launches the projector Onscreen Display (OSD) menu. For computer mode only. Opens MEDIA SETUP page.
This function is only available when connected to select the next or previous page. Launches the projector OSD subtitle menu during video playback. Use the button to a computer via a USB cable. Displays information of the selected file. English 5 # Function 7 SOURCE Description Press to open the Source menu that allows you to select an input signal source. 8 MENU 9 MEDIA SETUP 10 PAGE ^/v PgUp/PgDn 11 INFO 12 A/a Launches the projector Onscreen Display (OSD) menu. For computer mode only. Opens MEDIA SETUP page.
User Manual (Multimedia)
Page 6
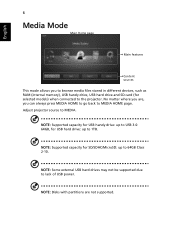
... to 64GB Class 2-10. NOTE: Supported capacity for USB handy drive: up to USB 3.0 64GB, for USB hard drive: up to MEDIA HOME page. Adjust projector source to lack of USB power. English 6 Media Mode Main Home page Main features Content sources This mode allows you are not supported. NOTE: Some... stored in different devices, such as RAM (internal memory), USB handy drive, USB hard drive and SD card (for SD/SDHC/MicroSD: up to the projector. NOTE: Supported capacity for selected models) when connected to 1TB.
... to 64GB Class 2-10. NOTE: Supported capacity for USB handy drive: up to USB 3.0 64GB, for USB hard drive: up to MEDIA HOME page. Adjust projector source to lack of USB power. English 6 Media Mode Main Home page Main features Content sources This mode allows you are not supported. NOTE: Some... stored in different devices, such as RAM (internal memory), USB handy drive, USB hard drive and SD card (for SD/SDHC/MicroSD: up to the projector. NOTE: Supported capacity for selected models) when connected to 1TB.

User Manual (Multimedia)
Page 9
... playback status Control bar Goes back to previous page Goes to the Video Setting in the Media Setup page You can press / to trigger the projector OSD subtitle menu. English Video When viewing video files Title image/ source Side bar 9 Total events/ files Thumbnail sorting Goes back to previous page Goes...
... playback status Control bar Goes back to previous page Goes to the Video Setting in the Media Setup page You can press / to trigger the projector OSD subtitle menu. English Video When viewing video files Title image/ source Side bar 9 Total events/ files Thumbnail sorting Goes back to previous page Goes...
User Manual (Multimedia)
Page 12
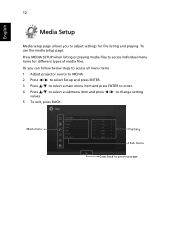
... for different types of media files. English 12 Media Setup Media setup page allows you can follow below steps to access all menu items. 1 Adjust projector source to MEDIA. 2 Press / to select Setup and press ENTER. 3 Press / to select a main menu item and press ENTER to enter. 4 Press / to select a submenu...
... for different types of media files. English 12 Media Setup Media setup page allows you can follow below steps to access all menu items. 1 Adjust projector source to MEDIA. 2 Press / to select Setup and press ENTER. 3 Press / to select a main menu item and press ENTER to enter. 4 Press / to select a submenu...
User Manual (Multimedia)
Page 14
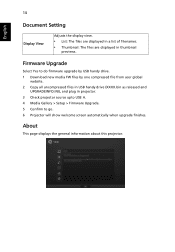
...files are displayed in a list of filenames. • Thumbnail: The files are displayed in projector. 3 Check projector source upto USB A. 4 Media Gallery > Setup > Firmware Upgrade. 5 Confirm to go. 6 Projector will show welcome screen automatically when upgrade finishes. About This page displays the general information about... this projector. Firmware Upgrade Select Yes to do firmware upgrade by USB handy drive. 1 Download new media FW files by one compressed file from acer global website. 2 Copy all uncompressed files in USB handy...
...files are displayed in a list of filenames. • Thumbnail: The files are displayed in projector. 3 Check projector source upto USB A. 4 Media Gallery > Setup > Firmware Upgrade. 5 Confirm to go. 6 Projector will show welcome screen automatically when upgrade finishes. About This page displays the general information about... this projector. Firmware Upgrade Select Yes to do firmware upgrade by USB handy drive. 1 Download new media FW files by one compressed file from acer global website. 2 Copy all uncompressed files in USB handy...
User Manual (Multimedia)
Page 21
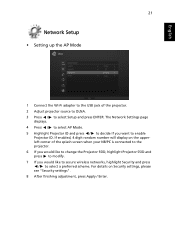
...the Wi-Fi adapter to the USB jack of the splash screen when your NB/PC is connected to the projector. 6 If you would like to change the Projector SSID, highlight Projector SSID and press to modify. 7 If you want to select Setup and press ENTER. For details on ...the upperleft corner of the projector. 2 Adjust projector source to DLNA. 3 Press / to enable Projector ID. If enabled, 4 digit random number will display on Security settings, please see "Security settings". 8 After finishing adjustment, ...
...the Wi-Fi adapter to the USB jack of the splash screen when your NB/PC is connected to the projector. 6 If you would like to change the Projector SSID, highlight Projector SSID and press to modify. 7 If you want to select Setup and press ENTER. For details on ...the upperleft corner of the projector. 2 Adjust projector source to DLNA. 3 Press / to enable Projector ID. If enabled, 4 digit random number will display on Security settings, please see "Security settings". 8 After finishing adjustment, ...


