
User Manual (3D)
Page 4
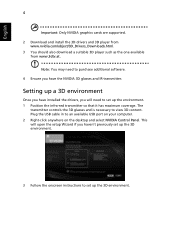
... set up the environment. 1 Position the infra-red transmitter so that it has maximum coverage. Plug the USB cable in to view 3D content. The transmitter controls the 3D glasses and is necessary to an available USB port on your computer. 2 Right-click anywhere on the desktop and select NVIDIA Control Panel. English 4 Important: Only NVIDIA graphics cards are supported. 2 Download and install...
... set up the environment. 1 Position the infra-red transmitter so that it has maximum coverage. Plug the USB cable in to view 3D content. The transmitter controls the 3D glasses and is necessary to an available USB port on your computer. 2 Right-click anywhere on the desktop and select NVIDIA Control Panel. English 4 Important: Only NVIDIA graphics cards are supported. 2 Download and install...
User Manual (3D)
Page 7
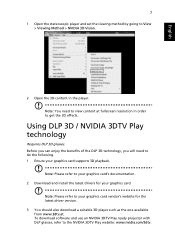
... driver version. 3 You should also download a suitable 3D player such as the one available from www.3dtv.at fullscreen resolution in the player. To download software and use an NVIDIA 3DTV Play ready projector with DLP glasses, refer to the NVIDIA 3DTV Play website: www.nvidia.com/3dtv. English 7 1 Open the stereoscopic player and set the viewing method by going to View > Viewing...
... driver version. 3 You should also download a suitable 3D player such as the one available from www.3dtv.at fullscreen resolution in the player. To download software and use an NVIDIA 3DTV Play ready projector with DLP glasses, refer to the NVIDIA 3DTV Play website: www.nvidia.com/3dtv. English 7 1 Open the stereoscopic player and set the viewing method by going to View > Viewing...
User Manual (Multimedia)
Page 1
... connectivity with 1080p@30Hz. • Supports office documents playback (Word, Excel, Powerpoint, PDF). • Easy control for your Acer projector. Multi-media features • Fancy and stylish user interface for better experience. • You can easily launch the Acer eDisplay Management to do Full screen, L/ R, 4-split screen projection and enable high quality video streaming. • Powerful wireless display features ready for devices with different OS (MS Windows, Mac...
... connectivity with 1080p@30Hz. • Supports office documents playback (Word, Excel, Powerpoint, PDF). • Easy control for your Acer projector. Multi-media features • Fancy and stylish user interface for better experience. • You can easily launch the Acer eDisplay Management to do Full screen, L/ R, 4-split screen projection and enable high quality video streaming. • Powerful wireless display features ready for devices with different OS (MS Windows, Mac...

User Manual (Multimedia)
Page 9
... use the side bar, press you can press A/a on the Video Setting, see "Video Setting". English Video When viewing video files Title image/ source Side bar 9 Total events/ files Thumbnail sorting Goes back to previous page Goes to the Video Setting in the Media Setup page You can press / to adjust the volume. For details on the remote control (if available) to access. repeatedly until it displays...
... use the side bar, press you can press A/a on the Video Setting, see "Video Setting". English Video When viewing video files Title image/ source Side bar 9 Total events/ files Thumbnail sorting Goes back to previous page Goes to the Video Setting in the Media Setup page You can press / to adjust the volume. For details on the remote control (if available) to access. repeatedly until it displays...
User Manual (Multimedia)
Page 14
Firmware Upgrade Select Yes to go. 6 Projector will show welcome screen automatically when upgrade finishes. 14 English Document Setting Display View Adjusts the display view. • List: The files are displayed in a list of filenames. • Thumbnail: The files are displayed in projector. 3 Check projector source upto USB A. 4 Media Gallery > Setup > Firmware Upgrade. 5 Confirm to do firmware upgrade by USB handy drive. 1 Download new media FW files by one compressed file from acer global website. 2 Copy all uncompressed...
Firmware Upgrade Select Yes to go. 6 Projector will show welcome screen automatically when upgrade finishes. 14 English Document Setting Display View Adjusts the display view. • List: The files are displayed in a list of filenames. • Thumbnail: The files are displayed in projector. 3 Check projector source upto USB A. 4 Media Gallery > Setup > Firmware Upgrade. 5 Confirm to do firmware upgrade by USB handy drive. 1 Download new media FW files by one compressed file from acer global website. 2 Copy all uncompressed...
User Manual (Multimedia)
Page 26
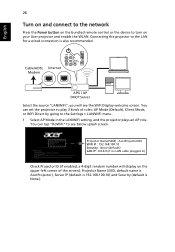
....10 Security : None (default) LAN IP : 0.0.0.0 (if no LAN cable plugged in) Check Projector ID (if enabled, a 4-digit random number will see below splash screen. English 26 Turn on and connect to the network Press the Power button on the bundled remote control or the device to see the WiFi Display welcome screen. Connecting the projector to the Settings > LAN/WiFi menu. 1 Select AP Mode in the LAN/WiFi setting, and the projector plays an AP role.
....10 Security : None (default) LAN IP : 0.0.0.0 (if no LAN cable plugged in) Check Projector ID (if enabled, a 4-digit random number will see below splash screen. English 26 Turn on and connect to the network Press the Power button on the bundled remote control or the device to see the WiFi Display welcome screen. Connecting the projector to the Settings > LAN/WiFi menu. 1 Select AP Mode in the LAN/WiFi setting, and the projector plays an AP role.
User Manual (Multimedia)
Page 28
... Acer eDisplay Management. Server IP The Server IP indicates the IP address your supervisor to set safer key when Security is On when using the WiFi Display and DLNA functions. It will be 192.168.100.10 for projector identification. pre-shared key) and WPA2-PSK are given randomly for general wireless and wired connections. Note: Make sure the LAN...
... Acer eDisplay Management. Server IP The Server IP indicates the IP address your supervisor to set safer key when Security is On when using the WiFi Display and DLNA functions. It will be 192.168.100.10 for projector identification. pre-shared key) and WPA2-PSK are given randomly for general wireless and wired connections. Note: Make sure the LAN...
User Manual (Multimedia)
Page 32
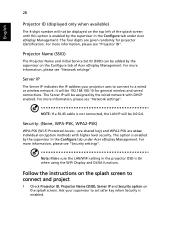
... Acer projector from the projector using unique, image-based encryption to the wireless projector, changing display settings, and controlling the projector. Onscreen remote An onscreen remote utility gives any NB/PC in finding and connecting to prevent eavesdropping or modification of the video signal. Acer eDisplay Management includes the following features: For first time installation The utility can be set up to the projector's remote handset or worn-out batteries. The software will be downloaded...
... Acer projector from the projector using unique, image-based encryption to the wireless projector, changing display settings, and controlling the projector. Onscreen remote An onscreen remote utility gives any NB/PC in finding and connecting to prevent eavesdropping or modification of the video signal. Acer eDisplay Management includes the following features: For first time installation The utility can be set up to the projector's remote handset or worn-out batteries. The software will be downloaded...
User Manual
Page 5
... the life span and darken the image. • Locations near fire alarms. • Locations with your eyes. • Turn on . v Product servicing Do not attempt to service this product from walls and free flow of air around the projector are necessary. • Locations where temperatures may become excessively high, such as opening or removing covers may expose you to dangerous voltage points or other controls may result...
... the life span and darken the image. • Locations near fire alarms. • Locations with your eyes. • Turn on . v Product servicing Do not attempt to service this product from walls and free flow of air around the projector are necessary. • Locations where temperatures may become excessively high, such as opening or removing covers may expose you to dangerous voltage points or other controls may result...

User Manual
Page 6
... cause fire or electric shock. It may hurt you. Please be sure to change the lamp when warning messages display. • When changing the lamp, please allow the projector to cool down, and follow all changing instructions. • Reset the "Lamp Hour Reset" function from the Onscreen Display "Management" menu after replacing the lamp module. • Do not attempt to the sun. Refer servicing only to removing the lamp assembly for ceiling mount installation.
... cause fire or electric shock. It may hurt you. Please be sure to change the lamp when warning messages display. • When changing the lamp, please allow the projector to cool down, and follow all changing instructions. • Reset the "Lamp Hour Reset" function from the Onscreen Display "Management" menu after replacing the lamp module. • Do not attempt to the sun. Refer servicing only to removing the lamp assembly for ceiling mount installation.
User Manual
Page 8
... all changing instructions. • This product will not turn back on the projector provided for a long period of its life, it shows warning messages. • Reset the "Lamp Hour Reset" function from the Onscreen Display "Management" menu after replacing the lamp module. • When switching the projector off, please ensure the projector completes its cooling cycle before disconnecting power. • Turn on the projector first and then the signal sources. • Do not use lens...
... all changing instructions. • This product will not turn back on the projector provided for a long period of its life, it shows warning messages. • Reset the "Lamp Hour Reset" function from the Onscreen Display "Management" menu after replacing the lamp module. • When switching the projector off, please ensure the projector completes its cooling cycle before disconnecting power. • Turn on the projector first and then the signal sources. • Do not use lens...

User Manual
Page 9
... 2 Projector Overview 3 Projector Outlook 3 Control Panel 4 Remote Control Layout 5 Getting Started 7 Connecting the Projector 7 Turning the Projector On/Off 8 Turning On the Projector 8 Turning Off the Projector 9 Adjusting the Projected Image 10 Adjusting the Height of the Projected Image 10 How to Optimize Image Size and Distance 11 How to Get a Preferred Image Size by Adjusting Distance and Zoom 13 User Controls 15 Installation Menu 15 Acer Empowering Technology 16 Onscreen Display (OSD) Menus 18 Color 19 Image 21 Setting 24 Management 28 Audio...
... 2 Projector Overview 3 Projector Outlook 3 Control Panel 4 Remote Control Layout 5 Getting Started 7 Connecting the Projector 7 Turning the Projector On/Off 8 Turning On the Projector 8 Turning Off the Projector 9 Adjusting the Projected Image 10 Adjusting the Height of the Projected Image 10 How to Optimize Image Size and Distance 11 How to Get a Preferred Image Size by Adjusting Distance and Zoom 13 User Controls 15 Installation Menu 15 Acer Empowering Technology 16 Onscreen Display (OSD) Menus 18 Color 19 Image 21 Setting 24 Management 28 Audio...
User Manual
Page 11
...; Manual focus projection lens zooms up to 70% when no input signal can be enhanced. - Dynamic Black: If turned on, the projector dynamically adjusts the power consumption of the lamp according to 1.6X • 2X digital zoom and pan move function • Microsoft® Windows® 2000, XP, 7, Vista®, Macintosh OS compliant • Enjoy media playback via DLP Link Technology • Acer ColorBoost technology delivers vivid, life...
...; Manual focus projection lens zooms up to 70% when no input signal can be enhanced. - Dynamic Black: If turned on, the projector dynamically adjusts the power consumption of the lamp according to 1.6X • 2X digital zoom and pan move function • Microsoft® Windows® 2000, XP, 7, Vista®, Macintosh OS compliant • Enjoy media playback via DLP Link Technology • Acer ColorBoost technology delivers vivid, life...
User Manual
Page 14
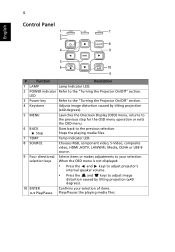
... 4 Keystone Adjusts image distortion caused by tilting projection (+40 degrees). 10 ENTER Play/Pause Confirms your selection. Stops the playing media files. 7 TEMP Temp Indicator LED. 8 SOURCE Chooses RGB, component video, S-Video, composite video, HDMI ,HDTV, LAN/WiFi, Media, DLNA or USB B source. 9 Four directional Selects items or makes adjustments to the "Turning the Projector On/Off" section. LED 3 Power key Refer to the previous selection. English 4 Control Panel 1 7 2 3 8 4 9 5 6 10 4 # Function Description 1 LAMP Lamp Indicator LED. 2 POWER indicator...
... 4 Keystone Adjusts image distortion caused by tilting projection (+40 degrees). 10 ENTER Play/Pause Confirms your selection. Stops the playing media files. 7 TEMP Temp Indicator LED. 8 SOURCE Chooses RGB, component video, S-Video, composite video, HDMI ,HDTV, LAN/WiFi, Media, DLNA or USB B source. 9 Four directional Selects items or makes adjustments to the "Turning the Projector On/Off" section. LED 3 Power key Refer to the previous selection. English 4 Control Panel 1 7 2 3 8 4 9 5 6 10 4 # Function Description 1 LAMP Lamp Indicator LED. 2 POWER indicator...
User Manual
Page 16
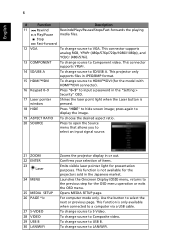
... laser point light when the Laser button is only available when connected to select an input signal source. 21 ZOOM 22 ENTER 23 Laser 24 MENU 25 MEDIA SETUP 26 PAGE ^/v 27 S-VIDEO 28 VIDEO 29 USB B 30 LAN/WiFi Zooms the projector display in the Japanese market. For computer mode only. Use the button to HDMI™/DVI (for the projectors sold in or out. To change source to hide screen image; To change source to...
... laser point light when the Laser button is only available when connected to select an input signal source. 21 ZOOM 22 ENTER 23 Laser 24 MENU 25 MEDIA SETUP 26 PAGE ^/v 27 S-VIDEO 28 VIDEO 29 USB B 30 LAN/WiFi Zooms the projector display in the Japanese market. For computer mode only. Use the button to HDMI™/DVI (for the projectors sold in or out. To change source to hide screen image; To change source to...
User Manual
Page 25
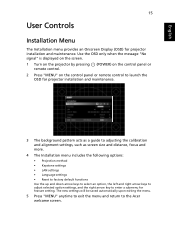
... signal" is displayed on the screen. 1 Turn on the projector by pressing remote control. (POWER) on the control panel or 2 Press "MENU" on the control panel or remote control to launch the OSD for projector installation and maintenance. 3 The background pattern acts as a guide to adjusting the calibration and alignment settings, such as screen size and distance, focus and more. 4 The Installation menu includes the following options: • Projection method • Keystone settings • LAN settings • Language settings • Reset to factory default functions Use...
... signal" is displayed on the screen. 1 Turn on the projector by pressing remote control. (POWER) on the control panel or 2 Press "MENU" on the control panel or remote control to launch the OSD for projector installation and maintenance. 3 The background pattern acts as a guide to adjusting the calibration and alignment settings, such as screen size and distance, focus and more. 4 The Installation menu includes the following options: • Projection method • Keystone settings • LAN settings • Language settings • Reset to factory default functions Use...
User Manual
Page 30
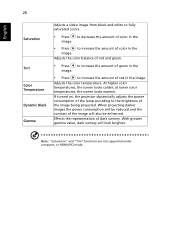
at lower color temperatures, the screen looks warmer. Note: "Saturation" and "Tint" functions are not supported under computer, or HDMI (PC) mode. If turned on, the projector dynamically adjusts the power consumption of the lamp according to the brightness of dark scenery. With greater gamma value, dark scenery will look brighter. Effects the representation of the image being projected. Adjusts the color balance of red and green. •...
at lower color temperatures, the screen looks warmer. Note: "Saturation" and "Tint" functions are not supported under computer, or HDMI (PC) mode. If turned on, the projector dynamically adjusts the power consumption of the lamp according to the brightness of dark scenery. With greater gamma value, dark scenery will look brighter. Effects the representation of the image being projected. Adjusts the color balance of red and green. •...

User Manual
Page 34
... factory default setting of "Timeout (Min.)" is "Off". • Once the security function is selected, you can switch on the "Security Mode". Security This projector provides a useful security function for this function slightly increases the standby power consumption. You have to manage the projector. English 24 Auto Screen VGA OUT (Standby) Reset The up , the projector will request you to enter password when switching on /off of the projector...
... factory default setting of "Timeout (Min.)" is "Off". • Once the security function is selected, you can switch on the "Security Mode". Security This projector provides a useful security function for this function slightly increases the standby power consumption. You have to manage the projector. English 24 Auto Screen VGA OUT (Standby) Reset The up , the projector will request you to enter password when switching on /off of the projector...
User Manual
Page 35
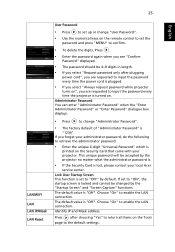
25 English LAN/WiFi LAN LAN IP/Mask LAN Reset User Password • Press to set up or change "Administrator Password". • The factory default of "Administrator Password" is "Off". Administrator Password You can enter "Administrator Password" when the "Enter Administrator Password" or "Enter Password" dialogue box displays. • Press to "OFF" by default. If set to change "User Password". • Use the numerical keys on the remote control to set the password and press "MENU" to confirm. • To...
25 English LAN/WiFi LAN LAN IP/Mask LAN Reset User Password • Press to set up or change "Administrator Password". • The factory default of "Administrator Password" is "Off". Administrator Password You can enter "Administrator Password" when the "Enter Administrator Password" or "Enter Password" dialogue box displays. • Press to "OFF" by default. If set to change "User Password". • Use the numerical keys on the remote control to set the password and press "MENU" to confirm. • To...

User Manual
Page 37
... choosing "Yes" to reset the lamp hour counter to 0 hours. 27 Management English ECO Mode High Altitude Turn Off Mode Choose "On" to dim the projector lamp, which will show or hide warning message Lamp Reminding when the changing lamp message is displayed. When this function to the normal mode. The message will also lower the power consumption, reduce noise, and extend the lamp life. Lamp Hour Reset Press after turning it off. Lamp Hour Elapse Displays the lamp's elapsed operating time (in hours).
... choosing "Yes" to reset the lamp hour counter to 0 hours. 27 Management English ECO Mode High Altitude Turn Off Mode Choose "On" to dim the projector lamp, which will show or hide warning message Lamp Reminding when the changing lamp message is displayed. When this function to the normal mode. The message will also lower the power consumption, reduce noise, and extend the lamp life. Lamp Hour Reset Press after turning it off. Lamp Hour Elapse Displays the lamp's elapsed operating time (in hours).


