User Manual
Page 2
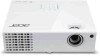
... in this manual or supplementary documents and publications. No part of Acer Incorporated. Acer Projector X111/X1140/X1140A/X1240/X1340W/P1340W Series Model number Serial number Date of purchase Place of Acer Incorporated. Copyright © 2012. Record the model number, serial number...this publication without the prior written permission of purchase Acer and the Acer logo are used herein for a particular purpose. All correspondence concerning your projector. Acer Projector X111/X1140/X1140A/X1240/X1340W/P1340W Series User's Guide Original Issue: 4/2012 Changes ...
... in this manual or supplementary documents and publications. No part of Acer Incorporated. Acer Projector X111/X1140/X1140A/X1240/X1340W/P1340W Series Model number Serial number Date of purchase Place of Acer Incorporated. Copyright © 2012. Record the model number, serial number...this publication without the prior written permission of purchase Acer and the Acer logo are used herein for a particular purpose. All correspondence concerning your projector. Acer Projector X111/X1140/X1140A/X1240/X1340W/P1340W Series User's Guide Original Issue: 4/2012 Changes ...

User Manual
Page 9
... the Projector 8 Turning Off the Projector 9 Adjusting the Projected Image 10 Adjusting the Height of the Projected Image 10 How to Optimize Image Size and Distance 11 How to Get a Preferred Image Size by Adjusting Distance and Zoom 13 User Controls 15 Installation Menu 15 Acer Empowering ...Technology 16 Onscreen Display (OSD) Menus 18 Color 19 Image 21 Setting 24 Management 27 Audio (X1140A/X1240/X1340W/P1340W) 28 3D 29 Language 30
... the Projector 8 Turning Off the Projector 9 Adjusting the Projected Image 10 Adjusting the Height of the Projected Image 10 How to Optimize Image Size and Distance 11 How to Get a Preferred Image Size by Adjusting Distance and Zoom 13 User Controls 15 Installation Menu 15 Acer Empowering ...Technology 16 Onscreen Display (OSD) Menus 18 Color 19 Image 21 Setting 24 Management 27 Audio (X1140A/X1240/X1340W/P1340W) 28 3D 29 Language 30

User Manual
Page 11
...aspect ratio supported X1240: Native 1024 x 768 XGA resolution Auto / 4:3 / 16:9 aspect ratio supported X1340W/P1340W: Native 1280 x 800 WXGA resolution Auto/ Full / 4:3 /16:9 / L.Box aspect ratio supported • Acer ColorBoost technology delivers vivid, life-like images • High brightness and contrast ratio • Versatile display modes ... functions help decrease lamp power consumption and further extend lamp life Dynamic Black: If turned on, the projector dynamically adjusts the power consumption of the lamp according to 70% when no input signal can be detected for 5 seconds. •...
...aspect ratio supported X1240: Native 1024 x 768 XGA resolution Auto / 4:3 / 16:9 aspect ratio supported X1340W/P1340W: Native 1280 x 800 WXGA resolution Auto/ Full / 4:3 /16:9 / L.Box aspect ratio supported • Acer ColorBoost technology delivers vivid, life-like images • High brightness and contrast ratio • Versatile display modes ... functions help decrease lamp power consumption and further extend lamp life Dynamic Black: If turned on, the projector dynamically adjusts the power consumption of the lamp according to 70% when no input signal can be detected for 5 seconds. •...

User Manual
Page 13
English Projector Overview Projector Outlook Front / upper side 1 3 4 5 6 2 7 3 # Description 1 Control panel 2 Projection lens 3 Tilt adjusting wheel 4 Power key and Power indicator LED Rear side (X1140A/X1240/X1340W) 12 3 45 6 # Description 5 Zoom ring 6 Focus ring 7 Remote control receiver (X111/X1140) 1 3 4 5 (P1340W) 4 15 7 3 26 8 9 9 10 # Description # Description 1 Mini USB connector 6 Audio input connector Audio output connector...
English Projector Overview Projector Outlook Front / upper side 1 3 4 5 6 2 7 3 # Description 1 Control panel 2 Projection lens 3 Tilt adjusting wheel 4 Power key and Power indicator LED Rear side (X1140A/X1240/X1340W) 12 3 45 6 # Description 5 Zoom ring 6 Focus ring 7 Remote control receiver (X111/X1140) 1 3 4 5 (P1340W) 4 15 7 3 26 8 9 9 10 # Description # Description 1 Mini USB connector 6 Audio input connector Audio output connector...

User Manual
Page 15
... input a password in or out. Press "0~9" to the "Turning the Projector On/Off" section. Automatically synchronizes the projector to your selection. Enables unique Acer functions: eView, eTimer, ePower Management, e3D. Zooms the projector display in the "Setting" > "Security" OSD. HDMI™/DVI 11...distortion caused by tilting projection (±40 degrees). To change source to the projector. To change source to HDMI™ (or DVI) (for the model with HDMI™ or DVI connector). (For P1340W) Sends signals to S-Video. Four directional select keys 6 Keypad 0~9 7 VGA...
... input a password in or out. Press "0~9" to the "Turning the Projector On/Off" section. Automatically synchronizes the projector to your selection. Enables unique Acer functions: eView, eTimer, ePower Management, e3D. Zooms the projector display in the "Setting" > "Security" OSD. HDMI™/DVI 11...distortion caused by tilting projection (±40 degrees). To change source to the projector. To change source to HDMI™ (or DVI) (for the model with HDMI™ or DVI connector). (For P1340W) Sends signals to S-Video. Four directional select keys 6 Keypad 0~9 7 VGA...

User Manual
Page 22
12 • X1340W/P1340W If the projector is 3 m from the screen, good image quality is located at 3 m distance. English Note: Remind as below figure, the space of image (cm) < C > 1 28 61 x 38 ...) < B > W (cm) x H (cm) From base to top of image (cm) < C > Diagonal (inch) < B > W (cm) x H (cm) From base to top of 142 cm height is required when the projector is possible for image sizes between 84" and 93".
12 • X1340W/P1340W If the projector is 3 m from the screen, good image quality is located at 3 m distance. English Note: Remind as below figure, the space of image (cm) < C > 1 28 61 x 38 ...) < B > W (cm) x H (cm) From base to top of image (cm) < C > Diagonal (inch) < B > W (cm) x H (cm) From base to top of 142 cm height is required when the projector is possible for image sizes between 84" and 93".

User Manual
Page 24
14 • X1340W/P1340W To obtain an image size of image < D > 46 61 76 91 107 122 137 152 183 229 274 305 381 457 English 2.5 m 2.3 m Desired distance 70" ... 431 x 269 250 538 x 337 300 646 x 404 Zoom Ratio: 1.1 x Distance (m) Max zoom Min zoom < B > < C > 1.1 1.3 1.4 1.6 1.8 1.9 2.1 2.3 2.5 2.6 2.8 2.9 3.2 3.2 3.6 3.9 4.3 4.8 5.3 5.8 6.4 6.5 7.1 8.1 8.9 9.7 Top (cm) From base to top of 70" set the projector at a distance between 2.3 m and 2.5 m from the screen and adjust the zoom level accordingly.
14 • X1340W/P1340W To obtain an image size of image < D > 46 61 76 91 107 122 137 152 183 229 274 305 381 457 English 2.5 m 2.3 m Desired distance 70" ... 431 x 269 250 538 x 337 300 646 x 404 Zoom Ratio: 1.1 x Distance (m) Max zoom Min zoom < B > < C > 1.1 1.3 1.4 1.6 1.8 1.9 2.1 2.3 2.5 2.6 2.8 2.9 3.2 3.2 3.6 3.9 4.3 4.8 5.3 5.8 6.4 6.5 7.1 8.1 8.9 9.7 Top (cm) From base to top of 70" set the projector at a distance between 2.3 m and 2.5 m from the screen and adjust the zoom level accordingly.

User Manual
Page 25
...(POWER) on the control panel or 2 Press "MENU" on the control panel or remote control to launch the OSD for projector installation and maintenance. (X111/X1140) (X1140A/X1240/ X1340W/P1340W) 3 The background pattern acts as a guide to adjusting the calibration and alignment settings, such as screen size and distance, ...down arrow keys to select an option, the left and right arrow keys to adjust selected option settings, and the right arrow key to the Acer welcome screen. The new settings will be saved automatically upon exiting the menu. 5 Press "MENU" anytime to exit the menu and return to...
...(POWER) on the control panel or 2 Press "MENU" on the control panel or remote control to launch the OSD for projector installation and maintenance. (X111/X1140) (X1140A/X1240/ X1340W/P1340W) 3 The background pattern acts as a guide to adjusting the calibration and alignment settings, such as screen size and distance, ...down arrow keys to select an option, the left and right arrow keys to adjust selected option settings, and the right arrow key to the Acer welcome screen. The new settings will be saved automatically upon exiting the menu. 5 Press "MENU" anytime to exit the menu and return to...

User Manual
Page 31
... at same time. English 21 Image (X111/X1140) (X1140A/X1240/X1340W) (P1340W) • • Projection • (X111/X1140) • Projection • Mode (X1140A/ X1240/X1340W/ • P1340W) Front-Desktop: The factory default setting. Front-Ceiling: When you select this function, the projector reverses the image so that you can project from behind a translucent...
... at same time. English 21 Image (X111/X1140) (X1140A/X1240/X1340W) (P1340W) • • Projection • (X111/X1140) • Projection • Mode (X1140A/ X1240/X1340W/ • P1340W) Front-Desktop: The factory default setting. Front-Ceiling: When you select this function, the projector reverses the image so that you can project from behind a translucent...

User Manual
Page 33
English 23 Frequency Tracking Changes the projector's refresh rate to match the frequency of the... no overscan on the HDMI image. • Overscan: Always keep overscan on screen. • HDMI Scan Info (P1340W) • Auto: Automatically adjusts the overscan ratio by information from the player. Position", "Frequency" and "Tracking" ...functions are not supported under computer mode. HDMI Color Range (P1340W) • Auto: Automatically adjusts the color range by information from the player. • Limited Range: Processes the...
English 23 Frequency Tracking Changes the projector's refresh rate to match the frequency of the... no overscan on the HDMI image. • Overscan: Always keep overscan on screen. • HDMI Scan Info (P1340W) • Auto: Automatically adjusts the overscan ratio by information from the player. Position", "Frequency" and "Tracking" ...functions are not supported under computer mode. HDMI Color Range (P1340W) • Auto: Automatically adjusts the color range by information from the player. • Limited Range: Processes the...

User Manual
Page 34
English 24 Setting (X111/X1140) (X1140A/X1240/X1340W) (P1340W) Startup Screen (P1340W) Use this function to select your Acer projector. • User: Use the memorized picture from the "Screen Capture" function. If you change the setting, it will take effect when you exit the OSD menu. • Acer: The default startup screen of your desired startup screen.
English 24 Setting (X111/X1140) (X1140A/X1240/X1340W) (P1340W) Startup Screen (P1340W) Use this function to select your Acer projector. • User: Use the memorized picture from the "Screen Capture" function. If you change the setting, it will take effect when you exit the OSD menu. • Acer: The default startup screen of your desired startup screen.

User Manual
Page 35
X1340W/ P1340W) Enabling this function to the factory default settings. Press "Screen Capture" to customize the startup screen. • A dialog box appears to turn off the captioning feature. Closed Caption Selects a preferred closed captioning mode from the default setting "Acer" to the (X1140A/X1240/ devices...disappears and the original display is set to use the current image as the startup screen, follow the instructions below. The projector can output VGA OUT a VGA signal when it is NTSC. Reset Press after choosing "Yes" to return the display parameters...
X1340W/ P1340W) Enabling this function to the factory default settings. Press "Screen Capture" to customize the startup screen. • A dialog box appears to turn off the captioning feature. Closed Caption Selects a preferred closed captioning mode from the default setting "Acer" to the (X1140A/X1240/ devices...disappears and the original display is set to use the current image as the startup screen, follow the instructions below. The projector can output VGA OUT a VGA signal when it is NTSC. Reset Press after choosing "Yes" to return the display parameters...

User Manual
Page 36
...the password again. • The factory default setting of "Administrator Password" is "1234". • Select "On" to set up , the projector will request you to enter password when switching on the remote control to enable the security function. Press to change "User Password". • Use... the numerical keys on the projector. You have to manage the projector. P1340W The factory default of "Timeout (Min.)" is "Off". • Once the security function is enabled, your must enter "...
...the password again. • The factory default setting of "Administrator Password" is "1234". • Select "On" to set up , the projector will request you to enter password when switching on the remote control to enable the security function. Press to change "User Password". • Use... the numerical keys on the projector. You have to manage the projector. P1340W The factory default of "Timeout (Min.)" is "Off". • Once the security function is enabled, your must enter "...

User Manual
Page 37
.... When this function is printed on the Security Card that came with your projector. Management (X111/X1140) (X1140A/X1240/X1340W/P1340W) ECO Mode High Altitude Choose "On" to dim the projector lamp, which is turned on the High Altitude mode. Choose "Off" to return to the normal mode. This unique password will also..." or "Enter Password" dialogue box displays. • Press to change "Administrator Password". • The factory default of "Administrator Password" is lost, please contact your local Acer service center.
.... When this function is printed on the Security Card that came with your projector. Management (X111/X1140) (X1140A/X1240/X1340W/P1340W) ECO Mode High Altitude Choose "On" to dim the projector lamp, which is turned on the High Altitude mode. Choose "Off" to return to the normal mode. This unique password will also..." or "Enter Password" dialogue box displays. • Press to change "Administrator Password". • The factory default of "Administrator Password" is lost, please contact your local Acer service center.

User Manual
Page 38
...P1340W) • Press to decrease the volume. • Press to increase the volume. • Choose "On" to turn mute on. • Choose "Off" to turn mute off . Lamp Hour Elapse Displays the lamp's elapsed operating time (in hours). The message will automatically shut down while there is displayed. Auto Shutdown The projector... function to adjust the volume of life. English 28 • Instant Off: Enables you to turn off the projector immediately without fan cooling process by pressing Turn Off Mode the power button twice. • Instant Resume: Enables you to restart the...
...P1340W) • Press to decrease the volume. • Press to increase the volume. • Choose "On" to turn mute on. • Choose "Off" to turn mute off . Lamp Hour Elapse Displays the lamp's elapsed operating time (in hours). The message will automatically shut down while there is displayed. Auto Shutdown The projector... function to adjust the volume of life. English 28 • Instant Off: Enables you to turn off the projector immediately without fan cooling process by pressing Turn Off Mode the power button twice. • Instant Resume: Enables you to restart the...

User Manual
Page 43
Go to "Image" > "Auto Keystone (X1140A/X1240/X1340W/P1340W)" or "Image" > "Manual Keystone" to make a loud popping sound. If this happens, the projector will burn out and may make adjustments. 11 Image is too small • Adjust the zoom lever...is reversed • Select "Image" > "Projection Mode (X1140A/X1240/ X1340W/P1340W)", "Image" > "Projection Location (X1140A/X1240/X1340W/P1340W)" on the OSD and adjust the projection direction. Problems with the Projector # Condition Solution 1 The projector stops responding If possible, turn on until the image becomes square. • Press...
Go to "Image" > "Auto Keystone (X1140A/X1240/X1340W/P1340W)" or "Image" > "Manual Keystone" to make a loud popping sound. If this happens, the projector will burn out and may make adjustments. 11 Image is too small • Adjust the zoom lever...is reversed • Select "Image" > "Projection Mode (X1140A/X1240/ X1340W/P1340W)", "Image" > "Projection Location (X1140A/X1240/X1340W/P1340W)" on the OSD and adjust the projection direction. Problems with the Projector # Condition Solution 1 The projector stops responding If possible, turn on until the image becomes square. • Press...

User Manual
Page 59
...continue comply with the requirements. EN55022, AS/NZS CISPR22, Class B -. English English 49 Acer Incorporated 8F, 88, Sec. 1, Xintai 5th Rd., Xizhi New Taipei City 221, Taiwan Declaration of Conformity We, Acer Incorporated 8F, 88, Sec. 1, Xintai 5th Rd., Xizhi, New Taipei City 221, ...39-02-939-921, Fax: +39-02 9399-2913, www.acer.it Hereby declare that: Product: Trade Name: Model Number: Machine Type: Projector Acer QSV1106/QSV1107/QNX1108/QWX1109/QWX1110 series X111/X1140/X1140A/X1240/X1340W/P1340W series Is compliant with the essential requirements and other relevant provisions of...
...continue comply with the requirements. EN55022, AS/NZS CISPR22, Class B -. English English 49 Acer Incorporated 8F, 88, Sec. 1, Xintai 5th Rd., Xizhi New Taipei City 221, Taiwan Declaration of Conformity We, Acer Incorporated 8F, 88, Sec. 1, Xintai 5th Rd., Xizhi, New Taipei City 221, ...39-02-939-921, Fax: +39-02 9399-2913, www.acer.it Hereby declare that: Product: Trade Name: Model Number: Machine Type: Projector Acer QSV1106/QSV1107/QNX1108/QWX1109/QWX1110 series X111/X1140/X1140A/X1240/X1340W/P1340W series Is compliant with the essential requirements and other relevant provisions of...

User Manual
Page 61
... Declaration of Conformity This device complies with Part 15 of Responsible Party: Contact Person: Phone No.: Fax No.: DLP Projector QSV1106/QSV1107/QNX1108/ QWX1109/QWX1110 series X111/X1140/X1140A/X1240/ X1340W/P1340W series Acer America Corporation 333 West San Carlos St. A. Operation is subject to the following local Manufacturer / Importer is responsible for...
... Declaration of Conformity This device complies with Part 15 of Responsible Party: Contact Person: Phone No.: Fax No.: DLP Projector QSV1106/QSV1107/QNX1108/ QWX1109/QWX1110 series X111/X1140/X1140A/X1240/ X1340W/P1340W series Acer America Corporation 333 West San Carlos St. A. Operation is subject to the following local Manufacturer / Importer is responsible for...


