
User Manual
Page 5
... air around the projector is necessary. • Locations where temperatures may become excessively high, such as opening or removing covers may hurt your eyes. • Turn on . Keep them out of the reach of other risks. It Unplug this product yourself, as inside of your projector. Your device and its enhancements may contaminate optical components, shortening the life span and darkening the image...
... air around the projector is necessary. • Locations where temperatures may become excessively high, such as opening or removing covers may hurt your eyes. • Turn on . Keep them out of the reach of other risks. It Unplug this product yourself, as inside of your projector. Your device and its enhancements may contaminate optical components, shortening the life span and darkening the image...
User Manual
Page 6
... product will detect the life of displaying inverted images for inspection. • Do not face the projector lens to turn off before disconnecting power. • Do not turn off . • Do not touch air outlet grille and bottom plate which becomes hot. • Clean the air filter frequently if have. Only use acer ceiling mount kit for replacement. • Do not operate lamps beyond the rated lamp life. vi might cause fire...
... product will detect the life of displaying inverted images for inspection. • Do not face the projector lens to turn off before disconnecting power. • Do not turn off . • Do not touch air outlet grille and bottom plate which becomes hot. • Clean the air filter frequently if have. Only use acer ceiling mount kit for replacement. • Do not operate lamps beyond the rated lamp life. vi might cause fire...
User Manual
Page 8
... time. Don't: • Block the slots and openings on the unit provided for a long period of the lamp itself. If this user's guide to maximize the life of its cooling cycle before cleaning. • Use a soft cloth moistened with mild detergent to clean the display housing. • Disconnect the power plug from the Onscreen display "Management" menu after replacing the lamp module. • When switching the projector...
... time. Don't: • Block the slots and openings on the unit provided for a long period of the lamp itself. If this user's guide to maximize the life of its cooling cycle before cleaning. • Use a soft cloth moistened with mild detergent to clean the display housing. • Disconnect the power plug from the Onscreen display "Management" menu after replacing the lamp module. • When switching the projector...
User Manual
Page 11
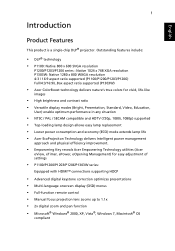
... Acer Empowering Technology utilities (Acer eView, eTimer, ePower, eOpening Management) for easy adjustment of settings • P1100/P1200/P1200B/P1200i/P1203/P1206/P1300WB/P1303W series: Equipped with HDMI™ connections supporting HDCP • Advanced digital keystone correction optimizes presentations • Multi-language onscreen display (OSD) menus • Full-function remote control • Manual focus projection lens zooms up to 1.1x • 2x digital zoom and pan function • Microsoft® Windows...
... Acer Empowering Technology utilities (Acer eView, eTimer, ePower, eOpening Management) for easy adjustment of settings • P1100/P1200/P1200B/P1200i/P1203/P1206/P1300WB/P1303W series: Equipped with HDMI™ connections supporting HDCP • Advanced digital keystone correction optimizes presentations • Multi-language onscreen display (OSD) menus • Full-function remote control • Manual focus projection lens zooms up to 1.1x • 2x digital zoom and pan function • Microsoft® Windows...
User Manual
Page 17
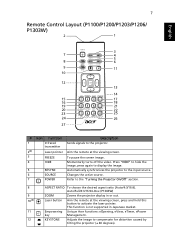
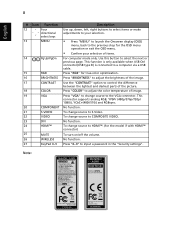
... function is not supported in or out. Auto/Full/4:3/16:9/L.Box (P1303W) ZOOM Zooms the projector display in Japanese market. Laser button Aim the remote at the viewing screen. 3 FREEZE To pause the screen image. 4 HIDE Momentarily turns off the video. Press "HIDE" to hide the image, press again to display the image. 5 RESYNC Automatically synchronizes the projector to the input source. 6 SOURCE Changes the active source. 7 POWER Refer to the projector. KEYSTONE Adjusts the image to activate the...
... function is not supported in or out. Auto/Full/4:3/16:9/L.Box (P1303W) ZOOM Zooms the projector display in Japanese market. Laser button Aim the remote at the viewing screen. 3 FREEZE To pause the screen image. 4 HIDE Momentarily turns off the video. Press "HIDE" to hide the image, press again to display the image. 5 RESYNC Automatically synchronizes the projector to the input source. 6 SOURCE Changes the active source. 7 POWER Refer to the projector. KEYSTONE Adjusts the image to activate the...
User Manual
Page 18
... "VGA" to change source to HDMI™. (for the model if with HDMI™ connector) 25 MUTE To turn on/off the volume. 26 WIRELESS No function. 27 KeyPad 0~9 Press "0~9" to input a password in the "Security settings". Use this button to adjust the color temperature of items. 14 PgUp/PgDn For computer mode only. This function is only available when USB Ctrl connector(USB type B) is connected to a computer via a USB cable...
... "VGA" to change source to HDMI™. (for the model if with HDMI™ connector) 25 MUTE To turn on/off the volume. 26 WIRELESS No function. 27 KeyPad 0~9 Press "0~9" to input a password in the "Security settings". Use this button to adjust the color temperature of items. 14 PgUp/PgDn For computer mode only. This function is only available when USB Ctrl connector(USB type B) is connected to a computer via a USB cable...
User Manual
Page 19
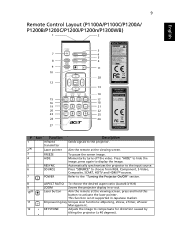
... transmitter 2(#) Laser pointer 3 FREEZE 4 HIDE 5 RESYNC 6 SOURCE 7 POWER Description Sends signals to choose from RGB, Component, S-Video, Composite, SCART, HDTV and HDMI™ sources. Automatically synchronizes the projector to activate the laser pointer. Laser button Aim the remote at the viewing screen. KEYSTONE Adjusts the image to compensate for distortion caused by tilting the projector (± 40 degrees). This function is not supported in or out.
... transmitter 2(#) Laser pointer 3 FREEZE 4 HIDE 5 RESYNC 6 SOURCE 7 POWER Description Sends signals to choose from RGB, Component, S-Video, Composite, SCART, HDTV and HDMI™ sources. Automatically synchronizes the projector to activate the laser pointer. Laser button Aim the remote at the viewing screen. KEYSTONE Adjusts the image to compensate for distortion caused by tilting the projector (± 40 degrees). This function is not supported in or out.
User Manual
Page 35
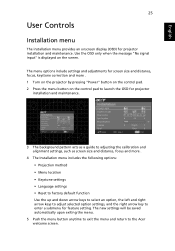
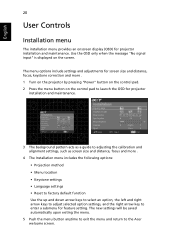
... projector by pressing "Power" button on the control pad. 2 Press the menu button on the screen. English 25 User Controls Installation menu The installation menu provides an onscreen display (OSD) for feature setting. Use the OSD only when the message "No signal input" is displayed on the control pad to launch the OSD for screen size and distance, focus, keystone correction and more . 4 The Installation menu includes the following options: • Projection method • Menu location • Keystone settings • Language settings • Reset to factory default...
... projector by pressing "Power" button on the control pad. 2 Press the menu button on the screen. English 25 User Controls Installation menu The installation menu provides an onscreen display (OSD) for feature setting. Use the OSD only when the message "No signal input" is displayed on the control pad to launch the OSD for screen size and distance, focus, keystone correction and more . 4 The Installation menu includes the following options: • Projection method • Menu location • Keystone settings • Language settings • Reset to factory default...
User Manual
Page 43
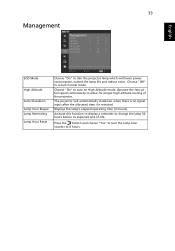
... display a reminder to change the lamp 30 hours before its expected end-of the projector. Operate the fans at full speed continuously to allow for proper high altitude cooling of -life. 33 Management English ECO Mode High Altitude Auto Shutdown Lamp Hour Elapse Lamp Reminding Lamp Hour Reset Choose "On" to dim the projector lamp which will automatically shutdown when there is no signal input after the allocated time. (in minutes) Displays the lamp's elapsed operating time...
... display a reminder to change the lamp 30 hours before its expected end-of the projector. Operate the fans at full speed continuously to allow for proper high altitude cooling of -life. 33 Management English ECO Mode High Altitude Auto Shutdown Lamp Hour Elapse Lamp Reminding Lamp Hour Reset Choose "On" to dim the projector lamp which will automatically shutdown when there is no signal input after the allocated time. (in minutes) Displays the lamp's elapsed operating time...

User Manual
Page 46
... an Acer service center. 36 English Timeout(Min.) Once "Security" is activated to "On", the administrator can set your password on the remote control and press "MENU" to confirm. • Press to delete character. • Enter the password when you forgot your administrator password, do the following to enter password when switch on the projector . If lock user startup screen is "ON", users cannot change startup screen anymore...
... an Acer service center. 36 English Timeout(Min.) Once "Security" is activated to "On", the administrator can set your password on the remote control and press "MENU" to confirm. • Press to delete character. • Enter the password when you forgot your administrator password, do the following to enter password when switch on the projector . If lock user startup screen is "ON", users cannot change startup screen anymore...
User Manual
Page 53
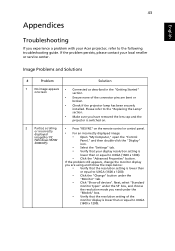
... choose the resolution mode you have removed the lens cap and the projector is switched on. 2 Partial, scrolling or incorrectly displayed image(For PC • Press "RESYNC" on the remote control or control panel. • For an incorrectly displayed image: • Open "My Computer," open the "Control (Windows 95/98/ 2000/XP)) Panel," and then double-click the "Display" icon. • Select the "Settings" tab. • Verify that the resolution setting of the...
... choose the resolution mode you have removed the lens cap and the projector is switched on. 2 Partial, scrolling or incorrectly displayed image(For PC • Press "RESYNC" on the remote control or control panel. • For an incorrectly displayed image: • Open "My Computer," open the "Control (Windows 95/98/ 2000/XP)) Panel," and then double-click the "Display" icon. • Select the "Settings" tab. • Verify that the resolution setting of the...
User Manual
Page 59
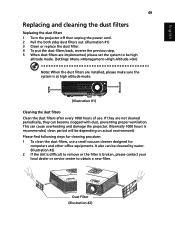
... service center to obtain a new filter. If they are installed, please make sure the system is at high altitude mode. (Illustration #1) Cleaning the dust filters Clean the dust filters after every 1000 hours of use a small vacuum cleaner designed for computers and other office equipments. English 49 Replacing and cleaning the dust filters Replacing the dust filters 1 Turn the projector off then unplug the power cord. 2 Pull the both sides dust filters...
... service center to obtain a new filter. If they are installed, please make sure the system is at high altitude mode. (Illustration #1) Cleaning the dust filters Clean the dust filters after every 1000 hours of use a small vacuum cleaner designed for computers and other office equipments. English 49 Replacing and cleaning the dust filters Replacing the dust filters 1 Turn the projector off then unplug the power cord. 2 Pull the both sides dust filters...

User Manual
Page 6
... temperature inside which may cause the projector to disassemble this could cause it is the lamp which becomes hot. • Clean the air filter frequently if have. Please be sure to change the lamp when is showing warning message. • When changing the lamp, please allow unit to cool down, and follow all changing instructions. • Reset the "Lamp Hour Reset" function from the Onscreen display "Management" menu after replacing the lamp...
... temperature inside which may cause the projector to disassemble this could cause it is the lamp which becomes hot. • Clean the air filter frequently if have. Please be sure to change the lamp when is showing warning message. • When changing the lamp, please allow unit to cool down, and follow all changing instructions. • Reset the "Lamp Hour Reset" function from the Onscreen display "Management" menu after replacing the lamp...
User Manual
Page 11
... Key reveals Acer Empowering Technology utilities (Acer eView, eTimer, ePower, eOpening Management) for easy adjustment of settings • P1100/P1200/P1203/P1206/P1303W series: Equipped with HDMI™ connections supporting HDCP • Advanced digital keystone correction optimizes presentations • Multi-language onscreen display (OSD) menus • Full-function remote control • Manual focus projection lens zooms up to 1.1x • 2x digital zoom and pan function • Microsoft® Windows®...
... Key reveals Acer Empowering Technology utilities (Acer eView, eTimer, ePower, eOpening Management) for easy adjustment of settings • P1100/P1200/P1203/P1206/P1303W series: Equipped with HDMI™ connections supporting HDCP • Advanced digital keystone correction optimizes presentations • Multi-language onscreen display (OSD) menus • Full-function remote control • Manual focus projection lens zooms up to 1.1x • 2x digital zoom and pan function • Microsoft® Windows®...

User Manual
Page 16
... source. 7 POWER Refer to the "Turning the Projector On/Off" section. 8 ASPECT RATIO To choose the desired aspect ratio (Auto/4:3/16:9). 9 ZOOM Zooms the projector display in Japanese market. 11 Empowering Unique Acer functions: eOpening, eView, eTimer, ePower key Management. 12 KEYSTONE Adjusts the image to compensate for distortion caused by tilting the projector (± 40 degrees). transmitter 2 Laser pointer Aim the remote at the viewing screen...
... source. 7 POWER Refer to the "Turning the Projector On/Off" section. 8 ASPECT RATIO To choose the desired aspect ratio (Auto/4:3/16:9). 9 ZOOM Zooms the projector display in Japanese market. 11 Empowering Unique Acer functions: eOpening, eView, eTimer, ePower key Management. 12 KEYSTONE Adjusts the image to compensate for distortion caused by tilting the projector (± 40 degrees). transmitter 2 Laser pointer Aim the remote at the viewing screen...
User Manual
Page 30
... for projector installation and maintenance. Use the OSD only when the message "No signal input" is displayed on the control pad to launch the OSD for projector installation and maintenance. 3 The background pattern acts as a guide to adjusting the calibration and alignment settings, such as screen size and distance, focus and more . 4 The Installation menu includes the following options: • Projection method • Menu location • Keystone settings • Language settings • Reset to factory default function Use the...
... for projector installation and maintenance. Use the OSD only when the message "No signal input" is displayed on the control pad to launch the OSD for projector installation and maintenance. 3 The background pattern acts as a guide to adjusting the calibration and alignment settings, such as screen size and distance, focus and more . 4 The Installation menu includes the following options: • Projection method • Menu location • Keystone settings • Language settings • Reset to factory default function Use the...

User Manual
Page 37
... change the lamp 30 hours before its expected end-of-life. Press the button and choose "Yes" to turn on the display screen. When source lock is turned "on", it will "lock" the current source channel unless you press "Source" button on the remote control for proper high altitude cooling of the projector. Use this function to display a reminder to change the setting, the changes will lower power consumption, extend the lamp life and reduce noise. Operate the fans...
... change the lamp 30 hours before its expected end-of-life. Press the button and choose "Yes" to turn on the display screen. When source lock is turned "on", it will "lock" the current source channel unless you press "Source" button on the remote control for proper high altitude cooling of the projector. Use this function to display a reminder to change the setting, the changes will lower power consumption, extend the lamp life and reduce noise. Operate the fans...

User Manual
Page 38
... mode from 10 minute to 990 minutes. • When the time is a new input signal or when you want to use the current image as the startup screen, follow the instructions below , takes effect when there is up, the projector will request user to enable the security function. Select "Off" to enter the password again. • The factory default setting of the projector . Security This projector provides a useful...
... mode from 10 minute to 990 minutes. • When the time is a new input signal or when you want to use the current image as the startup screen, follow the instructions below , takes effect when there is up, the projector will request user to enable the security function. Select "Off" to enter the password again. • The factory default setting of the projector . Security This projector provides a useful...

User Manual
Page 39
... remote control and press "MENU" to confirm. • Press to delete character. • Enter the password when you see "Confirm Password" displayed. • The password should be between 4 and 8 characters long. • If you select "Request password only after plugging power cord", the projector will be used in the box). Choose "OFF" to the factory default settings. Choose "On" to enable VGA OUT connection. • Press the button...
... remote control and press "MENU" to confirm. • Press to delete character. • Enter the password when you see "Confirm Password" displayed. • The password should be between 4 and 8 characters long. • If you select "Request password only after plugging power cord", the projector will be used in the box). Choose "OFF" to the factory default settings. Choose "On" to enable VGA OUT connection. • Press the button...

User Manual
Page 42
... choose the resolution mode you have removed the lens cap and the projector is switched on. 2 Partial, scrolling or incorrectly displayed image(For PC • Press "RESYNC" on the remote control or control panel. • For an incorrectly displayed image: • Open "My Computer," open the "Control (Windows 95/98/ 2000/XP)) Panel," and then double-click the "Display" icon. • Select the "Settings" tab. • Verify that your display resolution setting is lower...
... choose the resolution mode you have removed the lens cap and the projector is switched on. 2 Partial, scrolling or incorrectly displayed image(For PC • Press "RESYNC" on the remote control or control panel. • For an incorrectly displayed image: • Open "My Computer," open the "Control (Windows 95/98/ 2000/XP)) Panel," and then double-click the "Display" icon. • Select the "Settings" tab. • Verify that your display resolution setting is lower...


