

User Manual (3D)
Page 3
... support 144Hz sync signal for instructions how to a DVD or Blu-ray player, please read sections "Using DLP 3D / NVIDIA 3DTV Play technology" on page 7. If you do not wish to view 3D content, you should turn them on . Acer projectors need to change the battery. Using 3D glasses DLP 3D glasses are turned on and how to ensure the glasses are powered. English 3 The Acer projector...
... support 144Hz sync signal for instructions how to a DVD or Blu-ray player, please read sections "Using DLP 3D / NVIDIA 3DTV Play technology" on page 7. If you do not wish to view 3D content, you should turn them on . Acer projectors need to change the battery. Using 3D glasses DLP 3D glasses are turned on and how to ensure the glasses are powered. English 3 The Acer projector...

User Manual (3D)
Page 4
... HDMI 1.4a or later connection is not supported on the left-hand side of LED projectors. Setting up the environment. 1 Set the refresh rate to 100/120 Hz on the projector remote control to your graphics card's documentation. 2 Download and install the latest drivers for your graphics card vendor's website for frame/field sequential 3D formats. To download software and use an NVIDIA 3DTV Play ready projector...
... HDMI 1.4a or later connection is not supported on the left-hand side of LED projectors. Setting up the environment. 1 Set the refresh rate to 100/120 Hz on the projector remote control to your graphics card's documentation. 2 Download and install the latest drivers for your graphics card vendor's website for frame/field sequential 3D formats. To download software and use an NVIDIA 3DTV Play ready projector...
User Manual
Page 5
... service • the product does not operate normally after following environments: • Space that are necessary. • Locations where temperatures may become excessively high, such as opening or removing covers may expose you to dangerous voltage points or other controls may result in damage and will often require extensive work by a qualified technician to restore the product to normal condition. Keep...
... service • the product does not operate normally after following environments: • Space that are necessary. • Locations where temperatures may become excessively high, such as opening or removing covers may expose you to dangerous voltage points or other controls may result in damage and will often require extensive work by a qualified technician to restore the product to normal condition. Keep...
User Manual
Page 6
In this case contact your local dealer or Acer service center when you . • Do not stand the projector on the remote control. • Do not operate lamps beyond the rated lamp life. It could cause the object to become hot. • Clean the air filter frequently. vi • Locations where the altitudes are dangerous high voltages inside may rise and cause damage when the...
In this case contact your local dealer or Acer service center when you . • Do not stand the projector on the remote control. • Do not operate lamps beyond the rated lamp life. It could cause the object to become hot. • Clean the air filter frequently. vi • Locations where the altitudes are dangerous high voltages inside may rise and cause damage when the...
User Manual
Page 8
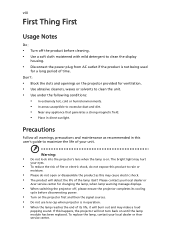
... product will detect the life of time. Don't: • Block the slots and openings on the projector provided for changing the lamp, when lamp warning message displays. • When switching the projector off the product before disconnecting power. • Turn on the projector first and then the signal sources. • Do not use lens cap when projector is on until the lamp module has been replaced. Precautions Follow all warnings, precautions and maintenance...
... product will detect the life of time. Don't: • Block the slots and openings on the projector provided for changing the lamp, when lamp warning message displays. • When switching the projector off the product before disconnecting power. • Turn on the projector first and then the signal sources. • Do not use lens cap when projector is on until the lamp module has been replaced. Precautions Follow all warnings, precautions and maintenance...
User Manual
Page 11
... x 800 WXGA resolution, Auto/Full/4:3/16:9/L.Box aspect ratio supported • Enables projecting 3D content via DLP Link Technology: Blu-Ray 3D supported • One-touch "3D" button on , the projector dynamically adjusts the power consumption of the lamp according to the brightness of the lamp by up to the 3D functions • Acer ColorBoost technology delivers vivid, life-like images • High brightness and contrast...
... x 800 WXGA resolution, Auto/Full/4:3/16:9/L.Box aspect ratio supported • Enables projecting 3D content via DLP Link Technology: Blu-Ray 3D supported • One-touch "3D" button on , the projector dynamically adjusts the power consumption of the lamp according to the brightness of the lamp by up to the 3D functions • Acer ColorBoost technology delivers vivid, life-like images • High brightness and contrast...
User Manual
Page 13
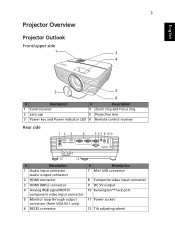
... and Focus ring 2 Lens cap 5 Projection lens 3 Power key and Power indicator LED 6 Remote control receiver Rear side 12 3 4 5 6 7 8 910 11 12 12 # Description 1 Audio input connector Audio output connector 2 HDMI connector 3 HDMI (MHL) connector 4 Analog RGB signal/HDTV/ component video input connector 5 Monitor loop-through output connector (from VGA IN 1 only) 6 RS232 connector # Description 7 Mini USB connector 8 Composite video input connector 9 DC 5V output 10 Kensington™ lock port 11 Power socket 12 Tilt adjusting wheel
... and Focus ring 2 Lens cap 5 Projection lens 3 Power key and Power indicator LED 6 Remote control receiver Rear side 12 3 4 5 6 7 8 910 11 12 12 # Description 1 Audio input connector Audio output connector 2 HDMI connector 3 HDMI (MHL) connector 4 Analog RGB signal/HDTV/ component video input connector 5 Monitor loop-through output connector (from VGA IN 1 only) 6 RS232 connector # Description 7 Mini USB connector 8 Composite video input connector 9 DC 5V output 10 Kensington™ lock port 11 Power socket 12 Tilt adjusting wheel

User Manual
Page 15
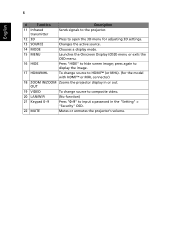
... makes adjustments to your selection, or goes back to previous page. Stop 6 FREEZE To pause the screen image. 7 VGA To change source to a computer via a mini USB cable. 9 COMPONENT (No function) 10 MEDIA (No function) Emits visible laser pointer light for the projectors sold in Japan/China. Use this button to the "Turning the Projector On/Off" section. Chooses an aspect ratio. English Remote Control Layout...
... makes adjustments to your selection, or goes back to previous page. Stop 6 FREEZE To pause the screen image. 7 VGA To change source to a computer via a mini USB cable. 9 COMPONENT (No function) 10 MEDIA (No function) Emits visible laser pointer light for the projectors sold in Japan/China. Use this button to the "Turning the Projector On/Off" section. Chooses an aspect ratio. English Remote Control Layout...
User Manual
Page 16
... to display the image. 17 HDMI/MHL To change source to composite video. 20 LAN/WiFi (No function) 21 Keypad 0~9 Press "0~9" to input a password in or out. 6 English # Function Description 11 Infrared transmitter Sends signals to the projector. 12 3D Press to open the 3D menu for adjusting 3D settings. 13 SOURCE Changes the active source. 14 MODE Chooses a display mode. 15 MENU Launches the Onscreen Display (OSD) menu or exits the OSD menu. 16...
... to display the image. 17 HDMI/MHL To change source to composite video. 20 LAN/WiFi (No function) 21 Keypad 0~9 Press "0~9" to input a password in or out. 6 English # Function Description 11 Infrared transmitter Sends signals to the projector. 12 3D Press to open the 3D menu for adjusting 3D settings. 13 SOURCE Changes the active source. 14 MODE Chooses a display mode. 15 MENU Launches the Onscreen Display (OSD) menu or exits the OSD menu. 16...
User Manual
Page 23
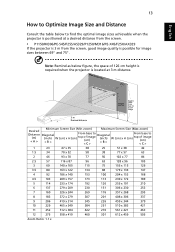
... of image (cm) < C > Maximum Screen Size (Max zoom) Diagonal (inch) < B > W (cm) x H (cm) From base to find the optimal image sizes achievable when the projector is positioned at a desired distance from the screen. • P1150/M306/PE-S45/F25S/AS329/P1250/M316/PE-X45/F25X/AX329 If the projector is 3 m from the screen, good image quality is located at 3 m distance. English 13 How to Optimize Image Size and Distance...
... of image (cm) < C > Maximum Screen Size (Max zoom) Diagonal (inch) < B > W (cm) x H (cm) From base to find the optimal image sizes achievable when the projector is positioned at a desired distance from the screen. • P1150/M306/PE-S45/F25S/AS329/P1250/M316/PE-X45/F25X/AX329 If the projector is 3 m from the screen, good image quality is located at 3 m distance. English 13 How to Optimize Image Size and Distance...
User Manual
Page 29
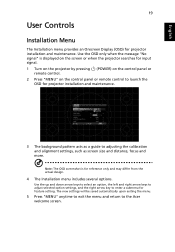
... projector searches for input signal. 1 Turn on the projector by pressing remote control. (POWER) on the control panel or 2 Press "MENU" on the control panel or remote control to the Acer welcome screen. English 19 User Controls Installation Menu The Installation menu provides an Onscreen Display (OSD) for projector installation and maintenance. 3 The background pattern acts as a guide to adjusting the calibration and alignment settings, such as screen size and distance, focus and more. Use the OSD only when the message "No signal" is for feature setting...
... projector searches for input signal. 1 Turn on the projector by pressing remote control. (POWER) on the control panel or 2 Press "MENU" on the control panel or remote control to the Acer welcome screen. English 19 User Controls Installation Menu The Installation menu provides an Onscreen Display (OSD) for projector installation and maintenance. 3 The background pattern acts as a guide to adjusting the calibration and alignment settings, such as screen size and distance, focus and more. Use the OSD only when the message "No signal" is for feature setting...
User Manual
Page 32
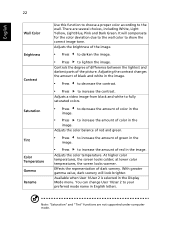
... picture. Adjusts a video image from black and white to fully saturated colors. • Press to decrease the amount of color in the image. • Press to your preferred mode name in the image. At higher color temperatures, the screen looks colder; Available when User 1/User 2 is selected in the Display Mode menu. Effects the representation of color in English letters. Note: "Saturation" and "Tint" functions are several choices, including White, Light Yellow, Light Blue...
... picture. Adjusts a video image from black and white to fully saturated colors. • Press to decrease the amount of color in the image. • Press to your preferred mode name in the image. At higher color temperatures, the screen looks colder; Available when User 1/User 2 is selected in the Display Mode menu. Effects the representation of color in English letters. Note: "Saturation" and "Tint" functions are several choices, including White, Light Yellow, Light Blue...
User Manual
Page 33
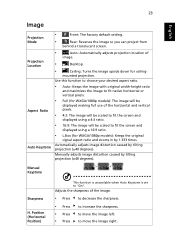
... (Horizontal Position) This function is unavailable when Auto Keystone is set to move the image left. mounted projection. to "On". 23 English Image Projection Mode Projection Location Aspect Ratio Auto Keystone • Front: The factory default setting. • Rear: Reverses the image so you can project from behind a translucent screen. • Auto: Automatically adjusts projection location of image. • Desktop • Ceiling: Turns the image upside down for WXGA/1080p models): Keeps the original signal aspect ratio and zooms in by 1.333 times.
... (Horizontal Position) This function is unavailable when Auto Keystone is set to move the image left. mounted projection. to "On". 23 English Image Projection Mode Projection Location Aspect Ratio Auto Keystone • Front: The factory default setting. • Rear: Reverses the image so you can project from behind a translucent screen. • Auto: Automatically adjusts projection location of image. • Desktop • Ceiling: Turns the image upside down for WXGA/1080p models): Keeps the original signal aspect ratio and zooms in by 1.333 times.
User Manual
Page 34
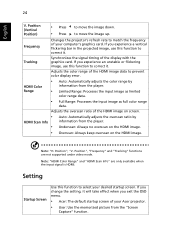
... unstable or flickering image, use this function to correct it . Position", "V. If you exit the OSD menu. • Acer: The default startup screen of your Acer projector. • User: Use the memorized picture from the "Screen Capture" function. English 24 V. to correct it . Adjusts the overscan ratio of your desired startup screen. Setting Startup Screen Use this function to move the image down. Synchronizes the signal timing of the HDMI image data to select...
... unstable or flickering image, use this function to correct it . Position", "V. If you exit the OSD menu. • Acer: The default startup screen of your Acer projector. • User: Use the memorized picture from the "Screen Capture" function. English 24 V. to correct it . Adjusts the overscan ratio of your desired startup screen. Setting Startup Screen Use this function to move the image down. Synchronizes the signal timing of the HDMI image data to select...
User Manual
Page 35
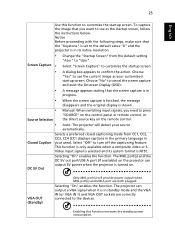
.... Video input signal is shown. • Manual: When switching input signals, you want to use as your area). Selecting "On" enables the function. The projector can output 5V power when the projector is NTSC. Notice Before proceeding with the following steps, make sure that the "Keystone" is set to the default value "0" and the projector is in its system format is turned on the remote control. • Auto: The projector...
.... Video input signal is shown. • Manual: When switching input signals, you want to use as your area). Selecting "On" enables the function. The projector can output 5V power when the projector is NTSC. Notice Before proceeding with the following steps, make sure that the "Keystone" is set to the default value "0" and the projector is in its system format is turned on the remote control. • Auto: The projector...

User Manual
Page 37
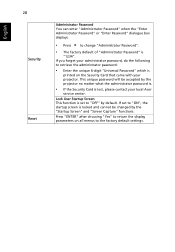
... password when switching on the projector. If you fail to input the password every time the power cord is plugged. If you fail to enter the correct password within 20 minutes upon request, the projector will shut down automatically. • If you select "Always request password while projector turns on . User Password • Press to set up , the projector will request you to enter the password again. • The factory default setting...
... password when switching on the projector. If you fail to input the password every time the power cord is plugged. If you fail to enter the correct password within 20 minutes upon request, the projector will shut down automatically. • If you select "Always request password while projector turns on . User Password • Press to set up , the projector will request you to enter the password again. • The factory default setting...
User Manual
Page 38
... lost, please contact your projector. If set to "OFF" by the "Startup Screen" and "Screen Capture" functions. Lock User Startup Screen This function is "1234". This unique password will be changed by default. Press "ENTER" after choosing "Yes" to return the display parameters on the Security Card that came with your local Acer service center. English 28 Security Reset Administrator Password You can enter "Administrator...
... lost, please contact your projector. If set to "OFF" by the "Startup Screen" and "Screen Capture" functions. Lock User Startup Screen This function is "1234". This unique password will be changed by default. Press "ENTER" after choosing "Yes" to return the display parameters on the Security Card that came with your local Acer service center. English 28 Security Reset Administrator Password You can enter "Administrator...
User Manual
Page 39
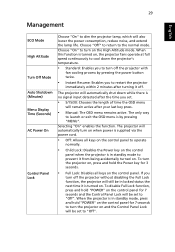
... power button twice. • Instant Resume: Enables you to turn on , the projector fans operate at full speed continuously to cool down while there is in standby mode, press and hold the Power key for 7 seconds and the Control Panel Lock will be set . • 5/15/30: Chooses the length of time the OSD menu will also lower the power consumption, reduce noise, and extend the lamp life...
... power button twice. • Instant Resume: Enables you to turn on , the projector fans operate at full speed continuously to cool down while there is in standby mode, press and hold the Power key for 7 seconds and the Control Panel Lock will be set . • 5/15/30: Chooses the length of time the OSD menu will also lower the power consumption, reduce noise, and extend the lamp life...
User Manual
Page 45
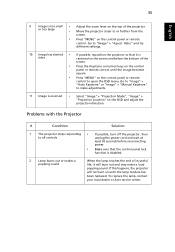
... top of its useful life, it is reversed • Select "Image" > "Projection Mode", "Image" > "Projection Location" on the OSD and adjust the projection direction. Go to "Image" > "Auto Keystone" or "Image" > "Manual Keystone" to open the OSD menu. To replace the lamp, contact your local dealer or Acer service center. Problems with the Projector # Condition Solution 1 The projector stops responding • If possible, turn on until the image becomes square. • Press "MENU" on the control panel or remote control to make...
... top of its useful life, it is reversed • Select "Image" > "Projection Mode", "Image" > "Projection Location" on the OSD and adjust the projection direction. Go to "Image" > "Auto Keystone" or "Image" > "Manual Keystone" to open the OSD menu. To replace the lamp, contact your local dealer or Acer service center. Problems with the Projector # Condition Solution 1 The projector stops responding • If possible, turn on until the image becomes square. • Press "MENU" on the control panel or remote control to make...
User Manual
Page 47
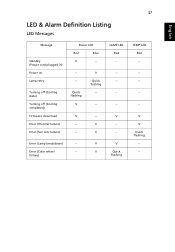
V -- V LAMP LED Red -- --- -- -- V --- failure) V V V Quick flashing TEMP LED Red -- --- -- -- Error (Color wheel -- V V Quick flashing --- Error (Lamp breakdown) -- Quick flashing V V Quick flashing -- -- V -- -- 37 LED & Alarm Definition Listing LED Messages English Message Standby (Power cord plugged in) Power on Lamp retry Turning off (Cooling state) Turning off (Cooling completed) Firmware download Error (Thermal failure) Error (Fan lock failure) Power LED Red Blue V -- ---
V -- V LAMP LED Red -- --- -- -- V --- failure) V V V Quick flashing TEMP LED Red -- --- -- -- Error (Color wheel -- V V Quick flashing --- Error (Lamp breakdown) -- Quick flashing V V Quick flashing -- -- V -- -- 37 LED & Alarm Definition Listing LED Messages English Message Standby (Power cord plugged in) Power on Lamp retry Turning off (Cooling state) Turning off (Cooling completed) Firmware download Error (Thermal failure) Error (Fan lock failure) Power LED Red Blue V -- ---


