
User Manual
Page 2
... should include the serial number, model number and purchase information. No part of this publication may be reproduced, stored in a retrieval system, or transmitted, in the space provided below. Such changes will be incorporated in new editions of this manual or supplementary documents and publications. Acer LCD Monitor User Guide Model number Serial number Date of purchase Place of purchase Acer and the Acer logo are used herein for...
... should include the serial number, model number and purchase information. No part of this publication may be reproduced, stored in a retrieval system, or transmitted, in the space provided below. Such changes will be incorporated in new editions of this manual or supplementary documents and publications. Acer LCD Monitor User Guide Model number Serial number Date of purchase Place of purchase Acer and the Acer logo are used herein for...
User Manual
Page 3
..., the screen is displayed for a few hours. It may include blemishes of the fluorescent light, the screen may remain after switching the image, when the same image is recovered slowly by changing the image or turning off the power switch and then turn it on the product. Cleaning your safety and comfort Safety instructions Read these guidelines when cleaning the monitor: • Always unplug the monitor before cleaning. • Use...
..., the screen is displayed for a few hours. It may include blemishes of the fluorescent light, the screen may remain after switching the image, when the same image is recovered slowly by changing the image or turning off the power switch and then turn it on the product. Cleaning your safety and comfort Safety instructions Read these guidelines when cleaning the monitor: • Always unplug the monitor before cleaning. • Use...
User Manual
Page 4
... this product through cabinet slots as they may touch dangerous voltage points or short-out parts that the power outlet you can hear it after your ears have adjusted. • Limit the amount of power available, consult your hearing, follow these instructions. • Gradually increase the volume until you plug the power cord into this product where people will probably...
... this product through cabinet slots as they may touch dangerous voltage points or short-out parts that the power outlet you can hear it after your ears have adjusted. • Limit the amount of power available, consult your hearing, follow these instructions. • Gradually increase the volume until you plug the power cord into this product where people will probably...
User Manual
Page 5
... 80% of the power strip's input rating. • This product's power cord is equipped with the supplied power supply cord set , make sure that the new power cord meets the following the operating instructions v The plug only fits in performance, indicating a need to dangerous voltage points or other nearby electrical devices that may interfere with the performance of this product yourself, as opening or removing covers may result in...
... 80% of the power strip's input rating. • This product's power cord is equipped with the supplied power supply cord set , make sure that the new power cord meets the following the operating instructions v The plug only fits in performance, indicating a need to dangerous voltage points or other nearby electrical devices that may interfere with the performance of this product yourself, as opening or removing covers may result in...

User Manual
Page 6
... (WEEE) regulations, visit http://www.acer-group.com/public/Sustainability/ sustainability01.htm vi English Note: Adjust only those controls that are covered by the operating instructions, since improper adjustment of other products. We at Acer are very conscious of the environmental effects of our business and strive to identify and provide the best working procedures to normal condition. Additional safety...
... (WEEE) regulations, visit http://www.acer-group.com/public/Sustainability/ sustainability01.htm vi English Note: Adjust only those controls that are covered by the operating instructions, since improper adjustment of other products. We at Acer are very conscious of the environmental effects of our business and strive to identify and provide the best working procedures to normal condition. Additional safety...
User Manual
Page 7
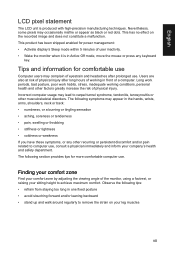
... your comfort zone by adjusting the viewing angle of the monitor, using a footrest, or raising your company's health and safety department. This product has been shipped enabled for power management: • Activate display's Sleep mode within 5 minutes of a computer. Long work periods, bad posture, poor work habits, stress, inadequate working in front of user inactivity. • Wake the monitor when it is produced...
... your comfort zone by adjusting the viewing angle of the monitor, using a footrest, or raising your company's health and safety department. This product has been shipped enabled for power management: • Activate display's Sleep mode within 5 minutes of a computer. Long work periods, bad posture, poor work habits, stress, inadequate working in front of user inactivity. • Wake the monitor when it is produced...
User Manual
Page 8
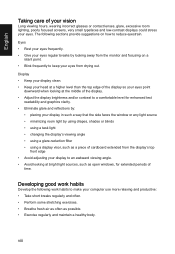
... work habits to make your eyes from drying out. viii English Taking care of your vision Long viewing hours, wearing incorrect glasses or contact lenses, glare, excessive room lighting, poorly focused screens, very small typefaces and low-contrast displays could stress your display in such a way that the side faces the window or any light source • minimizing room light by looking at bright light sources...
... work habits to make your eyes from drying out. viii English Taking care of your vision Long viewing hours, wearing incorrect glasses or contact lenses, glare, excessive room lighting, poorly focused screens, very small typefaces and low-contrast displays could stress your display in such a way that the side faces the window or any light source • minimizing room light by looking at bright light sources...
User Manual
Page 11
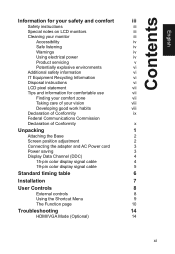
...zone vii Taking care of your vision viii Developing good work habits viii Declaration of Conformity ix Federal Communications Commission Declaration of Conformity x Unpacking 1 Attaching the Base 2 Screen position adjustment 2 Connecting the adapter and AC Power cord 3 Power saving 3 Display Data Channel (DDC) 4 15-pin color display signal cable 4 19-pin color display signal cable 5 Standard timing table 6 Installation 7 User Controls 8 External controls 8 Using the Shortcut Menu 9 The Function page 10 Troubleshooting 14 HDMI/VGA Mode (Optional) 14 xi
...zone vii Taking care of your vision viii Developing good work habits viii Declaration of Conformity ix Federal Communications Commission Declaration of Conformity x Unpacking 1 Attaching the Base 2 Screen position adjustment 2 Connecting the adapter and AC Power cord 3 Power saving 3 Display Data Channel (DDC) 4 15-pin color display signal cable 4 19-pin color display signal cable 5 Standard timing table 6 Installation 7 User Controls 8 External controls 8 Using the Shortcut Menu 9 The Function page 10 Troubleshooting 14 HDMI/VGA Mode (Optional) 14 xi
User Manual
Page 12
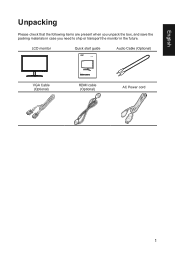
LCD monitor Quick start guide Audio Cable (Optional) KG221Q VGA Cable (Optional) KG1 Series USER GUIDE HDMI cable (Optional) AC Power cord 1 English Unpacking Please check that the following items are present when you unpack the box, and save the packing materials in case you need to ship or transport the monitor in the future.
LCD monitor Quick start guide Audio Cable (Optional) KG221Q VGA Cable (Optional) KG1 Series USER GUIDE HDMI cable (Optional) AC Power cord 1 English Unpacking Please check that the following items are present when you unpack the box, and save the packing materials in case you need to ship or transport the monitor in the future.
User Manual
Page 13
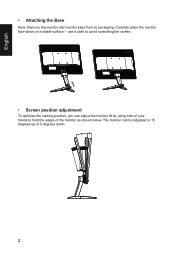
Carefully place the monitor face-down . 2 English • Attaching the Base Note: Remove the monitor and monitor base from its packaging. The monitor can adjust the monitor tilt by using both of your hands to 15 degrees up or 5 degrees down on a stable surface -- use a cloth to avoid scratching the screen. • Screen position adjustment To optimize the viewing position, you can be adjusted to hold the edges of the monitor as shown below.
Carefully place the monitor face-down . 2 English • Attaching the Base Note: Remove the monitor and monitor base from its packaging. The monitor can adjust the monitor tilt by using both of your hands to 15 degrees up or 5 degrees down on a stable surface -- use a cloth to avoid scratching the screen. • Screen position adjustment To optimize the viewing position, you can be adjusted to hold the edges of the monitor as shown below.
User Manual
Page 14
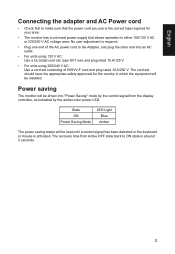
... Active OFF state back to the Adapter, and plug the other end into "Power Saving" mode by the control signal from the display controller, as indicated by the amber-color power LED. Power saving The monitor will be installed. No user-adjustment is required. • Plug one end of H05VV-F cord and plug rated 10 A/250 V. English Connecting the adapter and AC Power cord • Check first to make sure that the power cord you use is the correct type required for...
... Active OFF state back to the Adapter, and plug the other end into "Power Saving" mode by the control signal from the display controller, as indicated by the amber-color power LED. Power saving The monitor will be installed. No user-adjustment is required. • Plug one end of H05VV-F cord and plug rated 10 A/250 V. English Connecting the adapter and AC Power cord • Check first to make sure that the power cord you use is the correct type required for...
User Manual
Page 15
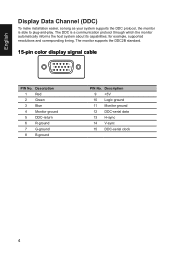
... monitor supports the DDC2B standard. 15-pin color display signal cable 1 5 6 10 11 15 PIN No. Description 1 Red 2 Green 3 Blue 4 Monitor ground 5 DDC-return 6 R-ground 7 G-ground 8 B-ground PIN No. for example, supported resolutions and corresponding timing. Description 9 +5V 10 Logic ground 11 Monitor ground 12 DDC-serial data 13 H-sync 14 V-sync 15 DDC-serial clock 4 The DDC is able to plug-and-play. English Display Data Channel (DDC) To make installation...
... monitor supports the DDC2B standard. 15-pin color display signal cable 1 5 6 10 11 15 PIN No. Description 1 Red 2 Green 3 Blue 4 Monitor ground 5 DDC-return 6 R-ground 7 G-ground 8 B-ground PIN No. for example, supported resolutions and corresponding timing. Description 9 +5V 10 Logic ground 11 Monitor ground 12 DDC-serial data 13 H-sync 14 V-sync 15 DDC-serial clock 4 The DDC is able to plug-and-play. English Display Data Channel (DDC) To make installation...
User Manual
Page 18
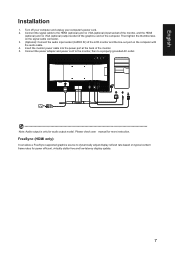
... allow a FreeSync supported graphics source to a properly grounded AC outlet. 2 Note: Audio output is only for audio output model. Insert the monitor power cable into the power port at the back of the LCD monitor and the line-out port on the computer. English Installation 1. Turn off your computer and unplug your computer's power cord. 2. Connect the power adapter and power cord to the monitor, then to dynamically adjust display refresh rate based on typical content frame rates for more instruction.
... allow a FreeSync supported graphics source to a properly grounded AC outlet. 2 Note: Audio output is only for audio output model. Insert the monitor power cable into the power port at the back of the LCD monitor and the line-out port on the computer. English Installation 1. Turn off your computer and unplug your computer's power cord. 2. Connect the power adapter and power cord to the monitor, then to dynamically adjust display refresh rate based on typical content frame rates for more instruction.
User Manual
Page 19
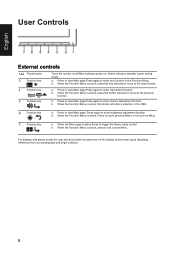
... move to the previous function. When the Function Menu is active, press this button will enter a selection in the Function Menu. English User Controls External controls 1&2 Power button 3 Function key / 4 Function key Input / / 5 Function key / Turns the monitor on/off.Blue indicates power on. a. When the Function Menu is active, press to enter brightness adjustment function. When the Function Menu is active, this key selected or move to...
... move to the previous function. When the Function Menu is active, press this button will enter a selection in the Function Menu. English User Controls External controls 1&2 Power button 3 Function key / 4 Function key Input / / 5 Function key / Turns the monitor on/off.Blue indicates power on. a. When the Function Menu is active, press to enter brightness adjustment function. When the Function Menu is active, this key selected or move to...
User Manual
Page 20
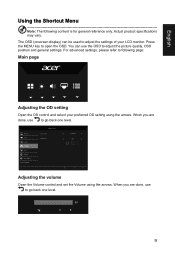
Picture Color Audio Gaming OSD System Information Save Setting to open the OSD. When you are done, use to go back one level. 9 9 9 You can be used to go back one level. User Over Drive Aim point Extrama Off Adjusting the volume Open the Volume control and set the Volume using the arrows. Actual product specifications may vary. Press the MENU key to ... When you are done, use the OSD to following content is...
Picture Color Audio Gaming OSD System Information Save Setting to open the OSD. When you are done, use to go back one level. 9 9 9 You can be used to go back one level. User Over Drive Aim point Extrama Off Adjusting the volume Open the Volume control and set the Volume using the arrows. Actual product specifications may vary. Press the MENU key to ... When you are done, use the OSD to following content is...
User Manual
Page 21
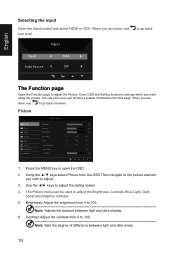
..., use one level. Picture Picture Color Audio Gaming OSD System Information Save Setting to adjust the sliding scales. 4. Press the MENU key to 100 Note: Sets the degree of difference between light and dark shades. 6. Brightness: Adjust the brightness from this page. Contrast: Adjust the contrast from the OSD.Then navigate to the picture element you are done, use to go back Input Input VGA Auto Source Off The Function page Open the Function page to adjust the Brightness, Contrast, Blue Light...
..., use one level. Picture Picture Color Audio Gaming OSD System Information Save Setting to adjust the sliding scales. 4. Press the MENU key to 100 Note: Sets the degree of difference between light and dark shades. 6. Brightness: Adjust the brightness from this page. Contrast: Adjust the contrast from the OSD.Then navigate to the picture element you are done, use to go back Input Input VGA Auto Source Off The Function page Open the Function page to adjust the Brightness, Contrast, Blue Light...
User Manual
Page 22
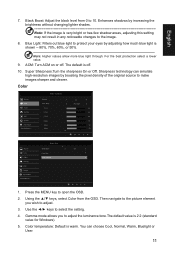
... 2.2 Blue Light 50 50 50 50 50 50 Mode - Then navigate to the picture element you to adjust. 3. Gamma mode allows you wish to adjust the luminance tone.The default value is 2.2 (standard value for Windows). 5. Mode - Move Enter Quick Start Mode 1. The default is warm. User Picture sRGB Mode Off Color Audio Gaming 6-axis Hue 6-axis Saturate OSD System Information Save setting to the image. 8. Super Sharpness:Turn the sharpness On or Off. Using...
... 2.2 Blue Light 50 50 50 50 50 50 Mode - Then navigate to the picture element you to adjust. 3. Gamma mode allows you wish to adjust the luminance tone.The default value is 2.2 (standard value for Windows). 5. Mode - Move Enter Quick Start Mode 1. The default is warm. User Picture sRGB Mode Off Color Audio Gaming 6-axis Hue 6-axis Saturate OSD System Information Save setting to the image. 8. Super Sharpness:Turn the sharpness On or Off. Using...

User Manual
Page 23
... refresh rate on or off to open the OSD. 3. Mode - Language: Set the OSD menu language. 5. Then navigate to the setting you 12 Standard Input Auto Source Wide Mode Hot Key Assignment DDC/CI HDMI Black level Quick Start Mode HDMI On Full On Normal Off Quick Start Mode 1. Use the ◄/► keys to change. 3. You can be used to ... Press the MENU key to better color match with peripheral devices, such as printers and digital cameras. 7. 6-axis Saturate: Adjust the red, green, blue...
... refresh rate on or off to open the OSD. 3. Mode - Language: Set the OSD menu language. 5. Then navigate to the setting you 12 Standard Input Auto Source Wide Mode Hot Key Assignment DDC/CI HDMI Black level Quick Start Mode HDMI On Full On Normal Off Quick Start Mode 1. Use the ◄/► keys to change. 3. You can be used to ... Press the MENU key to better color match with peripheral devices, such as printers and digital cameras. 7. 6-axis Saturate: Adjust the red, green, blue...
User Manual
Page 24
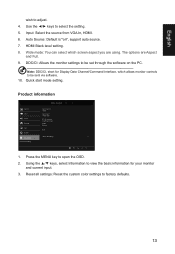
...Quick start mode setting. Standard Full Picture Color Audio Gaming OSD System Information Reset All Settings Main Source HDMI Resolution 1920x1080 H/V Frequency H 66KHz V 60Hz Mode Normal S/N: Reset All Settings Quick Start Mode 1. Reset all settings: Reset the custom color settings to open the OSD. 2. Auto Source: Default is "on the PC Note: DDC/CI, short for your monitor and current input. 3. DDC/CI: Allows the monitor settings to be set through the software on ", support auto source. 7. HDMI Black level setting. 8. The options are using. Press the MENU key to factory defaults...
...Quick start mode setting. Standard Full Picture Color Audio Gaming OSD System Information Reset All Settings Main Source HDMI Resolution 1920x1080 H/V Frequency H 66KHz V 60Hz Mode Normal S/N: Reset All Settings Quick Start Mode 1. Reset all settings: Reset the custom color settings to open the OSD. 2. Auto Source: Default is "on the PC Note: DDC/CI, short for your monitor and current input. 3. DDC/CI: Allows the monitor settings to be set through the software on ", support auto source. 7. HDMI Black level setting. 8. The options are using. Press the MENU key to factory defaults...
User Manual
Page 25
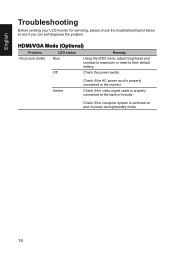
... AC power cord is properly connected to see if you can self-diagnose the problem. English Troubleshooting Before sending your LCD monitor for servicing, please check the troubleshooting list below to the monitor. Off Check the power switch. HDMI/VGA Mode (Optional) Problem LED status Remedy No picture visible Blue Using the OSD menu, adjust brightness and contrast to maximum or reset to their default setting. Check if the video signal cable is switched on and in power saving/standby mode. 14 Check if the computer system is properly connected at...
... AC power cord is properly connected to see if you can self-diagnose the problem. English Troubleshooting Before sending your LCD monitor for servicing, please check the troubleshooting list below to the monitor. Off Check the power switch. HDMI/VGA Mode (Optional) Problem LED status Remedy No picture visible Blue Using the OSD menu, adjust brightness and contrast to maximum or reset to their default setting. Check if the video signal cable is switched on and in power saving/standby mode. 14 Check if the computer system is properly connected at...

