

User Manual (3D)
Page 1
Acer Projectors with 3D Technology Quick Guide
Acer Projectors with 3D Technology Quick Guide

User Manual (3D)
Page 2
© 2014 All Rights Reserved. Acer Projector Series Quick Guide Original Issue: 10/2014 Model number Serial number Date of purchase Place of purchase
© 2014 All Rights Reserved. Acer Projector Series Quick Guide Original Issue: 10/2014 Model number Serial number Date of purchase Place of purchase

User Manual (3D)
Page 3
...on, you will be projected at full brightness. Note: Refer to the documentation that 3D is a power switch on one of inactivity. Acer projectors need to ensure the glasses are powered. Before you can press, and an LED that indicates if the glasses are turned on or not... change the battery. If you have bought has integrated DLP technology. Note: Suggest to use Acer DLP 3D glasses to enjoy perfect 3D performance without compatibility issues. English 3 The Acer projector you have connected your projector to a computer, please read "Watching 3D DVD or Blu-ray content" on page 7.
...on, you will be projected at full brightness. Note: Refer to the documentation that 3D is a power switch on one of inactivity. Acer projectors need to ensure the glasses are powered. Before you can press, and an LED that indicates if the glasses are turned on or not... change the battery. If you have bought has integrated DLP technology. Note: Suggest to use Acer DLP 3D glasses to enjoy perfect 3D performance without compatibility issues. English 3 The Acer projector you have connected your projector to a computer, please read "Watching 3D DVD or Blu-ray content" on page 7.

User Manual (3D)
Page 4
... to purchase additional software. 4 Ensure you are viewing Blu-ray 3D content over an HDMI 1.4a or later connection is not supported on the projector remote control to the NVIDIA 3DTV Play website: www.nvidia.com/3dtv. Note: You may need to your graphics card for frame/field sequential 3D... Note: Blu-ray 3D content over an HDMI 1.4a or later connection, this will be set automatically. 2 Press the menu button on most of LED projectors. Setting up the environment. 1 Set the refresh rate to do the following. 1 Ensure your graphics card. Before you can enjoy the benefits of the ...
... to purchase additional software. 4 Ensure you are viewing Blu-ray 3D content over an HDMI 1.4a or later connection is not supported on the projector remote control to the NVIDIA 3DTV Play website: www.nvidia.com/3dtv. Note: You may need to your graphics card for frame/field sequential 3D... Note: Blu-ray 3D content over an HDMI 1.4a or later connection, this will be set automatically. 2 Press the menu button on most of LED projectors. Setting up the environment. 1 Set the refresh rate to do the following. 1 Ensure your graphics card. Before you can enjoy the benefits of the ...

User Manual (3D)
Page 5
... provide different 3D mode, convergence and depth setting. 6 3D Format shows while no enough info, please choose suitable one for HDMI 1.4 or 2nd generation 3D projectors. 2. From the 3D options, select On. 5 2D to 3D supports most of 2D contents convert to model's specifications and change without notice. Note: 1. The "Frame...
... provide different 3D mode, convergence and depth setting. 6 3D Format shows while no enough info, please choose suitable one for HDMI 1.4 or 2nd generation 3D projectors. 2. From the 3D options, select On. 5 2D to 3D supports most of 2D contents convert to model's specifications and change without notice. Note: 1. The "Frame...
User Manual (3D)
Page 6
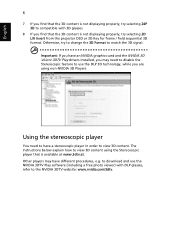
... an NVIDIA graphics card and the NVIDIA 3D Vision/ 3DTV Play drivers installed, you may have different procedures, e.g. Otherwise, try selecting 3D L/R Invert from the projector OSD or 3D Key for frame / field sequential 3D format. English 6 7 If you find that is available at www.3dtv.at. Other players may need...
... an NVIDIA graphics card and the NVIDIA 3D Vision/ 3DTV Play drivers installed, you may have different procedures, e.g. Otherwise, try selecting 3D L/R Invert from the projector OSD or 3D Key for frame / field sequential 3D format. English 6 7 If you find that is available at www.3dtv.at. Other players may need...

User Manual (3D)
Page 7
.... 2 Open the 3D content in the "Setting up a 3D environment" section on your DVD or Blu-ray player to get the 3D effects. Connect your projector. Note: If your DVD or Blu-ray player supports 3D over HDMI 1.4a, check that supports 3D playback, you can watch 3D DVD content using... any of the available input formats. Note: You need to view content at fullscreen resolution in order to the projector using your Acer 3D-enabled projector. Watching 3D DVD or Blu-ray content If you have a DVD or Blu-ray player that 3D options are on and the video...
.... 2 Open the 3D content in the "Setting up a 3D environment" section on your DVD or Blu-ray player to get the 3D effects. Connect your projector. Note: If your DVD or Blu-ray player supports 3D over HDMI 1.4a, check that supports 3D playback, you can watch 3D DVD content using... any of the available input formats. Note: You need to view content at fullscreen resolution in order to the projector using your Acer 3D-enabled projector. Watching 3D DVD or Blu-ray content If you have a DVD or Blu-ray player that 3D options are on and the video...

User Manual
Page 1
Acer Projector K138STi/L224R/LK-W16F Series User's Guide
Acer Projector K138STi/L224R/LK-W16F Series User's Guide

User Manual
Page 2
.... This company makes no representations or warranties, either expressed or implied, with respect to their respective companies. All Rights Reserved. Acer Projector User's Guide Original Issue: 09/2015 Changes may be reproduced, stored in a retrieval system, or transmitted, in this manual or supplementary documents and publications. Model ...
.... This company makes no representations or warranties, either expressed or implied, with respect to their respective companies. All Rights Reserved. Acer Projector User's Guide Original Issue: 09/2015 Changes may be reproduced, stored in a retrieval system, or transmitted, in this manual or supplementary documents and publications. Model ...

User Manual
Page 3
.... Use a damp cloth for your safety and comfort Read these instructions carefully. Caution for ventilation to ensure reliable operation of power, disconnect power from the projector. • If the system has multiple sources of the product and to protect it could result in installation unless proper ventilation is easily accessible and...
.... Use a damp cloth for your safety and comfort Read these instructions carefully. Caution for ventilation to ensure reliable operation of power, disconnect power from the projector. • If the system has multiple sources of the product and to protect it could result in installation unless proper ventilation is easily accessible and...

User Manual
Page 5
...the operating instructions, since improper adjustment of other risks. Do not operate if smoke, strange noise or odor comes out of air around the projector is necessary. • Locations where temperatures may become excessively high, such as opening or removing covers may expose you to dangerous voltage points... Refer all windows rolled up. • Locations where excessive humidity, dust, or cigarette smoke may contain small parts. Consult your projector. v Product servicing Do not attempt to service this product from walls and free flow of your reseller for service • the ...
...the operating instructions, since improper adjustment of other risks. Do not operate if smoke, strange noise or odor comes out of air around the projector is necessary. • Locations where temperatures may become excessively high, such as opening or removing covers may expose you to dangerous voltage points... Refer all windows rolled up. • Locations where excessive humidity, dust, or cigarette smoke may contain small parts. Consult your projector. v Product servicing Do not attempt to service this product from walls and free flow of your reseller for service • the ...

User Manual
Page 6
... as this could cause the object to become heated and deformed or even cause a fire. • Do not attempt to ensure the projector completes its cooling cycle before disconnecting power. • Do not frequently turn off before turning main power off. • Do not touch...bottom plate which may hurt your dealer for extended periods. • Do not increase the volume to turn off , suggest to disassemble this projector. Caution for Listening To protect your hearing, follow these instructions. • Increase the volume gradually until you can hear clearly and comfortably. &#...
... as this could cause the object to become heated and deformed or even cause a fire. • Do not attempt to ensure the projector completes its cooling cycle before disconnecting power. • Do not frequently turn off before turning main power off. • Do not touch...bottom plate which may hurt your dealer for extended periods. • Do not increase the volume to turn off , suggest to disassemble this projector. Caution for Listening To protect your hearing, follow these instructions. • Increase the volume gradually until you can hear clearly and comfortably. &#...

User Manual
Page 8
... direct sunlight. Don't: • Block the slots and openings on . viii First things first Usage Notes Do: • Turn off , please ensure the projector completes its cooling cycle before cleaning. • Use a soft cloth moistened with mild detergent to maximize the life of your eyes. • To reduce the... risk of time. Warning: • Do not look into the projector's lens when the light is not being used for ventilation. • Use abrasive cleaners, waxes or solvents to clean the unit. • Use ...
... direct sunlight. Don't: • Block the slots and openings on . viii First things first Usage Notes Do: • Turn off , please ensure the projector completes its cooling cycle before cleaning. • Use a soft cloth moistened with mild detergent to maximize the life of your eyes. • To reduce the... risk of time. Warning: • Do not look into the projector's lens when the light is not being used for ventilation. • Use abrasive cleaners, waxes or solvents to clean the unit. • Use ...

User Manual
Page 9
... 3 Control Panel 4 Remote Control Layout 6 MHL (Mobile High-Definition Link) Control 8 Getting Started 9 Connecting the Projector 9 DC 5V Out for Device Charge 10 Turning the Projector On/Off 11 Turning on the Projector 11 Turning the projector off 12 Adjusting the Projected Image 13 Adjusting the Height of Projected Image 13 How to optimize...
... 3 Control Panel 4 Remote Control Layout 6 MHL (Mobile High-Definition Link) Control 8 Getting Started 9 Connecting the Projector 9 DC 5V Out for Device Charge 10 Turning the Projector On/Off 11 Turning on the Projector 11 Turning the projector off 12 Adjusting the Projected Image 13 Adjusting the Height of Projected Image 13 How to optimize...

User Manual
Page 11
... • Versatile display modes (Bright, Standard, Movie, Picture, Game, User) enable optimum performance in any situation. • Compact size projector facilitates business purposes and home entertainment. • Acer EcoProjeciton Technology delivers Intelligent power management approach and physical efficiency improvement. • Equipped with HDMI™ connection supporting HDCP. • Advanced digital... with dts™ feature. • Built-in battery • Support wireless projection English 1 Introduction Product Features This product is a single-chip DLP® projector.
... • Versatile display modes (Bright, Standard, Movie, Picture, Game, User) enable optimum performance in any situation. • Compact size projector facilitates business purposes and home entertainment. • Acer EcoProjeciton Technology delivers Intelligent power management approach and physical efficiency improvement. • Equipped with HDMI™ connection supporting HDCP. • Advanced digital... with dts™ feature. • Built-in battery • Support wireless projection English 1 Introduction Product Features This product is a single-chip DLP® projector.

User Manual
Page 12
... Power cord XXXXXX 3V Battery AC to make sure your dealer immediately if any thing is complete. English 2 Package Overview This projector comes with all the items shown below. Contact your unit is missing. Check to DC power adapter User's guide Quick start guide Carrying case VGA ...
... Power cord XXXXXX 3V Battery AC to make sure your dealer immediately if any thing is complete. English 2 Package Overview This projector comes with all the items shown below. Contact your unit is missing. Check to DC power adapter User's guide Quick start guide Carrying case VGA ...

User Manual
Page 13
English 3 Projector Overview Projector Outlook Front / upper side 6 45 6 3 2 # Description 1 Projection lens 2 Tilt adjusting wheel 3 Focus ring Rear side 1 # Description 4 Control panel 5 Power button 6 Speakers USB VGA IN WIRELESS ... slot 9 LAN (RJ45 Port for 10/100M Ethernet) 10 Audio out connector 11 5V DC output connector (device charge only) 12 DC Input 13 For Acer WirelessProjection-Kit only, see Note 3.
English 3 Projector Overview Projector Outlook Front / upper side 6 45 6 3 2 # Description 1 Projection lens 2 Tilt adjusting wheel 3 Focus ring Rear side 1 # Description 4 Control panel 5 Power button 6 Speakers USB VGA IN WIRELESS ... slot 9 LAN (RJ45 Port for 10/100M Ethernet) 10 Audio out connector 11 5V DC output connector (device charge only) 12 DC Input 13 For Acer WirelessProjection-Kit only, see Note 3.

User Manual
Page 14
... (Details see LED indicator page) See the contents in Acer WirelessProjection-Kit or other USB WiFi dongle. Note 3: Acer WirelessProjection-Kit is only allowed to plug out or installed while projector is active. forbidden to be installed while projector is to protect projector from powering on projector, press "Battery On/Off" button first and then press... On/Off button" is off; Increases/decreases the volume. • Press "MENU" to launch the Onscreen display (OSD) menu, back to plug in "Turning the Projector On/Off" section. 4 English Note 1: The design mechanism of items.
... (Details see LED indicator page) See the contents in Acer WirelessProjection-Kit or other USB WiFi dongle. Note 3: Acer WirelessProjection-Kit is only allowed to plug out or installed while projector is active. forbidden to be installed while projector is to protect projector from powering on projector, press "Battery On/Off" button first and then press... On/Off button" is off; Increases/decreases the volume. • Press "MENU" to launch the Onscreen display (OSD) menu, back to plug in "Turning the Projector On/Off" section. 4 English Note 1: The design mechanism of items.

User Manual
Page 15
... 11 Play/Pause Press to select/enter the file. (only for Navigation mode) Toggles between playback and pause. (only for distortion caused by tilting the projector. (±20 degrees) Changes the active source. 10 Four directional select Use to select items or make keys adjustments to do screen off.
... 11 Play/Pause Press to select/enter the file. (only for Navigation mode) Toggles between playback and pause. (only for distortion caused by tilting the projector. (±20 degrees) Changes the active source. 10 Four directional select Use to select items or make keys adjustments to do screen off.

User Manual
Page 16
... Press "3D" to the home page of items. Use up, down, left, right buttons to select items or make adjustments to the projector. Press "MEDIA" to return to select 3D models. Press to select/enter the file. (only for Navigation mode) Toggles between playback and... exit the OSD menu. • Confirm your selection. Press "BACK" to select the display mode from Bright, Standard, Movie, Picture, Game and User. Zooms the projector display in or out. English 6 Remote Control Layout 1 3 2 4 9 13 5 14 15 9 6 7 10 8 11 12 # Icon Function 1 Infrared transmitter 2 POWER 3 ...
... Press "3D" to the home page of items. Use up, down, left, right buttons to select items or make adjustments to the projector. Press "MEDIA" to return to select 3D models. Press to select/enter the file. (only for Navigation mode) Toggles between playback and... exit the OSD menu. • Confirm your selection. Press "BACK" to select the display mode from Bright, Standard, Movie, Picture, Game and User. Zooms the projector display in or out. English 6 Remote Control Layout 1 3 2 4 9 13 5 14 15 9 6 7 10 8 11 12 # Icon Function 1 Infrared transmitter 2 POWER 3 ...


